-
Posts
4,777 -
Joined
-
Last visited
-
Days Won
39
Content Type
Links Directory
Profiles
Articles
Forums
Downloads
Store
Gallery
Blogs
Events
Everything posted by Los_Control
-
Depending on how old your coolant is, it may be time to refresh it. I can tell you when I opened my petcock it was plugged and not even a drip came out. I removed it from the block, and on the bench was very easy to work it back and forth and clean it. Then re-install it. In fairness, my coolant system was also clogged, not just petcock. Just saying, do not count on it to work when you need it, unless you maintain it. When it comes to battles, you pick the time and place for them to happen.
-
What I like about it, American ingenuity, just kids having fun, living proof we will get old, but we do not have to grow up. Obvious the idea came out 100 years ago, nothing new ... but seeing people get creative and having fun, we need more of it.
-
The modern points for different cars I have dealt with, they supply a small packet of clear grease to lube the points. Am told if you do not lube them, the nylon wears quickly ... worried if you do lube them, throws grease on the points and no fire. Sigh!
-
May also interest you to know there is a similar cap on the backside of your speedometer, a few drops there while you are at it. Look for a zoom spout oiler, will help a lot. The petcock you show is to drain the coolant from the block, use it when changing your antifreeze
-
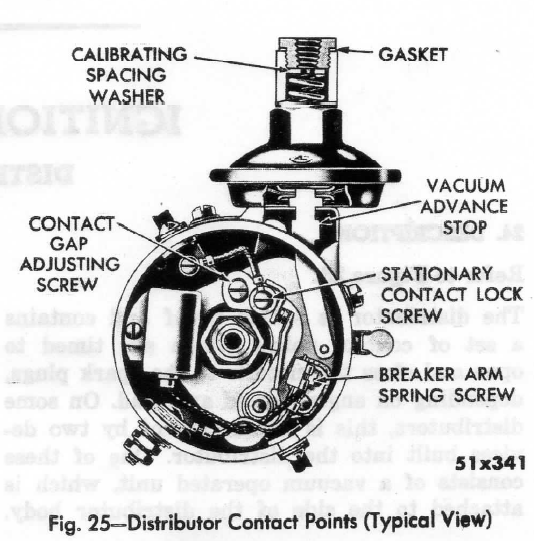
There is a small oil cup on the outside if the distributor. On this photo it is not labeled, but you can see the cap right above the words "breaker arm spring screw" Just lift the cap and add oil there, no need to remove the distributor cap as it is on the outside.
-
-
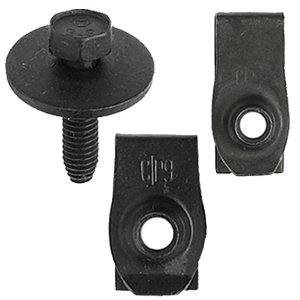
Must be a name for them, my dodge truck is held together by the same bolts. The toe boards use this bolt with a metal clip style nut. The spring clip attaches to one piece of metal, in this case the floor of the cab, then set the toe board down and the bolt screws in to the clip on the cab floor. Hope that makes sense I do not have a loose clip without opening up my sealed bolt pouches. I am missing several of these bolt and clips myself, have not searched online for them. My inner fenders use this method along with the center hood section. I think they are a very common bolt for dodges. I also think the clip style nuts are handy for the toe boards where you only can reach one side at a time. When I put my inner fenders back on, I will replace with a common nut/bolt. They will last longer and give me 10 extra bolts/clips to use elsewhere. A quick google search for body bolts should get what we need
-
Personally, I would ask the cat and see what it prefers. I have no actual experience using these portable shelters. I watched a neighbor tear one down today, bet I could make a offer and get a good deal on one. The issue is what you use to cover them with. A real honest to good canvas would cost a fortune. I bought a blue tarp recently, just opened it up yesterday and think I will put it straight in the trash .... what crap! Think I will stick to old fashioned stick built myself.
-
2 wires from heater motor is like my truck, 1 wire is grounded to the dash, 1 wire goes to the switch, like PA said, be sure and run the hot wire off the ignition switch to prevent a oops moment. Correct me if I am wrong, I think you need 3 wires if you were to have a 2 speed motor.
-
This looks just like the dimmer switch in my 49 B1B, two lugs on the High beam side one going to the high beam indicator. One thing I am wondering about as I muddle my way through a re-wire, Do I really want to keep the factory dimmer switch with the bullet end wires, or replace it now. I suspect it may be hard to find a replacement. Suspect replacement will use the screw terminals instead of bullet. Something for the op to consider if re-wiring is needed, which ends to use.
-
I am not sure what differences between a car and a truck would be, if any. This is a pretty good link and gives a good schematic for the trucks electrical You may be able to use it to trace your existing wires. Then I have to wonder about your existing wires. Is it original cloth wiring that probably needs replaced? Or has someone else already replaced it, ran the wiring the way they wanted? .http://dodgepilothouseclub.org/know/wiring_harness/wiring.htm
-

My First Car -- P15 1947 Plymouth Deluxe
Los_Control replied to NickPickToo's topic in P15-D24 Forum
Have to agree, was several cars I drove, was simply the under-coatney that held it together and on the road. I really think all should pay attention here .... never leave home without your under-coatney! -

need bolt pattern and size for spare tire/wheel
Los_Control replied to djohn's topic in Mopar Flathead Truck Forum
B1C has a 5 on 5 bolt pattern. Lot of older larger gm cars had this pattern, pretty sure my 1991 chevy truck has the same, I have not pulled the wheels to verify though. 1955 Packard also had this same bolt pattern, in case you see one of them at the junk yard. You might want to check the bolt pattern on existing wheels. My 1949 B1C had the front hubs or axles changed, and now has the same bolt pattern as a B1B 5 on 4.5" To measure the wheel it is much easier to have the wheel off and face side down. Measure a bolt hole from the far left side of the hole, across the center hole to the middle of the next lug bolt hole. Yours should measure exactly 5" While a B1B would measure 4.5" A typical chevelle or camaro mid sized chevy would be 4.75" The 5 on 5 bolt pattern you need would be a large GM like a 70's Buick Riveira or a Lasabre, really not that common today in a local pick a part. I think my 91 chevy truck is the same, but it has aluminum wheels like most other cars you will find in a junk yard today. Maybe others have more ideas on wheels that would fit. Your 3/4 ton B1C has oddball wheel size. A B1B with 4.5" bolt pattern will accept wheels from a jeep, ford explorer, ranger, rambler, mustang ... very common. -
I have seen several, but believe most I have seen came from a auto parts store back in that era. My uncle has several that fold up and sto away. I think some may have came from a emergency roadside tool kit. But if yours is a mopar item, I would think it a keeper for sure.
-
plymouth was wood, chrysler/Desoto was steel Just kidding, no clue.
-

1940 Chrysler Windsor Coupe brake conversion
Los_Control replied to dangulo's topic in P15-D24 Forum
I feel a song coming on here -

Repairing pilothouse fenders
Los_Control replied to Los_Control's topic in Mopar Flathead Truck Forum
Purox w-200 is sold on ebay for cheap, may be good for practice. Bottom is Victor j-100 Both belonged to my wifes grandfather, may not actually work but will not be tossed either. -

Repairing pilothouse fenders
Los_Control replied to Los_Control's topic in Mopar Flathead Truck Forum
Exactly, lets pretend I am going to build you a fine curved oak stair rail. I prefer and use a 12" Dewalt chop saw for daily use. This job I am pulling out the old out dated 8" chop saw. Plain and simple, the 12" saw blade has too much deflect, I can get a straighter pie cut with a smaller 8" blade. Experience. I very well may have my saw set to x degree, then lay it down to x degree, and have my helper holding the rail at x degree at the same time, to make one cut. 12" blade will deflect off the angles and give you a poor cut. It may actually take me and my helper 30 minutes to setup and make this one cut, this is what we call quality. You better believe, I cut it long. Now if it actually is the exact cut we want, after a test fit, then we cut it exact. Next go to tool is a 4" makita grinder with 80 grit paper on it. I can take your $3k pile of lumber and do tricks with the old grinder. Your curved rail has too many angles for a saw, going to take talent and a steady hand to grind in the new profile, keep it un-noticeable by eye or more importantly feel, as you run your hand on the rail walking down the stairs. Nice to have the tools we have today, we have many options and is the right tool for the job. Our Grandfathers were carving and whittling that old curved handrail by hand. I feel I know the level of skill it takes to work metal, I do not have that skill. With effort I will learn it. I think attitude and a sense of quality, is what will bring any person to the top of the dog pile. -

Repairing pilothouse fenders
Los_Control replied to Los_Control's topic in Mopar Flathead Truck Forum
I do have a couple torch heads, I have watched some youtube vids on torch welding. I love the talent some people have. Makes me jump up and down ... I want to learn to do that! I still need hoses and tanks, not sure if these torches would be usable for body work. Funny story time. "The welding web" is actually a very big welding forum, lots of knowledgeable people and information. I asked for some pointers on using oxy/act to do bodywork .... I started such a crap storm, I was told to not touch anything, just take my metal to a qualified welder with a mig to fix it. Long story short, I am banned from that forum I love the idea of using gas like the old pro's did. Then I watched vids with people using a mig .... now I gotta get me one of those. Then I saw a vid of a guy tig welding sheet metal ...OMG I gotta get one of these. I think with the right skill set, any process will work. I can transfer the skill set to carpentry and which saw to use. The more skill you have, the less tool you need. -

Repairing pilothouse fenders
Los_Control replied to Los_Control's topic in Mopar Flathead Truck Forum
Was there A link missing PA? I feel I am missing something, I know you have excellent advice As far as mig goes, think there is no bead, only spot welds on sheet metal, with lots of time in between spots. For example, one spot weld this side, one spot weld that side .... 3 drinks of beer while cools, 2 more spot welds then 4 more drinks and so on -

Repairing pilothouse fenders
Los_Control replied to Los_Control's topic in Mopar Flathead Truck Forum
I cleaned some 16 gage metal and fabricated a coil bracket and worked great. I have a 91 chubby pickup, they cut the floor of the bed out to replace the fuel pump. I did not clean the patch metal so good, and was a disaster. I started a welding thread once, I thought my issue was I needed gas to be a better welder. I read through that thread and now blame dirty metal. Have not yet got back to welding since then, been busy with other projects. Now getting them caught up. I am a old remodel carpenter, made my living with my tools. I bought what I think is a great welder, Forney 190 multi process tig/mig/stick. Next year in a few months, I want to move to gas and also try tig. First I want to learn fluxcore well, then move up. I simply spent too much money this year already. I spent $800 for a welder, then it sat for 3 months before I plugged it in. I need to learn to use what I have, learn the limitations, then understand why I want to upgrade and what would expect to gain from the upgrade. Yeah I want instant gratification, afraid I am going to have to get a little school of hard knocks under my belt first. I would love to take a welding class at some local collage right now, simply nothing close by .... Remember, when I show my mistakes, I am laughing also -

Occasional rattling noise from bell housing area
Los_Control replied to maok's topic in P15-D24 Forum
what kind of pilot shaft bushing do you have? I suppose is bronze or babbit of some sort. Check to see if it is in good condition. I once had a toyota with a "ball bearing" pilot shaft bearing. It went bad and was very noisy. -

Repairing pilothouse fenders
Los_Control replied to Los_Control's topic in Mopar Flathead Truck Forum
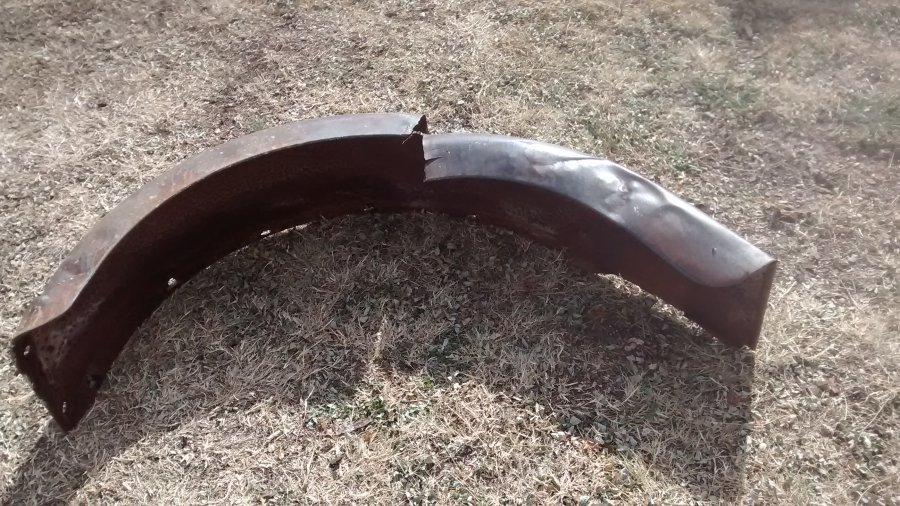
That sounds like a vote of confidence PA I have been doing some hammer dolly work on the hood, also the SS grill, pretty happy with outcome. My big fear right now is burn through with the welder. I am skeered I would take a minor patch repair on the front fender, turn it into something else. I have a dozen different patches I need to put in this truck, figure the rear fender would be a good place to start. (since DCM sells new) I think I have my biggest welding issue down to, wire feed fluxcore & dirty metal. So will make a better effort to get it clean. I also bought a led light that I want to mount on to my welding hood. And still learning where to adjust the settings on my helmet, first had shade to dark, then to light .... my garage I have only 2, 60 watt bulbs for light. I need to add florescent light. But probably if I move to the back yard in direct sunlight, may work better. Still figuring things out. -

Repairing pilothouse fenders
Los_Control replied to Los_Control's topic in Mopar Flathead Truck Forum
-

Repairing pilothouse fenders
Los_Control replied to Los_Control's topic in Mopar Flathead Truck Forum
Think it may be more about the look, then the function. Once we get this deep, putting a rivet or a carriage bolt is more of a option to keep the original Dodge look. I think a rivet could be tack welded just to hold it in place, for the look. Going to take a big tool to set the 7/8" rivets Yesterday I finally got all the rust stripped from the doghouse pieces, and stored in my office. Now I can take out one piece at a time, work it over and prep each piece for paint. This will be the first fender I tackle, need to brush up on my welding and figure I cant hurt this one much more then it already is


