

Los_Control
-
Posts
4,983 -
Joined
-
Last visited
-
Days Won
42
Everything posted by Los_Control
-
I honestly do not know, I thought you bought the fittings to match your lines, then the tool to match your job. Just saying, maybe it is not a big deal ... I would buy the tools and fittings to match the job and material/line you are working with. Years ago, while a manager in a bandag tire retread shop, Nothing more frustrating then replacing air lines with the wrong parts. This was not life threatening. Just saying, there are several different styles of fittings over the years. When you working on fuel lines or brakes ... There is top notch advice here in the H.A.M.B, I would be finding the exact info you need for the product you are installing.
-

What size (guage) battery cables for my 1950 Plymouth
Los_Control replied to Rosco's topic in P15-D24 Forum
I am a little smaller then wanted, but my local parts store has some pretty decent sized cables for the farmers and heavy equipment. I want 00 or 1.0, I think I have 2.0, but it actually works and off the shelf. It does work, like your 12 volt cables, you getting by ... if you ever had any starting issues, would be the first thing to be replaced. A quality welding shop, they can make you a set of supreme cables, Welding cables clamped to good battery post clamps ... wont be cheap, probably best you can get. Unless you can do it yourself, no reason why you cant. -
paint booth up and running.
Los_Control replied to Los_Control's topic in Mopar Flathead Truck Forum
.... ouch! will you come bail me out of jail PA! -
paint booth up and running.
Los_Control replied to Los_Control's topic in Mopar Flathead Truck Forum
Thanks DJ, That is my only goal, preserve it and drive the wheels off of it ... when I am gone, next guy can do what he wants. Wont effect me any. I think you may agree with me, The paint looks like a cats butt. What I did, I mixed the paint really well, then because it is hot triple digits I used lacquer thinner to thin it I dumped some paint in a coffee can and then dumped some thinner in. I was Leary about adding too much. Possible I just did not add enough thinner, and will smooth out with more. I just need more practice, but I think my first attempt is not body panel ready. -
paint booth up and running.
Los_Control replied to Los_Control's topic in Mopar Flathead Truck Forum
I did wet the ground before spraying PA, does that spray texture look normal for enamel? I am just not sure if that is what I should expect, then buff and wax to improve the finish? Just a work truck, I will be hauling tools and lumber with it ... it will work. When I connected the hplv gun, I could not adjust the regulator on it, I cleaned it properly a few months ago. So was going to pull the regulator and just set the reg on my compressor. Found some bug had moved into the air line and made a cocoon. So I cleaned the gun again I thought my spray pattern was good, my airflow set right ... just the texture of the paint I did not like. I dunno, If I want a old truck, that may be just the look I want Just wondering if anyone that sprayed enamel, thinks it should look like that. -
paint booth up and running.
Los_Control replied to Los_Control's topic in Mopar Flathead Truck Forum
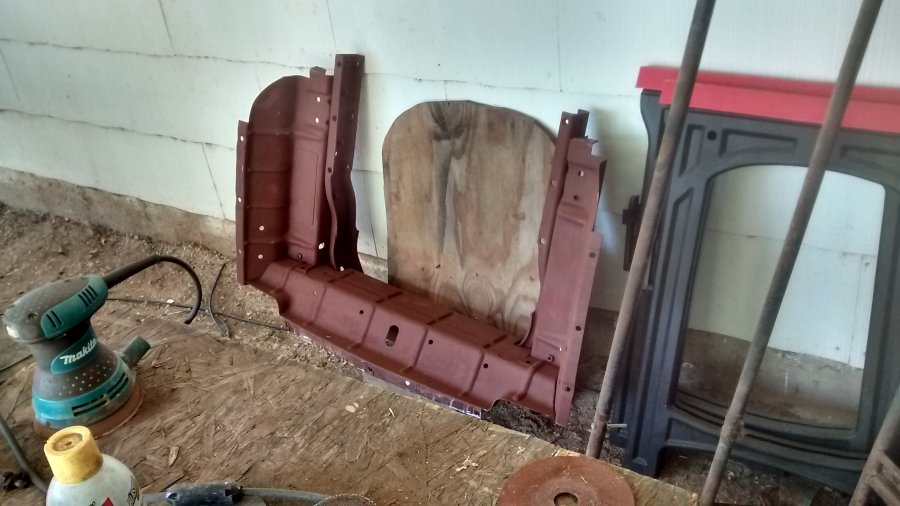
Did I ever thank you properly for sending me the broken switch? It was exactly what I needed to fix mine. I really appreciate it. In this project, the paint is just long overdue neglected maintenance. I am not restoring. I did not separate surround and core support. Everything is actually cleaning up pretty good. In this project. And so far, I am pretty much breaking every bolt as I remove them, to be expected. That piece, was really bolted in well, it had some paint on it, it cleaned up well ... I just primed it as is. Because the nuts are welded to the core support, if I actually broke one and the bolts are a fine thread ... I might actually open a can of worms I do not want to deal with. And it is fine the way it is. Problem is, as is it is to heavy for my paint booth. I may end up taking it apart yet for paint. -
paint booth up and running.
Los_Control replied to Los_Control's topic in Mopar Flathead Truck Forum
And the paint booth
-
Squirting some paint, working ok for the parts I am spraying , splash pans, mud guards core support etc... For these items, pretty easy to get to bare metal, some areas not so easy. Then I use the sand blaster to get to areas I cant get mechanically. Then I spray with a rust converter "ospho" Prime and paint. Not perfect, but better condition then when I got it. something I am concerned about, I will have to play with it and see what kind of finish I can get. For splash pans and frame, I love it. For body panels, doors, hood etc ... not so sure if I love it. Seems like a bit of texture, I am guessing is the paint, not sure if can buff it out smooth then wax, is cheap enamel paint. I want cheap paint, maybe my expectations are to high. I really do want to stick with a single stage paint though, maybe I can play with air pressure and such.


-
As far as picking up the engine & trans in original post. Grab it, maybe you can find someone else that can use it, save it from the scrap yard. Not called hoarding, is stepping up to the plate and doing your duty
-
Did fire even play a role? What I have seen, the get me by shows the existing product, while not adding to the existing product. Just saying, I would double check my existing product before posting this crap.
-
Thank you . I thought so, just so easy to get off in the weeds and then wonder what hit you.
-
Thanks Merle, I will try that and see if it improves. My first no, no is running detergent oil ... I will have to drop the pan and clean it. This truck has never had a oil filter installed. Just trying to stay out of the weeds, one thing leads to another and the next thing is .... I can try the spray oil and see if it helps ....
-
The side covers have thumb screws holding them on, and PO has all kinds of silicone squirted around them to seal them ... why I need to pull and clean. I have been spraying pb blaster on the intake/exhaust bolts ... hoping to remove the manifolds. This is my issue, I am trying to not get to distracted and wander into the weeds, then step into the rabbit hole and not get out. I kinda have a plan to get this truck on the road, is 3 stages, I am on stage 1. Stage 1: clean, paint, grease, new brakes cowl forward. Stage 2: Back the truck into the driveway, remove the bed, clean, paint grease, brakes, seals, repair floors and cab and bed. Get it licensed and insured and driving. Stage 2 is a big project, but the truck is really not that bad, so it will be work but not terrible. Stage 3: is actually a lifetime project of just keeping it running and driving, including upgrades on the drivetrain as needed, stage 3 never ends. This is my idea of eating a elephant one bite at a time .... so easy to get distracted and end up with a pile of parts in the driveway. With my disability and the drugs the Doctors had me on, This is a exercise to recovery. I really do not trust myself to do it right, yank it to the frame and put it back together. So one bite at a time.... Just saying, I understand frustration and "why dont you just do it right the first time" I have my reasons. I just simply do not trust my mental capacity to put it back together. Just worried if I start on this engine now, I will end up in a rabbit hole. Yet I am pleased with my recovery in the last few years, after telling the DR's to go visit Hades. For a few years, I could not remember my phone #.
-
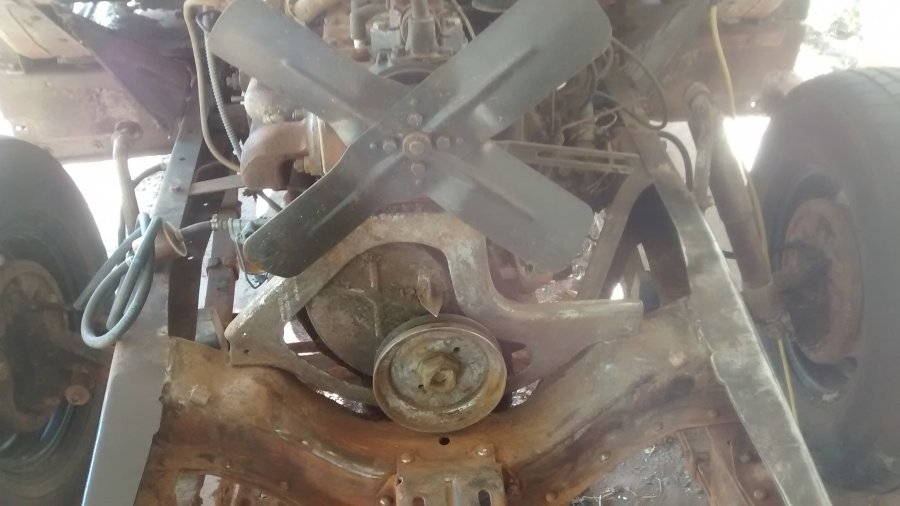
Ok results from this test. Now it sounds like a valve, and specifically #2, which is the one cylinder that was low on compression, but has been improving the more it runs. I sure hope you guys do not get to mad at me, we all learn as we go, and sometimes just talking about it gets us going in the right direction. Amazing how far sound travels, but running it without the belt really made the difference. Next question would be: Seems like I need to adjust the valves. I do need to change the valve cover gaskets anyways ... something in the back of my head is telling me, run this motor a bit first, let the valves clean the seats best they will, then do adjustment. Truck was claimed to be sitting 10 years, I think it is over 15 years it has been sitting. I think the valve adjustment wont be today, will be another post for another day.
-
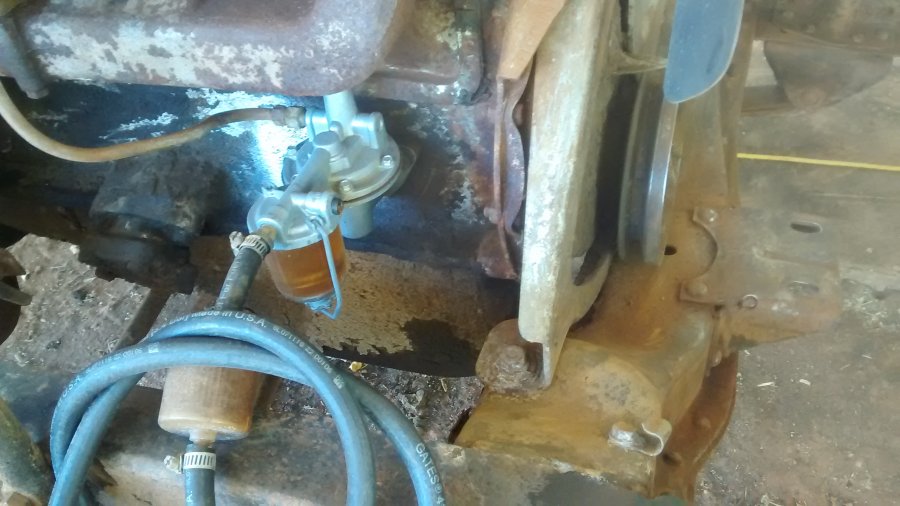
I can do that, pull the pump and block it somehow with some cardboard or such ... gravity feed the carb? Seems for a test it would work .... going to try as is first, if still noise then try the above.
-
I think so, I have replaced the fuel pump with one from Napa, and noise has not changed. Noise could be cam shaft related? What I can do now, go ahead and start it back up, with no fan belt. This will eliminate water pump and genny also. Going to try that now, have the battery out so take a few min to test.
-
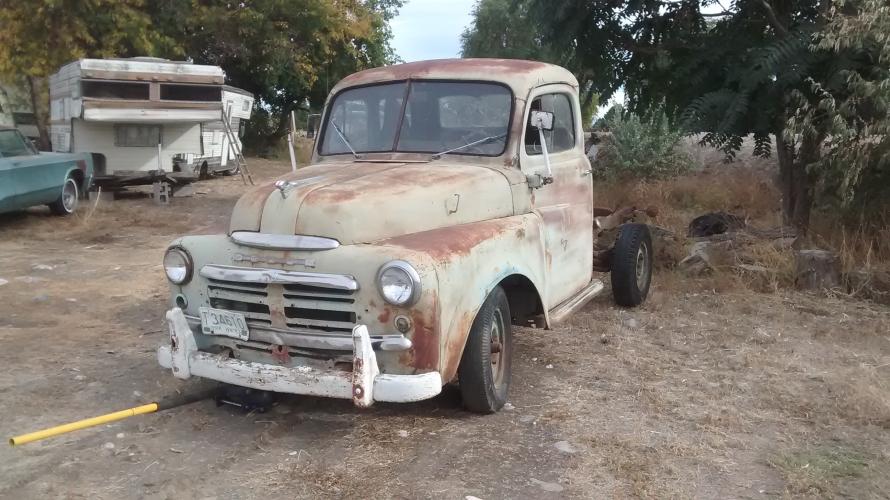
Wondering what I might be getting into here, if any have advice. Motor runs good, but there is a ticking noise, sounds like a lifter, using a highly technical stick of wood, noise seems to be coming from the timing cover area. My only goal with the truck is to repair it, catch up on 30 years backlog of maintenance, and drive it. I am not restoring it. I suspect after 1 or 2 years, maybe sooner, I will want to pull the engine and do rings, bearings, seals, valves etc .... Something tells me, I should at least look at the chain now, to see what is causing the noise, probably replace the chain and gears. I also think, for the miles I will put on it, it would probably be fine until I do pull the engine. Question's I have, What could cause the noise? Is there something specific on these motors where it is a common issue? I once had a old (1977) Toyota pickup, the timing chain stretched so far, it slapped a hole in the side of the timing chain cover. So a stretched chain is the only cause for the noise that I know of .... is there something else? What am I getting into here? I need to buy a socket large enough to remove the nut on the pulley ... probably be 3/4" drive and only have 1/2" tools Block of wood and a jack under the engine to support the weight, will the old pan hold up? Will I need a puller to remove the bottom pulley, or will it slide off with help? If this was a sbc or a ford, toyota, I would dive right in, old mopars like brakes for example, they have their own ways of doing things. Just asking if any gotcha's while attempting this. You can see from the photo I am already there .... I have to pull the water pump any ways, I cleaned the cooling system and have a cardboard "get me by" gasket that leaks. Had the pump on and off a few times, now time to mount it permanent.
-
Thank you, the bottom post is slightly larger then top, I appreciate the point in the right direction, just makes sense.
-
I think you need to be concerned about rpm. These old flatheads will run forever, but not at high rpm for long. Think factory says 3600 tops, that is for short burst not for cruising all day. As others suggested above, OD transmission or a gear swap in the rear end ... goal is to keep the engine rpm down to a comfortable level.
-
That sounds reasonable. I have painted them in the past, they just did not look right to me. This time around, and for a driver ... I cleaned it with some windex and called it a day. Then I looked at the starter bolts, screamed like a little girl and ran away! I did order a starter wrench from ebay yesterday I apologize to PA for getting off in the weeds in his thread. Can I ask a question while I have this photo up? When I bought the truck, the genny wires were disconnected and needed repair, I do not know which post is Arm or field. I promise to buy a motors or chiltons manual soon, can someone tell me which post is Arm from the photo? I assume they are somewhat standard wiring config, and I cant tell from the wiring diagram floating around the forum.

-
I will double check my local store. When I was there looking a few months ago, the kid pulled out a roll of copper ... said this is all we have in 5/16" Me being a old remodel carpenter, it looked like something I would use to plumb your ice maker on your refrigerator. no, no no I told him, I dont want copper tubing! Now I need to go back and see if it was nickel copper made for automotive use. It may be exactly what I wanted in the first place. Just me being ignorant, and not knowing nickel copper looks exactly like copper tubing. As long as we are learning .... Either way, I just needed to get the old gas tank out of the way, now can cut out the old floor for repairs. And will get paint on the frame before installing new fuel/brake lines. Be a couple weeks before installing the new line. Not sure if you checked for 5/16 transmission line Thanks veemoney ... I can also check for that. I'm just a little weird. I do order a lot online, I try to do as much business at my local brick & mortar store. I live in a real small town, try to do what I can. They do have top notch quality parts, They only stock wix oil filters. Ol Charlie will come down at 2:00 am in his tighty white'ys during harvest time and sell you a part. Yeah he had a bath robe on. And yes, in this town, I am the one that walks in and they roll their eyes ..... oh gawd, what are you looking for this time ... they let me wander in the back room to search for something that will work. Yet they are as helpful as they can be. I usually research part numbers and have them order them, The carb is a good example. They saw it was a good number and correct part, just no way they could order it in their system ... then I went to Rockauto and order it.
-
I need to start shopping for fuel line, I hear the good thing is the nickel copper is real easy to work with. Honestly, if the original steel line lasted 70 years, I have no issue going back with same material. Problem I am having is finding 5/16" at my local parts house, they say they cant even order it for me. Now am trying to decide to go 1/4" or 3/8", I think either one would work fine. Here is the fuel line I removed yesterday. I was running the engine off of the original tank and line in the driveway, kept running out of gas. Let it sit for a bit and would fire up and run for awhile again. Looking at the line now, surprised it ran at all. You just never know what treat these old trucks will present next.

-
512 cid C series on Dakota chassis- build thread
Los_Control replied to Radarsonwheels's topic in Mopar Flathead Truck Forum
was the first place for a flathead 6? -
You actually should have 00 welding cables for battery cables. 6 volt just requires heavy cable, while in the years they introduced 12 volt cables, lots of cars/trucks got converted to the smaller cables .... they do not work worth a crap on a 6 volt system. Just do it right, It will cost you for a roll back to come pick it up. I made a deal on my truck, then was able to make a deal to have it delivered, I paid a xtra $100 because I knew they spent it in fuel. Then you have the opportunity in your drive way to put it back together like it was meant to be.
-
Pull it ... if you got room, the engine will turn over faster and start easier. ... still need the basics like spark, timing, compression. And brakes are nice once it does start ... if you got brakes, maybe it is a 15 year vacation for it ... I kinda doubt with 15 years you have brakes though. These flatheads are known to gum up in the valve stems after sitting ... pulling it will get the valve train moving faster ... still may not clear it, but true 15 years should not need it.

