-
Posts
4,768 -
Joined
-
Last visited
-
Days Won
39
Content Type
Links Directory
Profiles
Articles
Forums
Downloads
Store
Gallery
Blogs
Events
Everything posted by Los_Control
-

it's just around the corner......IWOYTD
Los_Control replied to Plymouthy Adams's topic in Mopar Flathead Truck Forum
I just assumed ... I do that to much sometimes I also assume that a cooling issue along with the po age is why my truck was parked. My first hurdle was to correct the over heating, and with much reading older post on this forum learned we need to pull those soft plugs. Often the original casting sand will be left in the block and it all gathers here. When I pulled all the soft plugs on that side and flushed mine, along with wire to reach up and probe and clean, I pulled a lot of sand out of my block. Just a guess or assumption on my part, maybe your engine was rebuilt and hot tanked with the plugs out sometime in the past and you had no sand. I have to agree with you there, because my truck is still apart, was easier for me. Just thinking here, the scale will also build up in the distribution tube. For you to access that, you need to pull your hood, radiator, water pump. Not a easy job. I am positive that was my real issue, the scale blocked the water passage in the tube. I was able to use a 3/4" flat bar 4' long and insert it through the grill. I manually removed the scale. I had to use a hammer to drive the flat bar in, and a slide hammer to pull it out ... that's how bad the scale in the tube "can" get. I do not recommend this as a permanent repair ... just how I did it, I also filled the radiator with vinegar warmed it up a few times and let it sit for a few weeks, rinse and repeat ... it now runs at 160 with no T-stat installed. 50/50 chance I will be pulling the motor and rebuilding it first year back on the road. Why I did what I did. I assume the scale build up in this tube, is why they are so hard to remove and replace. The scale build up will expand the tube out of original shape. That scale is so hard it wont allow the tube to go back to original shape and come out easily. I bet if a guy hollowed the tube out like I did, or at least check it first, it will slide out much easier. -
If your wiring is original, it probably does need to be replaced. But if your wiring is good, you do not need to change it for 12 volts. The 6 volt wiring is heavier then modern 12 volts and stronger. I have no advice on the new harness but know others will.
-

it's just around the corner......IWOYTD
Los_Control replied to Plymouthy Adams's topic in Mopar Flathead Truck Forum
Amazing how much sand comes out of original blocks -

it's just around the corner......IWOYTD
Los_Control replied to Plymouthy Adams's topic in Mopar Flathead Truck Forum
I think I am going to have to set down my tools, raise my hands and back away very carefully. I put a few items on just for inspiration, If I think about my original goals, A daily driver to go to the hardware store for lumber or bags of concrete, grocery store post office etc... Do I need paint? Thinking I don't need no stinking paint! If you open the hood and see the frame painted, all maintenance up to date, new brake lines and fuel lines it is safe to drive, new wiring ... Do I really need to extend the project another year for body paint? Or just get it on the road and start driving it? I am 57 years old and retired on disability, have limitations and have a lifetime of IWOYTD. This truck is rougher then a corn cob, a paint job for a noobie is not ideal. I love the work others are doing on their cars/trucks, I want to see a mud puddle, yell "HANG ON MOMMA" And hope I do not need to dry out the distributor on the side of the road. Just another reason why IWOYTD is valuable, I can work on my truck fer next 20 years, what I need to do is get it on the road. -

it's just around the corner......IWOYTD
Los_Control replied to Plymouthy Adams's topic in Mopar Flathead Truck Forum
You sound like you are having fun. I watched Jonathon build a roadster, he was all gung ho and when done, He looked like a gorilla driving a kiddie car. Now he is building a RPU. He stretched the cab and also running a Buick straight 8. Took a stock A frame and used some parts while building a new frame. Just saying ya both doing the same thing and you may enjoy watching what he is doing. -
That is where I may be wrong, I think a good welder/body man, could tig weld the holes back up with stainless rod and then polish it out. The end result may look like a small blemish, or you may never see it. Just depends on what level restoration you are going for. Hoping someone will correct me if I am wrong. My knowledge is based off of past experience of custom SS back splashes being welded and formed and then installed in a kitchen remodel ... or commercial kitchens and all the SS food grade tables and equipment and the welding done on them. Only issue with trim is it is very thin and have to be very careful.
-
If it is stainless steel trim and you have it, good chance someone can save it. My ss grill bars on my truck were smooshed flat. In a couple hours messing around I was able to get them looking pretty good. If it is not something you want to do yourself, maybe find a old school body and paint shop, one with a older worker that remembers this type of work .... They will enjoy fixing it. It can be welded, hammered out and polished. This may be your best choice if you actually have the original trim.
-
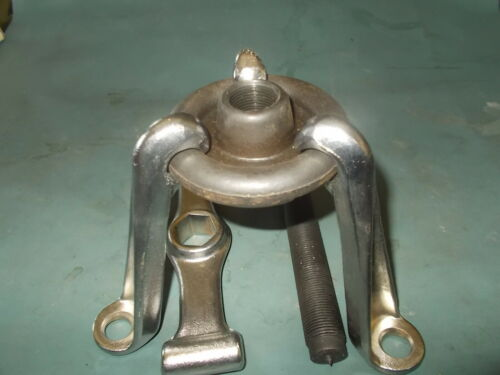
ok done deal, I went searching again found this one in my price range ($85) Looks like it will work once or twice. and clicked buy now and it is on it's way. NAPA- 3 LEG HUB PULLER # NH 2251 "NEW"
-
I guess that is the key word. And right now there really is not. I only see one decent used one that is way over priced. Thats ok I still have time. When I do get the nose back on, then turn the truck around in the driveway and pull the bed .... then I will need it for sure. With my past track record .... that could be another year Wife and I only moved to Texas couple years ago, we were going to go to angelo one time just for a road trip and see the town, and we just never did. It is still on our bucket list.
-

it's just around the corner......IWOYTD
Los_Control replied to Plymouthy Adams's topic in Mopar Flathead Truck Forum
Huh, I thought the event had been changed to IWOYTM? I admit my wife had a funny look on her face when I explained the event had changed Starting to put the puzzle back together, got the heater mounted yesterday, more sheet metal today and hopefully get "A" radiator in. Getting nose and inner fenders on is a big goal, from there can start some wiring , maybe by tomorrow? ... one bite at a time. The event was a good push for me and did help me get moving. I do have to get back to a couple other projects soon and then every day can be a IWOYTD. -
My biggest problem I do start with a smaller bit and work my way up .... I just do not have a large enough drill bit for my "pilot house truck" to fit.
-
Good thing we get smarter with age
-
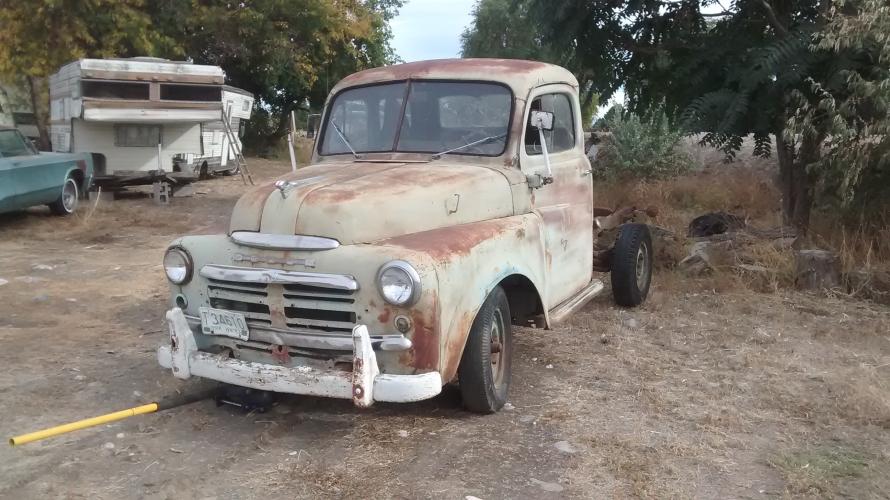
I love it .... I am not a big fan of "patina" I like what is there and would try to save as much as I could. I would want to try and color match any rockers or patch panels. You clean that thing up and it is beautiful just the way it sits .... and of course we are 20 feet away
-
Yes sir, this will have to be your decision. Dado imho is more of a process and not a blade. We can buy Dado blade for a table saw or even skill saws, or a router bit and make a dado. for your situation, I just think the router gives you more control ... I would use a table saw for dado's in a cabinet, A skill saw for dado's in framing lumber ... your job a router. For a hinge I would lay the hinge on the router bed, then raise or lower the bit to thickness of hinge .... then you need to add the thickness of shovel strip ... you are on your own there to decide how much.
-
If you have a router, you would set your bracket on the wood in position, then using a #2 or a fine pencil trace around the bracket. Then you would take a sharp razor knife and follow the line, cutting inside the line ... will prevent splinters. Then set the dado up in your router at the depth you want to countersink your hinge .... I am thinking same depth as the hinge so it sits flush? Then use the router to hog out the material following the inside of the line ... you can always go bigger if needed. You cant really get the dado in the square corners. Just get as close as you can, and then use your wood chisel to finish the corners. And any size bit would work, the smaller one on the right would get closer in the corners, & easier to control. While the bigger one on the left would be faster and remove more material. This is how I would set hinges in a wooden house door. The other option is to trim around the hinge with the razor knife, and just use your sharp wood chisel to remove the wood. Takes more effort, talent and time, still how it was done in the past. And what you are doing exactly like setting a hinge on a door.
-

it's just around the corner......IWOYTD
Los_Control replied to Plymouthy Adams's topic in Mopar Flathead Truck Forum
I also had a good day, think I have my linkage issue fixed, flushed again, but was nothing but clean water coming out so quickly moved on .... water pump, T-stat installed using gasket sealer expecting it to be last time. Generator, fan, fan belt installed Gave her a good hose job while it was out in the driveway .... like to do a little more, but 4:30 and with my wife disability I also do all the cooking, cleaning and shopping and it is time to get dinner started. And I got the shocks installed! Now she riding high in the front and the rear is really is squatting -

Help with linkage please "Solved"
Los_Control replied to Los_Control's topic in Mopar Flathead Truck Forum
I dunno, I decided to reach down and just shift it manually for now. To do what I needed. And now all gears are working as should. I guess one linkage got moved or some thing? -
I can use some thoughts on this issue I created. I removed this screw and probably should not have. Now with the screw installed I no longer have reverse or 1rst gear. When I lift up and shift to reverse, linkage feels normal but I am in 2nd gear, Lift up and shift to 1rst and I get 3rd gear. Shifting was fine before I removed the one screw .... I assume there must be a procedure to follow. The shop manual I have does not cover linkage, I have a motors manual coming from ebay but wont be here til next week. Hoping it will cover it. While searching the internet just finding instructions for adjustment. Today I wanted to back it up into the driveway and run a lot of water through it to flush it out. Really disappointed in how much rust & sediment sitting in the head after flushing it out last year and then just draining the water out.
-

it's just around the corner......IWOYTD
Los_Control replied to Plymouthy Adams's topic in Mopar Flathead Truck Forum
We got that rain last night ..... It poured! No more in the foreseeable forecast. Generator bracket pulled cleaned and painted. -

it's just around the corner......IWOYTD
Los_Control replied to Plymouthy Adams's topic in Mopar Flathead Truck Forum
I am going for the water pump now ... shocks done, truck started and pulled back up to the door. Doing a little research trying to find out how I lost reverse and 1rst gear -

it's just around the corner......IWOYTD
Los_Control replied to Plymouthy Adams's topic in Mopar Flathead Truck Forum
I am undecided as usual, think I would like to do some painting today, or I need to remove my water pump, flush the block one last time, install a real water pump gasket and thermostat, T-stat, generator ... button the engine up. Then I want to play with the welder, still teaching myself and past I used .035 flux core and it sucks for sheet metal. I now have gas and .024 wire and need to set it up and play so can patch my fenders. Decisions decisions sigh! First I need to clean the shop and put carpenter tools away -

it's just around the corner......IWOYTD
Los_Control replied to Plymouthy Adams's topic in Mopar Flathead Truck Forum
-
Thats interesting, I have 2 of them, yellow one is a 48-50 1/2 ton converted to a utility trailer, other one is a 49 B1B Is it possible your 3/4 ton used a different style?
-
It has to be a personal hobby or it just wont get done. I actually enjoy it and have future plans. What we envision and just like our cars, our vision is different then others. I sure could use Fabio assistance, seems like just to busy to visit my house.
-


