-
Posts
4,722 -
Joined
-
Last visited
-
Days Won
37
Content Type
Links Directory
Profiles
Articles
Forums
Downloads
Store
Gallery
Blogs
Events
Everything posted by Los_Control
-
Good on you ... you want to eat good, step up and get er did!
-
?
-
Sounds like a good plan, I am kicking around the idea myself. I would also consider going 12 volt and call it a upgrade for a driver, you can now use modern radio, brighter headlights, tail lights, gps ... If you do a little research, you will find it is pretty simple to convert to 12 volt, change all light bulbs for sure, I think your gauges will work fine as is ... they are mechanical and gas gauge does not care. Wiper motor if you have electric will need attention and same with heater motor. Both will work on 12 volts for awhile, just turn faster then 6 volt and eventually burn out and need replaced. But can run a 12 > 6 volt reducer to them. Radio is a problem. I remember when I was a kid, the adults just switched to 12 volt because it was easier and cheaper. Today we stick to 6 volt to stay stock. If going alternator, is no longer stock so why not go better and cheaper? .... ya going to stick your toe in the water? Or just jump in?
-
Just curious because do not know ... is there a way to remove wiring from genny and test it with multi meter with engine running ... isolate the genny from the wiring & car?
-

Newby needing assistance with carburetor linkage
Los_Control replied to 53 Pilot's topic in Mopar Flathead Truck Forum
Bad photo, but you can see the connection you are concerned with, on mine it is on the same side and below the throttle cable bracket., then goes up to the carb. Yours is on top and on the other side. We also have different years, I have a late 1949 with 1950 motor/trans ... you have 1953. On your 2nd photo with a arrow to the linkage. is also a small spring ... I do not have that either. I do not know if our linkage is different, our carbs or choke is different. I am saying one is not like the other, I am not expert enough, to tell you why your arm is in a different position in then my arm. -
-
Some things to consider. B2C is a 3/4 ton with a larger 5 on 5 bolt pattern, While a 1/2 ton B2B would have the 5 on 4.5" bolt pattern. If you did change the rear end with modern rear end, you would most likely be getting the smaller 5 on 4.5" wheel pattern ... with the front still larger ... would need 2 spares. Or modify the front brakes/drums to match the rear. And that is easy also. I wonder what & who places values on these trucks ...Stock and capable of 50 mph ...concourse restoration, I doubt you could sell it for more then you put into resto. Would be easy ... kinda ... to find a used 3/4 ton rear end. I think 1/2 tons were more plentiful, then people who bought trucks bought the larger 1 ton and up. New brake drums I think is $350-$400 each, would not take long to go north of $1k just for new brakes. ON THE REAR! Then lets get on the front brakes. You can swap hubs with a 1/2 ton and get correct bolt pattern so they match .. Either used or the new ones again are over $300 each. Or you could do a disk brake conversion for cheaper. You see where I am heading, you can pickup a old explorer rear end for $0-$200 do a brake job for cheap. or a jeep cherokee rear is good, I understand our flathead 6's like 3:73 gears, comfortable gear where they can run 65-70 mph, While a 3:55 seems a little tall, go a little faster on a flat surface, on hills you may lack torque and be busy shifting. Just depends on you and what you want to do with your truck ... If thinking about value, you may be better off investing in gold. If you want to drive your truck and enjoy it, you can save yourself hundreds of dollars on brakes alone and get a truck you really enjoy driving. I respect those that do a concourse restoration and preserve these old cars. In the end we are just caretakers to pass them on to the next generation.
-
One thing I did was remove the dog house. It is not to difficult on these old trucks. Get it unbolted and 2 guys can lift it off and set aside. While everything on your list can be done with the front end left on, the amount of items on your list it may be easier faster with it out of the way. Maybe depends on how much motor work is needed. The motors sit so low, is hard to lean over the fenders and work on. As mine sits, I can still start it up and move it around as needed. Almost like having it on a engine stand to work on. But I had a different list of items to work on.
-
Story time ... @Young Ed I appreciate and thank you for your experience. You actually just did it and learned from past how to do it right. I guess I should not ask and also learn on my own. I have good intentions, what I learn I can pass on to others. My past employer used to get so mad at me asking questions. I was a apprentice learning finish carpentry, I would ask many questions ... after 2 years I was asking a question while I was grinding away on a curved oak stair rail. Boss blew up .... "took me 30 years to learn this trade" you are learning in 2 years .... I shrug my shoulders, you paying me by the hour boss, you want me to learn on your dime, or show me the correct way? He showed me. I do not deserve to be given this information, yet I want to take personal advantage of it ... and pass it on to others.
-
Thank you ... I cleaned up with a wire wheel and put oil on them, I expect to remove after getting hydraulics working for proper adjustment. Thats exactly what was wondering ... I was very light on the trigger ... as if installing the tire/wheel 95-100 pounds. I am thinking more is better, then wondering if will create other issues with free play ... Thanks for reply.
-
Seems fairly straightforward, just asking for a friend First time I ever have installed drums on a tapered axle. Have a question about proper procedure. Looked in my Motors repair manual under axle and brake section, I see nothing helpful. So excuse me if I missed it. When we install front drums, would snug them down good, to seat the bearings, then back off for proper bearing clearances. On a tapered axle, I am concerned with torque required to pull the drum onto the taper and into proper position. I see no torque specs ... so I used impact gun and and snugged it up fair, without hammering on it? Needing to adjust the nut to install cotter key, should I go tighter or looser? Do we just hammer it on with the impact and get on with our day? Or is there a proper procedure to follow?
-
Halibut is some good tasting fish ... I love fish. I cook fish every Friday, I could it it 2 or 3 times a week. But the adventure of going out and searching hunting then actually catching is the fun. The wife & I use to spend hours out bass fishing, during the week I would car pool with a co-worker, he would pick me up and we go to work and when we got back to my house, jump in my van and the boat was always connected, lived a 1/4 mile from a boat launch to the Columbia river. Crazy days indeed ... sometimes we just made it back off the river to make it to work the next morning. Today, all my fish comes from walmart ... sigh!
-

step bore to straight bore wheel cylinders.
Los_Control replied to Los_Control's topic in Mopar Flathead Truck Forum
I appreciate your info. As you say, so many BS artist on the youtube ... makes a guy wonder. Exactly, your opinion gives me peace of mind. Fact is I really did not know. was gnawing in the back of my mind. I am no spring chicken, but was hatched in 1962. was the 70's before I started working on cars ... Just because I drove a 51 ford in school does not mean I worked on it, just the cheapest beater I could afford. Only thing I have against step bores today is running a hone through them for rebuild ... otherwise I know nothing. -

step bore to straight bore wheel cylinders.
Los_Control replied to Los_Control's topic in Mopar Flathead Truck Forum
Since I did this swap ... plot gets deeper. Watching JonathanW on youtube build a old roadster, he is using a 30's mopar straight axle and he made a huge deal out of the fact he was using the step wheel cylinders and he took his brake shoes and cut the front shoe shorter then the rear shoe. Or opposite, but he acted like it mattered. Suggesting that the step cylinders were used to work different pressures on front and rear shoes on that axle. I guess that is where my question really lies ... Is there really a different set of shoes to go with the wheel cylinders? -

step bore to straight bore wheel cylinders.
Los_Control posted a topic in Mopar Flathead Truck Forum
I wondering if others have changed from one to the other. My truck had the step bore on the front and needed replaced. Me being the selfish person I am, wanted straight bore and saw they were a option and ordered those. They fit fine, I noticed it was difficult to get the drums back on. I did have to back off the adjustment on the shoes all the way, then basically leave them backed off and just a slight drag when turning the drums. .... exactly how I would have adjusted them in the first place. This is with the used thin brake shoes. Thinking if I had new shoes, may not have gotten the drums on at all. Now I am kinda second guessing my choice. ... My thought is when I get hydraulics working and get some pressure on them, they will get seated proper and then can or will need to adjust them up. While putting my rear brakes together ... my mind is wandering to the front brakes and wonder if I need to revisit them? Is it bad voo doo to go from step to straight bores? -
Or the 3rd thing ... long rope and extra transmission
-
Yes I have done it myself for one reason or another. I picture in my mind, previous owner takes it to mechanic to have the leaky wheel cylinders fixed .... Could just as easy be the previous owners work. I found it because am cleaning things up waiting on parts. If I had the truck on the rack and just swapping new parts in and connecting lines, would have been easy to miss. Would not be able to bleed the brakes and start tearing things apart chasing the problem.
-
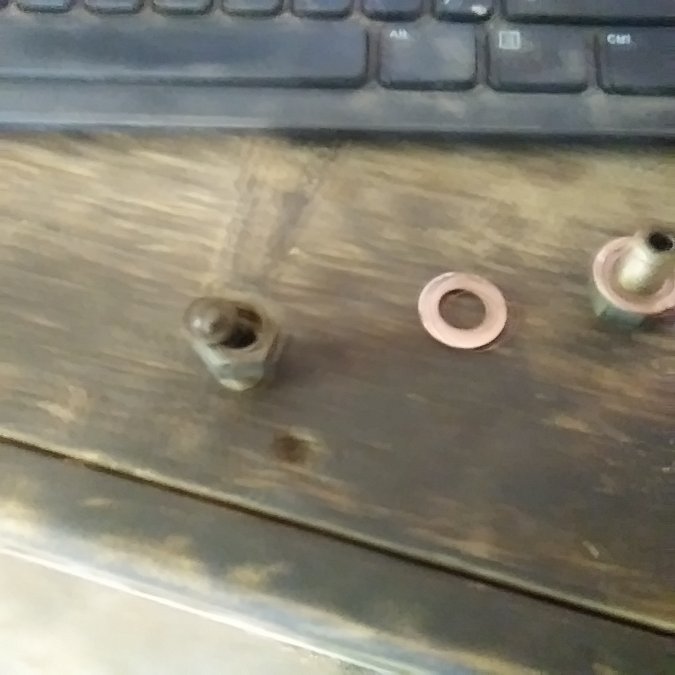
First time I seen this, got a good laugh and thought would share. Someone added a copper blank into the brake line connection to the right rear wheel cylinder. I can only assume the wheel cylinders were leaking so they blocked it off instead of fixing. Seems like a professional fix, the fix I have seen in the past is to cut the line and fold it over. This time I feel is professional garbage mechanic, cause they took the line loose and inserted a plug and I assume probably needed to bleed them. But they did not really damage any line or wheel cylinder. Just different.
-

Rear Wheel Cylinders for 53 B4B
Los_Control replied to 53 Truck-O-Matic's topic in Mopar Flathead Truck Forum
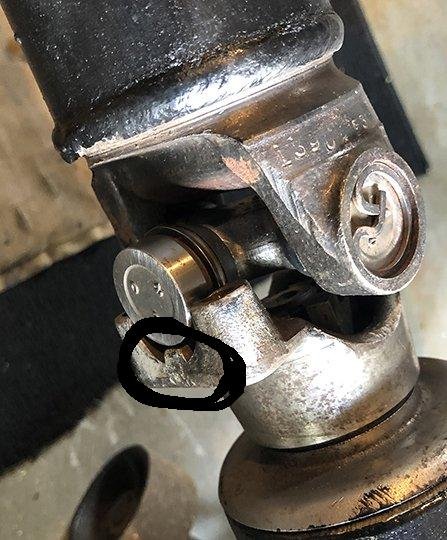
The face of the cap, should be inside the tang on the yoke. This photo shows it sitting on top of the tang. This is wrong. That tang is there to hold the cap on the ujoint .... That cap needs to sit flush in the saddle of the yoke .... you are sitting on top of the tang and shows ujoint is to wide. Possible you may be able to change the caps for something narrower ... I have no clue. The ujoint fits the drive line, but does not fit the yoke. My daily driver 91 chevy has a 2004 or newer rearend installed while a stock 1991 drive line. I have to buy a ujoint for both years, take 2 caps from one and install on the other ... and it is fine ... but difference is diameter, height of the caps ... not the width of the ujoint. But what you show will not work as is. -
There is a how to thread on here where a guy did exactly that. 1 or 2 years ago. I really see no issue .... I thought about doing that to mine .... But I am lazy. Looks like my rear wheel cylinders will be here tomorrow, I have a bit more cleanup and paint to do, so I can re-assemble. Until I drive it, I am not sold on keeping this rear end. I may swap it out for a modern 3:73 in 6 months ... If I decide I want to keep it, then I may grind the 4 rivets off.
-
Well I'll be dipped .... I just bought last one from local brick & mortar store. I Assumed rock auto would be selling same switch ... Cant hope for no better then acdelco, I have the page up now and see it. I bet you are correct, give the part # to the dealer and would have a better chance of getting it. Rock auto works for me though. Thanks, now I feel lazy for not checking rock auto first .... I try to buy local when I can.
-
OK then, thats the way I connected it the very first time that the battery was still in the car ... The charger died ... I thought "well, we cant do that" And never tried again. I do not want to spread dis-information, that was just my experience the first time, never did it again. Positive ground still seems so backwards to me.
-
Last time I tried it, was a old school charger probably 20 years old think it was 10/6/2 with option for 12 or 6 volt. And it worked fine charging a 6 volt battery out of the car. The one time I connected it to the battery while still installed in the car (truck) It pegged the needle on the gauge and twisted it off. I assumed that was because of the positive ground still connected. And would myself assume would happen to solar charger also .... Maybe it was fine to connect it, and just was the end of the life of the charger?
-
Well maybe I am doing it wrong. I know that when I charge my battery using a standard 110 volt battery charger. I connect the red to positive and black to neg on the battery, just like any other modern battery ... except charger is set to 6 volt. When finished I then install battery using positive ground. All seems fine here. I know if I connect my charger this way and leave the positive cable connected, I will have a very sad battery charger .... I assume solar charger would be sad also.
-
I wonder how they work on a 6 volt car battery. I suspect these solar panels have modern day electronics in mind. A usb port typically is ~5 volts. Or at least the power supply in a computer tower, the wires that power a usb port is 5 volts. Same when you connect a 110 volt outlet with a usb port, The usb port should be about 5 volts. So I suspect these 6 volt solar panel are so popular to charge a cell phone in remote locations. Would also charge some tablets and note books, while a laptop and other larger electronics may require maybe 12 volts to charge. They vary. I know a guy who does maintenance on wireless internet towers. All the work is done with cordless power tools and batteries charged with solar. You need a better solar panel to charge the power tools and of course he needed his laptop to check the signal strength, he charged it also. Sure a little better solar panel charger, you get some adjustment on voltage to your electronics. Only point is, I am sure they did not have a 6 volt positive ground desoto in mind when they created the 6 volt chargers. I assume it will work, you will need to disconnect the positive cable from your car while in use ... I could be wrong.

