

junkers72
-
Posts
163 -
Joined
-
Last visited
-
Days Won
1
Content Type
Links Directory
Profiles
Articles
Forums
Downloads
Store
Gallery
Blogs
Events
Everything posted by junkers72
-
I will jack my car up tomorrow and get better photos of all the linkage and brackets
-
This isn’t too much of a help but it’s the only photo I have of my 47 DeSoto linkage from when I replaced the master cylinder and was in the process of the re wire job

-
 I got my engine mounts from mopar pro (eBay store) = good ; water pump and thermostat from local Napa (ordered and in store 2 days later) = also good ; hoses are bulk from Napa and Rock auto
 -
48 DeSoto Removing hog's head off the diff. to drain. Any warnings!
junkers72 replied to MarcDeSoto's topic in P15-D24 Forum
I didn’t find a drain plug although I did clean all the cake off the housing and searched real good for one. I even have the 5/16” square socket to get it out if I would have found it. -
48 DeSoto Removing hog's head off the diff. to drain. Any warnings!
junkers72 replied to MarcDeSoto's topic in P15-D24 Forum
I just recently drained and refilled my 1947 DeSoto . I took 1 of the lowest bolts out that holds the pumpkin to the housing and left it drain out overnight. Cleaned bolt and put a dab of thread sealer on it before re installation. The oil didn’t look to be freckled with glitter and I didn’t recall a previous problem so I refilled with new gear oil and all is well. -
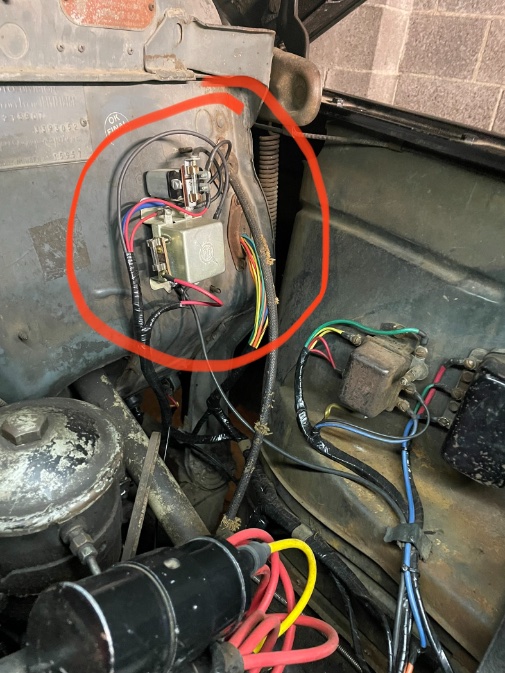
Added a 6 volt headlight relay (the bigger one in the red circle) and halogen 6 volt headlight bulbs . Relay is NOS P&D brand for 2 light high and low beam sourced from eBay for $30 something bucks . The headlight bulbs from NAPA . They work very well and I do drive at night too. Note : little relay above it is for the brake lights. Pic is from winter rewire job . Has since been wrapped up in harness tape
-
I got a new tank for my ‘47 DeSoto from a seller on eBay tomsclassic for a hair under $250 delivered august of 2020. No problems and fit perfectly. I did a quick look and that seller doesn’t have em listed now but at the time there were others listed for more $ but either looked exactly the same or just painted black instead of the silver . Been driving the old bomb with no fuel tank issues all this summer.
-
It looks to me that the upper bearing is wiped out and possibly the housing damaged. That’s if my eyes are tuned in to this pic
-
That chicken is patiently waiting for a ride in that “Coupe”
-
It is what it is. Gotta get it on the road and can revisit this issue when time allows. I’m sure you learned a lot on this major project. Keep up the good work.
-
My 47 Desoto has it . I didn’t want to re invent the wheel so when I rewired it under the hood I replaced the wire going through the ground without too much hassle.
-

-
Called and asked if they could check a part # , didn’t tell guy on phone what it was for.

-
I just picked up pn 5752 from my local Napa auto parts store for the front of my 47 . They had a pair in stock . I think I paid around $50 for the pair. And they fit right on. I just called them with the part # I found on The Monroe website.
-
It’s not on any part of the throttle linkage on my 47 DeSoto. Took a quick look around the engine bay and transmission linkage and didn’t see it anywhere there neither.
-
I will take a peek at my DeSoto today. I think also it could be part of the throttle linkage . It’s been a bugging me since I saw the pic .
-
Thank you ratbailey for posting this issue and also to those who answered. Happy Wiring
-
I am in the process of rewiring my 1947 desoto engine compartment also and am confused with the shop manual drawing as well for the coil to transmission solenoid. It makes it appear there is a 3rd terminal but there isn’t. I pulled my falling apart cloth covered wires without tracing prior because I have the shop manual.
-
Trace those wires . IGN. goes to the negative terminal on the coil. ACC. would power radio and heater if equipped or any other item that would only function while in run or acc . Obviously if it cranks over the power coming to the BAT terminal from the ammeter is ok and so is the ST terminal to the starter solenoid. I would trace that red wire before taking a wild guess. A simple meter is your friend. Also a shop manual has the complete schematic. I will dig through my stuff and see if I can find the schematic.
-
Should be marked like this one

-
Step 1 : Drive it Step 2 : Drive it again Step 3 : Repeat step 1 & 2 Insert smile when appropriate........ ..... or inappropriate. Enjoy
-
1941 Dodge Business Coupe License Plate Bracket
junkers72 replied to 1941 Dodge Business Coupe's topic in P15-D24 Forum
Sent you a message -
Hope you get it all ironed out soon. Happy motoring
-
Pic #2 of your fuel pump appears that the pivot pin has walked out
-
Looks comfortable

