


Dodgeb4ya
-
Posts
10,002 -
Joined
-
Last visited
-
Days Won
181
Content Type
Links Directory
Profiles
Articles
Forums
Downloads
Store
Gallery
Blogs
Events
Everything posted by Dodgeb4ya
-
What adhesive did you use? Is it used to just hold the cap centered or to help hold it tight to the cap itself?
-
Remove plug...carefully wedge the bulb out. Simple.
-
Sadly last summer I scrapped out 2500 lbs of 1946-50 straight eights I've save for 35+ years. I saved the good parts. Cranks and manifolds and couple pieces of tin. Yep those things are heavy. Messed with many.
-
Jesus...been thru this way too many times here. Moparts is full of sh*t in regards to the use of brass in iron engine blocks and use of brass core plugs. Period.
-
 Lot of work that's not necessary for cable removal is all I'm stating. Tight quarters removing a dirty floor pan possibly soiling a nice pretty seat. Six cylinder and eight cylinder floor pans of course are different.. We all have our ways.
 -
Study the old original e-brake cable and note routing. Hopefully it is the original and routed as OE designed. I myself have never removed the whole front floor pan which also requires removing all the carpet and front seat let alone another 20 plus bolts and throttle linkage. Anyway.... At the hand brake handle there are two bolts that position and clamp the end of the cable housing to the hand brake handle assembly. There is aslo a clevis pin with a cotter pin to remove at the hand brake lever. Next thing to remove is a double screwed aluminum clamp ring retaining the rubber grommet and cable located at the upper drivers side of the firewall. Then remove the E- brake cable clamp bolt at the lower steering column. The e-brake cable is routed between the engine rear cross member and bell housing cover...stays close to the drivers side lower rubber engine mount. Just rear of this cross member there is a cable end retaining clamp located on the transmission side cover...remove the bolt and nut...pull cable end out of this retaining clamp. Under the car at the rear of the transmission remove the e-brake return spring, cable yoke clevis pin, also remove two nuts retaining the cable end "U" yoke....remove said yoke. Remove cable assembly from car noting proper original routing. Install the new cable in reverse order. Adjust cable down at transmission brake band for proper e-brake operation. A fun little project..not too difficult...a little tight up by the handle brake.?
-
Merle showed a oxy/acetylene torch heating up the remnants of a spark plug being removed here a few years back. Bamfords D24 Dodge. Broken off plugs are common on flatheads as they rust thin in the sunken head wells.
-
I heat the broken off threaded and lower shell part red hot with a oxy/acet torch.... then melt a little candle wax on it. I remove them with a shortened easy out. They will come right out. Try to keep the valves down.
-
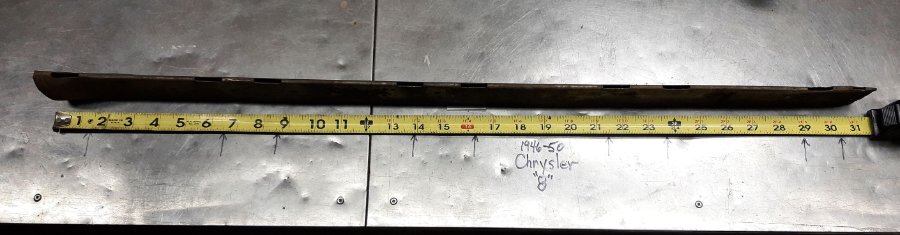
Here is a picture of a tube out of a 1946-50 eight with mrasurements to the center line of each cooling slot...the arrows point to each exact measurement center line.
-
I could go out and take a picture of mine...but I am positve the screws are right behind the arm rest flap door....possibly hidden under the folded/glued over upholstry trimmings.
-
On that spacer block...the wider portions of the oval face each end of the axle shafts that go through the axle shaft gears. Reason being so it leaves room to shim the axles in/out for end play adjustments.
-
On my 1948 C39 T&C ...under the arm rest door there are two slotted round head screws attaching the arm rest to the door. The two screws are there.
-
Colder parts of the country used two stapled together asbestos choke base gaskets to promote longer choke plate opening. Standard moderate climate areas was one gasket.
-
Tomorrow I can post a picture of an original factory water tube if you like?
-
Brake master cylinder part number?
Dodgeb4ya replied to Dunkin's topic in Mopar Flathead Truck Forum
Your truck has a 1-1/2" M/cyl. bore. It looks pretty ugly. I doubt it you can safely hone the deep pitting in it. I say sleeve it if new is not available...especially on a heavy truck. -
Is the exhaust manifold cracked?
-
Nice looking straight eight C49 NewYorker or Imperial! Cannot read the fender nameplate...
-
Check for run out on the carrier case with the ring gear removed. Check all mounting surfaces for any burrs... Rotate the ring gear on carrier 180 degree's on the carrier housing..might diminish the min/max backlash variation.
-
Wally...You have a nicely optioned truck. It's a really good original truck too that gets plenty of use. Glad there's a few of us into the bigger trucks who can handle driving them...which isn't difficult....actually fun driving them!?
-
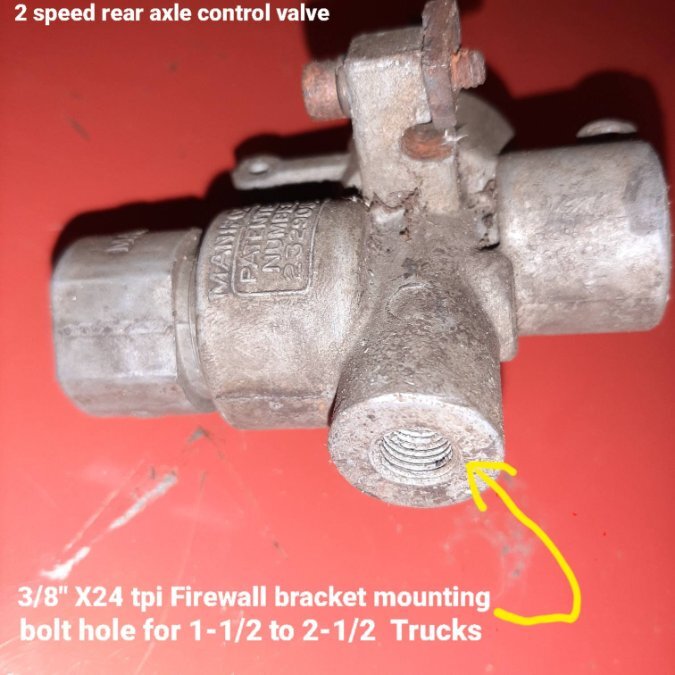
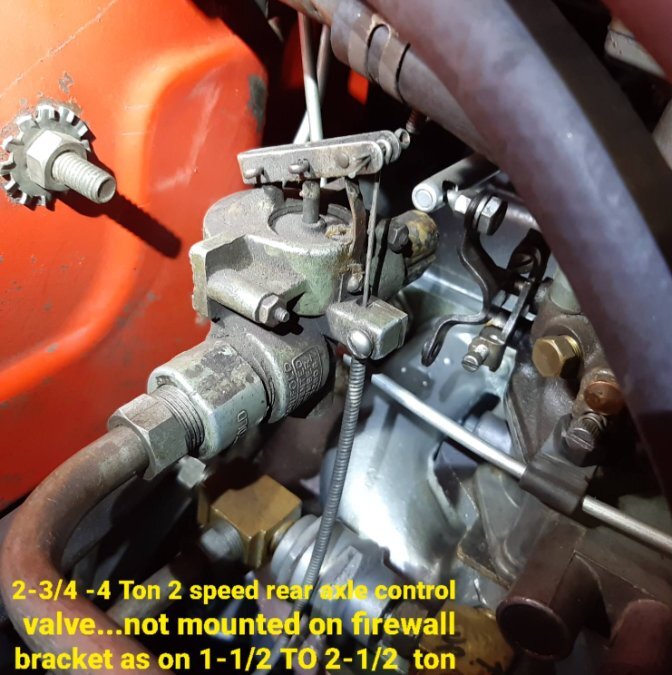
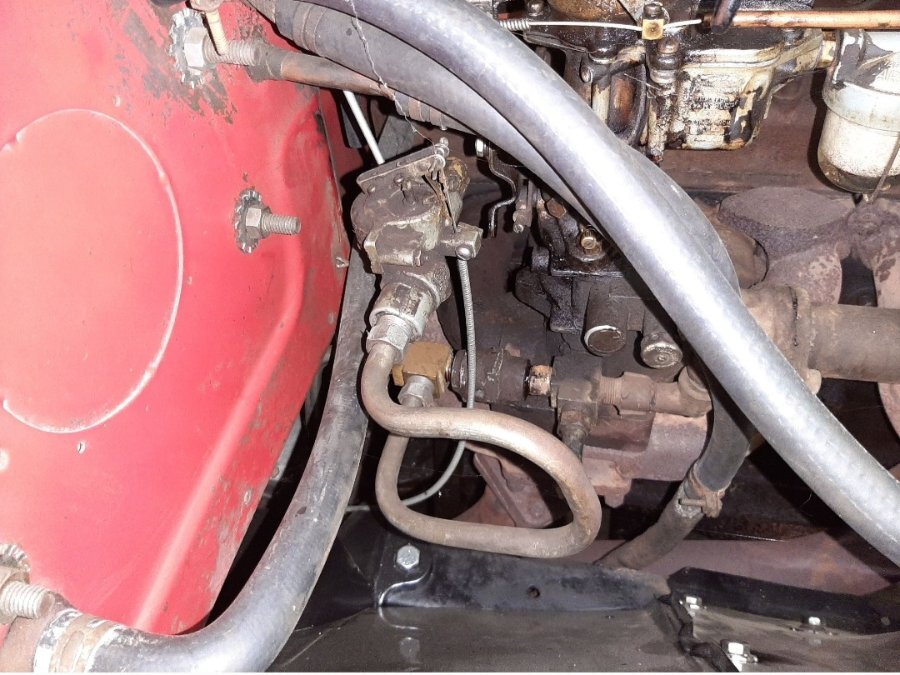
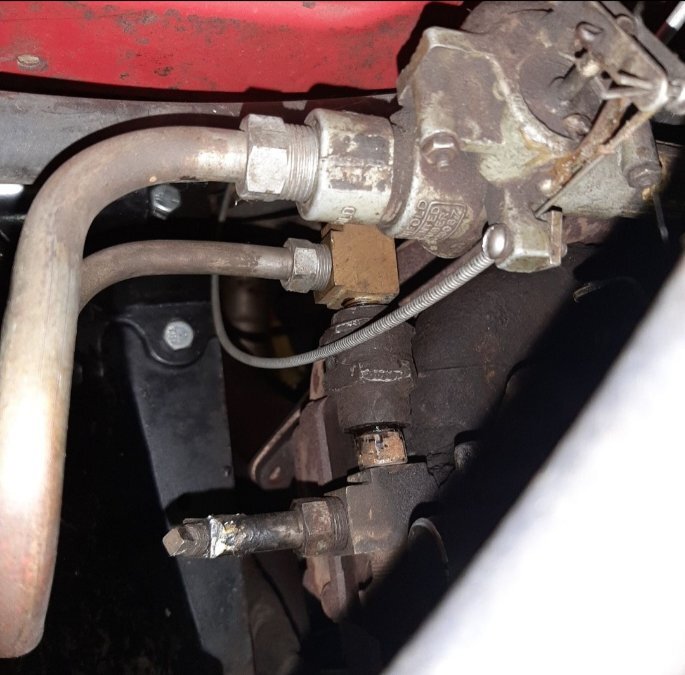
That control valve bottom hole is a 3/8" X 24 tpi bolt hole. The 1-1/2 thru 2-1/2 trucks use that bolt hole to mount the 2 speed rear axle control valve on a rubber insulated bracket to the firewall... up at the approximate height of the single carb air cleaner as used on most all 1-1/2 thru 2-1/2 ton trucks. On the bigger twin carb Moly Block 30" long engines the control valve has to be mounted down lower on rigid 1/2" tubing....not using a firewall mounting bracket. The reason is the rear carburetor is right up close to the firewall. So that lower threaded hole is not used.

-
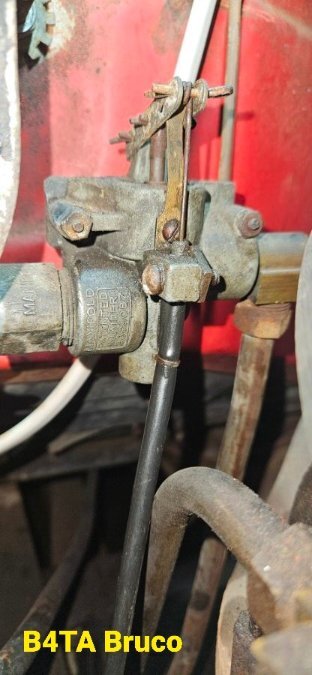
It is the factory Dodge control valve... The shift cable on yours has been changed at some point. Black vinyl covered cable ... As wallytoo said only an 1" of shift button movement up/down. Should be easy movement too...not sticky or uncomfortable to pull/push shift button.
-
NOS crank gears for straight eights are rare as hens teeth. Cam gear's same. I have only found two crank gears in over 40 years. There are two types of chains and gears. Morse and Whitney. The timing chain ...Morse or Whitney denotes which crank and cam gears are used with the timing chain. Cannot remember the differences. 695424 cam came out in the mid 30's and is used in 1939-42 eights. That's what my 1937-42 Chrysler parts book shows. I don't have the earlier parts books. 1946-50 use the higher # sold lifter cam. The "two flats" damper is used on all 1946-50 eights that I have ever worked on. Same style damper on DeSoto and some upper line Dodges. The big thick damper is similar to what I have seen on 1934/35 323/385 engine Airflow's I have worked on. Cannot say It's exactly the same though.
-
The float to up pipe pivot connection doesn't need or use a O-ring. That pivot connection is completely submerged in oil at all times. An incorrectly up/down float pick up adjustment is something to be sure is checked and adjusted if necessary.
-
Great you have the engine issue fixed! As for the 2 speedrear end... When the shift button is pushed down the rear axle should never be able to upshift. It stays in low range. Pull the button up... vacuum is sent to the rear axle shift diaphram...let off the gas for a second the axle shifts into high. If the rear axle shift diaphram gets no vacuum it cannot upshift into high range at all. So..look at **A incorrectly adjusted shift button cable that operates the control valve on the firewall.. **You need to check that the shift cable operates the control valve fully both up and down. The Control valve is on the passenger side of the firewall ** The control valve internal seat gasket could be damaged and leaking admitting vacuum to the rear axle causing un- controlled upshifts. ** Check all the vacuum lines and flex hose to the rear axle diaphram for damage cracks and vacuum leakage.. **It is possible the rubber diaphram and or spring are damaged...diaphram might have cracks or is stiff and not flexible, return spring is broken. **A quick check to be sure it can stay in low range is to disconnect the vacuum hose and plug the vacuum line to the engine...drive it. Should only stay in low range. If it still tries to upshift or make noise the diaphram spring is weak/broken or the rubber diaphram is hard and not flexible. Or bell crank/ shift collar issue. Unlikely. **There are two screws on top of the differential to adjust the shift collar bell crank inside the axle...don't mess with them until all othet avenues are exhausted.
-
There are video's of submerged arc welding of crankshafts on u-Tube.


