


DonaldSmith
-
Posts
2,475 -
Joined
-
Last visited
-
Days Won
25
Content Type
Links Directory
Profiles
Articles
Forums
Downloads
Store
Gallery
Blogs
Events
Everything posted by DonaldSmith
-
 My understanding is that the 6 to 12 volt converter doesn't care whether the 12-volt circuit is positive or negative ground, or grounded at all. The only oddity is that, if you happen to connect the 6-volt and 12-volt "Hot"wires, you will get either 6 or 18 volts, depending which way the grounding happens to be. But you will be keeping the "hot" wires apart anyway.
 -
Try lifting the door while trying to open it.
-
Some people just switch the plug wires 180 degrees. The PO did my car that way. No. 1 is at 1:00 instead of 7:00, etc. I re-did it right. You can remove the distributor, turn the shaft 180 degrees, and reinstall it. (If the oil pump is in right, No. 1 will be at either 7:00 or 1:00.)
-
No. 6 pistom comes up twice for every firing. You could be getting spark when the valves are 180 degrees out of phase. One way to make sure that a piston is at the top of the compression stroke is to have a thumb over the sparkplug hole. If cylinder No . 1, the puff against the thumb should be when the rotor is pointing to the No. 1 plug wire, or close.
-
Wanna convert 53 belvedere steering wheel to a grant steering wheel
DonaldSmith replied to Turbo53's topic in P15-D24 Forum
If the 53 is like my 47, the steering shaft is really a half-inch pipe. I modified my steering shaft for universal joints and D-shaft, to fit a power steering gear. I bought a splined plug ahd had it welded into the pipe shaft. (I also devised a brush to contact a sleeve over the shaft, to maintain the horn grounding circuit.) -
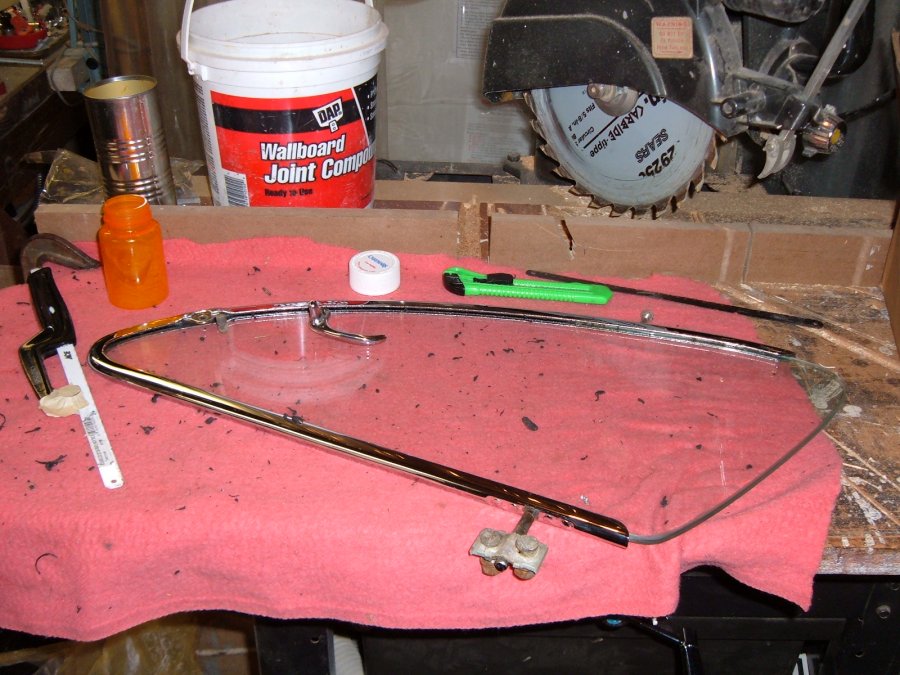
I vaguely remember doing something like that to a quarter window. How to remove the glass? Very carefully. Snapknife flush with the glass, cutting the setting stuff. Carefully prying between the edge of the glass and the channel, with a non-marring tool. Working one end, then the other . Somebody's got to chime in now, because I forgot what I used for the setting gasket, softening it with paint thinner, etc. Doable, carefully. Or take it to an auto glass shop.
-
Town sedan! Rare! Shear pin in the transmission? Maybe the guy just doesn't understand fluid couplings. And the parking brake- must use. Or keep a brick handy. No rigid connection between engine and back wheels.
-
Replacing press fit seal / Cleaning differential
DonaldSmith replied to 51_Meadowbrook's topic in P15-D24 Forum
I remember putting stainless steel strips between the seal and the pinion housing, but theseal still leaked. Thus the old seal to hold back the oil while the sealant set around the new seal. And the speedi-sleeve. One thing about the speedi-sleeve- I could have/should have ordered a deeper sleeve. I had to locate the sleeve very carefully, so that the new seal would contact only the sleeve. -
Replacing press fit seal / Cleaning differential
DonaldSmith replied to 51_Meadowbrook's topic in P15-D24 Forum
The pinion seal on myDeSoto Suburban leaked persistently, even after I replaced the seal. Two problems: the outer diameter of the seal was not quite large enough, and the pinion surface was scored. (I was able to readily get a seal with the proper inner diameter, but not the outer diameter.) I bought and installed a Speedi-Sleeve on the pinion shaft, which took care of the scored surface. I figured a way to install the new seal with sealant at its perimeter to close the gap. (I had enough depth for two seals.) To keep the lubricant from dripping out while I properly cleaned the surfaces and applied sealant for the perimeter of the new seal, I cleaned the surfaces as best I could, quickly installed the old seal, properly re-cleaned the surfaces, applied the sealant, and installed the new seal. The old seal kept the lubricant at bay while the sealant set up. I hasn't leaked since. -
Just build a new countertop over the old one. Or just set a countertop on a few bricks. You can push stuff apart enough to spot a few bricks.
-
Recently I had antifreeze in the three front spark plug wells. I tightened all the hose clamps at the thermostat housing, and checked the bolts securing the housing. No leaks since. I think that antifreeze sprayed out over the engine and evaporated from the head, except at the spark plug wells.
-
Detroit Zoo train (Chrysler engine):

-
There was a small locomotive company called Plymouth. They were small, and they made small locomotives. The Detroit Zoo has a narrow-gauge railway that shuttles from one end to the other. The locomotive is modeled after the streamlined steqm locomotives of the 30's, but is powered by a Chrysler engine from the 30's.
-
Fluid Drive fluid, what is available in today's oils?
DonaldSmith replied to Bruce48D24's topic in P15-D24 Forum
Don't change the fluid drive fluid as a maintenance item. Not like motor oil and coolant. Maybe check the level, but there is a trick for that. There was a recent thread on that. Good luck finding it. (Two posts, May 16,2018) -
Your local garage must have been certified for installing automatic transmissions, but they must have missed the class on standard transmissions.
-
As with a typical standard transmission, there is a clutch disc, which as to be centered. Use a centering tool, which looks like a short broomstick, available in various diameters from car parts places, to center the disc as someone pushes down the clutch pedal. Or have someone push down the clutch pedal while moving the transmission the last inch.
-
The ground wires can touch, since they are both grounded. Keep the "live" wires apart. For a while, I ran a 12-volt fan from two 6-volt batteries, one positive ground, one negative. I got 12 volts betwen the two "live " wires. And I kept the fan circuit isolated from any grounds. I also installed a 12-volt power outlet, and could plug 12-volt accessories, including a hand-held spotlight. But I had to wrap the spotlight shell, since it was grounded. Touch metal, and I would get a 6-volt spark. (Later, I got a 6-volt fan, eliminated the 12-volt fan and second battery, and installed an inverter to provide 12 volts for garmins and cell phones.)
-
From the other Don: You can have two complete circuits, 6 volt and 12 volt, with a common ground. If the 6 volts are positive ground and the 12 volts are negative ground, you don't want to have the live ends get together, or you will have 18 volts. Similar to house wiring, where you have 220 volts for the range and dryer but separate 110 volts circuits elsewhere. The wonders of electrical engineering.
-
There's an ancient thread (2007) about me fixing the 602 radio in my 47 SeSoto. The vibrator has moving points that provide an interrupted primary current to the radio transformer, which produces the high voltage (~200 volts) for the electronics in the vacuum tubes. I was able to shock the vibrator back to life by applying alternating current to it. I connected the vibrator in series with a 60 watt light bulb, and intermittently applied 120 volts to the circuit. The alternating current moved the points, and burned them clean. (Warning - house voltage!) I also replaced the condensers (Capacitors). Search Nostalgia Air and Antique Radio. Search 6 volt radio vibrator. Good luck.
-
R200, etc. ... Made in Sermany? Where's that?
-
Miss Daisey's Cadillac morphs from a 55 to a 56 and back. The 55 has the exhaust outlet at the bottom of the bumper end. The 56 has the fender protruding as fitting over the exhaust pipe, and the outlet is oval, at the top of the bumper end.
-
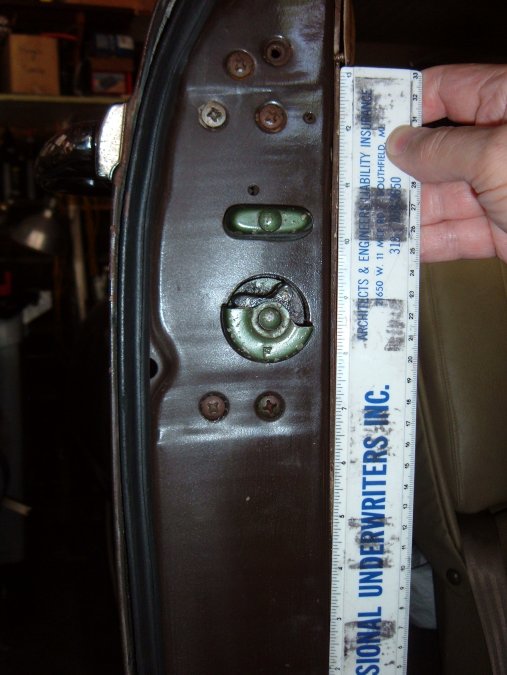
There is a setscrew accessible by pushing the weatherstrip aside. See the little bump at the weatherstrkp in the photo below. (The screw is a real bear to remove if rusted. Maybe your screw is loose or missing.)
-
It'll buff out? How many of us are tempted to restore this here bidness coupe? Find some rare doors, rare rear glass, etc? Maybe just a mind game? No, I guess some cars are doomed to be parts cars.
-
Are we talking those flip-out turn signal indicators that used to be common in Europe? I remember a recent photo of a Chrysler that had some sort of light by the rear quarter window.
-
I've got the momentary on-off-on switch setup. We're re-plowing the same field. We covered this in a recent thread, but I searched for it and couldn't find it. There must be a trick to have it search "oil safety switch" and not hit every post that has the word "switch" in it.


