


DonaldSmith
-
Posts
2,481 -
Joined
-
Last visited
-
Days Won
25
Content Type
Links Directory
Profiles
Articles
Forums
Downloads
Store
Gallery
Blogs
Events
Everything posted by DonaldSmith
-
Last year I removed the starter on my 47 DeSoto, to replumb the oil filter lines. No way of getting a typical wrench on the upper bolt. I couldn't use a standard socket because the end of the starter is narrower than the body, interfering with a socket extension. An open-end crowsfoot would not stay on the bolt. So I ordered a crowsfoot from Grainger with a 12-point box end. A bit-ch, but it worked. I also supported the starter with a rope sling. We old folks need all the help we can devise.
starterhoisted.JPG.570a1de6afbb8dfad600cc941abcec13.JPG)
-
We had a beater of a Taurus for our daughter to drive. It was grey with a red interior. Grey on the outside and red on the inside. She called it the Armadillo.
-
If by Fluid Drive you mean the semi-automatic transmission with the fluid coupling, the carburetor needs a kickdown switch to downshift, and an anti-stall gizmo. At some point, Dodges had the fluid coupling with a conventional 3-speed manual transmission. Then they went semni-auto. I think Stromberg vs Carter depended where the engine was assembled, a Dodge plant vs a DeSoto plant, Detroit vs west cast. Just my guess.
-
Big Brown car, 2024 update - all growed up:
-
Simple starter installation: Step 1. Remove engine. Step 2. Install starter. Step 3. Reinstall engine. Am I missing some steps?
-
On my 47 DeSoto, the tie rods connect to the pitman arm with this odd fitting, with resilient sleeves, to provide some vibration isolation, versus Plymouth's resilient-mounted steering box. At one point I installed some Steele rubber sleeves, which deteriorated. So I cut some copper and plastic pipe pieces, cobbled some washers, etc., and made it work.
andtierods-Copy.JPG.8ee571f7b9b8529dec2242e1781783be.JPG)
-Copy.jpg.ececfdbe99e74fe412dba12304e4cf8a.jpg)
-

Question about Carb Lockout Assembly (for transmission)
DonaldSmith replied to joecoozie's topic in P15-D24 Forum
What do you mean "lock-out"? Is this for an overdrive, or for a semi-automatic transmission? I looked at the wiring diagrams for the M-5 and M-6 semi-automatic transmissions. Each diagram shows two devices at the carburetor, an anti-stall control at the top of the carb, and a kick-down switch near the base. The M-5 has one wire to each device; the M-6 has two. I would guess that the same carb would work for either transmission.- 1 reply
-
- 1
-

-
When I put in my PCV system, I followed instructions from somewhere in the forum. I plugged up the oil filler cap, and ran a tube from the oil filler tube to the air cleaner, to supply filtered air to the crankcase.
-
I presume that these are all right-hand threads.
-
Picky, picky, picky.
-
Flat head, flathead, I get it. Even this early in the morning. I do have sort of a flat spot on the back of my head. Maybe I was meant to have my flathead DeSoto.
-
My vintage car insurance won't allow me to haul a trailer. For the low cost of the insurance, I can live with the restriction.
-
"Big Brown Car" So named by my grandson Jakob, about 20 years ago. He just graduated from college, for a career in the film industry. Granddaughter Samantha ("Sammy") has graduated and is completing her student teaching.

-
Ditto to Merle Coggins' post. Dummy me had the points in wrong. so that the spring was not operative. Running well at idle and slow revs, but flattening out at mid revs. Of course, I had been working on carb issues so the carb got the blame.
-
Why oh why? -does the driver in front of me stop two car lengths behind the car in front of (him)(her)(them)? (or other acceptable pronoun) Maybe the driver wants to have room to change mind and change lanes. Maybe there is a sense of accomplishment, to inch forward occasionally, while waiting for the traffic light to change. And everyone in the line can inch forward occasionally. Maybe it doesn't usually matter. But there are situations where some poor soul way back there, at the back of the line, is trying to maneuver into line, to stop blocking someone else. If only those in line would move forward a little. Wait. There are all taking turns inching forward. Patience, patience. Many drivers are oblivious to those behind them. (Plural pronoun, always acceptable) Spare us from the oblivious. Oh wait! Someone behind me honked. Sorry, I was daydreaming.
-
I've been doing it wrong all these years. I've been putting in Spring and Fall air in the tires, Spring in the fronts and Fall in the rears. And the spare is a mix.
-
Anyone come here from FaceBook recommendation?
DonaldSmith replied to Eneto-55's topic in Off Topic (OT)
I've been on P-D for years. I heard about if from a pony express rider. -
This adventurousness, driving about to see the eclipse-distracted, or wandering through a riot, seems like when I find myself driving through a snowstorm. I tell my wife that I was going out to see what sort of an idiot would drive around in conditions like this.
-
I found photos of my carb rebuild. The tool that I had sent away for did not fit. I found that I had a screwdriver whose blade was jus wide enough to unscrew the tube. X X Just happened to have a screwdriver... This photo is titled "wrong tool". "
wrongtool.JPG.5abe32add6db9a5bcab47611ee9c7ad8.JPG)
screwdriver.JPG.9f1a52c9107f4a4bf62e5f7b36a4eef6.JPG)
-
Easter - maybe that will motivate me. We have had a few months of no snow, no salt on the roads, and mild weather. But I haven't touched the DeSoto, which is still asleep in the garage, with the battery tender tending the battery. Come on, Don, you're not that old. Maybe these photos will inspire me.
-
Whenever I try to type "Ratio", it comes out "Ration". Ratio Ratio Ration?
-
I notice that my Desoto dash has the instrument cluster the same size and shape as the glovebox door. I've seen photos of a RHD DeSoto. Shazam! Clever! Photos? I'm just to lazy for now.
-
I had liquid around Plug No 1 and maybe #2. from time to time. It seems it would come and go. I found a sometime leak at the fitting between the radiator hose and the head. It was coolant, leaking at the bolt head and migrating to the plug well. Permatex on the gasket and bolt solved it. Disclaimer: This might not be what Desert Rat has, but I had to tell everyone about it anyway.
-
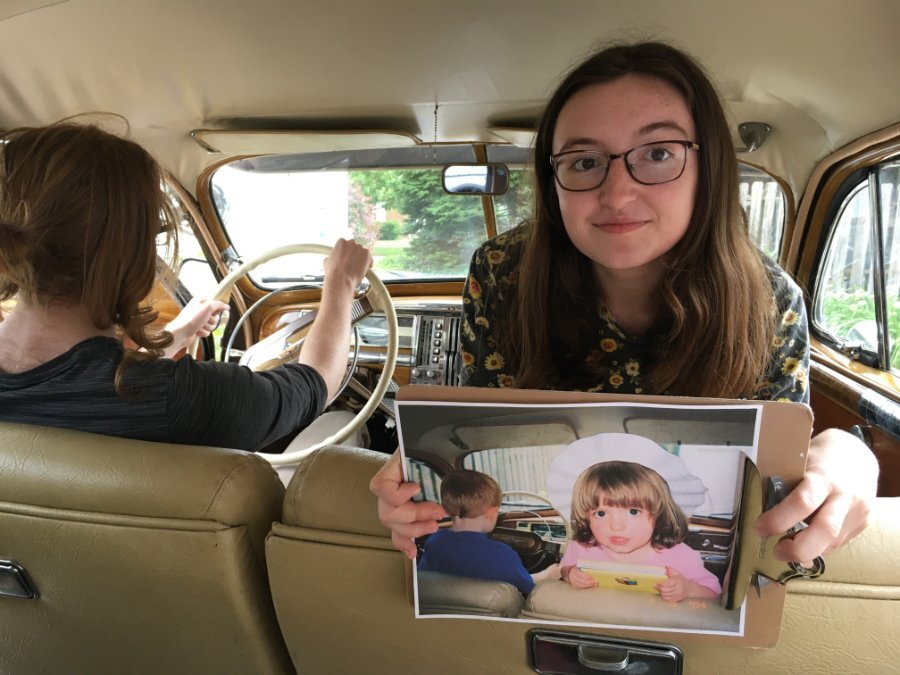
future speeders anonymous member...
DonaldSmith replied to Plymouthy Adams's topic in Off Topic (OT)
From 2004, the grandchildren. (I should get another photo these days, in their adult personas.)
-
Wow to westaus29's 1938 stretched Plymouth. Briggs made the 7-passenger body for the long wheelbase Chryslers, DeSotos and Dodges, which shared the larger body, while Plymouth had its own smaller body. Maybe today it's called a platform. I had seen a few pictures of long 1930's Plymouth sedans, and wondered if Plymouth had the same large body back then. But the 1938 Aussie was a cut and stretch job.
