


P15-D24
-
Posts
2,026 -
Joined
-
Last visited
-
Days Won
24
Content Type
Links Directory
Profiles
Articles
Forums
Downloads
Store
Gallery
Blogs
Events
Classifieds
Everything posted by P15-D24
-

Your Daily Dose Of Carnage, Delivered!
P15-D24 replied to 41/53dodges's topic in Mopar Flathead Truck Forum
+1, bad water pump will allow enough movement to hit the radiator. Usually it gives you a little warning (ting, ting, ting sound) before major failure. -
This is correct. Check the parts book.
-
Not sure, as the P15 parts book does show a pair, 684980 and 684981 with no RHD designation. That is the same number for the ones on the Dodge. I checked , the RHD is for right hand drive, but suspect maybe it means they can be used on both left and right hand drives?
-
What I did was head over to rado shack and purchased a10 ohm and 78 ohm 1/4 watt resistors. (should cost about a buck) Then hooked up each one separately to the terminal on the gauge and turned on the power. That way you can isolate the problem, gauge or sender. WIth one resistor hooked up it should read full, the other empty. If not you know you have a gauge issue, not a sender issue.
-
I like the round ones...
-
Parts book show two but for "RHD" which I assume means Right Hand Drive. None listed for left hand drive.
-
carburetor-manual.com looks like a commercial site that sells manuals.
-
Has nothing to do with this site. Sound like a phishing email.
-
Parts book doesn't show a welch plug. Look like there is a flat plate with a bolt to hold the shaft. Is the bolt tight? Maybe add some sealer on the bolt threads?
-
I have a Trico vac fan mounted in my B1. You can see it between the visors in the pic. It helps. Cracking the vent windows is good. Most of the aftermarket Arvin heaters (and others) have a defrost mode. You need to close the downward facing heater vents so the hot air is redirected into the windshield defroster tubes. I'm in the process of installing the fresh air heater (one with an air inlet at the front by the radiator) and I'm pretty sure that will fil the problem. But I will also have a towel close at hand on rainy days.
-
Use a rubber or plastic hammer.
-
Throttle return, if I remember correctly the brake return springs are more beefy. Bigger question is your throttle linkage missing the return spring?
-
Blog: Noun a personal web log, shorten to Blog. (weB LOG) A web site on which an individual or groups of users record opinions, information on a regular basis. Think of is as a public online diary or journal. Blogging: The term blogging is used as a verb to refer to the action that is performed by a person when they make a post to a web log or a blog. I think they have gained a huge amount of popularity as they are an easy way to "publish" on the web without having to know the technical details of creating web pages. Definitely not an anachronism, born in the internet age.
-
Confusion here is modern engines now use a head bolt that deforms when fully torqued and cannot be reused. Stock head bolts do not use this technology and can safely be re-used. For stock bolts it is more important to chase and clean the threads on on the block and bolt, so plan on investing in a tap and die for that job. Also make sure you have an accurate torque wrench.
-
Going to start a new blog regarding my B1 project instead of posting to the WIP page on the "About" section. Just a lot faster and easier than editing html web pages! A little history, I purchased the truck, a B1C, in early 1999 from the son of the original buyer. The truck had spent it's entire life working on a farm in the Dunbar, Nebraska area. It even came with a copy of the January, 1949 Certificate of Title! I had the truck shipped out to California and the seller had been honest about the condition so I knew I had some work ahead to get it road worthy. Carb rebuild, brake overhaul, radiator flush, tires and tune up and I was back on the road. About two weeks after putting it back into service I was coming back from a dump run and suddenly had no power to the rear axle. Tow truck home and dropped the pumpkin to get out the piece of broken axle in the third member. Probably from metal fatigue from all those years of hard work on the farm! I drove the truck as is for about six years. It did have some bigger issues I knew I would need to address in the not to distant future. Had a crack in the water jacket but stop leak seemed to keep it under control. Smoked badly and needed an overhaul. And I was having to replace the head gasket about once a year. Around 2005 I acquired a B1D parts truck, no engine but full drive line and running gear. After investing this model a bit more I decided to "upgrade" to a 1 ton, with the optional dual 20" rear wheels and a rebuild 230. This model is listed in the factory brochure as a D-116 Code 75 Like all projects life sometimes gets in the way and it is still not finished. Good news is I have all the parts, either acquired or fabricated. Now I just need to get it finished and back on the road! I be posting updates as I reach a new milestones but for a starter I will post a some pics to get your interest. More to come in the months ahead!
-

-

-
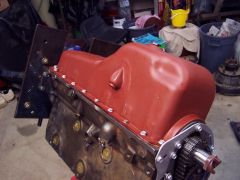
From the album: G.T.'s B1 Project Blog
Bottom end closed up. Pan has been sprayed with Zero Rust primer.© GT Koldjeski
-

-
-

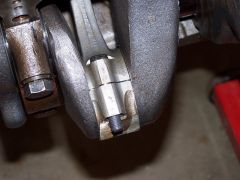
From the album: G.T.'s B1 Project Blog
Use clear tubing to protect the journals from damage by the rod bolts.© GT Koldjeski
-
Radiator shop should be able to repair.
-
The schematic for these is typically pasted inside one of the side plates of the radio.
-
Give Your Electrical System A Quick Check Up, Watch Your Ammeter!
P15-D24 posted a blog entry in P15-D24's Website Blog
One of the quickest ways to get a quick health check on your electrical system is watch your ammeter! It will tell you all kinds of valuable information if you know how to read it! Most modern cars now use a voltmeter to provide limited information about your electrical system. Or even worse just a warning light to let you know your alternator has failed. Because voltmeters are now the norm the skill of interpreting the information the ammeter provides is becoming a lost art. Let’s walk through a driving sequence to understand what the ammeter will reveal about your electrical system. Entering the car your the ammeter should be reading "0", straight up. You may see a quick defection to the minus side if your have an interior light that comes on with opening the door. It's at "0" because you are not using any or generating any current (engine is not running). When you turn on the ignition you will see the needle move slightly to the minus (discharge) side indicating a discharge of a couple amps. This means your ignition system is getting power. When you hit the starter the ammeter will deflect sharply to the left (minus 20-30 amps) as the starter spins. The energy for the starter is being drawn straight from the battery. As the engine fires the ammeter will quickly move to the plus side (charging) of the gauge in the 20-30 amp range. The energy that was drawn down from the battery while starting is quickly being replaced by charging current from the generator. As you start driving the voltage regulator will manage the amount of charge needed to go back into the battery. After around five minutes of driving typically the battery will start to approaches full charge and you will see a reduction of charge rate down to 1-3 amps on the plus side. At this point the battery has fully recovered from the starter discharge and now the generator is putting out only enough current to maintain the charge. The voltage regulator manages the on-going charge rate. While your driving night time is coming and it is getting cooler. You turn on your headlights and start up the heater fan. Immediately you see the needle momentarily jump to the minus side, then come back to 1-3 amps on the charge side as the regulator manages the generator output to meet the increased demand. As you come to a stop sign and the engine speed drops, the ammeter will move sharply to the minus side, often 15-20 amps down. You notice the lights dim and the heater motor may slow. Right now your generator is not creating enough power to offset the increased load of the headlight and heater motor and is drawing backup power from the battery. This lack of sufficient power generation can fully discharge a battery if allowed to go for a long period. The short stop at the stoplight however, is not harmful. In fact, you can always bump the manual throttle to bring the idle up enough to stop the discharge. As soon as you accelerate from the stop the generator will again start generating sufficient current to replenish the energy pulled from the battery (expect a jump to 5-10 amps charge for a short period) before settling back to a trickle charge of a couple amps while driving. So how can you use if for some basic troubleshooting? When you first get in and step on the break pedal, the ammeter should deflect slightly to discharge as the brake lamp lights. This lets you know the battery has some charge. No deflection? Battery is probably dead or disconnected. Also when you turn on the key if you don't see a slight discharge indication your ignition is probably not connected or functional. If when turning on the key and immediate your have a full discharge (minus 35 amps) you have a dead short that needs to be repaired. Immediately turn off the key and begin trouble shooting to find the electrical short. Otherwise you risk the very real danger of a wiring fire. Might start your troubleshooting at the headlight switch as they have historically been trouble spots due to corrosion resistance in the connectors. If you are running and suddenly see a continuous discharge usually this indicates a voltage regulator issue. Try tapping the regulator case with a screwdriver handle to see if a relay is sticking and it starts charging again. On teh other hand if you see a continuous rate of high charge (> 20 amps) that never goes down you may have a battery starting to fail (it's not taking or holding a charge) or a voltage regulator failing. Either way it's time to troubleshoot the generator and regulator charging circuit. By watching the action of your ammeter your can easily tell if your electrical system is functioning correctly. It will tell you if you have a short, your battery is full charged, how fast it is charging and how much current your are consuming while driving. Compared to a voltmeter which simply gives system voltage, ammeters allow you active monitor your electrical system. Share what on the road lessons have you learned by paying attention to your ammeter!- 7 comments
-
- 6
-

-
- Generator
- Electrical System
- (and 1 more)
-
Excellent!