steve3050
-
Posts
31 -
Joined
-
Last visited
1 Follower

-
Thanks for all the help. In the next few days I hope to get the hoses on and get them sealed using annealed copper washers. I'll post on how it turns out.
-
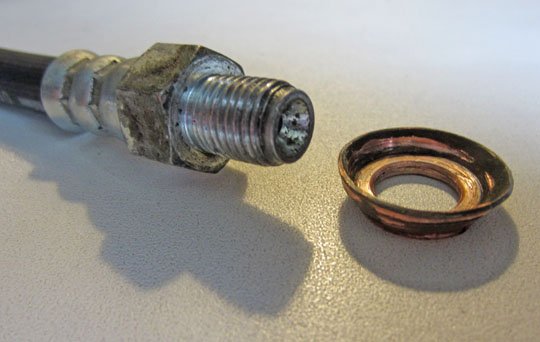
I am replacing front brake hoses and cylinders in my 53 Plymouth. I am unclear about whether to use a copper washer under the fitting that goes into the brake cylinder. The photo shows the old hose and the copper washer that was on it. The copper washer was pulled partly into the hole in the backing plate, and the washer was distorted as shown. I have seen the term banjo fitting but do not know if that is what the 53 has. I've done some online information on these hoses on '50's cars, but I need to know what 53 Plymouth used. Thanks for any help on this subject. I don't want to make a mistake with brakes!
-
Where did you find the Airtex 73201 pump? I checked Rock Auto and NAPA. Vintage Power Wagons lists a more expensive pump, brand unknown at this point.
-
Thanks to all. There are differences between model years, of course... I was just told by a 53 owner that the dimmer switch and wiring are definitely reachable from underneath the car. So the odd sheet metal work blanked off my access. The last time I turned on the headlights, the switch worked briefly on each position. Then it wouldn't. So I'll put it all back together and try the switch a few more times. The headlight relay is a great idea, too.
-
The car is already up on jackstands. I see the two mounting screws on the floorboard. In the past, extensive body work was done in the cowl and floor pan areas, and when the work was done, maybe the access to the dimmer switch may have been closed off. Thanks for the replies.
-
The headlight dimmer switch (high beam switch) in the floor of my 53 does not allow the headlights to be on at one of the two switch positions. I want to change the dimmer switch, but I can’t get access to it. I have taken out the bolts holding the driver’s side inner fender panel. I can’t see how to remove the panel, and after further looking, it doesn’t seem that having the panel out would make any difference. Basically I’m asking how to get access to the switch, on a 53.
-
I have a 53 Plymouth Hy-Drive car. I had the carb rebuilt about 2 years ago but did not have the car ready for any driving for some time. The dashpot is part of the carb housing, with no wiring involved. It does not prevent stalling when the throttle is opened when in gear, then let off. This is with a warmed up engine. It still stalls although the adjusting screw was turned out. I removed the top of the carb and found all was clean in there, and the leather plunger from the dashpot looked new from the rebuild. The only thing I found was that the dashpot linkage seemed slightly bent and was hanging up. So I freed that. It still does not work any better. It seems that the downward movement of the plunger us supposed to slow the shutting of the throttle. What causes the plunger to move upward in the first place?
-
I have a fuel system with a 5/16 line from the fuel pump to the tank, which I believe is normal. I recently purchased a new flex hose that leads to the pump, as there was none on the car. The hose is marked 1/4 and the I.D. is visibly smaller than the I.D. of the fuel line. The supplier says this is the only size they sell and it does the job. Is there such a thing as a 5/16 flex line for our cars?
-
I am replacing the fuel line on a 53 convertible, and I'm stuck for one answer. I am unsure of the correct routing of the fuel line in one particular section. It would be a great help to have a description, diagram, or photo of the route the line takes from the steering box area around to the end, at the fuel pump flex line. I can see a couple of possible ways to go, and I want to choose the right one. I would think any 53 or 54 body style would have the same fuel line pathway.
-
I'm working on a 1954 218 engine. The head bolts have rust and sealant that would need to be cleaned off, so I ordered a new set from Bernbaum. The old bolts from the engine have a hex head for an 11/16 wrench. The replacement bolts have 1/2" heads. The heads look quite different, but otherwise they are the same thread and length.There is no point asking the supplier about it, since these new bolts look like they would work. I can always return them. I'm just curious what year Plymouth engines used these bolts with the smaller, 1/2" hex heads.
-
The Plymouth Owners Club judging information for 1954 says that the last 218 engine was P25* 243000 and the first 230 engine was P25* 243001. This changeover happened at the same time that Hy-Drive transmission option was phased out and the Powerflite came in.
-
Just to bring this particular phase of the engine work to a close...I was finally able to remove the #4 conn rod cap with a lot of trouble. Apparently someone lost the correct split washers and used 3/8 flat washers of soft steel. When the nuts were tightened to 50 ft. lbs. the washers flattened and got an extremely tight grip on the bolts. I was able to tap one bolt up about 1/4 inch and tap it down again. This allowed me to get a small Vise-Grip on the washer and literally screw it off the bolt leaving threads on the ID of the washer. I couldn't move the other bolt, so I had to carefully drill two 3/32 holes through the washer, finishing with an end mill in the electric drill so I wouldn't mark the cap with the point of the twist drill. This weakened the washer's hold on the bolt enough that I was able to tap it upward and remove the washer. The next step is to get all the piston and rod assemblies out and look for a twisted rod or loose piston pin. Thanks to all for the advice.
-
I removed the #6 conn rod cap easily. Then I went back to trying to remove the #4 cap, but still no luck. The lock washers are firmly stuck in the recesses in the cap, and this appears to be the problem. The only thing I can think of is to tap harder on the bolts, to move them up 1/4 inch or so. Maybe that would dislodge the washers. I would use something softer than steel as a cushion. But I would like to know if I am in danger of breaking the cap or damaging the crank. I turned the engine over two revolutions by hand, before I took off the #6 cap, and that did not loosen the #4 cap.
-
I was able to remove conn rod bearing #3 using the advice given. Thanks. I used Plastigage on the bearing. I took a photo but do not know how to upload it from my desktop as an attachment to this post. The clearance is .002" based on how I read it. I measured the journal with a dial caliper and it read 2.053". The car came with some invoices, one of which was a Bernbaum order form with the owner's credit card number on it. So I think it was an actual order. It included a set of .010 conn rod bearings. I will move on to check the #4 conn rod bearing—the cap didn't come loose on my first try. I thought that the #4 was where the noise was coming from, based on taking off the plug wires one at a time and trying to duplicate the noise. I read a post from this forum about turning over the engine with a wrench and looking for loose piston pins. Maybe I'll do that next.
-
I rotated the crank so that the #3 and #4 throws were down all the way. Then I removed the conn rod cap nuts from #4 and saw no lock washers. Thought the cap would come off easily but it did not budge. So I took off the nuts from #3 and a lock washer came off with each nut. So I finally get it. The washers are there, just stuck on the bolt with the #4. Next question is, what kind of persuasion do you use to get the cap off? I intend to measure the clearance on one bearing, coat with assembly lube, bolt up the cap, and do the next one. I'm doing this with the engine in the car.