


keithb7
-
Posts
3,347 -
Joined
-
Last visited
-
Days Won
188
Content Type
Links Directory
Profiles
Articles
Forums
Downloads
Store
Gallery
Blogs
Events
Classifieds
Everything posted by keithb7
-
Junk is what I found. Waste of time buying these 6V LED's. They would not return my emails.
-
I think the speedi-sleeve install was a success. I removed the flanged lip on one end of the sleeve. I didn’t like how it would have set in the base of the pulley. There is lip machined in the pulley base. @Sniper ‘s part number seemed perfect. As recommended by a friend, I did heat the speedi-sleeve up to about 350C in my oven. Momma was raising her eyebrows but said nothing. I put the pulley in the freezer for about an hour. All went together pretty easily. I did struggle a little bit to get the flange off the speedi-sleeve. But I got it.

-
Yup. I’d like it too.
-
Speaking of crank pulleys. 2 large felt washers came in my engine rebuild gasket kit. I am wondering where they go? Behind front pulley maybe? A guess. I Don’t recall removing an old one when I pulled the pulley. Thx.


-
Sounds like that’s it Sniper. Thanks. I will order one.
-
This pulley is from my 1953 25” 226 engine. (Building a 237 ci) I hope to utilize a speedi-sleeve. Wondering if anyone has the sleeve part number that fits for this application? I measure about 2.1874 ish. Thanks.

-
You came to the right spot for lots love for old Mopars. We all like it too. Like it was frozen in time. As it would have been in the 50's. She does crank over well, not a typical 6V growl I'm used to hearing. Good job on the video production and discussion points. You did well pointing out most of the unique features on the old car. I tend to overlook the obvious when I do an old car walk-around video. For some reason I assume in error, people aren't too interested in plain old boring stuff. Not true. It was good to see and hear about every little detail. The little wear and tear items do indeed add to it's character. The car has stories to tell. We see it and can reminisce about simpler times.
-
Maybe see you can get their some of their parts book, before the throw them out! Soon you might be dealign with a 19 year old that has no clue if a part it not easily found in the computer. Walk in a parts store and ask for some small generic brass fittings for the oil filter line of your Dodge. If they ask what year car, I am tempted to turn around and walk out.
-

Engine Failed and Need Help With Bearing Identification
keithb7 replied to TravisL17's topic in P15-D24 Forum
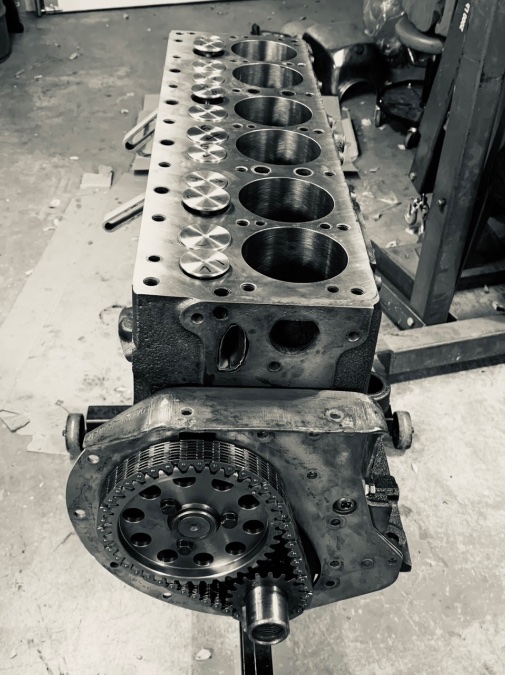
Glad to hear the updates. I too thought about doing a similar repair in my 38 Plymouth engine. Machining work is pretty pricey. I like to learn new things. I also enjoy the mental challenge. So I went for a full teardown and overhaul. I had planned to reuse the cam and tappets in my rebuild. Yet a good deal on a new NOS cam appeared. I bought it, then of course all new tappets. In the end only internal parts not replaced was the connecting rods. Pricey, yes. I sure hope I got it all right. When I fire it up I'll know! I have the same pistons you do. Also came from Vintage Powerwagons. I concur, great service. I had the incorrect head gasket supplied. They shipped one out pre-paid immediately. -
The specs are listed in Motor’s manuals. Looking at mine here dated 1957, the earliest Dodge listed is 1949. Maybe someone here has an older manual and can help you out. 1950 or so Motors manual would have it. For reference for 1949 my book reads Auto-Lite D29 & D33 IGS-4207B-1. For D30 and D34 1AP-4103A-1. I suspect these dizzys would probably work just fine in your 47. What’s the difference year to year? Changes in Centrifugal weights or spring tension for advance changes? Changes to Vacuum diaphragm spring tension?
-
@Los_Control You just wait till you see my parts washer in my next video! Here at home in our Hack Garages we do what we can, with what we have available to us. MacGuyver and Micky Mouse are not visitors in our garages. Their 2nd cousins may show up on the odd occasion. Lol.
-
Which car are you working on? Your 48 or the 58? If you have a service manual, a parts manual, and a Motors manual, you've about as good as you can get for printed instructions. Maybe start to write out a list, in order of events. Then reference each section of each book. Make notes on your list about specific pages within each book with the data you need. Get out there and look at the car when referencing the books. if you get stumped, looking at the actual car parts should help. If you are still stumped there are often You Tube videos on specific tasks. The Chrysler Master Tech series are awesome. Then you've got the support of everyone here. At some point we all just rolled up our sleeves and started digging in. Figuring it out as we go. I cannot speak specifically about your car but my '38 Plymouth was pretty easy. From memory my list of events included: Steam clean as much as possible in engine bay and up under car block up car and remove front wheels for easier access Disconnected battery Removed front seat Removed cab front floor boards Remove drive shaft Remove transmission Removed Engine hood and side panels remove radiator & fan Don't have to remove the front rad nose-cone enclosure but recommend remove all mechanical and electrical connections to the engine. Wires, oil and fuel lines ect. Throttle linkage Unbolt engine mounts These next few items are not necessary but lighten the lift load quite a bit: removed head removed starter removed generator remove intake and exhaust manifold with carb Lifted engine out with flywheel housing and clutch still attached using hydraulic hoist While on hoist removed clutch & flywheel, the bell housing Bolted engine to an engine stand Commenced with tear down. Parts bagged and labeled. I took tons of photos and videos. Saved them to my Google Images account. They are invaluable now at reassembly. It was a year ago I pulled the engine out. I tore it apart in Dec 2020. Now finally I am reassembling it this winter. Documented details I made, are key to my success a year later. I have uploaded videos to YT on my path to pulling the engine. From testing & measuring to tranny pull and engine pull, disassembly and re-assembly. I am currently reassembling my engine. I have a playlist here. https://www.youtube.com/playlist?list=PLiWbTXH-Vdq7ghZwW51oXbu2B5tdOwjl_ The list of steps and instructions on my YT playlist are incomplete because so is my engine job. I'm not done. Still a work in progress. Videos liteally get uploaded as I progress ahead. I don't cover every step in detail along the way. It takes a ton of time to record, edit & produce long detailed instructions for every step. My personal goal is to rebuild an engine, unfortunately not to produce detailed video learning aids. I like to help people out along the way within a reasonable time commitment. Giving folks some confidence to do their own work. There is little reward for making these videos except for the overall good of the hobby. Love for the old Mopars. Flathead Terry and I are along the same lines, help folks keep these old cars alive. Keith
-
I suspect when they wrote the factory service manuals, the target audience was the experienced automotive mechanic who worked at the dealership. So step by step directions were not necessary. Basic fundamentals were probably expected to be well known to the dealer mechanic.
-
Pflaming sorry to hear about your current hearing issues. Hopefully there is something that can be done. On the topic of hearing, mine has been dropping year over year. I started avoiding mandatory hearing tests at work several years ago. Tinnitus ramped up and never went away. I started thinking about hearing aides 2 years ago. A recent new office job told me it was time. Out in the field everyone is fine yelling at each other. In the office, it's quiet. Yet I was missing a fair amount of important work details. My wife was really getting tired of the results of my hearing loss. Having to repeat almost everything unless she was speaking directly across from me. I made an appointment with an audiologist. I was told my bass frequencies are great. Like new. High end frequencies are gone. I was handed set of hearing aids tuned to amplify my damaged frequencies. Wow. Amazing. I love them. Changed my world. I can hear like when I was 10 again! Over the ear type, a little clear tube goes into my ear canal. It's only been 3 weeks yet. I am adjusting nicely. I quite like the option of turning them up or down depending on what I want to hear, or not. A recent example: I was getting my snowblower ready. Single cylinder 11 HP 30" cut. She's a brute. Fired it up. It was rattling and vibrating like any single cylinder engine contraption would. Metal panels and parts zinging, pinging. Sounded almost like a bag of bolts flopping around in a pipe. I turned my hearing aids down, all the highs disappeared. At that point all I heard was the grunt of the engine. I have options! Lol. We get older. Crap happens to our bodies. I have no problem accepting that. Manmade improvements to regain our net losses, are fine by me. Now I just gotta figure out how to dial-in my Mopar addiction.
-
You know what comes from Coco leave....No pain from any illness would be felt! Lol.
-
After checking several service manuals that I have here, they were all unclear on how the plunger and spring are to be installed. These photos above here it is very clear. The spring sits in the recess of the plunger. I had to keep digging to find an image like shown above. Is there a chance your plunger and spring are not installed as shown above?
-
Think about the weight of air. Think about miles of air above us, the weight of it pushing downward. Creating atmospheric pressure. At sea level 14.7 psi natural atmospheric pressure. Sort of like having a turbo, boosting the air pressure down into our carbs and into the cylinders. A free boost assisting the pistons, sucking down this air. A little 14.7 psi boost. Then we tune our carbs so they run just right. The right amount of fuel is jetted and dial'd-in to create the best combustion and horsepower in our engines where we live and drive. Now travel up a mountain 5000 ft. The layer of heavier air above you is now 5000 feet thinner. Now you have about 12 psi. You have less free air boost. Each time the piston draws in a gulp of air, it gets less in the cylinder. Now you need less fuel to match up with the lower amount air coming into the cylinders. Your carb was tuned for sea level. Now you're running rich, cylinder air intake is down. Compression is down probably down too. Suddenly your horsepower is down. Fuel injected vehicles can compensate pretty well. Carbs cannot. 4 strokes are less sensitive to elevation changes than 2 stroke engines. 2-strokes really run like crap when you run them at these various altitudes with the same jetting (air/fuel ratio). You lean out 2 strokes to go higher in elevation. If you come back down to sea level and forget to re-jet, the two-stroke seizes the engine. Too much air, not enough gas/fuel mixture. Runs hot! Bet performance ever! Briefly, then the engine seizes! One time I was in the mountains of Peru. 13,000 feet up. My head spun at every movement. My body ached in spots. Tingling. My heart pounding & chest burning after climbing a simple set of Inca steps. 8.29 psi approximately. Less oxygen in every gulp that I took. The vehicles still drove. The lamas still grazed. Yet I was feeling it. Big time. Wait! Now I know why the special crown & pinion gear sets are listed for specific flathead era Mopar cars sent to Bolivia. 4.89 or something crazy like that. They needed it to work at those elevations and climb hills! Power was probably lacking.
-

-
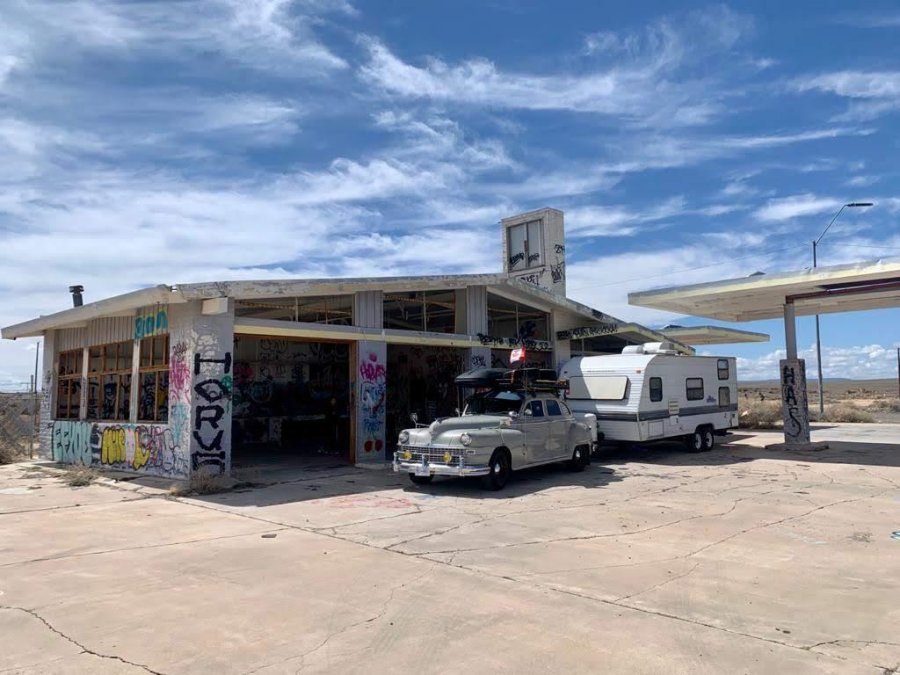
My friend went all-out with this New Yorker. Straight 8. Have a look at his load. He took his family from BC Canada, on a long tour. Camping. I think they made in into New Mexico and had to turn around when the pandemic broke out. 2019. Pretty brave in a 1948 car in my opinion, but hey to each their own. He did say speeds were pretty bad on hill climbs. Mountain passes. If I recall down into the 20-25 mph range. Hugging the shoulder. You can read all about his story here: https://forums.aaca.org/topic/285532-1948-new-yorker-2-year-road-trip/
-
Agree with Sniper. Sounds like a vacuum whoosh. Shut down the engine. Take your oil bath filter off. Ensure choke is wide open. Look down carb Venturi with a flashlight. cycle the throttle linkage wide open a couple times fairly briskly. Observe a raw stream of fuel squirting into the Venturi. If not, you may have a carb accelerator pump issue. Leather cups wear out and don’t like to push fuel. Do you experience a brief stumble when you drive the car, at initial acceleration? You can witness this pump action in my video here:
-
I thought about reporting this malice. Lol. I like to think I carry minimal too. However recently I really could have used some safety triangles. Flirting with Disaster Molley Hatchet said. A fire extinguisher is a must for me too. After climbing the big hill home earlier this year. Raw fuel spewing out every carb orifice, all over the super heated exhaust manifold. I figure I was 5 degrees from spontaneous combustion. Ever since then I keep a good sized extinguisher in the trunk.
-
That’s quite an entrance! Great car. Welcome to our group. Arguably the best place in the world for everything related to flathead era Mopars. You’re gonna love it here.
-
A simple cheap multi-tool that I toss in the glove box has gotten me home at least a couple of times. Collapsible pliers. Pocket knife. Screw drivers. All part of the one tool. It stays in the car as it easily has proven its worth. No need to buy a good one. Someone else may like it more than you.

-
I own the exact same dwell/rpm tool. To clarify, the 3rd connection, hook it to the wire from the coil that travels to the points. Clip it on to the little screw at the coil. Other 2 connections to the battery as Dodgeb4ya said. Be sure and hook up the unit (all 3 connections) before turning on the key, or firing up the engine. Otherwise Tach won’t work on your 6V system.
-
@Young Edwhat car are we looking at here? Is it missing stock running boards? What year did they drop them off the Mopar line up?


