ggdad1951 Posted December 5, 2013 Report Posted December 5, 2013 What head bolts are you using? from VPW, not correct, but also not $16 a shot Quote
Merle Coggins Posted December 5, 2013 Report Posted December 5, 2013 Hank, That "start" looking plug is actually a double square (8 point) and you should be able to use a 1/2" drive ratchet Don, I have those same head bolts on my engine. I thing mine came from Bernbaum. Quote
Don Coatney Posted December 5, 2013 Report Posted December 5, 2013 The head bolts look very good. Quote
Jeff Balazs Posted December 6, 2013 Report Posted December 6, 2013 Hank; I think the original routing is better than using the cross member behind the Ebrake. That cross member is bolted in place. If you wanted to upgrade to a T5 at some point......my guess is that you would have to pull that all apart at some point. Also I believe there is a fair amount of flex that occurs in the mid section of these frames. I think the section from the tank up onto this cross member might be an issue for hard line. And honestly I don't see any gain in going to this alternative route other than it is different. My biggest concern with the way these were originally routed occurs from the fuel pump to the carb. I really didn't like that arrangement ....even with a heat shield and a modified line routed a bit further from the exhaust manifold. I kept seeing the fuel perking away in the fuel filter ahead of the carb...after the engine had been shut off .....and after maybe 10 or 15 minutes running time. I wasn't comfortable with that condition and made changes that eliminated it. Of course I also ditched the mechanical pump and went to an electric pump back by the tank. I had a nagging oil leak at the pump and I didn't like the idea of ever getting stuck with a bad pump and having to work on it in that location while the engine was hot....or the possibility that it could dump gas directly into the crankcase. With what I have done servicing or dealing with a failure is just a whole lot simpler. And the fuel going to the carb is cool and clean. Jeff Oh yah....go ahead and run the extra ground wire to the sender......and I would leave that "star" plug alone if I were you......IMO you are just asking for trouble there. Quote
HanksB3B Posted December 13, 2013 Author Report Posted December 13, 2013 (edited) Well Folks I opted for the original factory fuel line routing and will take a few photos showing the line from gas tank to fuel pump. It took a bit of doing after the fact and there were some logistics to be overcome which I'll explain later on in this post. The fuel tank to fuel pump line is finalized, for now (until I install a heat shield and make sure the CN5 line is formed to allow for it's installation) I am using the 5/16" aluminum stage two mock-up from fuel pump to fuel filter and a 3/16" aluminum mock-up vacuum line. The real good news is short of filling the tank with gas, the truck will should be able to be started today and driveable. The 5/16" thread on the right side was stripped there was no way to drill. The space was tighter than it looks in the photo. The reaming tool could not be turned 360 deg. only wiggled back and forth. It took some patience and pressure with a steady hand to keep the tap moving the 3/8" tap in straight line one click at a time with this little ratchet The clip shown here with the 3/16 mock-up line in the background. A lock washer was added later and it tightened down right. I plan on replacing the bolt with a socket head cap screw or for those in the know..an Allen head bolt...I took other "protect at wear points" measures that I'll show later on... To be continued...have errands to do...and a five gallon gas tank to fill. Thanks for looking and TGIF to all, Hank Edited December 13, 2013 by HanksB3B Quote
1952B3b23 Posted December 17, 2013 Report Posted December 17, 2013 Very cool Hank, you did a great job with this thread! -Chris Quote
HanksB3B Posted December 18, 2013 Author Report Posted December 18, 2013 (edited) Thanks Chris. Lots of people helped me out and glad to take my turn to be of help. I plan to post pictures of the installation and hopefully add some useful information I've learned along the way. Yesterday I had issues with the gasket between the glass bowl and the body of the A/C fuel filter. When I started the truck gas sprayed from the glass bowl. I thought I could reseal it by unscrewing the bowl and re-seating the gasket and making it a bit tighter. Boy was I wrong ! I started up again and by the time I slid over to the right side of the seat, exited the truck and got around to the front, sparkplug wells #1 & #2 where filled to the ceramic part of the plug with gas. (I run with no boots and this was the first time I saw some value in having an “Ever-dry” setup. ) Did I have a Fire Extinguisher; YES. Did I have to use it, thankfully NO . The gasket that came with the filter NAPA Gold Filter 3034appears to be too soft and not as dimensionally perfect as I would like it to be. Under pressure (see pic) is appears to have “coned”. Plan “A” is to drive your truck. Plan “B” is to fix your truck. When it comes to trucks as nice as ours to work on I can’t complain. So it looks like it's back to Plan “B” (gasket hunt or fab.) . Hank Edited December 18, 2013 by HanksB3B Quote
48Dodger Posted December 18, 2013 Report Posted December 18, 2013 Loving the thread Hank.....maybe we should make it a Youtube slide video. hmmm? 48D Quote
1952B3b23 Posted December 18, 2013 Report Posted December 18, 2013 Hank, Since you have the old gasket you can measure it's dimensions. Do you know the material that the gasket is made out of? If so you might be able to go to McMaster Carr and find the same thing except in a higher durometer. If you think the problem is that it's to soft. Which it looks like it could be since you tightened it and it leaked more. That tells me that by tightening you squished more of the gasket out of the way and the seal became worse. From your pic it looks like the gasket is a square ring, essentially an o-ring with a square cross section instead of round. McMaster will have a good selection of these to chose from. They also sell a kit where you can make your own custom fit o-rings. -Chris Quote
4852dodge Posted December 18, 2013 Report Posted December 18, 2013 Try Tractor Supply if they are in your area. They have glass bowl filters in stock and may have the gasket you need. 1 Quote
ggdad1951 Posted December 18, 2013 Report Posted December 18, 2013 as in all plumbing type applications "tighter" is not necessarily "better"... Quote
Jeff Balazs Posted December 18, 2013 Report Posted December 18, 2013 Hank; I bet that got your attention. Seems to me I had a leak there when I first got my engine running. Didn't spray but it did drip. I went back to the old gasket and used a bit of permatex. It did not leak after that.......but it has since been removed. I don't suppose you have checked the output pressure from the fuel pump? There is a section on this topic in the manual. I don't have it with me but it seems to me that the pressure should be in the range of 3.5# to 5# or something like that. It did seem to me that there is a possibility that these pumps can actually exceed this amount. Spraying rather than a drip type leak might be an indication that the fuel pressure is too high.......? When you get it all back together you might want to test it by leaving the ignition off and cranking it over with the battery. Hope this helps. Jeff Quote
TodFitch Posted December 18, 2013 Report Posted December 18, 2013 Try Tractor Supply if they are in your area. They have glass bowl filters in stock and may have the gasket you need. My local better auto supply, happens to be a CarQuest, has filter bowl gaskets in stock. There are a few different sizes so you should take something along to match up. I took the glass bowl when I got a gasket for mine. Quote
HanksB3B Posted December 18, 2013 Author Report Posted December 18, 2013 (edited) Loving the thread Hank.....maybe we should make it a Youtube slide video. hmmm? 48D Tim, thanks. it's getting long enough that's for sure Hank, Since you have the old gasket you can measure it's dimensions. Do you know the material that the gasket is made out of? If so you might be able to go to McMaster Carr and find the same thing except in a higher durometer. If you think the problem is that it's to soft. Which it looks like it could be since you tightened it and it leaked more. That tells me that by tightening you squished more of the gasket out of the way and the seal became worse. From your pic it looks like the gasket is a square ring, essentially an o-ring with a square cross section instead of round. McMaster will have a good selection of these to chose from. They also sell a kit where you can make your own custom fit o-rings. -Chris I wanted to use that word "durometer" but thought "squishy" was more scientific. I always wanted a printed McMaster Carr catalog but they were next to impossible to obtain. They have everything. I think they were the originators of selling the Pentagon $200 hammers and once when I was sourcing some sintered washers, they had some for helicopters and they were $400 ea. I'm searching for my swivel cut blade that fits into a compass. If I can't find it, I may have to go to Jo'anns or Michael's both of which I consider worse than waterboarding especially this time of year. Try Tractor Supply if they are in your area. They have glass bowl filters in stock and may have the gasket you need. I think there's one on Rodeo Drive right next to Tiffany's (LA's fine but it ain't home). I will need to source back-ups when I change the filters in the future and that's a good source so thanks for reminding me. Supposed to rain...humm, Hank Edited December 18, 2013 by HanksB3B Quote
Don Coatney Posted December 18, 2013 Report Posted December 18, 2013 I just called McMaster Carr and ordered a catalog. Non available until Next year but my order is in Need help? Call (404) 346-7000,e-mail, or text 50479. Quote
HanksB3B Posted December 18, 2013 Author Report Posted December 18, 2013 as in all plumbing type applications "tighter" is not necessarily "better"... You learn something new everyday. I'll remember that" Hank; I bet that got your attention. Seems to me I had a leak there when I first got my engine running. Didn't spray but it did drip. I went back to the old gasket and used a bit of permatex. It did not leak after that.......but it has since been removed. I don't suppose you have checked the output pressure from the fuel pump? There is a section on this topic in the manual. I don't have it with me but it seems to me that the pressure should be in the range of 3.5# to 5# or something like that. It did seem to me that there is a possibility that these pumps can actually exceed this amount. Spraying rather than a drip type leak might be an indication that the fuel pressure is too high.......? When you get it all back together you might want to test it by leaving the ignition off and cranking it over with the battery. Hope this helps. Jeff Jeff does that mean you are not running the fuel filter in front of the carburetor. I ran a fuel pressure test back when the problems first started you remember the one that Fernando guessed "Conderser" it was 5lbs and my compression was all around 110 (was so glad). I think next time I fire her up it'll be with a helper on the footstarter. Thanks. My local better auto supply, happens to be a CarQuest, has filter bowl gaskets in stock. There are a few different sizes so you should take something along to match up. I took the glass bowl when I got a gasket for mine. I'll give Car Quest a call with dimensions see what I can find. All I want for Christmas is a ride in my truck, (I already know what my wife got me I'm bad I almost always figgure it out) Hank Quote
HanksB3B Posted December 18, 2013 Author Report Posted December 18, 2013 (edited) I just called McMaster Carr and ordered a catalog. Non available until Next year but my order is in Need help? Call (404) 346-7000,e-mail, or text 50479. Don, What did you have to tell them. Did you have to give a company name or justify your desire to have one? Thanks, Hank Edited December 18, 2013 by HanksB3B Quote
Jeff Balazs Posted December 18, 2013 Report Posted December 18, 2013 Hank; Well......the only things that are still original in my fuel system are the tank and the carb. I had it all as it came from the factory.....including the heat shield but when I saw the fuel percolating in that glass bowl filter this summer I felt as I could re-engineer it and do better. There were just too many negatives with the way the system was originally assembled for me. It all worked but I kept seeing potential problems and I really hate calling for a tow. What I ended up with beginning at the tank is a large sealed canister pre-filter ahead of a HD Carter electric pump. From there I used new metal line and the factory routing over to the passenger side of the radiator. At that point I have fuel injection rated hose up to another sealed canister filter mounted on the inner fender. The line between this filter and the carb is the same fuel injection type hose. I am much happier with this arrangement and will replace these hose's regularly to maintain the system integrity. I also blanked off the mechanical pump and reworked the oil bath air cleaner to accept a large K & N oiled gauze air filter. I feel this all works well together and I have more confidence in it than I did the way it was. I have a couple more things I want to mess about with like perhaps installing some sort of insulator between the carb and the manifold.....but overall it is working well. Jeff Quote
HanksB3B Posted December 18, 2013 Author Report Posted December 18, 2013 (edited) Jeff, I understand why you made your modifications and they do make sense to me. I finally settled down on the original tank to fuel pump routing. For now I have fittings and hose clamps from the termination of the hard line to the fuel pump, but will most likely pick up a bona-fide shielded flex hose I'm o.k and with my fuel pump and have a spare I rebuilt recently. I completed the fuel pump to fuel filter hard line. Before I discovered my "snow-globe of a glass bowl on my fuel pump (I think it was excess coating from my fuel tank ) my truck never had a fuel filter and ran flex hose from fuel pump to the carburetor. Things have cleaned up since then. My cleaned up fuel sending unit (you know the one with the cork in it and gas tank are installed was installed in kind with no additional ground wire. I haveb not even glanced at it to see if it is working. Achieving the original setup has not been easy and is certainly going to take a watchful eye before I'm comfortable with it. Thanks, (we'll see) Hank Edited December 18, 2013 by HanksB3B Quote
HanksB3B Posted December 19, 2013 Author Report Posted December 19, 2013 Well, it leaked or should I say seeped. In my search for a new Glass Bowl Fuel Filter (defeatest attitude) I discovered something from the "StoveBolt" forum (not sure what's it's called but it's for Chevy Trucks). It seems I am not alone in finding out that glass bowl fuel filters have special needs More to follow Hank Quote
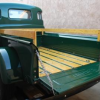
HanksB3B Posted December 19, 2013 Author Report Posted December 19, 2013 (edited) Well the good news is that everything (except the above) is working. The fuel line is installed and there are indications that my fuel gauge is getting the message from the gas tank's fuel sending unit (more on this later). While installing the fuel line with the cab and engine installed presents some problems, it is possible. If I had it to do over, I would have carefully removed the lines like in Davin's photos and fabricated new ones at the same time, stored them carefully and installed them after my frame was painted. With the flange and tube nut that connect to the flex hose new line complete and with the inner right fender removed, I started feeding the new line from the right side of the truck under the radiator support and through a loosened but not removed left side inner fender. Next with the left tire removed, the line was looped over the shock mount (the tricky part) and then loosely formed in place by first revisiting the starting point under the radiator, clamped right front, left front, then along the frame with the final bends, adding a few lengths of 3/8" i.d. hose, slipping them into place before the final flare and fitting at the tank were completed while under the truck. x Will be revisiting this section for final fitting (mostly cosmetic) There is plenty of clearance between the shock mount and inner fender even without the additional hose, Left Clip I worked for this Clip that's for sure Temporary aluminum vacuum line (works!) to be replaced with copper (doing the around the front of the head route) The CN5 copper nickel line installed Thanks for looking, Hank (very ) Edited December 19, 2013 by HanksB3B Quote
Jeff Balazs Posted December 20, 2013 Report Posted December 20, 2013 Hank; This fit up issue sort of reminds me of bad sealing surfaces I had to deal with on old Brit bikes I have worked on over the years. Just out of curiosity.......have you actually examined the top surface of the glass bowl? Maybe it needs to be trued up? Wet and dry paper and some water and elbow grease is all that it would cost you. You could then maybe use it to true up the mating surface on the housing? Jeff Quote
1952B3b23 Posted December 20, 2013 Report Posted December 20, 2013 (edited) Looks good hank. I like the look of the copper nickel line. -Chris Edited December 20, 2013 by 1952B3b23 Quote
HanksB3B Posted December 20, 2013 Author Report Posted December 20, 2013 (edited) Hank; This fit up issue sort of reminds me of bad sealing surfaces I had to deal with on old Brit bikes I have worked on over the years. Just out of curiosity.......have you actually examined the top surface of the glass bowl? Maybe it needs to be trued up? Wet and dry paper and some water and elbow grease is all that it would cost you. You could then maybe use it to true up the mating surface on the housing? Jeff Jeff (and other interested Truck Folk) that's exactly what I did. I discovered this and pasted the the procedure in post #70. Hang on till I attach the photos and you be the judge. Just started to wet sand the rim of the glass bowl The thin lines of frosted glass tell the story. Picture gas leaking up and over these ledges. Using the gasket pattern to cut 220 wet or dry paper Looks like a perfect fit The gooey part. Now to start the machining of the fuel filter body I think this is going to do it A little clean up, a gasket and I think I'm good to go. Back to Mark's statement that tighter is not necessarily better when it comes to plumbing, someone in the script of post #70 said loosen the glass bowl retainer unit it starts to leak and then snug it till it stops. Makes sense. Hoping, Hank Edited December 20, 2013 by HanksB3B Quote
Jeff Balazs Posted December 20, 2013 Report Posted December 20, 2013 Hank That is exactly what I was talking about. If the paper type gasket material doesn't do the job you might want to try rubber. Or a tiny bit of permatex on a paper type gasket. Because of where this is located you should keep a close eye on it for a while. After it has had a chance to really warm up you might want to check it to see if it percolates the fuel after you shut down. This was the "feature" of the original set up that tipped the balance for me. Well that and the need to be different. Jeff Quote

Recommended Posts
Join the conversation
You can post now and register later. If you have an account, sign in now to post with your account.