


Radarsonwheels
-
Posts
1,232 -
Joined
-
Last visited
-
Days Won
17
Content Type
Links Directory
Profiles
Articles
Forums
Downloads
Store
Gallery
Blogs
Events
Everything posted by Radarsonwheels
-
 I taped some heavy clear plastic to the door and made a pattern for the door card. I have to figure out if I’m doing them in luon or if I can figure out where to get ABS or what. I like that plastic that looks like corrugated cardboard but I don’t know where to get some. I was going to sew something up but I found this 1.5” diamond pleat vinyl on ebay. Hopefully it fits into the businesslike vintage hotrod kinda theme I’m going for and doesn’t stand out too much.
-
I put a low deck big block in mine and ‘Farmer’ did too except mine is set about 8” into the firewall which is all hand made along with the floor etc. If you do the easier job of sinking a radiator farther forward into the grill area a smallblock should fit really nicely with minimal work to the firewall. A corvette style small diameter dual diaphragm swinging power brake pedal with brackets can be had on ebay for less than $150 and the gas pedal is easily swapped for a cable style pedal. I used a lot of dodge dakota chassis for my ingredients too which made a lot of work but now drives like a modern truck. So it’s not just motor mounts and go no matter how you do it plus don’t forget the old brakes & chassis were barely good enough for flathead power. If your brakes and steering are tight and you are good with metal there’s nothing stopping you from rumbling around with v8 power. I did really love the 230 in mine though. After some reliablity upgrades it was a sweet fun reliable driver- it just didn’t steer well, stop well, and had rotten body mounts... Ok so I’m rambling but I have a million page build thread on here if you want to check it out. Bisquick has a less radical but much cleaner v8 gen1 hemi swap, and there are a bunch of beautiful factory, better than factory, and off the wall artistic restorations documented on here- lotsa good reading and talent.
-
I dropped off my new forged 1350 slip yoke and solid universal joints at Pete’s welding and driveshaft service in Trenton today. He’s going to make me a new 38.75” long shaft from 3.5” .083” DOM tubing with new steel ends. This should be way overkill, especially for such a short shaft. I also checked on my transmission parts order and added a couple small parts. I started building up the trans but didn’t get far. I installed the sprag, the rear drum & planetaries, the output shaft with governor & bearing. My parts should ship from Indiana today or tomorrow fingers crossed. While I’m waiting on trans internals but not ready to drop the old trans (planning on weds) I got a few little things done. I replaced my cracked vent window glass, dropped my smashed bent small U-joint driveshaft, and drained the ATF out of the beat trans. It was still nice and clean with only 100 miles on it I’m probably going to re-use it again. The last time I drove it the inside driver’s door handle gave up the ghost (started another thread on that & just added pics) so that was another fun detour from forward progress.

-
Door handle & latch questions
Radarsonwheels replied to Radarsonwheels's topic in Mopar Flathead Truck Forum
Ok so it’s all back together and working. I ended up using one of the extra large flathead stainless 1/4-20 machine screws in the tight spot. I flattened out the head first on the belt sander until it barely still had a slot for a big screwdriver. There is a nice access hole through the back of the bracket to install it. On the other side I put a washer and screwed a nylock nut down until it didn’t have any play but still slides freely. Then I hacksawed off the extra threads and smashed the nut a little in a vice so it hopefully can’t easily unscrew or work loose. I put on a nitrile glove and mushed a handful of axle grease all into and under all the lockwork on the latch then wiped off all the extra with a paper towel. Threading it back in past the window regulator and rear track was probably the hardest part but not too bad. It unsurprisingly works better than before now that it’s all cleaned and freshly greased and all the rivets are tightened up a little with less play.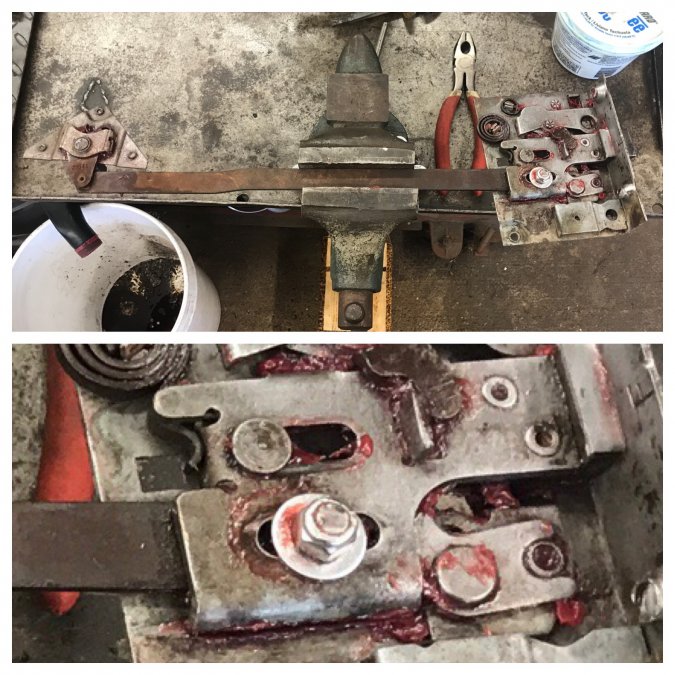
-
Door handle & latch questions
Radarsonwheels replied to Radarsonwheels's topic in Mopar Flathead Truck Forum
Ok so I managed to push back the rubber boot (escutcheon?) and tap out a pin, then the handle mechanism came free with three machine screws. It took some window up & down and some flipping, head scratching, and a little bit of pulling and stretching the door opening but now I have both internal latch mechanisms and linkage bar out and on the bench. I still need to find or make a pin to hold the linkage bar in the latch slot. Anybody been there done that before I reinvent the wheel? -
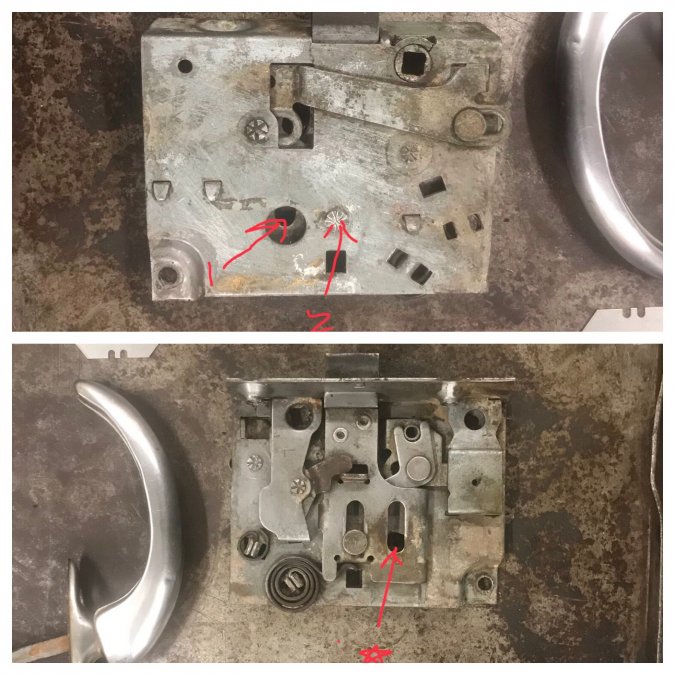
Hey fellas Last week I heard something fall in my driver’s door and wouldn’t you know it when I got where I was going the inside latch didn’t work any more. Plus my door is ‘vented’ on the bottom ? so I didn’t recover the piece. I found out today while investigating that the inside handle was still capable of locking the door, but not unlocking it! Thankfully the three screws and exterior handle that hold the latch mechanism in the door all unscrewed without a fight. It’s pretty obvious that I need a new rivet/nut&bolt to attach the inside handle linkage. I peened the rivet that holds the slider in place- marked #2 in the top pic- it was a little loose and now it’s better. Everything else looks ok in the latch mechanism. What is a good option to use for a replacement for the rivet that used to live in hole #1 top pic/*arrow bottom pic? I’m thinking button head allen/nylock but it needs to be a snug fit and stay perpendicular in the operating linkage rod and very thin headed to fit in the slider groove in the latch. Maybe a 6pt bolt with the head ground thin? I think if I pull the inside handle (how do I do that?) maybe I can do a peened rivet on the bench then reinstall as a unit but working inside the door it’d have to be nut & bolt. I want to learn to pull the handle anyway I want to make door cards and armrests soon. Also- I have no key but I do have a keyhole with a swinging cover on the passenger door. The driver’s side has none. Is it supposed to? Can I easily add one? Who makes a set with keys? Thanks!
-
Does after dinner count as tomorrow? The ‘77 case from NJ cleaned up pretty well. All the threads and sealing surfaces in it look good and the sprag race is nice and tight. I did simple green and a wirebrush scrub followed by power washing, compressed air, then hosed the steel sprag parts with wd40. Interestingly somewhere in the 9 months between the two 1977 trans cases casting dates they changed the shape of the starter area some. The good case on the left is a little thinner along the bottom edge of the bell but nice and thick along the engine block mounting surface with extra ribs in the starter area. I’ll take it. Still gotta pull the old broken trans and rob it for one fiber thrust washer, the valvebody, speedo drive and adapter, and the deep pan. I had bought a new clean large plastic drain pan/bottle to save & reuse 11 quarts of trick shift type F during the last transmission shenanigans but I didn’t think it would get used so much.

-
Ok so I got the case & tail took all the way down, power washed, and dried with compressed air. I think I might end up using the other ‘77 case I picked up in north Jersey. This one the race for the sprag was a little bit loose and the rear fitting for the trans cooler is sheared flush with the case. I can remove the brass stub with some elbow grease but a bolt in sprag isn’t an upgrade unless I go to the ‘ultimate’ sprag or similar with more rollers and steeper ramps. The other case is in the trunk of my challenger which is dropped off at the inspection station so I’m done for the day. Hopefully tomorrow I’ll have time to strip wash and inspect the NJ case when I have my car back. In the meantime I gotta go to work. Still good progress today!
-
Got my garage tightened up into a 3rd world operating room yesterday and pulled the new trans apart this morning. My fancy forged steel 1350 series trans yoke is here and I’m waiting on the matching unit for the axle pinion. I’m planning to measure and have a new driveshaft made up once the new trans is installed so I’m aiming to be back on the road in two or three weeks. I didn’t put any sta-bil in the gas tank ? I ended up just ordering a complete overhaul kit with red clutches and kolene steels along with a 4.2 kickdown lever, billet rear servo, and a high groove front drum to run 5 thinner front clutches instead of the stock 3 in my non HD unit. The overhaul kit is only $150- seems all the money in a built trans is in the labor until you start putting in steel drums and upgraded sprags. I’m going to re-use my modded valvebody and not much else from the blown trans. I’m looking at blocking my part throttle kickdown function (passing gear not needed with the big motor) and defeating the late model controlled load front servo for faster band release.

-
So of course be careful but my ox/a torch gets used soo much now that I made a rolling cart for it. I like it because I can quickly get a LOT of heat in a very small area with a small tip on it. I’m also the guy that would wave a stuck pickle jar lid over my gas range in the kitchen a couple times like how you can wave a finger through a candle flame instead of waiting for the water to get hot out of the faucet. You can’t tell some people to do that they will get burnt, crack the pickle jar, slip on the brine, get impaled on the shards, and sue the gas company. I think you could make it work. if you have ox/a or even a little mapp setup I bet it would tap right off. Or even put some tension on it with your puller and warm it up some. Good luck!
-
Thanks Bisquik! It was a daily for a couple years till I decided I needed AC. I rebuilt the 318 last year- fresh swirl port heads, 650 eddie carb, headers, intake, rv cam. All spurred on by intermittent low oil pressure. Turned out some genius replaced a failed plastic tooth silent timing chain with a double roller but didn’t drop the pan. The pickup was full of kibbles & bits. That’s ok though it’s much better now. I couldn’t stand the suspense and pulled the pan off the new 727 core. The pan was crusty and full of crud but not a ton of friction material and no rust! The internals look great and more red atf fell out than water. (Not much of either). I should be good to check the endplay, clean it up, and stuff it with my good clutch packs & guts. Hopefully the story is the same inside the tailshaft. Somebody gave it a little love at some point- it had a large brass screen filter installed and one of the valve body bolts was slightly rounded off. All of them were slightly overly tight.


-
I went on a road trip sunday to get a spare 1977 727 case and a set of mystery 727 internals with a matching tailshaft, for a case of beer. Turns out they’re heavy duty ‘65-‘70 with a 4 fiber high groove front clutch drum and 4 gear planets. My buddy had a mystery 727 that was free so I picked it up this evening. It was a gamble that paid off- score! PK4028412 1977 Chrysler passenger car 400 std. 2 barrel motor non HP Casting date Weds Dec. 1st 1976 Perfect swap for my internals out of the busted cases- '76-77 are all the same spline counts & planetary gear angles etc. '78 was 1st year lockup converter. Mine was also a '77. The only dicey thing is that the dipstick was open so it could be a flood victim. I’ll drain it and pull the pan tomorrow but my shop needs a full day of cleaning and organizing before I’m ready for transmission surgery. If it’s rusty & ruined inside I only really need the cases and output shaft which I can order if I have to.

-
Figuring out wheel offset
Radarsonwheels replied to furiousgeorge's topic in Mopar Flathead Truck Forum
I had the rusty hope kit on mine. It pushes the wheel out a little. After discovering that I actually had three different offset of wheel I ended up swapping in some cragar ‘soft 8’ black painted steel wheels with chome coffee can center caps. 15x8 with no offset, 31x12.5” tires iirc- possibly 33s in the back
-
I just got new glass cut for mine- the driver’s side has a crack and the passenger side has a bullet hole in it (!). I thought the bullet hole was pretty cool but over the years the cracked glass has started to push into the cab and not be flat any more. I want to do new seals too but the originals look like a fairly complicated piece (the front side). I’ll have to check out what robert’s and steele have and decide if I want to try to make an expensive part fit or just start with a generic piece. Mine don’t have any tension on them- the wind closes them right back up so I can’t get that good breeze angled at me. Any tips for how your all’s work? Good luck with the new setup in your truck- thanks for this thread and sorry if I’m highjacking a little! Radar
-
Agreed! Hopefully somebody will buy it and drive it around. I hate to see them tucked away and rubbed with a diaper on weekends but we need those guys too so these trucks will still be around in years to come.
-
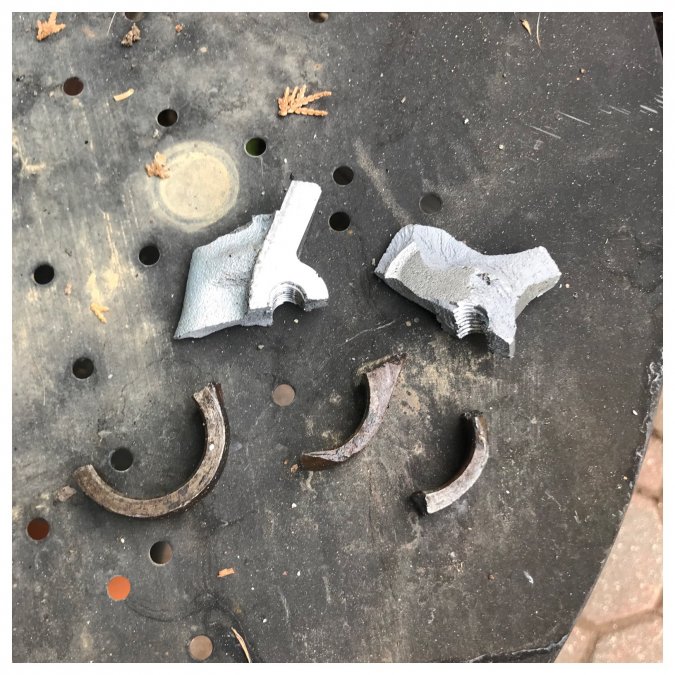
I think the grade is measured in tension not in shear? I thought grade 5 was less brittle and better for some applications since it will bend before breaking but I’m not any kind of expert. Sounds like you might have had a pot metal bolt in there! Hope it extracted easily and didn’t add a day to your thrash.
-
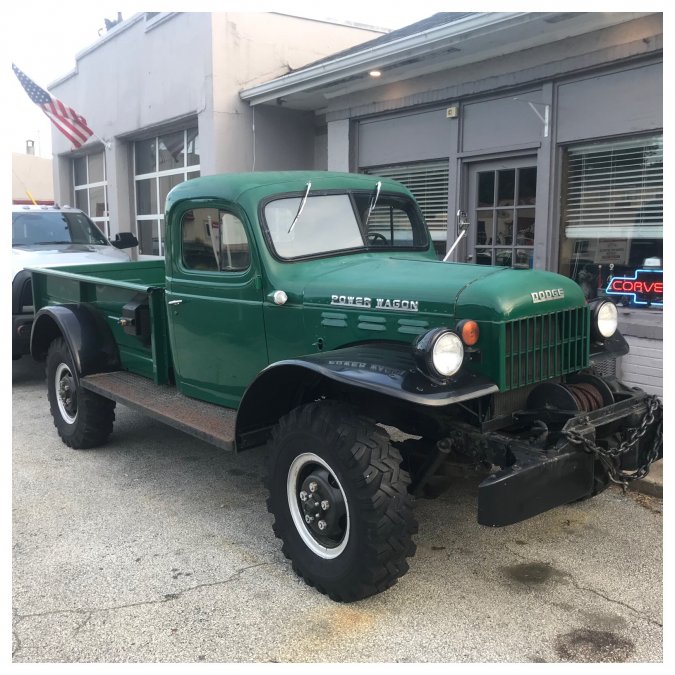
My band is playing a show in Ardmore PA tonite at the Rusty Nail on haverford road. There’s a cool truck parked next door in front of a repair shop. I’m not sure when dodge actually started making 4wd power wagons but this thing is super clean. It looks like an older restoration- the wood bed is getting real rough- but no rust and good paint. Just thought I’d share- love seeing these out in the world vs hidden away or at a car show

-
Yeah if you look at a 54 there is no center rib in the glass and tbe corners wrap. Then in 55 it wraps around so much farther that it radically changes the shape of the door. If I had a 53 with two flat planes I would have made the cab a couple inches shorter they are so easy to chop.
-
Can you bench press a transmission? Got the good beer in my fridge!
-
I have a date to drive an hour and a half Sunday to pick up a stripped 727 with most of the parts included and a complete tailshaft assembly for the same year as my broken one. A dude off moparts offered it to me for free and I had to convince him to take a case of beer for it. I have a lead on another free complete core a buddy might have in his pile, and a crusty one for probably $100 local off ebay to go look at. Things are looking good- just have to spend a whole night cleaning my garage after these last thrashes getting the body on & brakes working right. Gotta make it into an operating room to build the trans and lay out a few dissected ones.
-
Thanks for the vote of confidence Jomani! So far I ordered a billet steel slip yokes for the trans and the axle pinion and solid 1350 universals, put out feelers to all my hotrod and mopar friends looking for a new rebuildable 727 core, and scoured FB marketplace ebay and Craigslist for something within a couple hour drive. I want to find something close to my fragged 1977 trans so I will have more parts to choose from instead of hoping all the planetary gears etc are healthy in whatever core I end up with. I’m trying to learn what interchanges from what years- ‘65 back is push button stuff that won’t work for me, 71 is a big changeover, and a bunch of small stuff like planet gear angle, internal spline counts, and front drum/oil pump bushing and oiling changed around 74-76. I want to at least re-use my TF2 modded valve body. It’s a long shot but if anybody here knows where there’s a dusty 727 near philly let me know!
-
Welp I guess 525 torque off idle might not be such a good thing after all. I shredded my front driveshaft yoke apart and somehow wedged the universal or something which ripped the tailshaft off the trans, ruining both parts. Time to put some sta-bil in the gas tank and look for a new 727 core to transfer my worked valvebody and new clutches into. Luckily it was three blocks from home and a helpful neighbor pulled me home with a tow strap. I was hoping it was just a U joint broke until I walked back with kitty litter to clean up and collect my carnage off the scene of the crime and found aluminum trans case chunks along with busted yoke and a universal cap.
-
Found some power on the dyno today. Ended up with 362hp & 527tq at the wheels. It was still making hp at 5500 but bounced off the limiter. I drive mostly 1500-4500 on the street anyway. It’s not crazy horsepower but the torque is pretty flat and over 500 ft lbs almost off idle. For a street build I’m totally happy. The two curves are before and after tuning

-
The gasket on mine is the type that grabs the glass and pinch weld with rubber channels then tightens up with a locking strip worked into a groove on the front. You wouldn’t know it to look at it though- these days it looks more like an antique fishtank that is only good for a lizard terrarium because it won’t hold water despite a whole tube of silicone artfully applied by a drunk kindergartener. The glass and seal are spendy to buy all at once. I might order a seal and see if it looks like it’ll fit, then order glass or see if mine’ll buff out.
-
Dyno session got moved to Weds AM. I figured out my tuning interface issues and got my laptop to fire up and communicate with the ECU. Now I will be able to tune the timing and fuel curves in real time on the dyno. Never did that before without having to crack the float bowl on a holley a bunch of times and never was able to tune more than WOT timing on the dyno- too time consuming to mess with curving a mechanical distributor on the clock. So wierd to have a laptop on the seat of a 1954 truck to tune its 1977 engine. I pumped as much RTV into the cracks between the glass and windshield gasket as I could- can’t trap water and make rust with rubber and glass. I also threw a thin bead all around the inside and outside of the exterior windshield gasket. We’ll see if it helped next rain. I also put in a momentary switch for cranking and my key now only turns the ignition on and off. No ill effects from running all my grounds together on the disconnect.

