


Radarsonwheels
-
Posts
1,232 -
Joined
-
Last visited
-
Days Won
17
Content Type
Links Directory
Profiles
Articles
Forums
Downloads
Store
Gallery
Blogs
Events
Everything posted by Radarsonwheels
-
 I got some help for an hour and a half this morning. I got the stand for the m/c and 90% of the disconnecting done before he got here. We got the cab off clean and decided it was a bad idea to lean it on its back since the lower panels are not structural and all the weight is in the front. So we put it on some beefy jack stands where I can still get underneath to do the finishing work. The transmission is sitting right there, ripe for the plucking, and my gaskets and seals are here for it too. Taking a lunch break right now trying to rally to get more work done today. The firewall, floor, and frame are going to keep me busy for a week or two in the driveway. Hopefully I can get the engine shimmed up by the oil pan so I can pull the trans while the sun is shining and I can make noise wheeling the crane around the driveway.
-
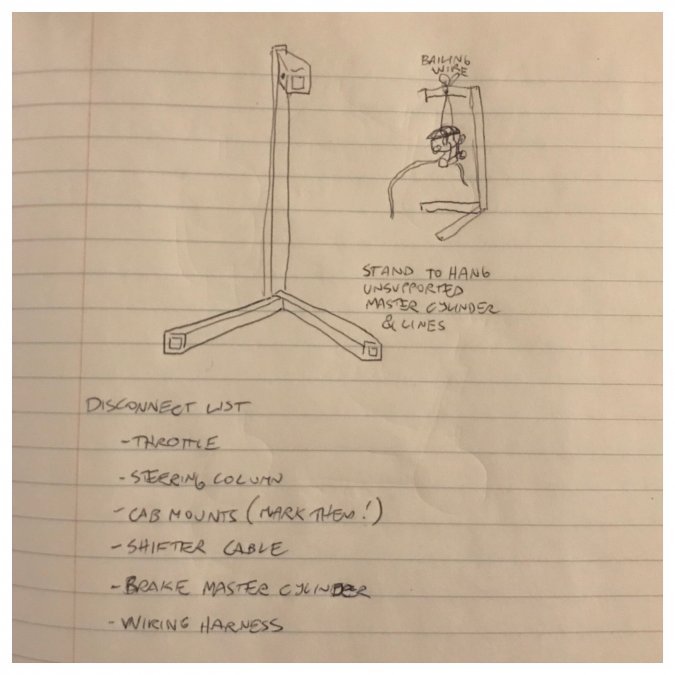
Today’s cab pulling day. I am going to make a stand to suspend my brake master cylinder so the lines don’t bend.
-
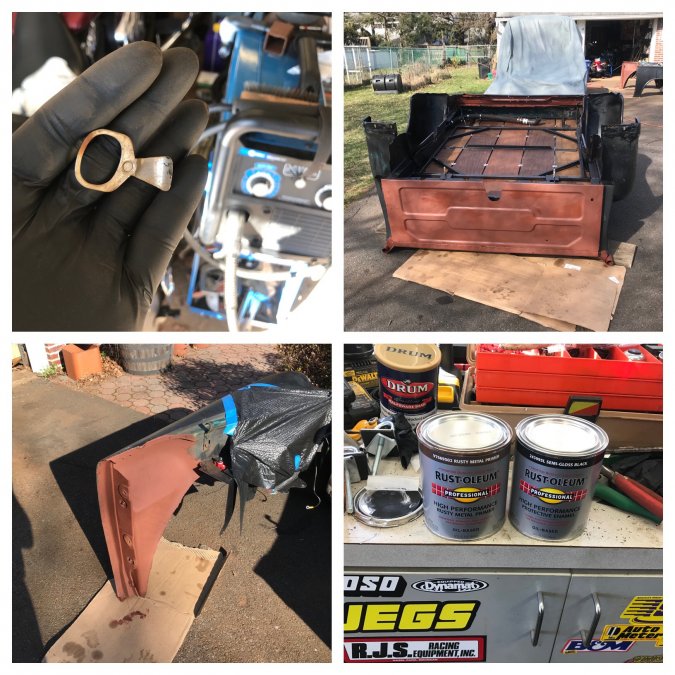
Thanks! I just brushed it on outdoors wearing nitrile gloves- no spraygun action yesterday. I did have a bandanna over my nose like a bandit during the dirt & rust removal in the tubs. It was pretty crazy I probably looked like pigpen- dirt tornado included. I would have sprayed undercoat last night if I had por15 brand but I was worried my 3M rubberized undercoating would not be simpatico with the por15 solvent or it would seal in the por so it would never dry. I put a spraycan of the 3M in each tub, spending extra time around the back to dampen thrown rocks and pebbles. I also found a handful of rivets on the rear top inside edge of the fenders (original gasket hold downs I’m guessing) that I air chiseled off so they can’t shake like moroccas. I found my first antique treasure tucked in the corner of the stake pocket area- an old pull tab from a 70’s beer! All the slamming and shaking this thing’s done I’m surprised. I got some oil based rusto ‘rusty metal’ primer and satin black oil enamel to paint the hidden areas for some longer lasting rust protection. Hopefully once she’s back together this time I won’t be pulling the bed or fenders off again for a long while. Gotta go open my shop in a bit but I hit the bed front that butts to the cab and the pocket under the tailgate with the wire cup and some oil rust primer tthis morning so it’ll be ready to topcoat tomorrow.
-
1953 Dodge - What have I got into
Radarsonwheels replied to peteandvanessa's topic in Mopar Flathead Truck Forum
Congrats that’s awesome! -
I know where there’s a really nice 230 with a 5 speed attached to it. Not up for sale but sitting in philadelphia. I bet you’d come out way ahead
-
I only used the por15 where the sun don’t shine so I think it’ll hold up fine. Still gotta do the back of the dogouse- the rears that clamp to the cab have some surface rust that needs attention before I squeeze it back together. And of course the whole bottom and front of the cab need attention. I’m thinking I can roll the cab on its back on some wood & towels with the windshield pointing at the sky and handle all that. Probably done for today though. Probably spray rubberized undercoat on the insides of the tubs tomorrow am before work if it’s gonna be sunny. That stuff also doesn’t hold up in the sun but does fine in wheelwells. My transmission seals and gaskets should be here by weds. I’m anxious to finish my undercarriage work so I can dig back into the transmission.
-
I’m thinking about getting a gallon of oil based rust treatment gloss enamel to paint the frame. There isn’t really any real rust on it but I’d hate to trap anything under regular paint. I’m thinking the stuff you’d use on wrought iron fence? I used a whole quart of por15 so far. It is spendy and it works but it’s not a miracle or the only way.
-
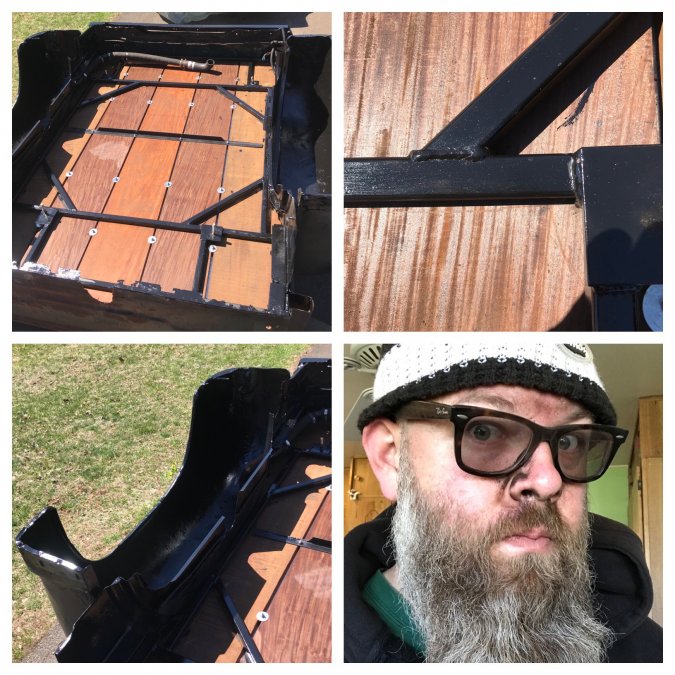
I got all the bottom joints of the bed floor frame welded in, power wirebrushed and vacuumed the whole undercarriage including inside the tubs, and painted everything with por15. And I didn’t even get dirty!
-
It sorta cleared up outside but my reinforcements came and we got busy for a bit. The doghouse came off pretty easily and the bed came off with the cherry picker on the back and a guy on each corner. It’s pretty heavy with the wood installed and the mounting bolts are going to be fun to get lined up when I re-install. I’m glad I flipped the bed on its back- now I can finish the welds on the bottom, paint the frame, and wirebrush & paint the insides of the tubs etc- it would have given years of service as it but was really 3/4 done and will last much much better with some finish work. The struts behind the tires that stabilize the rear fender lips will be easy to weld in now too. Still gotta pull the cab but that’ll be easier too now that it’s not butted almost to the bed and I have easy access to disconnect the steering wiring and oil sender. Gonna take the opportunity to paint the frame where it’s still crusty too.

-
Thanks Farmer I put my engine in the chassis with the cab on but no doghouse and cut out my firewall and floor so it would go in, then once the mounts were all done I built the firewall and floor around the driveline. In theory the motor and trans will slide right out the front- it does have plenty of room to work on the motor now but it’s tightish around the trans. It’ll feel good to have the bottoms all nicely finished and protected from the elements. I still might not pull the cab right away but since I have another set of hands on the way I’m thinking it’d be a good time to pull and upend the cab and bed. Plus I can get the whole chassis painted too. I will look over the VB but I will be surprised if the air check doesn’t sound good on the rear clutch (called the forward clutch) compared to the front (R/3rd) clutch. At least the front clutch is right there behind the pump and won’t need a lot of digging to get to like the sprag. If it stops raining I’ll get some work done in an hour or 2
-
I was amazed that Farmer’s burnout video was embedded in the forum- I have to shrink the pixels on iphone photos to upload them and his quality looked pretty good. I have been uploading clips to youtube then when you hit share and copy link and paste it here the video pops up nicely. Congratulations on break in. That thing is a jewel.
-
Here’s an even better video since it shows how I’ll be checking it through the ports in a built up transmission. The first one is more like how to check it before re-installing.
-
*not my front clutches* just a youtube clip I found. This is what I’ll be looking for when I hit the front clutch port in the trans after I pull the valve body. If it seems good I will tear apart and verify the valve body pistons and check balls. If it doesn’t apply or sounds like a hurricane I’ll have to pull it and replace the seals. Hafta try it at high air pressure and low to simulate reverse and drive fluid pressures. If it’s the seal it might look like it applies at high pressure but make a lot of noise and the return will be instant instead of a sigh. Low pressure would be just a rush of leaking air that can’t defeat the return springs. Making a lot of work for myself here but I’m actually excited to get the undercarriage nicely finished and protected- most of it was built in place and some is unpainted underneath. I am also no stranger to taking on big jobs- one step at a time it’ll get done right.
-
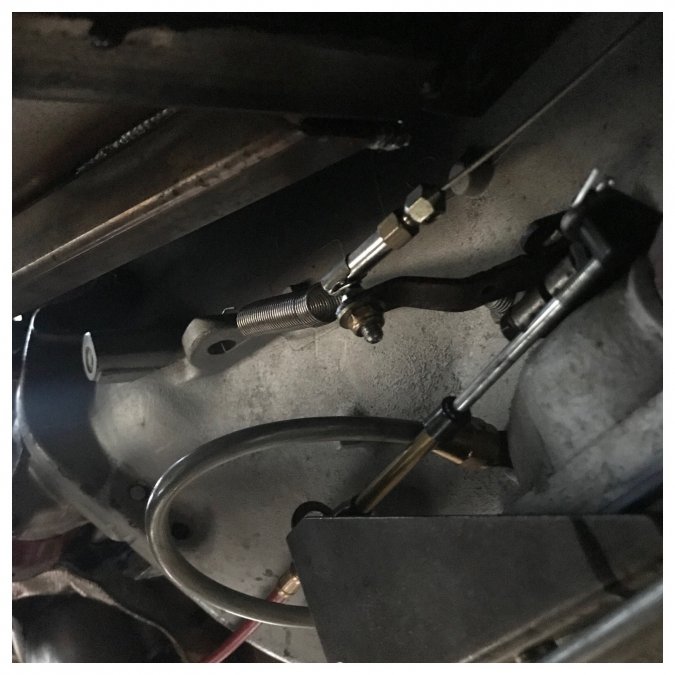
With this cable all you can do at the carb side is introduce slack. Here’s a pic of my return spring. It’s gentle enough to not introduce stress to the throttle shaft or make the pedal stiff, but returns the lever nicely to full forward (idle) position. The cable is doing its job. Taking off in Drive part throttle upshifts from 1 to 2 are quick and heavy throttle shifts hold 1st longer. I stayed up last night studying the operation section of my transmission book- even re-watched the old mopar master tech movie on youtube which covered the basics I already double checked but was still a good watch. I’m still very inexperienced as a transmission mechanic but here’s my diagnosis: I have park, neutral, 1, & 2 working just as intended. The one part shared by 3rd gear direct and reverse is the front clutches and since it only has to share duties with the rear clutches in D the line pressure is much lower than in R. Reverse having a intermittant operation and sometimes a violent shuddering that jerks you backward could be explained by the front clutch trying to engage at high psi with a leaking seal. I still have to really study the valve body again and see if I could have missed something there before I pull the whole trans. In the meantime I’ve been mulling over whether to drop the trans out the bottom, which could involve the chassis springing from all the frame welding I did when the trans crossmember is unbolted or cut out. Or I could take off the nose and fenders and pull the driveline from the front. This is probably the best option time wise. It would also offer nice access to my firewall and undercarriage- a great time to finish, paint, and insulate some spots that were hard to reach underneath. Then the answer hit me right between the eyes. What I really need to do is pull off the nose, cab, and bed. Then I can access the trans from above, and flip the cab and bed up on their rear panels so the bottoms can get nice finish work. This would also be the time to shim up the motor 1/4” for more header clearance and decide if I want to try and seal the rear main or if the leak is livable. Y’know like the right way to build stuff- make it work, then take it apart and finish it. At least I made everything servicable so it will be easy to take apart. And I know where I’m looking for a ripped seal in the transmission. I already ordered new 727 seals and gaskets- they’re cheap enough.
-
1951 Fargo 400cid on Dakota chassis
Radarsonwheels replied to f_armer's topic in Mopar Flathead Truck Forum
Well if it happens somebody post it up on YouTube and post a link! -
I have verified that the shifter indexing is dead on to the transmission indexing. The shifter came with a lever to go on the 727 so the throw would be correct. For the throttle pressure lever (kickdown) I’m using a lokar cable. Sometimes these have less throw than the lever on the trans and you have to drill a hole closer to the pivot so they match. If it never returns far enough forward they can take forever befor upshifting at high rpm. Mine’s not perfect but it is timed to be pulled all the way back at wide open throttle. I was thinking maybe it wasn’t returning at idle so I added a return spring to the lever. In 1 it has engine braking and will do whatever you ask it with the throttle. A slap shift to 2 is firm but not harsh. Coming from a stop in Drive it will upshift quickly to 2 with low throttle and hold 1st longer with more throttle. Then it just seems to stay in 2? And if I remember correctly doesn’t engine brake. Then sometimes Reverse seems to work smoothly. But sometimes it doesn’t work at all its like you’re in N, theres no rpm drop whole holding down the brake and putting it in R. Then if you give her gas sometimes it creeps sometimes it shudders and sometimes a series of violent jerks backward. It is what it is. I’m gonna keep messing around in my neighborhood getting the tune closer, read up on my trans problems and buy a couple pressure guages. Then see what I did wrong- if I have to drop the trans it’s not the end of the world.
-
Went for another drive. It is acting up in Reverse again- not seeming to be in gear, banging and shuddering like I’m backing over 2x4s. No bueno. Reverse worked fine twice yesterday. First and second work awesome. It will shift to 2 nicely early or late depending on throttle pressure in Drive, and seem pretty crisp in manual 1-2 shifting. It lays a burnout on the brake from a stop effortlessly and it’ll break traction at 3/4 throttle doing 30mph. But it doesn’t seem to go into 3rd gear at all. I’m second guessing if it ever did? Just kinda stays in second gear. I don’t know if I didn’t get something right in the valve body, or maybe the piston in the reverse/3rd drum has bad seals in it? Or maybe something in the band or adjustment? Reverse sorta working and 3rd not working kinda sounds like maybe an internal leak because the line pressure is higher in R but still not high enough. Really I know squat about this automatic transmission deal- with the way things are going it looks like I’m getting my education quickly! At least I’m getting good at dropping the trans pan and pulling the valvebody. I guess I’ll do that again, do air checks on the pressure ports in the trans, check the band adjustments, maybe open up the valve body and go thru that again too. I should get a set of pressure gauges to see what the pump is doing too. Everything I can do without dropping the whole trans.
-
Went for another drive. It is acting up in Reverse again- not seeming to be in gear, banging and shuddering like I’m backing over 2x4s. No bueno. Reverse worked fine twice yesterday. First and second work awesome. It will shift to 2 nicely early or late depending on throttle pressure in Drive, and seem pretty crisp in manual 1-2 shifting. It lays a burnout on the brake from a stop effortlessly and it’ll break traction at 3/4 throttle doing 30mph. But it doesn’t seem to go into 3rd gear at all. I’m second guessing if it ever did? Just kinda stays in second gear. I don’t know if I didn’t get something right in the valve body, or maybe the piston in the reverse/3rd drum has bad seals in it? Or maybe something in the band or adjustment? Reverse sorta working and 3rd not working kinda sounds like maybe an internal leak because the line pressure is higher in R but still not higj enough.
-
Thanks man! I put the seat and rubber floor back in time to get my kid from school. Hot startup was good but the afr was going way lean at idle and I had to ocillate the squirter to keep it happy. Part throttle was good. I thought carbed motors got richer when they warm up? Maybe its a collector leak. When I got home I let it run in Park and increased the corner screws a 1/5th turn out. It seemed happier at idle and in gear. I also cracked the gas filler- no sucking sound so that’s good. Edit oh and also the rear height is confidence inspiring over bumps but it has a subtle sliding board effect in the cab. It was at 35psi and I went to 50 so maybe 42 psi should be my next setting to try. Always more debugging to do.
-
1951 Fargo 400cid on Dakota chassis
Radarsonwheels replied to f_armer's topic in Mopar Flathead Truck Forum
I think drag racing flatheads would maybe be even more fun! See who can shift smoothly and put the old iron to the test. Hafta do -no time- like the grudge racers write in shoe polish on their windows that don’t want to let people know what they’re capable of except in this case it would just be more fun to win than to run a 23 second 1/4 mile Wish I lived closer to the bbq -
I’m looking at doing the lizardskin two process spray deadener and insulator on the console/firewall later this spring. Hopefully that plus the cowl vent will make summer driving bearable.
-
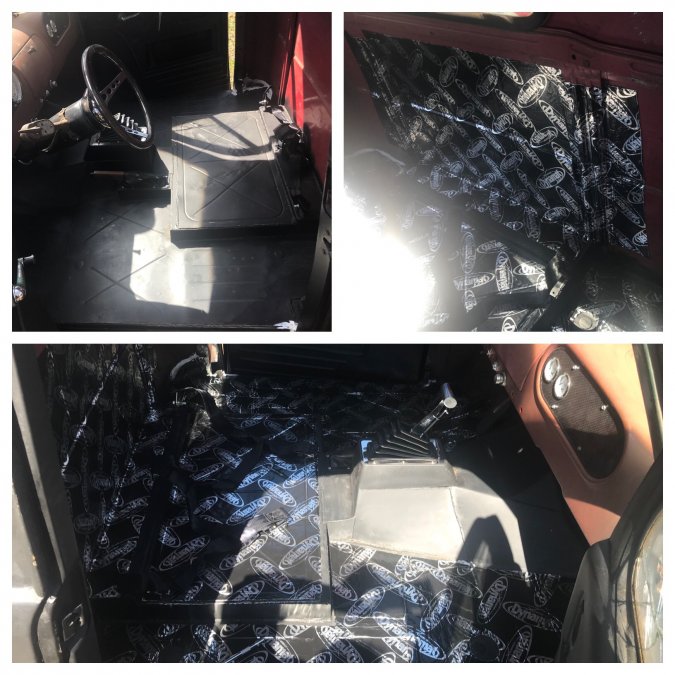
Seam sealer, dynamat, then some touch up paint inside the cab corners and sills today. Gotta go to work now I should have time to reassemble the interior over dry paint later tonight. It was a few hours work and if I did it right there will be zero change to how it looks. I’m sure I will notice the difference from damping the biggest unsupported flat panels behind and under the seat but doing the firewall and console would have given the most benefit in terms of engine heat and some sound too. I don’t want the visible sheetmetal to be silver and say dynamat a thousand times. Sorry for the glare in the pics- it’s 60° and sunny so I figured the adhesive would stick well. Of course I stripped the interior last night and it was 30°. The weather prediction actually worked out.
-
I got in a little more wrench time- just came back in as it was really getting dark. I went and bought 10 quarts of royal purple 5w30, a regular size Mobil1 oil filter, and a bottle of Lucas zinc additive. I used a melling high pressure oil pump and it really works as advertised! I have over 50psi hot at idle. Iirc I used brad penn 10w40. I know my bearings would live fine with 0w5 low windage racing oil but I want a little thickness to help with the slightly leaky rear main seal. The break in oil and filter had very little metal grit and glitter- about what I was hoping to see. The cut open filter looked really clean in the pleats of the element. It’s good to know my cam lifters and bearings are all still healthy, especially after some setbacks during break in. Feels good to have any break-in junk washed out of there too with the oil change. While I was under there I added a return spring to the throttle pressure lever on the trans. The lokar setup doesn’t come with one. Hopefully it will upshift a little faster at low throttle in traffic. Those lokar kickdown cables sometimes need a new hole drilled in the lever on the trans so the travel at the carb equals the full range of travel at the trans. I have it adjusted now so that WOT has the lever pulled all the way back. If it isn’t returning far enough it will result in delayed upshifts but no real problems. I was having trouble telling if I ever hit 3rd gear when I was getting into heavy throttle at higher speeds on my way home last night. I have to get used to the converter flashing up to almost 3k when I nail it from a roll.
-
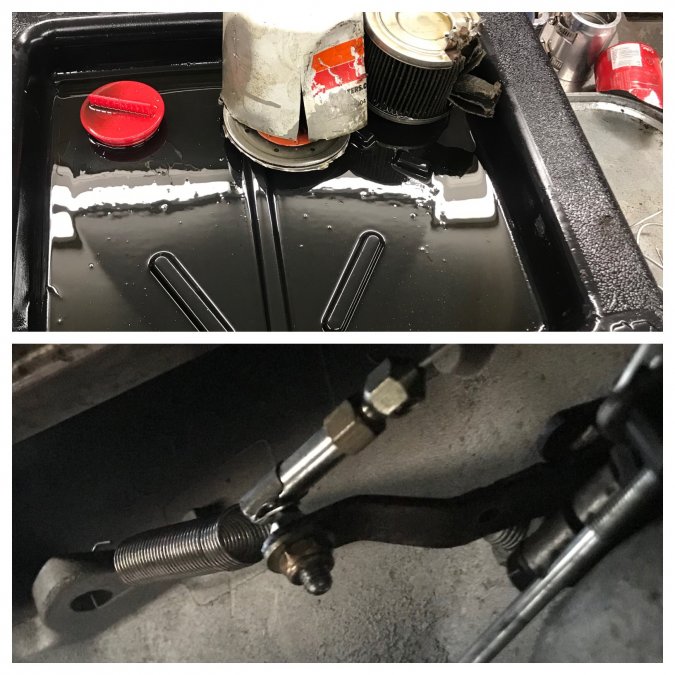
I tried filling a 3/8” hard line with sand and torching it orange to get a smooth 180° bend to fit in the stake pocket and make my vent point down to shed rain but the thin alloy just cracked in half immediately. Then I found a power steering high pressure hose that had the tight mandril bend I need. I cut it off, deburred it, and stuck a piece of 1/2” heater hose on the end over the brass fitting. The cut off end slips snug into the top of my rubber fuel line vent and smoothly turns it down, then the 1/2” hose makes the whole package a dampened unit that fits snug in the stake pocket with no kinks or rattling. A little black paint makes it less noticable. It’ll be a tiny bit more work if I want to blow in the vent to prime the fuel system (which even quickly fills the float bowls with just lung power!) but now it won’t vacuum lock and it will hopefully not restrict the vent enough to cause problems buying gas. I also upped the rear airbag pressure from 35 to 50 psi. It has a little bit more rake and a bunch more ground clearance. I was nervous last night about the tall manhole/fill covers at the gas station.

-
1951 Fargo 400cid on Dakota chassis
Radarsonwheels replied to f_armer's topic in Mopar Flathead Truck Forum
Ha! 3” dumps straight off the headers? I was wondering where the heddman shortys outlets pointed- are your downpipes just straight uncurved pipe with a slash cut end? They sound awesome and make the tire smoke shoot out the back & sides for dramatic effect- I didn’t even notice it was a one tire burnout. Looks like we’re running the same milodon deep offroad truck oil pan too. Mine is an old one with a passenger side dipstick bung.


