Radarsonwheels
-
Posts
1,232 -
Joined
-
Last visited
-
Days Won
17
Content Type
Links Directory
Profiles
Articles
Forums
Downloads
Store
Gallery
Blogs
Events
Everything posted by Radarsonwheels
-
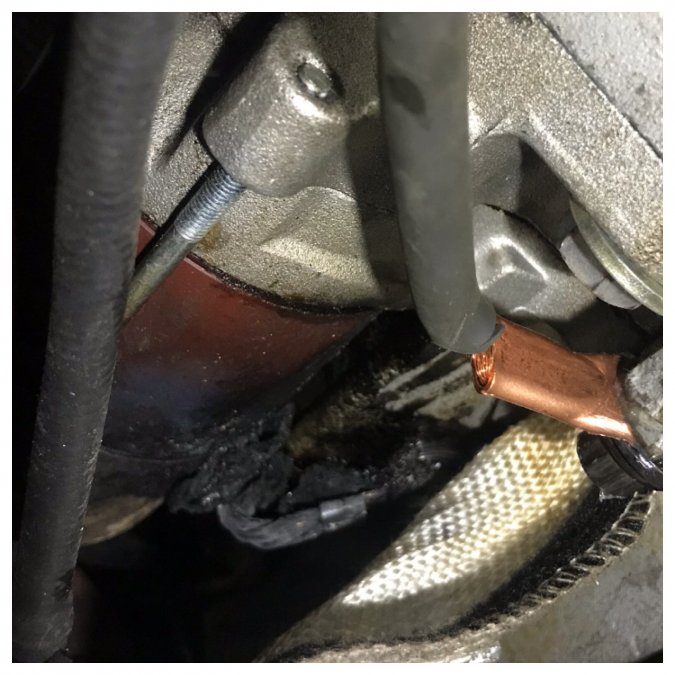
 Cleaned up and threw in the 1989 dakota starter that came with my donor truck. Still gotta troubleshoot the keyswitch and cranking trigger wire to make sure that wasn’t my problem but my wires all survived the fire inside the fiberglass blanket. Not even crunchy. I still have to hook up the battery and test the starter before I hook up the efi but I’m going to swap the sniper ground to my master disconnect switch along with all the other grounds to the chassis etc. edit: I found my 50 amp maxi fuse in the cable between my hot starter lug and my main harness had done its job and blown. That’s why I saw the volt differential from the shorted battery and the disconnected front half of the harness that was happily running off the alternator. Also the sniper being hooked directly to the battery did its job and protected the ecu from any spikes and it only saw a gradual voltage drop. I extended the sniper constant ground to my disconnect switch and put the negative battery cable alone on one side of the switch opposite my chassis, block, fuel pump, and sniper grounds. Now it is a full on battery disconnect switch again. After making sure the dakota starter turned over the motor nicely and stopped cranking with the key in the run position I threw the master and plugged the main sniper harness back in. No wierd noises so I turned on the master- and still all good. I turned the key to run and the sniper handheld came to life along with the fuel pump prime cycle and the IAC parked itself. No starting it and waking up the neighbors tonite but it looks like I might make it to the dyno tomorrow nite after all.
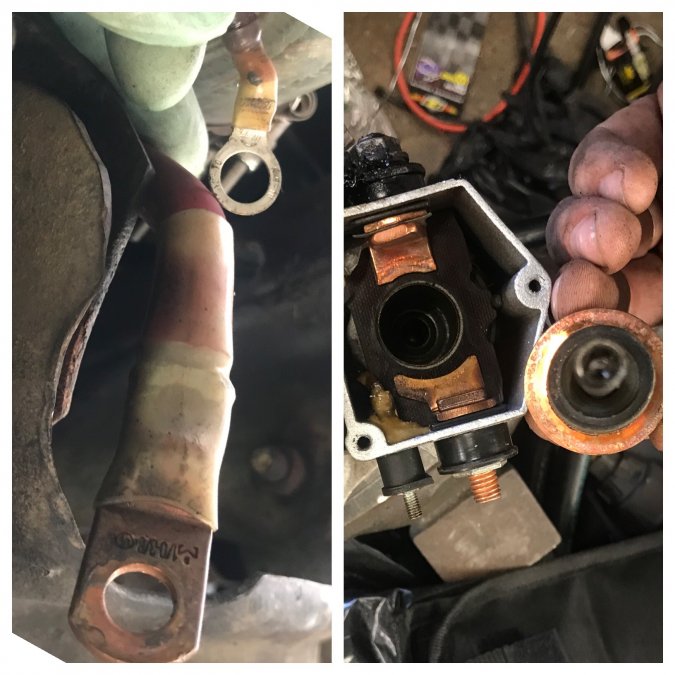
-
I assumed my wiring was at fault. Maybe, maybe not. The wire on the starter itself I guess from the internal solenoid to the motor is what burnt. My wires still look perfect topside.
-
Speaking of scary I got a good one this morning- let some smoke out of my wiring harness... I have everything but the EFI fed off the big lug on my starter- 0g wire back from there to the battery and a 50amp 4g fused wire to a remote positive terminal forward that feeds my fuse panel, & MSD box. The charging system feeds back into that remote stud too. The EFI instructions say to run the constant hot and ground directly to the battery so I have them isolated on the battery side terminals for ‘clean’ power. Well I warmed up the truck to drive to work and when I got in to leave I noticed the Efi gauge was reporting 10v of battery power and dropping. The autometer volt gauge in the dash still said 13.5v. I was pondering this when smoke started pouring out from under the truck and engine bay! Uh oh! The key successfully switched off the motor and as quickly as possible I unplugged the EFI harness from power, then the negative battery cables, then the positive. The smoke was coming from the power and trigger stud area on the starter. So it seems there is a short there caused from securing the heat blanket on the starter with a loop of bailing wire twisted tight with pliers or maybe the starter itself was either shorting internally or running for minutes on end and burning up witb heat resistance or maybe the jackshaft didn’t return and the starter motor was working as a reverse generator driven by the flywheel? Dunno yet. After making everything safe and dead I opened my shop 10 mins late and I smell a little like an electrical fire... The starter was obviously shorted in some way and drawing down the battery pretty hard while the charging system somehow kept everything forward of the starter at a happy 13.5 volts. Gotta check that 50amp maxi fuse if that blew it could still run off the alternator with the battery disconnected. The sniper EFI was still doing it’s job at a weak 9.5 volts coming directly from the battery when I shut her down. The disconnected battery showed 12.3 volts so it doesn’t seem hurt either. In any case it never developed into a fire or smoked any expensive electronics or anything but I’ll have to pull at least the blanket and heavy wire to look for a short. If I don’t find one I’ll have to bench test the starter. Holley engineers be damned with their ‘constant power to the sniper must be directly to the battery terminals’ thing. I’m going back to running ALL the grounds through a beefy switch that I can throw and immediately disconnect the battery. I know NHRA wants a positive disconnect but this isn’t a track car and the first thing you do before working on a car is disconnect the - battery terminal. I just want to do that with a switch instead of a wrench. I’m always thankful when I break down in my own driveway instead of miles from home in a snowstorm with no jacket and a dead cellphone.
-
My 54 3/4 ton needs a windshield gasket pretty badly, and also a windshield. Steele rubber sells the gasket and Auto City Classic sells the glass but I would love to hear if anybody has experience with these products. The search function here is really hard to use sometimes but I didn’t find anything despite several boolean configurations and forum/title specific searches. Apologies if this is a much discussed topic and I failed to find good info that’s already here. thanks!
-
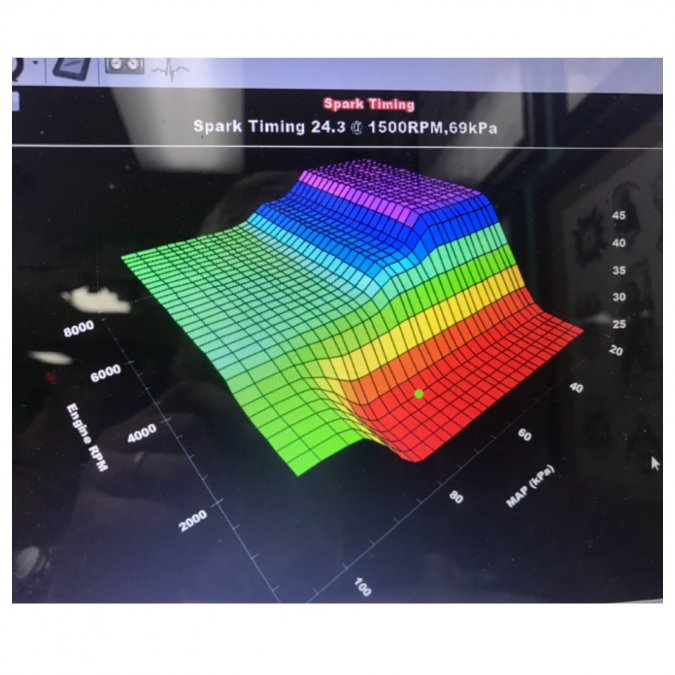
And a separate post to go with a completely unconnected picture I figured out how to use the holley software to take datalogs and flash the ECU with a removable SD card in the sniper 3.5” touchscreen controller. I was into hacking, online bulletin boards, and phone phreaking back in the day but once the ‘desktop’ interface became the dominant interface with apple and windows I gave up the computer as a hobby. I’m used to welding up the advance slots in a mechanical advance distributor and changing the springs and vacuum cans in them so all this mouse clicking and kpa readings from the MAP sensor instead of inches of vacuum is new to me but pretty awesome. The spark map was so much better than a mechanical distributor but still kind of all over the place. The handheld allows you to pick timing at cranking, idle, wot, & cruise (I put 15°, 24°, 34°, & 44°) but the map it makes has sharp corners and isn’t at all optimized for my driveline. I used the datalogger to find out what my actual kpa MAP sensor readings actually are at cruise, idle, and gunning it and reorganized the spark table on a numerical spreadsheet then converted it to a 3d graph and used their smoothing function to take off the sharp corners. That’s what’s in the picture. On the fuel map I was able to see the base map and the adjusted version with all the marked cells that had ‘learned’ - spots where I had driven and the computer noted what % change up or down the engine needed to hit the target afr. That map is not in AFR it’s in volumetric efficiency so I have some more homework to do. In the meantime the software makes it easy to transfer the learned table to the base table then smooth out the rusulting spikes and corners that come from learned cells next to base tune cells. It will continue to self adjust and learn in open loop so it’s not that critical now. I am trying to get comfortable with the software before my (possibly monday night) chassis dyno session. My cable should be here by then and I’ll be able to load the engine with resistance and actually tune with the laptop in real time to the ECU instead of removing the SD card and flashing new tunes in back and forth with shutdowns inbetween. I didn’t try my new spark map yet- I was too chicken to go flashing tunes into my ECU when the truck is not home juuuust in case I brick it!
-
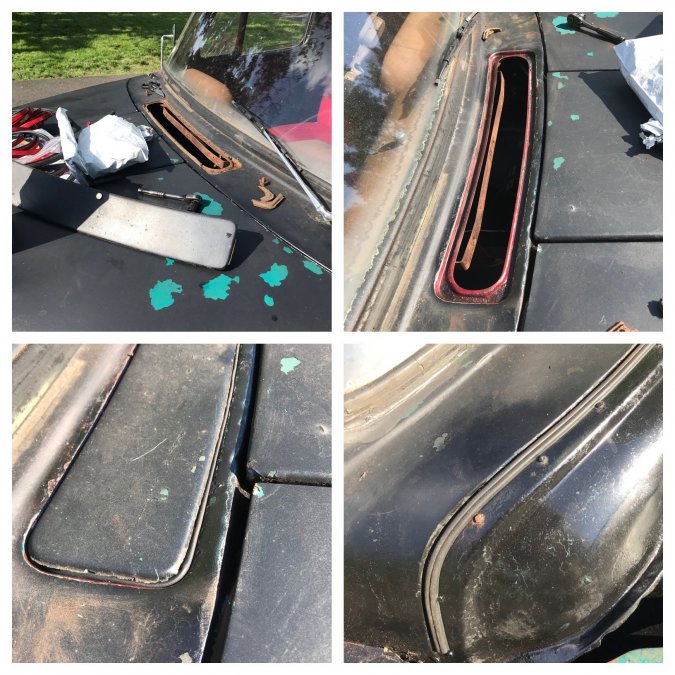
It rained today! Usually that means I get no work done but today it meant I get to look for leaks in the cab now that I installed all that fresh weatherstripping. I am waiting on my glass guy to call me to say come on in when he has my triangle glass cut so he can glue it in my frames and get them sealed up but it wasn’t heavy enough rain to pour through them. The cowl vent is holding water out nicely and despite my driver’s door being slightly bowed and not touching the gasket on the top middle area above the window the doors didn’t leak either. The one nice gusher I have left is the bottom inside corner of the passenger side windshield. I patched up all the cracks in the ancient windshield gasket from the front with RTV this morning but I didn’t fully caulk it to the glass and to the sheetmetal. The outside looks functionally pretty good albeit patched up by a drunk roofer. On the inside the gasket has a pretty good crack on both the top and bottom corners. I’m thinking water must be getting in the top and flowing down between the side edge of the glass and the shrunken brittle channel inside the gasket. I’m half inclined to spray a bunch of rust converting primer up there followed by a tube of RTV but I know that being able to drain is the only reason it isn’t already worse than it is. I think somebody here posted a link that I hope I saved to a source for new 54 glass which I believe is a one year only item so I hope it’s still available. Mine is serviceable but has wiper arm tracks and some nice scratches in it. I think it was never highway worthy enough in its rough life to never get the ‘sandblasted’ look. In any case I at least know I need a new gasket and it looks like the kind with a locking strip that I never did before. I’m jist afraid that I will be looking at a lot of welding to fix whatever is underneath that gasket. I already know there’s some holes rotten through the passenger A pillar next to the gasket and filled with rubber. Ugh. Still- a better situation than before I solved 80% of my leaks.

-
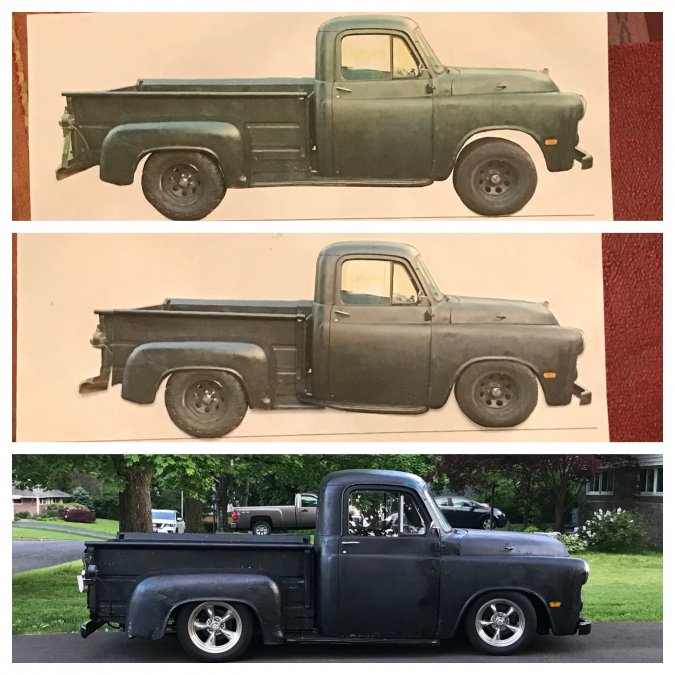
Wow I was just cleaning up some papers and found my original cut and paste photocopy from when I was trying to figure out what it was going to look like. I changed some stuff- left the bed long behind the tub, channeled it a little lower, and put different wheels on it but it ended up pretty close.
-
I ordered 3 sizes of 3m self stick weatherstripping for $40 off amazon. I redid the door seals, rear hood windlace, window sweeps, and sealed up the cowl vent too. I also glued in the driver’s rear and top window track but still have to make the bracket to hold the back of it inside the door when the window’s down. Now I gotta wait for some rain to see if I sealed any leaks but it couldn’t be worse than dry cracked & missing.

-
It’s loud like a harley with short vance&hines, not like open pipes. The video was from too far on a windy day- I was surprised how quiet the video was off my buddy’s phone. I actually wouldn’t mind a little quieter but with the efi I can start it and warm up on my way out of the neighborhood which is good for neighbor relations vs warming up in the driveway after dark with a race carb. It’ll sound amazing on tight city streets for sure whenever I get around to cruising it downtown Philly and you can feel the pressure on your ears going through 2 lane overpasses on the throttle.
-
Here’s a little startup video with the efi and laying some stripes in front of my shop ?
-
I have a friend with a mustang chassis dyno. People call them ‘the heartbreaker’ because they usually spit out conservative numbers. My 408 smallblock ‘72 demon made 350hp/400tq on it. I never got that car to hook at the track (stickshift) without breaking parts so my ET and 60’ always sucked but it consistently did 108mph in the 1/4. The online hp calculators for that mph at my weight give 350hp so his dyno is pretty accurate. I put a ‘what will it make’ post on moparts with a basic rundown of my build and got some guesses and also some tips on the Sniper from Andy Finkbeiner. I’m always tickled when he chimes in on my threads- he wrote the performance mopar big block book that inspired me to build a low deck stroker. I’m hopefully going to get on my friend’s dyno next monday night to fine tune my timing and air fuel ratios. I built the motor aiming for 500hp 600tq so at the rear wheels I’m hoping to see 380/500 but my ego isn’t attached to a number and dyno numbers aren’t really that meaningful except as a tuning tool. I’m still curious though! It’s kind of like a report card as an engine builder. I’m really interested to see what the torque curve looks like. I’m guessing that my big inches will be somewhat limited by my heads and headers- I doubt that the horsepower will continue to increase over 5500 rpm. The flipside of that coin is that I’m hoping to see big torque all over the place. My 2500 converter will slip under stall speed so even though it moves the truck nicely in traffic under 2500 rpm when it’s under load on the dyno it probably won’t give any results under stall speed. Today looks like it might be a beautiful day out. Maybe I will take the afternoon to spray the sound deadening lizardskin I’ve been talking about.
-
Woo hoo! Drove her to work today. The truck is totally controllable on wet roads. The brakes are not easy to lock but slow from speed in a hurry. It still makes a little noise while stopping- gotta bed in the new pads and finish scraping the junkyard surface rust off the rotors. I considered new rotors (integral to the hubs) but the donor dakota had freshly packed bearings under the metal dome covers and the rotors are pretty flat without a lip. The sniper adjusted to the extra air from the pcv without missing a beat- just had to reset the curb idle screw until the IAC valve sits at 5%ish at idle. I was also able to feel the 3rd gear shift and enjoy some top gear cruising. It does 60 nice and smooth just flirting with lockup on the 2400 stall converter. I’m coming up fast on the one year mark on this build. I’m pleased as punch to be driving already and not dealing with too many gremlins. Calling the first version a mockup, taking it apart and dealing with all the issues was definitely a good move. Got my novice transmission building skills to thank for that!
-
It stopped raining long enough to take up some slack on the threaded adjuster on the front of the booster. Now I have a nice brake pedal that feels good! It doesn’t bottom out on the floor before progressively getting real stiff, not spongy, & doesn’t sit too high either! If tomorrow isn’t too wet I’ll at least cruise it to work after a little test around the neighborhood to make sure my brake problems are all solved.
-
Wow I should have looked closer at the banjo sealing surface on this ‘remanufactured’ caliper. I figured the copper could deal with a little sandblasted texture but this thing looked like it was really heavily rusted before media blasting. I guess they don’t touch them up before calling them good at cardone. Radial grooves like stock would bite into the copper way better but a flat polished surface and freshly annealed copper washers have a better chance of sealing than how it was. I filed it then sanded alternating directions up to 800 grit wrapped around a file for flatness. If it still weeps I have some russel stat-o-seals on order to keep around. I didn’t snap a banjo bolt in there- that’s a paper towel plug in the pic to keep metal shavings out. Still gotta fine tune the pedal to booster to master cyl piston clearances to get a full stroke that’s not preloaded.

-
Nice- you got it off!
-
Got the rubber bonded seals and copper crush washers in the mail yesterday. I soaked one of the bonded seals in dot3 overnight and it softened up a little. Guess they are oil resistant but not the ones for brake systems. Plan B is to anneal the new copper washers in case they are a little work hardened from being stamped out, then remove, inspect, and possibly improve the sealing surface on the caliper around the banjo bolt. This isn’t the first time I’ve fought remanufactured calipers with a bad sealing surface. Every time I wish somebody made a piloted spot facing cutter that left a factory type surface with fine concentric sealing grooves. Seems much cheaper to just buy another $35 reman caliper. I wish dorman and rebestos etc. would touch up that spot after media blasting! Anyway, it’s crappy windy and raining since last night and forcasted thru tomorrow too so all I got done was annealing three new crush washers. They should be nice and soft and ready to squish home.

-
Ugh the driver’s caliper is having trouble sealing the banjo to the remanned caliper. I ordered some more copper crush washers and also some dowty seals- the fancy washers with rubber o-rings bonded to the middle made for brakes and hydraulics. She stopped well enough to take my buddy for a joyride yesterday around the neighborhood- the guy that I’ve been trading the truck back and forth with for 15 years or so. We left some stripes here and there and made some people smile with the aahoogah horn. I gotta head to work and I want to drive it but I’d rather get the brakes perfect first. Today’s little bit of wrenching was kinda nerdy but I’m psyched about it- I installed a PCV valve! The race carb didn’t have any vacuum ports in the base and I didn’t want to send the crank vent only to the #7 runner with my brake booster vacuum line. The Sniper has vacuum ports in the base so now I can run a PCV. It should help a lot with keeping the stink and oily mess out of the engine bay and will also help keep my oil cleaner and maybe even help with engine gasket sealing a little. It’s the only emmissions device that is a win all over and a big upgrade.
-
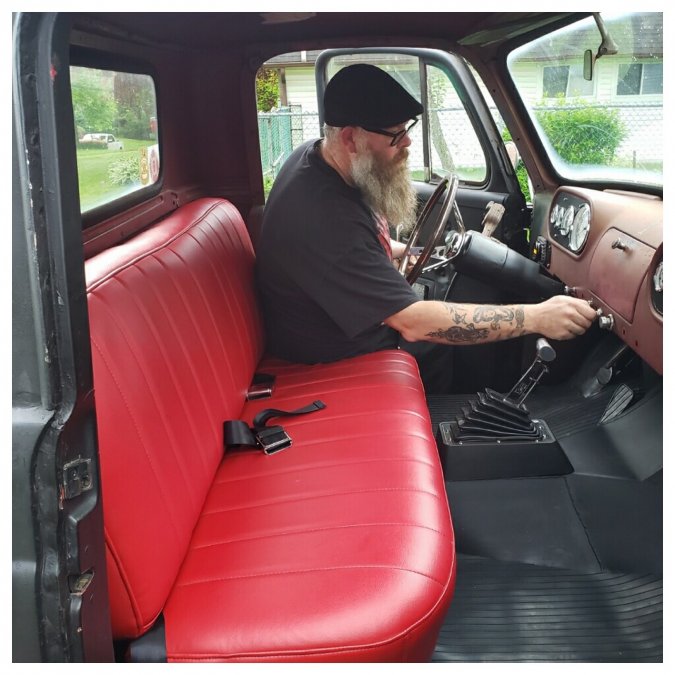
Action shot!
-
I got the new master cylinder bench bled and installed along with two new calipers. The fluid in the front reservoir was brown while the rear was still clear. Maybe the contaminated fluid from the old calipers was causing me problems when hot? Maybe it was a dirt clog? Doesn’t matter now. I have more bleeding to do and I have to take up more of the slack in the pedal with a longer insert in the hollow mc piston or booster rod adjustment or both. I had to make a little rod with a concave end- the booster has a hollow rear piston like you would have on a mopar manual brake setup with the rubber grommet to capture the pedal pushrod.

-
All day off waiting for my brake parts in the mail and couldn’t leave the house because we had to get all new hvac installed. I’ll appreciate it when it gets hot and swampy this summer for sure though. Of course my parts came once it was almost dark out. I’m so spoiled now when I was a kid everything you mail ordered was 6 to 8 weeks! By the time it came you forgot you ordered it! I got the MC and calipers hosed down with brakleen and spraybombed the mc with black and the calipers with high heat red paint. It might be a futile effort because they will be sopping wet with paint dissolving dot 3 soon enough but I hate when new parts are covered in rust a week later. I’ll probably be out in the driveway for a few hours tonite installing them with a flashlight then gravity bleeding everything. I stopped asking my wife to do the pumping holding up down brake bleeding boogie years ago in the interest of staying married and gravity has been working out well lately. Well for brakes anyway- my knees have seen better days haha
-
1951 fargo dashpot carburetor?
Radarsonwheels replied to 1951fargo's topic in Mopar Flathead Truck Forum
As far as I know the dashpot just helps with a slower return to idle? Mine ran fine without it but I’ll tell anybody who’ll listen that a repop weber 32/36 from the stovebolt site was one of the best upgrades I did on my 230. It started, warmed up, and ran like a new car -
Wow! I was planning to do luan or corrugated core plastic board door cards wrapped in vinyl but that wood looks great! Is it a fancy veneer? Or just the nicest ones in the stack at home depot?
-
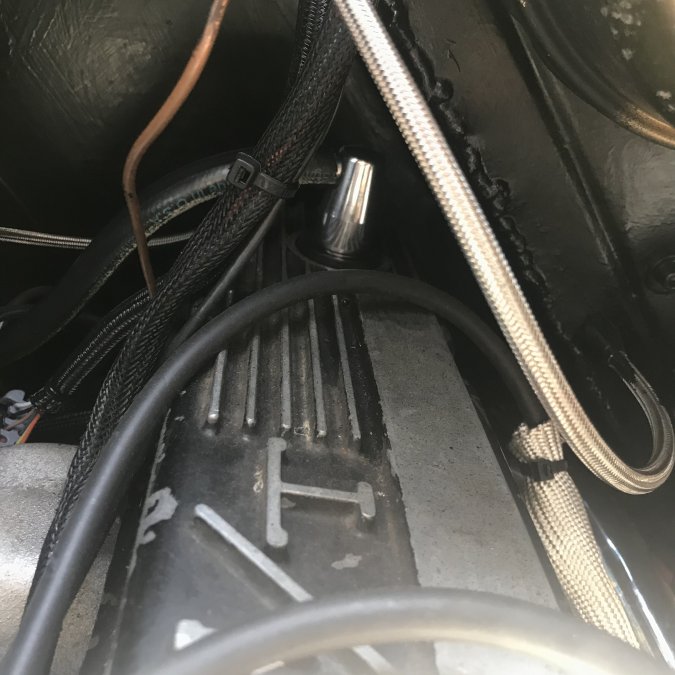
Ha! Nah my upholstery is staying the red marine vinyl. It’s one of the few things I farmed out and I was super happy with how the seat came out. It’s a little fancier than stock with the stitching in it but still looks right in the old truck- not drag race or overdone street rod. I got the lizard skin spray insulation because I have done dynamat in cars before and was amazed by how much more solid and quiet the ride was. The problem is that I don’t know how long it will take to find and solve all my water leaks so carpet is a bad idea and I only could figure out how to make a rubber floor look good for the flats and the toe boards. I did dynamat on the bench pedestal top, behind the bench, and under the rubber floor. I really want the benefits of doing the inside roof and the full firewall/trans tunnel/console but I don’t know how to cover it up- it’d need a molded rubber or carpet to cover without a bunch of flaps and seams. So it would be silver and say “DYNAMAT XTREME” a thousand times all over it which I am not cool with. The Lizardskin ends up with a kind of charcoal colored durable finish with a bedliner type texture which I think would compliment my businesslike theme. I still haven’t decided if I want a headliner but in the meantime I really want to quiet and insulate the roof. The inside has a bunch of og paint and a bunch of surface rust so I need to power wirebrush it and paint it with rust converter primer before I spray the insulation. I think I will do my taping and masking before I clean up all the rust and scuff the existing paint. Less dust cleanup especially on the fresh dash. I want to leave the stock red dash alone and try to wet sand the metallic green laquer paint off the edges. I do plan to make door cards or whatever they’re called after I get the window tracks working better. Dunno if I’m going to go red or black vinyl on them or black with red armrests. Probably make them out of that plastic internally corrugated sheet that resembles cardboard from a box and wrap/glue over that. It’s crappy and raining in Philly today and my brake parts still aren’t here yet. I did swap out the hard line in the return from the throttle body. The holley kit came with straight hosebarb fittings and the hose coming off it was hitting the corner of the firewall relief pocket. I got a 90° push lock -6 hosebarb to replace the straight one and now the hose doesn’t hit anything and just makes a 1/2 rainbow straight down to the firewall hard lines. I also capped off my heater nipples on the water pump. It looks a little better and there isn’t a loop of hose flopping around looking for trouble. There’s a little green in the pic but I managed to only spill a splash.

-
I got her back from the alignment shop! The front tires no longer fight each other to decide which one is steering. The toe was pretty far out. I have the fuel hard lines all done and insulated under the hood. It’s probably overkill but I think I’m going to throw a blanket on the post pump fuel filter as well- it gets pretty toasty in the engine bay. I have a new problem- the front brakes are staying applied to the point where I could smell them after a 1.5 mile ride home from the alignment shop. Everything is new from the banjo bolts up but investigation points 60/40 toward the master cylinder being bad. I tried separating the mc from the booster to see if it was preloaded and not allowing the mc piston to return- no luck there. Cracking a bleeder seemed to free the rotor up some but there was no dramatic squirt of dot 3. So I ordered new calipers and a new master cylinder. I don’t like throwing $ at a problem but if I’m going to the trouble of bleeding everything why do it twice? I have just enough seat time that I think I’ll really appreciate the difference after the lizardskin install. Hopefully I’ll have time to get after it in the next couple weeks. I’m really enjoying the easy starting, warmup, and reliable smooth idle with the efi/timing control. I got to do a little drive with my cousin that helped me put the body on. Thought I might have solved the sticky brakes but no. Still got to do a smoky burnout this thing makes smoke quick!
-
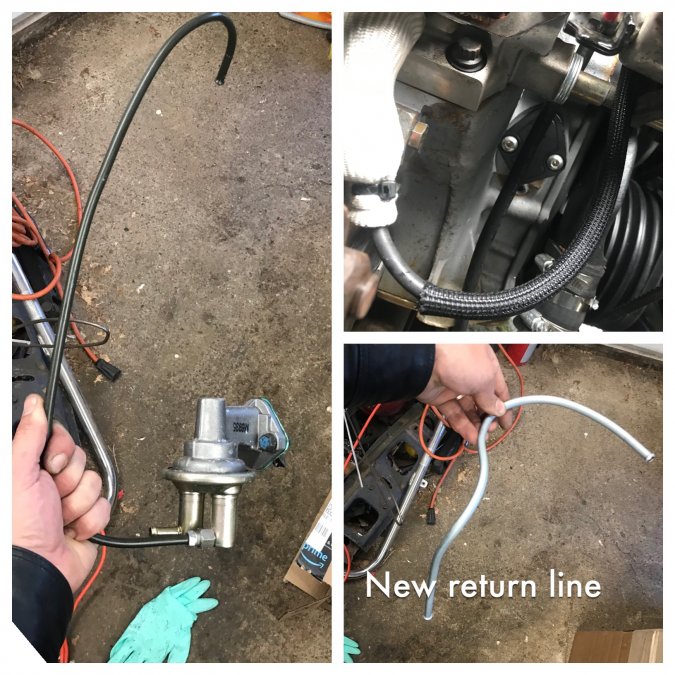
Got the old fuel pump and hard line off the block and installed a block off plate. I’m sure I’ll really feel the horsepower difference now that I’m rid of that power robbing accessory ? I also got the hard section of return line bent up and flared. Gotta hit the fartcan boy racer section at pepboys for some more insulating sleeve and I can plumb it in.