
Los_Control
-
Posts
4,895 -
Joined
-
Last visited
-
Days Won
42
Content Type
Links Directory
Profiles
Articles
Forums
Downloads
Store
Gallery
Blogs
Events
Everything posted by Los_Control
-
I would just toss a guess out there .... I'm not convinced it is a stuck oil ring .... that might be a common issue on our old iron ... I think I have one on my 1949. On a modern engine with modern oils .... I do not think so, or it would be my last possible guess. You never did post what the compression readings were. Anytime two adjoining cylinders show less then normal compression and those 2 cylinders have the same compression .... good chance it is a blown head gasket. If the gasket is blown between a oil port, it would allow oil to get into both cylinders when the head is draining oil back into the pan on shut down. My past experience with 4 cylinder engines, not all but some it is common to blow a head gasket. The small engines do not have a lot of room or surface area to install adequate amount of head bolts. Then modern engines really do have more compression and work under harder loads .... We get so much more horse power from a engine today then 30 years ago. Just not uncommon to blow a gasket. If I was a betting man, I would bet on a blown head gasket before a stuck ring. .... Easy fix.
-
Er oh .... someone get up on the wrong side of the bed this morning .... and such a beautiful day it is I love old Hoopty's and stand behind them .... in case the brakes fail My philosophy is they are cheap to run if you take care of them. .... Key is to choose one that has a proven track record for dependability. When you price a transmission rebuild on a modern car the price is crazy..... the electronics are a headache and expensive. A replacement motor cost more then my first house. A 1993 Caravan Rebuilt transmission $2K Used 135K engine ... $600 New tires $400 .... Shocks, struts, brakes, axles .... every sensor, tps, maf, egr, 02, coolant, .... You can basically rebuild a complete older car for $5K and make a very dependable car out of it. Basic insurance for the van and my truck is $230 every 6 months. Registration is cheap. Naturally you need to do the labor yourself ..... One major repair on a 10 year old vehicle can can require a shop to do the repair and exceed $5K Very cheap to maintain and drive a older vehicle.
-
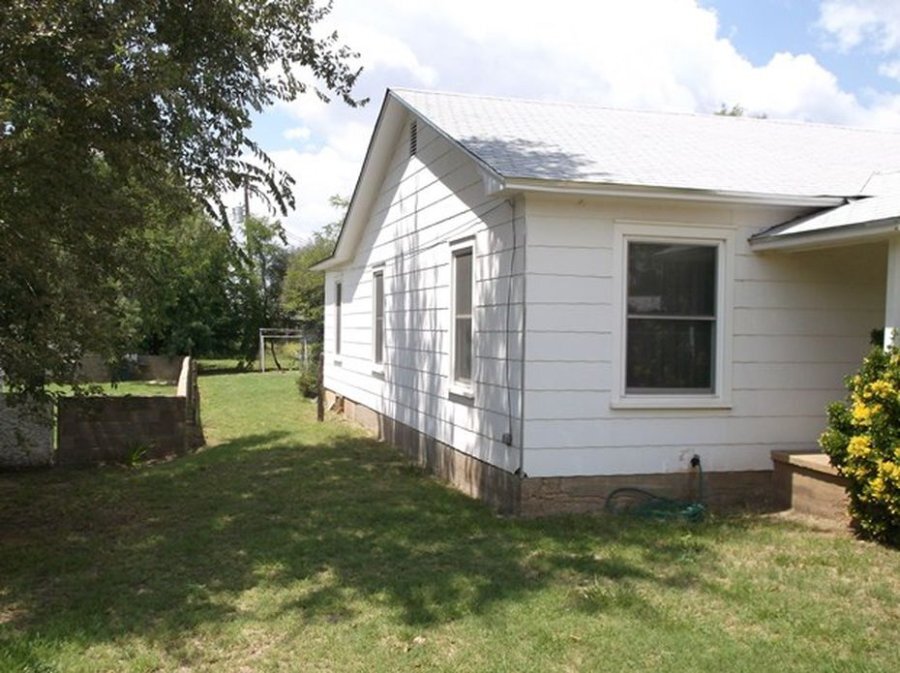
I'm all for safer and better building practices .... sometimes I think it gets overplayed. This house built in 1948 still has the original siding on it. The tiles are a mixture of cement and asbestos. Paint is a nice feature, these tiles do not care if they have paint or not ... they are fire proof .... I love my asbestos tiles Again 75 years ago we could build a product to last a lifetime ... we are no longer allowed to use it. They say it can cause cancer ..... I wonder if that has ever been realistically scientifically proven to be traced to asbestos ... it does have small fibers that can get in the lungs and cause issues. Could we just find better ways to work with the product? .... Or is it the fact it last forever it was banned? Lead paint is another .... last a long time .... They found out early the more lead you put in paint, the longer it would last. They figured out they could put more lead into red paint and maintain the color, thus most old barns were painted red because it would last the longest. Lead paint is still used today on commercial projects like bridges .... it was canceled for home use because it taste sweet, small children could eat loose flaking paint and get sick from it .... small children can eat many things and get sick. Of course we do not want to dump our used engine oil on the front yard .... where does oil come from? Mark me Grumpy
-

New B-3-B owner with some basic questions
Los_Control replied to ktb's topic in Mopar Flathead Truck Forum
Have to admit I never gave it much thought. A motorcycle chain is the same way ... replace the sprockets if you feel like it. Looking at RockAuto for my 1949, they have a crank gear but no cam or chain available .... dunno where we go when we need one ... I would check Napa first. On RA they also sell chains separately for a 1970 318, or in sets. So you can buy just the chain. The cheapest timing set for the 318 is $10.16 all the way up to $105 for a billet roller version. @ktb is measuring 3/8" play, I would not bother replacing it myself at this point ... If rebuilding the engine then yes. -
New B-3-B owner with some basic questions
Los_Control replied to ktb's topic in Mopar Flathead Truck Forum
To be honest .... seems we always call it "the timing chain" When it is really a timing chain set. Not even sure it is possible to buy a new chain without the gears being included. Maybe, just never heard of it. I would remove all of the rod bearing caps and set them aside being careful to keep them in order so can be replaced where they came from .... then see that the crank turns. ... If not then start checking the main bearings. Then start moving the pistons by hand up and down. .... You should know very quickly if and how many pistons or a main bearing. I had one main bearing that locked it up from some mouse pee ... anything can have happened over the years of sitting. I would put some rubber hose over the rod bolts so they do not mark up the crank while working on it ... or some tape, anything for protection to save the polished crank surface. If you find a piston froze to the cylinder wall ... use a block of wood 2"x4" ripped down to fit. Then use a hammer and wood to tap them down. just to free them up. If it is a piston, now is the time to pull them out and install new rings and clean up the cylinder bores. Hopefully if it is pistons, a few sharp blows with the hammer/wood will free them up. Your cylinders do not look too bad and should not be a big problem getting the pistons free. -
New B-3-B owner with some basic questions
Los_Control replied to ktb's topic in Mopar Flathead Truck Forum
As a side note, you can check stretch by removing your distributor cap and rotate the crank back and forth. You want to see how much free play you have in the crank before the cam moves .. which moves the distributor rotor. Just a quick and dirty test when troubleshooting timing issues without tearing into the engine. -
New B-3-B owner with some basic questions
Los_Control replied to ktb's topic in Mopar Flathead Truck Forum
To check timing chain slack, you need to access the timing cover on your engine, then use a wrench or tool to rotate the crankshaft while observing the movement of the timing chain between the sprockets What you are looking at is how far the crank moves before the cam moves .... the cam needs to move with the crank/pistons ... so it can open the valves at correct timing and it also controls the spark. A chain needs a certain amount of play to function correctly ... it can not be too tight it will cause issues. When looking at the longest stretch in the chain, you can move it outwards towards the case 1/2" I believe this is what the manual means with 1/2" play. Same time you can push the chain in 1/2" ... so technically you might call this 1" play? The goal is to have the cam move when the crank moves .... you also notice if you turn the crank in the opposite direction, the slack is now on the other side .... this happens while you are driving and you let off of the gas and then step on it ... the slack goes back and forth and the cam is also floating in and out of time with a loose chain. Just use common sense when looking at wear on a chain. .... Generally is a good idea to change it since you are already there and is a lot of work to get to later. With all that said, the engine will run with a stretched chain .... I had a Toyota pickup the chain stretched so far it was slapping against the side of the cover and rubbed a hole in it. I had a jeep the chain stretched far enough that it skipped a couple of teeth on the gear and would not run. Your measurements are a guideline to use common sense. -
My thoughts ... my professionally rebuilt carb shoots out a nice sharp stream .... yours seems to dribble. But while it is dribbling, it is probably passing just as much fuel as mine does in a small diameter concentrated stream .... yours is larger diameter with less pressure. Either way they both do the job to apply more fuel when opening the throttle. Unless you have a problem, I think it might be fine.
-
I think the cam tip, may be part of the fun of old men swapping lies on the front porch. .... It sounds good. In reality new cams were not soaked in barrels of oil before packaged and sold? .... I would assume the mechanic may have used some assembly lube or possibly just engine oil on the surfaces when it was installed .... I think a used cam should be fine if cleaned and then had clean oil or lube applied when installed. I was getting a bit un interested when he was removing the distribution tube ..... I was bouncing up and down in my chair yelling!!! CHECK OUT @48Dodger video!!!! 🤣 I did learn something there, I feel his approach should have been as a last resort to drill and tap the block. .... Certainly is a fool proof way to get it out though. Very possible with his years of experience, and that block did have a unusual amount of sand in it .... Maybe it was the best way .... I would have at least tried to pull it though. Always good to watch and listen to how others have done these jobs. .... I would watch more of them.
-
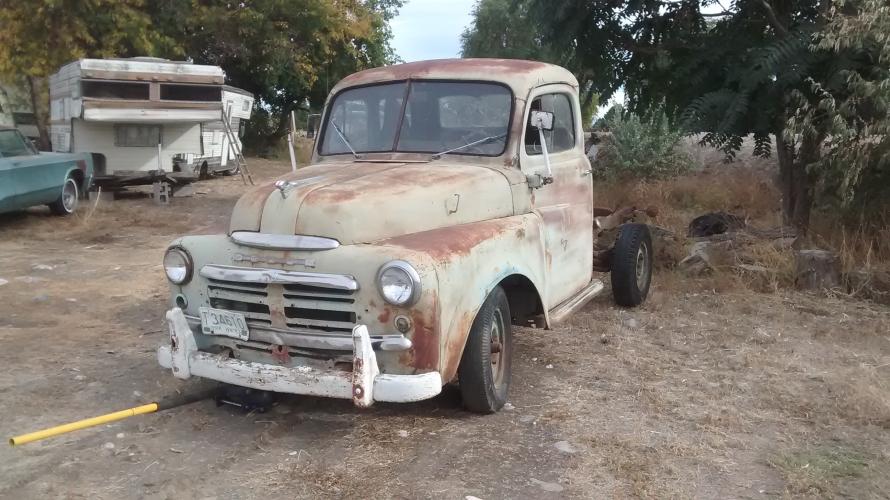
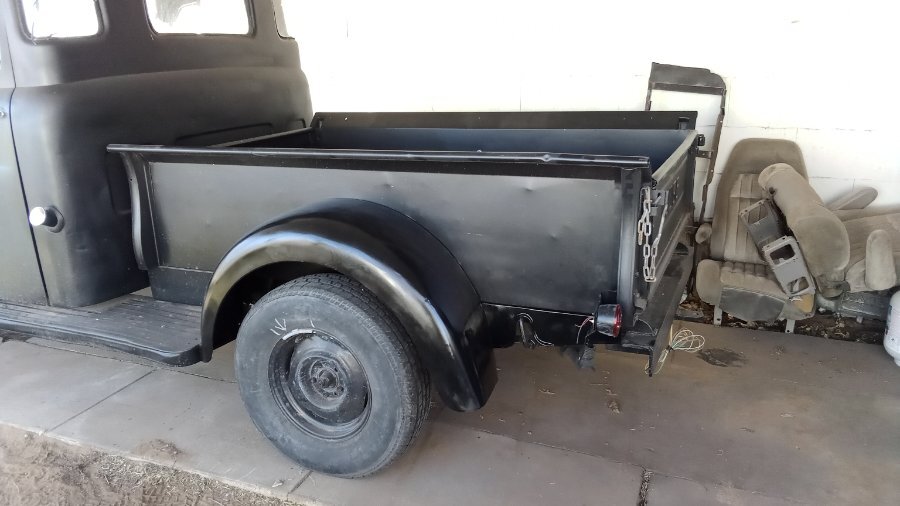
I have never lived in the rust belt or have to deal with rust prevention like others need to. ..... From what we see it looks pretty good for its age. I know one guy uses bar and chain oil for chainsaws. He thins it down with paint thinner and sprays it with a pump up garden sprayer. He likes that oil because it is sticky and clings to the metal .... and it is cheap! .... The paint thinner allows it to be sprayed and will evaporate over time leaving just the oil. I imagine there are many holes in the frame you can poke the sprayer into ... anything would be better then nothing. Probably using a pressure washer and blasting accumulated dirt out of the frame would be most beneficial .... or just leave it alone. Looking good.
-
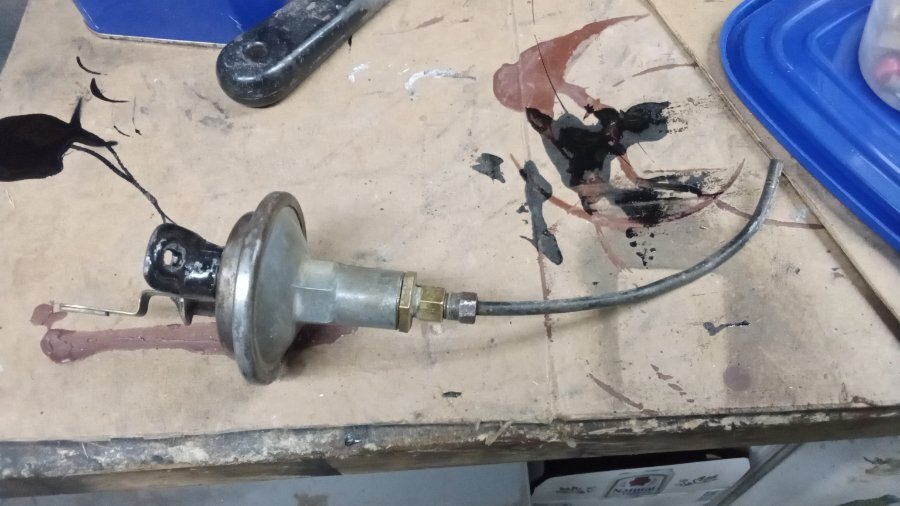
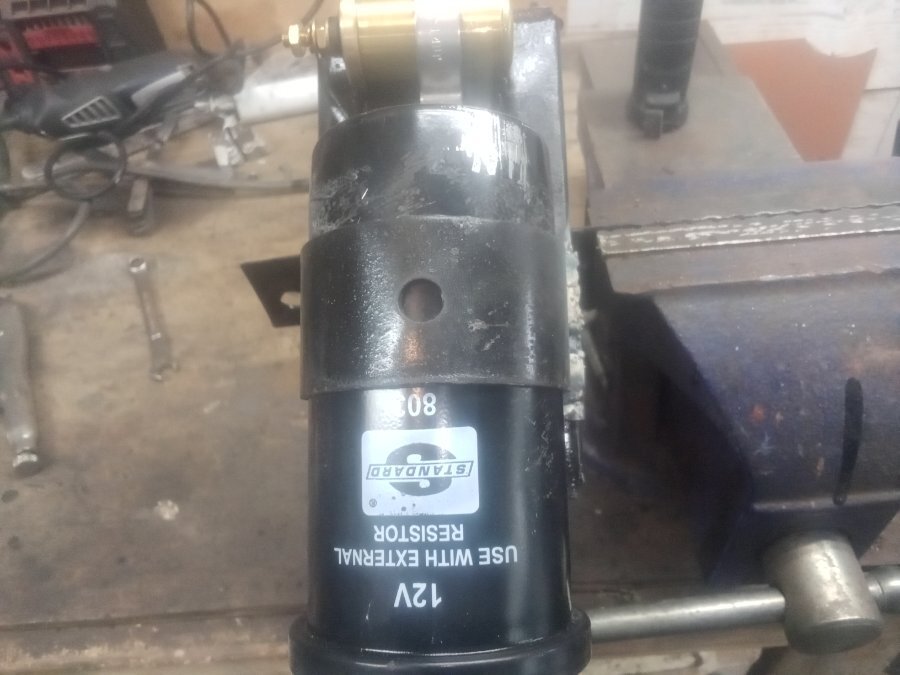
The ballast resistor comes into play when you have 12V electrics. The job of the ballast resistor is to drop the voltage from 12V to 6V so the points will last longer. Mopar even kept the same ballast resistor system into the 70's with electronic ignition just to keep it easy on the electrical components. Since you are 6V, you just need a regular 6V coil. .... Here is a photo of my old 12V coil. All this means, it is a 6V coil and it is expecting you to drop the voltage to 6V with a external ballast resistor before the coil. A coil with internal resistor will accept 12V and drop it to 6V going through the coil. So a 6V car does not need to be concerned with a ballast resistor. .... Only Mopar used the external ballast resistor and it does not make sense to me. Chebby or Ferd never used a ballast resistor .... Sorry for the rant. I switched to 12V, electronic ignition with a GM control module and petronix coil because it makes sense .... too me. I should add, a new coil does not care which polarity you run through it ... positive ground is fine on any new coil. It does not care. If you have a old coil with 50K miles on it, it might complain if you swap polarity on it and give strange problems at different RPM's
-
Was 19 this morning and slowly warmed to 27 all day .... then for about 1 hour got up to 35 and is cooling down again. Anyways this is the 3rd day and will start warming up tomorrow.
-
New B-3-B owner with some basic questions
Los_Control replied to ktb's topic in Mopar Flathead Truck Forum
I would try and put a block of wood between the jack and block. The larger area the wood covers the more the weight will be distributed. ..... No idea how much space you are looking at, the more area covered the less stressful it would be on the block. ..... probably could lift it without wood ... I would want to protect it all I could. @Bobacuda is correct. By removing the timing chain, this allows the crank to be turned without the cam and lifters. It is a common trouble shooting task to determine if the issue is in the top end or the lower end .... possible it can be both. Will be easier to separate the two and fix individual issues. Example: I had a engine with a frozen bearing and 3 stuck lifters. With the chain removed I found the bad bearing and got the lower end to turn ... then just needed to work on the lifters. I would at least have the bearings and caps in place, even if the bolts were snugged up by hand .... just to support the weight of the crank .... Bolted to the flywheel leaves a lot of weight hanging on the cast crank bolting flange. I plan to replace mine in the vehicle after I measure and verify the bores are OK. This is how it was done in the 30's-60's along with valve replacement. Also at least lap the valves .... the seats get rusty when sitting with the valves open. I would suggest replacing the rear main seal while in there .... they all seem to leak a little. Also replacing the bad rubber mounts is a good idea, as they get old and compress, they will throw things out of alignment such as shift linkage .... replacing the mount can improve shifting gears. Good luck. -
Might help other people that are actual mechanics ..... I am not and have proven it many times over What year and engine are you working on? Some engines have known issues like leaking intake gaskets or many other possibilities. But yeah, seems like the oil is coming from somewhere in the top end.
-
I was thinking the same about the top of the pistons .... looks like divots. I think it is a optical illusion of the burnt, dried up oil on top of the pistons. .... The puddle of oil is not yet burned. I'm just guessing, but agree with Ivan on valve stem seals .... could the oil in the head leak down past the seals with engine not running. Then you would have a puddle and the puddle would be burnt on start up. .... leakage would be burnt while running .... puddle would occur while not running. Makes sense to me, no way for it to get past the rings if not running.
-
I do not know anything about the DCM MC conversion. Another popular conversion is the 1992 Toyota Celica MC. Simply because of the 3 bolt mounting. You would need to auger out one of the holes to make all 3 line up. You need 2 fittings to convert from 10mm metric to 1/4" brake line. You need to shorten your existing brake rod from pedal to MC. Then figure out the brake line connections ... remembering you need to add in a brake light switch. Your existing pressure switch is mounted to the old MC. You can add in a T to the brake lines and mount it there, I went with a electric switch. The advantage to the Toyota is ease of converting, availability if need future replacement. If running 4 wheel drum they will work fine without a proportioning valve ... If you add disk then you can select and add a proportioning valve. Many trucks running this conversion and not seen any complaints yet. I converted mine but still not driving it yet.
-
The only real advantage to the grease is, if you have a leak. If the oil pours out, then fill it with grease. Mine has oil in it and no leaks, while I might change the oil, I would replace it with oil.
-
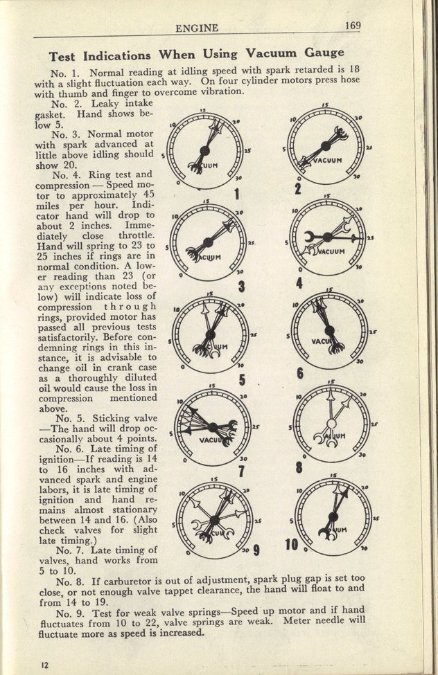
There is quite a bit you can use them for. Setting the A/F screw on the carburetor is easy .... always looking for the highest vacuum for a good running engine. Turn in the screw til the vacuum drops, then open it up until you reach the highest vacuum. Same with timing .... adjust distributor to the highest vacuum. Recently I used it to bench test the EGR valve on the wife car. If you open a old motors manual to troubleshooting, will be a whole page on different circumstances of a vacuum reading, you can tell if you have restricted exhaust, bad valves, late ignition timing ... pretty handy tool to have .... the hand pump claims you can bleed your brakes with it ..... I tried once but had bad results.
-
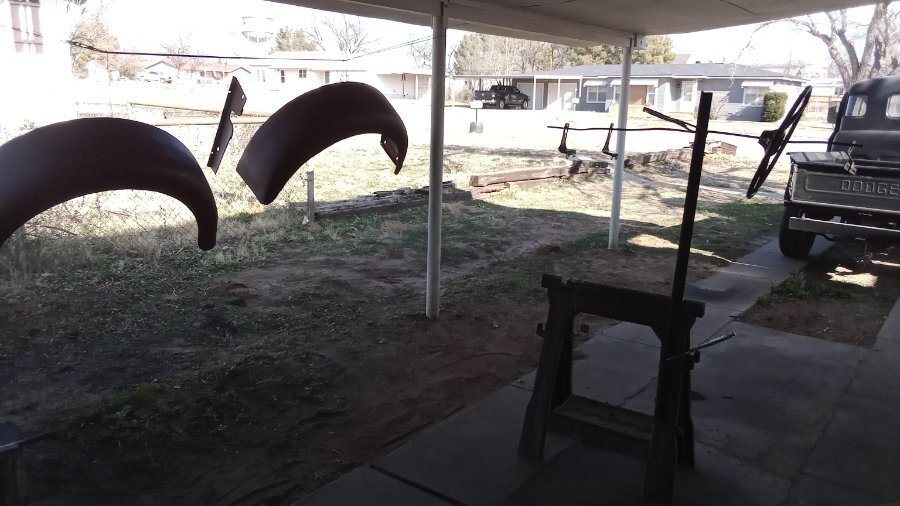
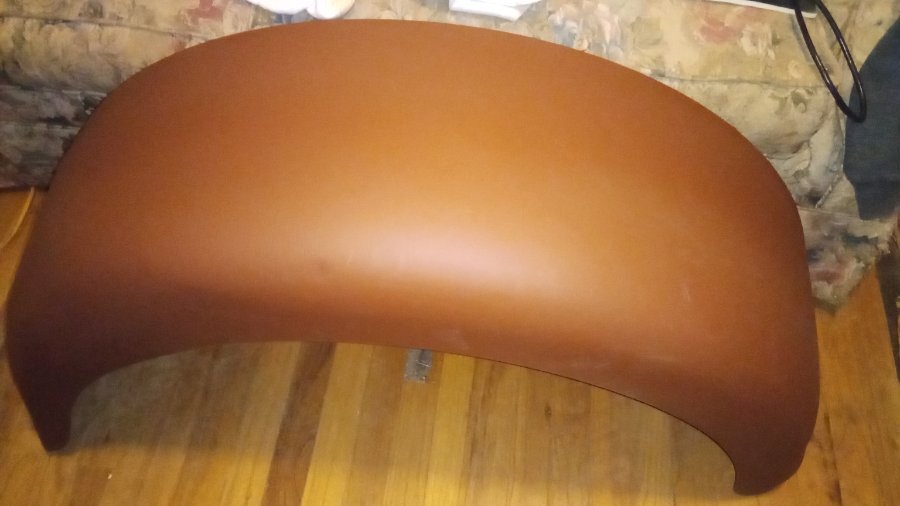
Did I mention I hate paint? .... well let me tell ya I should be shot for this one .... I painted the fenders the wrong color ... gloss black and not semi gloss. Just too many paint cans lying around .... I grabbed the partial can from the corner of the garage where I thought I left it and sprayed. Then I went to put the rest in the office so it wont freeze .... and the low gloss paint was in there. I instantly knew I sprayed the wrong paint. Gloss paint does not work well at all with this truck and especially these rear fenders. Oh well they have paint on them to protect them, I can move forward and work on the wiring now and repaint them later.
-
I agree with adding a aftermarket gauge to test with, until you fix the original. .... I would want to know what the temps are while driving for peace of mind. There is a liquid gas inside the tubing of the gauge .... You freeze the new donor gauge and all the liquid gets pulled into the bulb. Then you quickly transfer the bulb and solder it on before it thaws out. .... there are youtube videos showing the process. Leave the tires on to check the king pins. You want the tires off the ground and then use them for leverage. Grabbing top and bottom try to rock back and forth while watching for movement at the king pins. ..... There should be zero movement .... shows there is wear between the bushing and the pin. I imagine a little play is not life threatening ... Top passenger pin on my truck has 1/16" of play .... I figure in a few years will be time to replace .... will have to keep a eye on it. It also had a bad zirk fitting and would not take grease .... I had 1/8" play, I got grease in it and now down to 1/16". Good looking truck! What is going on with the fuel system? .... you say first drive that sounds like it has been parked. Have you checked the fuel tank for rust and debris? Be interesting to pull off the top of the carb and see if you have any floaters in it that came from the tank.
-
GAWD I HATE PAINT !!!! Nuff said.
-
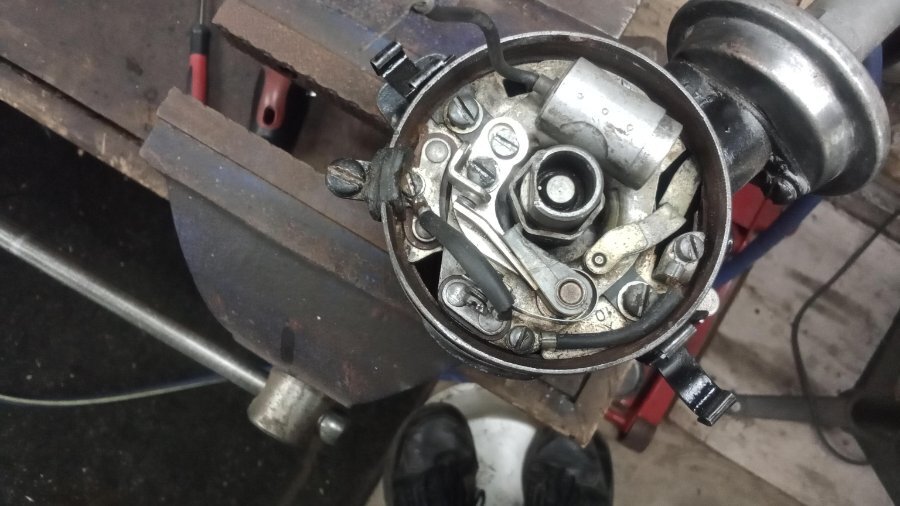
Just my 2 cents. If things are working as they should, the plate rotates smoothly on a flat plane ... I had one distributor with ball bearings it rotated on .... while I did free it up, the ball bearings had rust on them and were no longer smooth and round .... the plate would go up and down as it rotated. And if the vacuum advance is frozen and non working, when the plate rotates and the advance arm does not .... something has to give and the pivot point with no clip would be the weak link. The vacuum advance will pivot with vacuum applied to it ... have you tried this approach to use a little hand held vacuum pump to operate the vacuum advance? Does the lever still pull off using the vacuum pump? .... this is what the parts will see is a vacuum moving the parts. .... not you manually moving them. So in a perfect world, no clip is needed .... If you have something less then perfect .... A clip to hold the arm on may not be the correct fix. These are pretty cheap and many uses for them around a vehicle.
-
Here is a picture of mine before I modified it .... there was no clip.
-
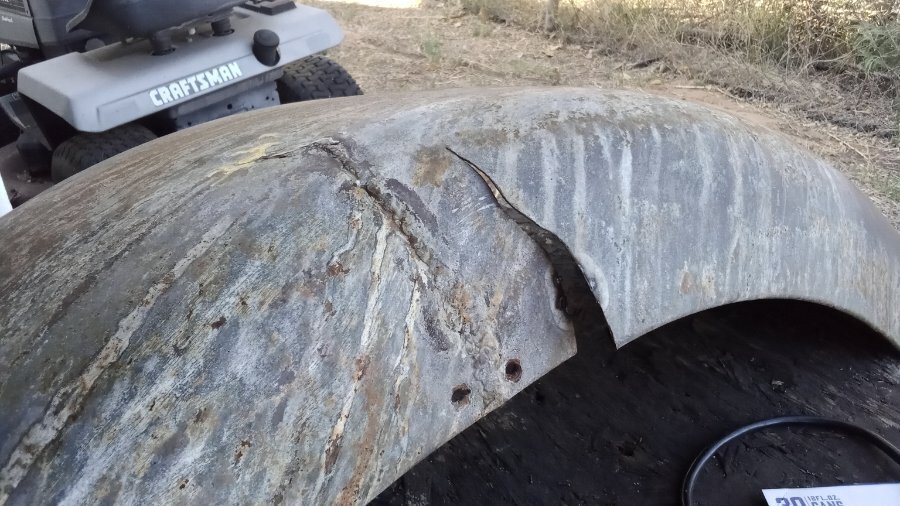
So I opened up the paint booth today. Was a balmy 55 degrees out. There were no bugs injured in the process Actually came out OK, the fenders were total junk. A before pic of the passenger fender, the best one of the two. They are still rough, they are stronger now then when they were new ... I love them. I will work them over before I put final paint on them .... I see a few dents already that I classify as character and will be left alone.
-
Think it depends on which fitting we are talking about. The vacuum advance technically has 3 fittings and 3 different threads. The middle adapter I believe is NPT threads like @Plymouthy Adams suggest, then standard lines will thread to that .... the carburetor has the same adapter and believe a good hardware store would have them.