

Los_Control
-
Posts
4,968 -
Joined
-
Last visited
-
Days Won
42
Everything posted by Los_Control
-
While I do not know the answer, if I wanted to know I would start here. https://hubcapmike.com/ Seems they have just about every type of hubcap and in my case with newer wheels they show how to measure the outside bumps for correct fit. I would assume somewhere in their site is what you want.
-
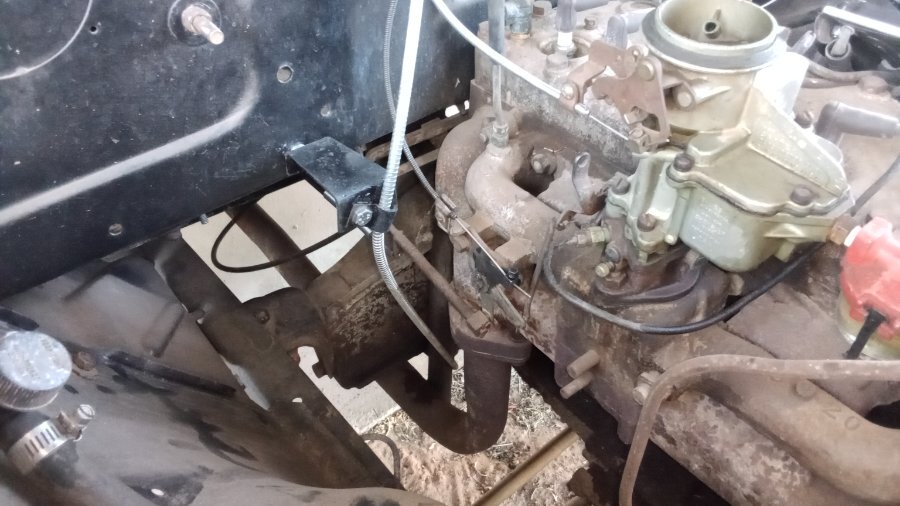
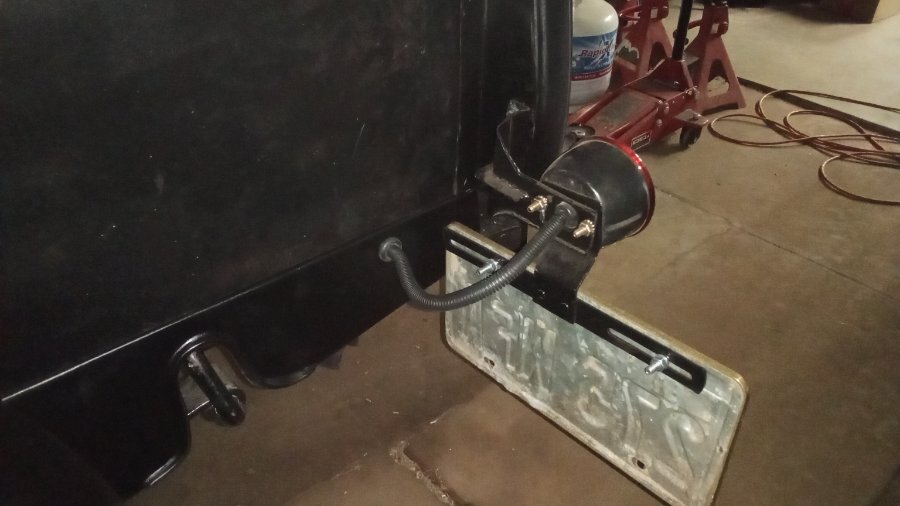
I dunno, I think the way you have approached and built your truck .... it deserves the extra niceties. While my truck is often built on git me byes. The tail lights I posted above are cheap $10 lights sold for semi trailers .... they should work for 3-4 years and then I can decide to buy better. .... I can also decide to install better wire loom at that time .... this will get me on the road. Today while working on wiring, I spent the day connecting engine controls. The choke cable is for chebby and was 8" too long so I needed to modify it. Throttle cable went back the way I removed it. The E-brake cable is also from some chebby truck and is too short, it rubbed on the throttle linkage so I made a bracket for it. ..... I suspect some day I will be installing a different rear end with different brakes .... this is a git me by that works ... Temporarily. Possible if I reroute it, I can gain the 3" needed. My wiring looks exactly as it should .... A mess. But it is slowly getting closer to what it needs to be. I'm satisfied with what is finished .... just what is not is a mess. So yeah I have plastic sheathing on my wires for now ..... I reserve right to change that at any time in the future.
-
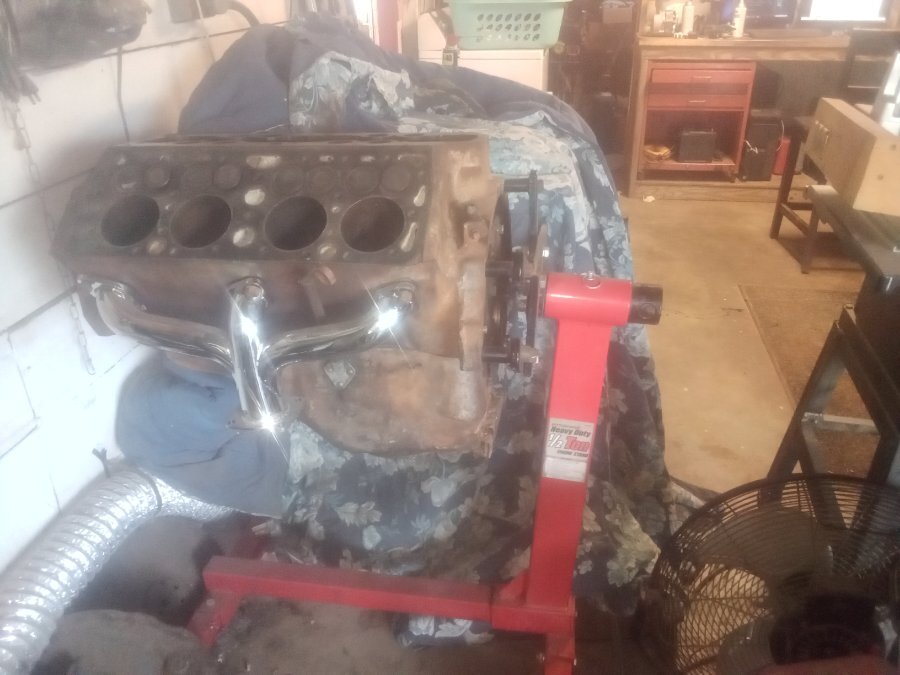
Looking at the failure on my step .... It all looks perfect, except where the bolts and washers attach it to the frame ... Tightening the bolts damaged the coating. It would probably be fine if we used something like LINEX uses with their masking tape with a string in the masking tape to create a hard line to stop the product. And stop the powder coating at the mounting holes and just use regular paint there. My step I'm talking about, they clean up and look fine and are pretty old. Just where the mounting bolts go through it fails and makes the whole thing junk. I have these headers I bought, I'm afraid they are powder coated ... they might not be .... If they are, I would suspect them to fail around the mounting holes and start rusting after a few years and basically look like crap. .... they might be chrome but I doubt it. Probably why Summitt had them at a clearance sale for $40.
-
Several years ago while bored, I was doing a fair amount of research on DIY powder coating. I never used any of the knowledge and quickly forgot it. .... seems a basic kitchen oven could work for items that would fit. Then I was reading on how others were building their own ovens for things like bumpers and such. Not really technical .... did not need to be a rocket scientist to make it work. I was thinking it could be something fairly easy to get started at home and be a potential way to make some cash on the side, powder coating for friends and local persons. As pointed out above, proper preparation is everything to creating a quality product you can sell to friends and remain friends. Oh well, I seem to have lost interest in the process. I can say the steps on my daily driver are powder coated, where the bolts pass through for mounting, has broken the seal of the powder coating and caused rust. This has just multiplied the rust process making it far worse then if they were painted and the paint failed. ... would have surface rust. Where the powder coat has failed, literally has eaten the metal and has large holes in the steps now .... some day I need to remove them. Same time, if they were painted ... I could weld in patches and repaint them. Removing the powder coat would probably require sand blasting and outweigh the cost of simply throw them away and buy new ones. Done wrong, is not a good thing.
-
Your truck has the real cool cloth covered wire protectors .... that's sexy. I wanted to ask you where you got it from .... to be honest, the plastic works fine for the purpose of this truck .... a daily driver. Cheap and easily replaced if needed.
-
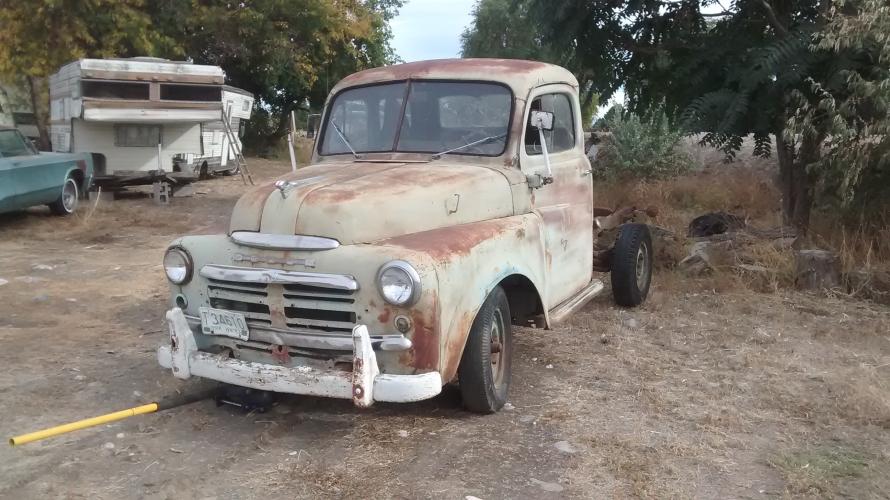
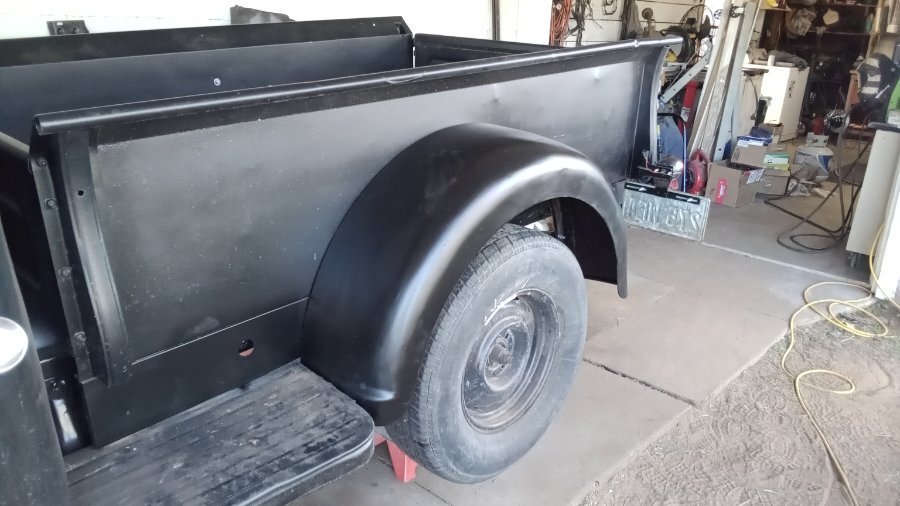
Well yippie and look at what I did! .... Just goes to prove even a blind squirrel gets a nut once in awhile. I actually grabbed the correct bucket of paint and sprayed the fenders ... One of these days I may wash this truck While the weather was cold I started working on the wiring .... Thanks to @Sniper I have a working charging system. Today I spent way too much time on building the tail light and trailer connection wiring .... but I got er did. Then I moved to installing the vacuum wiper system .... what a treat that was and took the rest of the day. Did I mention I also got the inside of the cab painted? .... been working at it. I have the fuse box mounted .... I was finally sensible and installed it inside on the kick panel. Not as sexy as @bkahler lights .... for a beater with a heater they will work
-

Priming fuel pump after sitting
Los_Control replied to Salomi22's topic in Mopar Flathead Truck Forum
While many say it is bad ... I will just give it a squirt of starting fluid. I do not remove the air cleaner, just spray a little into it. .... This will be enough to get the engine to fire off. Even if it just tries to start and die, it is spinning fast enough to get the fuel flowing. I have seen some remove the air cleaner and spray it into the carburetor to keep a engine running .... that is bad and will wash the cylinder walls. Just a whiff to get things flowing, I do not feel is bad. .... sure saves on the starter and battery. -
I looked at your video you shared .... right about the 9 minute mark he was talking about a contraption that operates off of oil pressure and controls the lift/duration of your intake valves .... All I know is he said they go bad and are expensive .... just something I would want to learn more about.
-
It would be nice to replace the seals and find a obvious leak. No question it is a small high performance Hot Rod engine that runs under high stress. I wonder if it would do any good to put the plugs back in the head and then fill the chambers with gasoline and check for leaks? The intake valves on #3 look pretty clean, #4 has a little smudge and #1-#2 are filthy .... seems exhaust valves are always black and sooty, while intakes are clean ... on a good running engine. I wonder if the valves are leaking, can we lap the newer modern engines the same as we could the older engines .... to get the valves to seat? Or do the seats have to be surfaced with a seat cutting tool?
-
Creative electrical, need help holding in the smoke.
Los_Control replied to Los_Control's topic in Off Topic (OT)
Well I used this one right here .... Thanks for finding it, when I search I always get the same one I posted above. I can say no fires were started .... I think it is charging .... Time will tell. I checked the battery before starting ... it was 12.4 volts. At idle the truck showed 13.2 volts Not the 14.4 volts I want to see, but the battery really was not discharged so maybe 13V is all I should see. I will leave it as is for now and next move on to the dash lights, volt gauge, fuel gauge, running lights. The headlights, dimmer switch, turn signals should be extra fun 🙄 I planned on two 2 wire flashers and today I see my sigstat 900 switch wants one 3 wire flasher .... One circuit at a time. -
Creative electrical, need help holding in the smoke.
Los_Control replied to Los_Control's topic in Off Topic (OT)
LOL .... I read your post at 4:00 AM and no chance of going back to sleep .... I would like to return the comment The diagram you show does look good to me and I think I will try it. .... It looks old and I can smell the must coming off the 50 year old book. Meeting at the junction (starter solenoid) will be fine and it is connected to the battery. The only problem I see with that is running the alternator through the amp gauge .... I suppose it is a opinion and has been done both ways for many decades. Interesting the relay connector on back of alternator does not get used .... only used if you have a idiot light ... I do not. I have been so worried about protecting the 14 ga wire with a fuse .... the diagram I showed has the #12 fusible link on the 10 ga wire which I did not protect. Not sure how much I will get done today, I do have to go to town and plan to pick up the fusible link while there .... wife wants to adopt a dog from the pound. No idea how that is going to go and what time I will have to work on the truck. -
Sounds good on paper .... linkage previously adjusted to compensate for worn mounts. New mounts, now they need to be adjusted again .... hope that is all it is.
-
Just throw my 2 cents in .... The fluids available today are far superior to what was available when these vehicles were made. They suggested GL1 back then because it is all that was available. I'm using 85-140 GL5 from walmart because it is easily available to me. .... And it is cheap! The 85 is a little thinner then the 90 .... 140 is offering higher protection and GL5 means it has more special additives to it. The main concern is to read the label and verify the oil protects soft metals .... after a large lawsuit a couple decades ago, most if not all do .... just read the label. You will get many opinions when talking about oil .... my opinion on GL1 is, I would not use it in a old farm tractor that sits in a field .... when there are better and cheaper oils available. The next question would be, How are your engine mounts? If your rubber mounts are deteriorated, shrunken and hard .... it could cause excessive play in the linkage and mess with your shifting.
-
Creative electrical, need help holding in the smoke.
Los_Control replied to Los_Control's topic in Off Topic (OT)
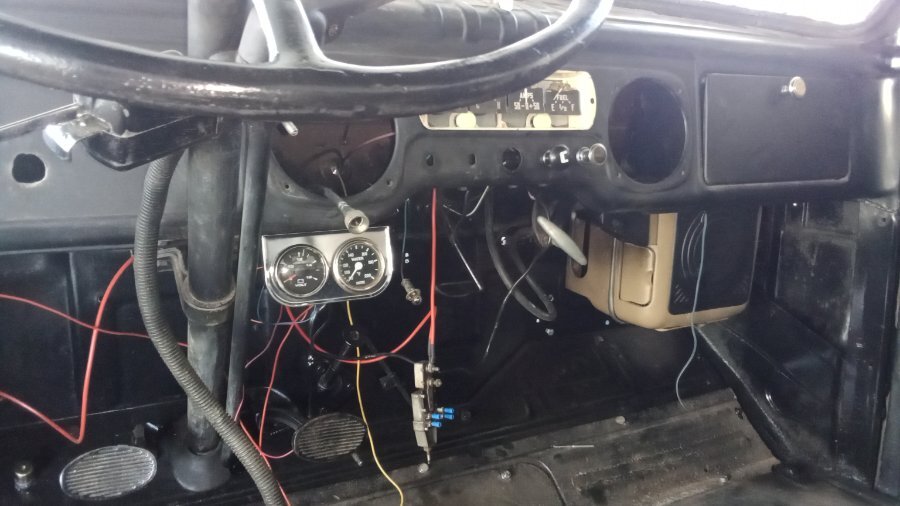
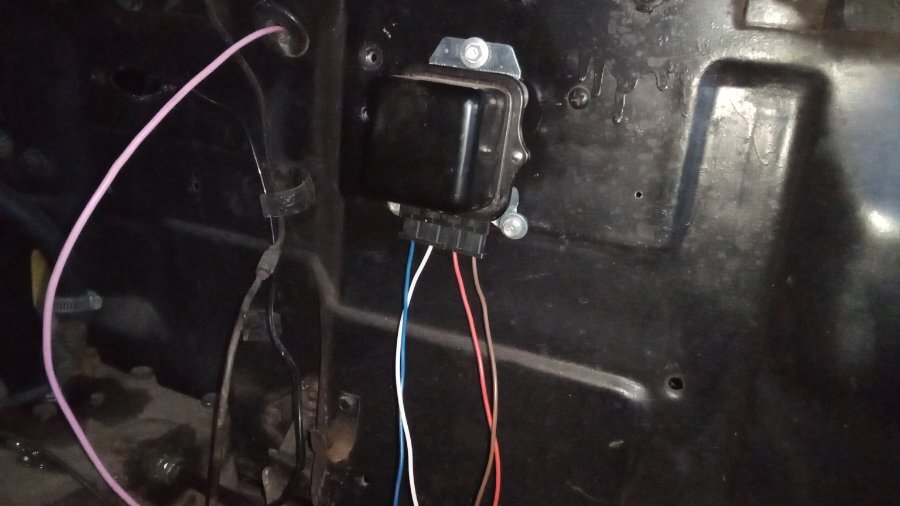
They call #3 a voltage sensing wire? #4 is connected to ignition switch or coil .... it provides the 12V needed to make it charge? To early to put the plastic sheathing on. I think I can make it kinda clean with the fuse holder poking out of the sheathing as it is in the photo. The only thing left for the charging system is to connect the after market Voltage gauge .... then I can start the truck up and verify it works or try something new. Been spending time making the dash gauge wire harness and mounting the fuse panel. and hope to be able to start it by the end of the day ... using the key. I have a 12V > 6V converter to wire in for the fuel gauge .... I wired the sending unit a year ago and am hoping I marked the ground wire .... all bundled up under the cab with the tail light wires. I tested the speedometer on the bench with a drill .... before installing it, needle never moved so it has internal issues .... need to dig out the spare and test it. Everything always takes longer then I think it will 😕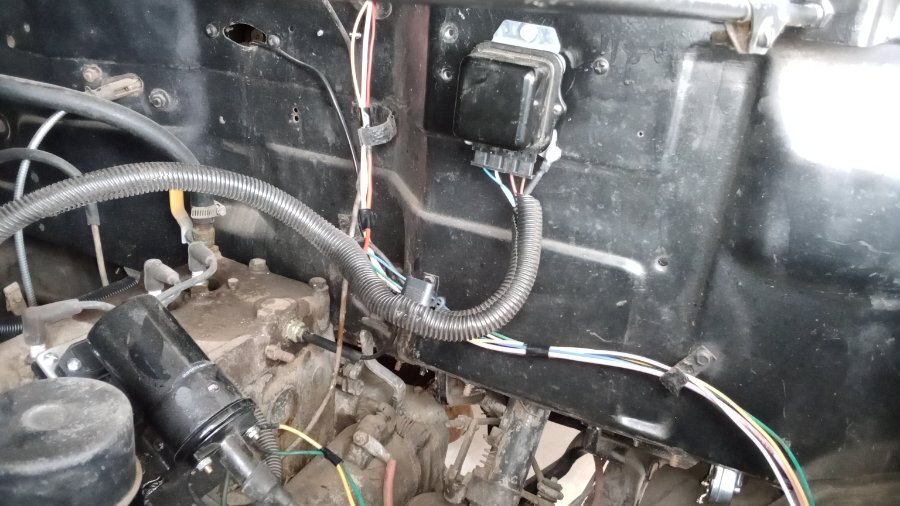
-
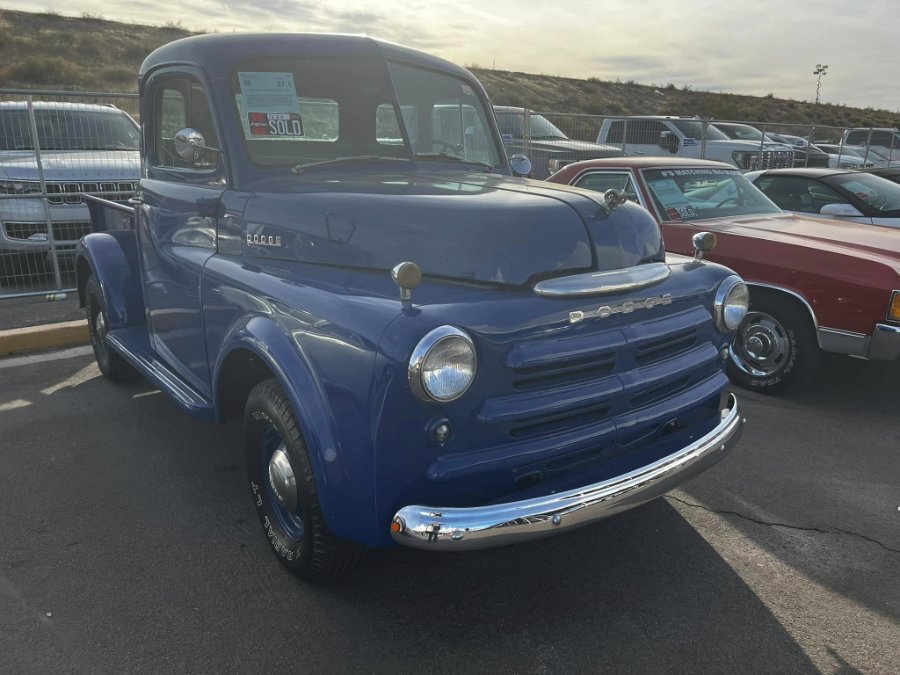
My 2 cents .... a very limited photo ... it has been converted to 12Volt, I question the quality simply because I see at least 1 original cloth covered wire, Who knows, maybe that year they were already 12V and the wiring is just patched .... I dunno $9500 still sounds high for a project. I saw this one on FB this morning, sold at Meacom auction for $13500 .... Granted that is a good deal and have seen them sell for more ... in todays market that is what it sold for. We know your truck has questionable wiring and should be replaced, will need tires .... paint in the photo is not that great ... has been sitting for years, does the engine turn over and does it have any stuck valves? .... From the one limited photo you showed, I would say it is over priced.
-
Creative electrical, need help holding in the smoke.
Los_Control replied to Los_Control's topic in Off Topic (OT)
Sadly I'm a bit too far invested into this GM charging system .... I thought I was ordering a 1 wire internally regulated alternator .... so my charging system is a mistake to begin with .... but I have it now. And all the needed goodies to complete it. It should be fine once all is sorted out. Just the darn Voltage sensor wire where all are saying 10 ga and the factory wiring harness has 14 ga. So my thoughts are to just install a inline fuse of 15 amp. Internet tells me to use 15 with 14 wire. Actually tempted to run it through the fuse box .... I just do not understand the wire that much. It is always connected with the main 10 ga wire from the factory or the other diagram I showed .... so I'm just connecting it under the dash with the same wire because I do not know any better. I'm not using a fusible link, because would prefer to have the option to just change a fuse if needed. .... I only assume that is fine? -
Creative electrical, need help holding in the smoke.
Los_Control replied to Los_Control's topic in Off Topic (OT)
Thanks for the help @Sniper does this make sense? I want the Alternator to join on the outgoing side of the amp gauge and will run 10GA from Alt to there. Then run from the VR to the same post using it as a junction block with 16 GA ... just continue with 16 GA the vr already has. Hard to draw with a mouse, but is the general idea I'm thinking of.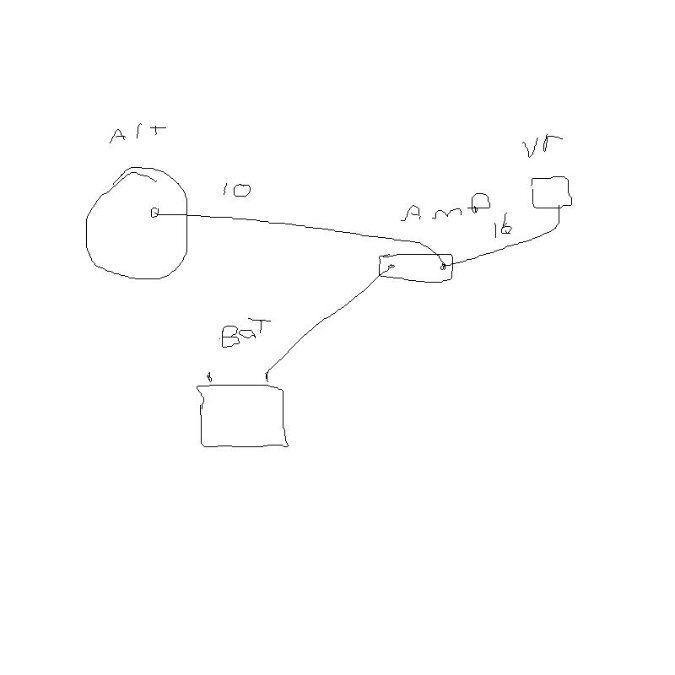
-
To be honest, I think pulling the head is the next step. It is obvious there is oil in the cylinder .... it is a internal problem. You will need to actually open it up and look.
-
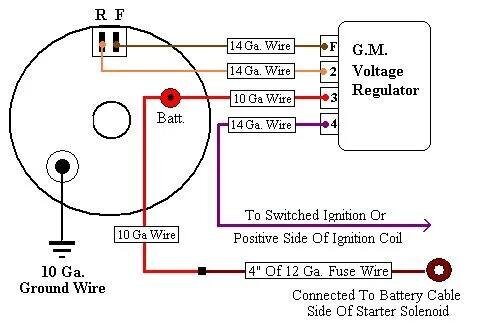
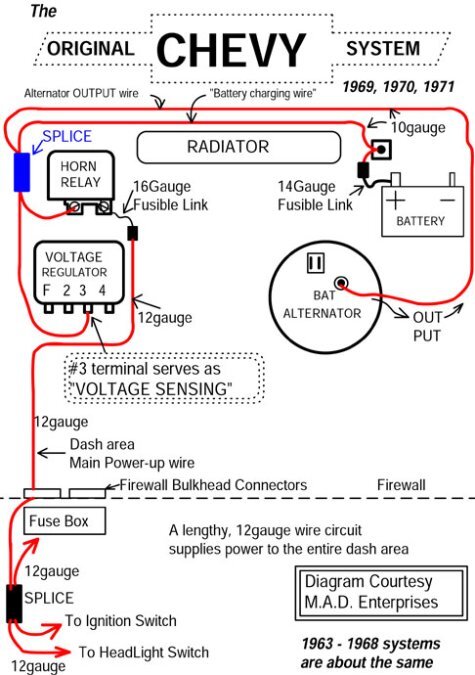
Wiring up my charging system and I'm confused as what to do with wire #3 on the voltage regulator. I have a factory ACDELCO replacement plug for the VR .... All 4 wires are 16 GA I'm afraid if I were to connect 16 GA wire to the main lug of Alternator, would eventually melt. Obvious this is not a factory wiring diagram .... the factory shows it also 10GA with a short piece of 16 GA fusible link and connected to the battery post. From what I have read, it serves as voltage sensing .... Here is a version of the original wiring. Again they say to use 10 GA wire with a 14 GA fusible link to the battery. .... It is just the wire size I'm confused on because the plug coming out of VR is 14 GA not 10. Does it matter if I just run 10 GA to the 14 GA and have it the fusible link on the VR side? Everbody says 10 GA but the factory ACDELCO plug is only 14 GA ...
-
My thoughts are access to the gauges. .... Most vehicles like my truck are very difficult to lay on the floor and get access under the dash. I find the seats are bolted to a platform, you can remove the seat but the base is welded (brazed) to the floor. I removed my base from the floor. I now have access to lay on the floor and work under the dash. I used a grinder and a cut off wheel to remove the base. Then I rebuilt the base and it bolts to the floor using 16 grade 5 bolts. And the seat bolts to it .... so I can still remove it in the future. I may be missing your question here .... I think what you really want is access to your work, removing the factory base is all I know. I'm in the process now of re-wiring my truck .... I'm so happy I removed and modified the seat base.
-
C'mon Ivan .... you making me look bad .... I'm just a carpenter .... I hack on wood. I do not think so. Your engine is creating 195-205 psi compression ..... rings and valves are working correctly. ..... just a bad gasket. I can not answer that .... I know what you are saying and what you mean .... I realize those cylinders would be at different strokes .... I read that 2 cylinders side by side sharing same compression reading is a possible sign for a blown head gasket and they share the compression ..... was 40 years ago. There was no distinction on how many cylinders it had .... 4, 6 or 8 it all meant the same thing. ..... I give the deer in the headlight look and can not explain exactly why .... just that it has happened since the automobile was invented. I think there are at least 6 times in my life, driving old junk .... I replaced just the head gasket .... 5 times worked well one time on a old 1960 chebby with no torque wrench it did not work. Replacing a head gasket without doing other work is kinda common. Some mechanics may suggest replacing the entire motor .... makes sense if you are paying a mechanic by the hour .... If doing the labor yourself, and it fails .... you are out the price of gaskets and some time. Have you checked carpart.com for a used replacement engine? Possibly $700 and has a 90 day warranty .... replacing the head gasket might be $200? I would at least carefully remove the head without damaging the gasket .... would not be surprised you find a pathway where the gasket has been leaking. For giggles lets google. Is 200 psi a good compression? The limit for street engines seems to be around 200 psi of cranking pressure. Numbers higher than 200 psi create excessive cylinder pressure at low engine speeds, which turns the engine into a detonating monster This was written in 2002 ... times have changed .... 155 on my chebby V8 is good, 205 is a monster on you 4 cylinder and a blown head gasket is part of the charm.
-
No, please say no .... tell me you are not going to put red rims on this beautiful car! .... Only @Plymouthy Adams would appreciate the red rims.
-
Thats what I was thinking 195, 195, 205, 205, You would like to see 205 across the board. The 2 cylinders have a blown gasket and they are sharing compression .... this means they have a larger area to fill "both cylinders" So rings and valves are doing their job and building compression .... just a larger area so they show 10 psi less. The oil would be leaking into the cylinders and obvious by photos being burnt ... that should cause a misfire code because of burning not as efficient as they should. Sitting here at the bar stool and giving advice ... I say go for it! My 350 chebby vortec engine has 155 psi and I think that is pretty good .... 205 psi is a lot and goes with the gasket is working harder then other engines theory. For your list of symptoms, sounds like you are right on top of things ... replacing the head gasket now should be pretty painless. Waiting til later you might see worse symptoms and even engine failure. In a perfect world, you would pull the head and see a spot where the gasket failed ... just replace it. In my world you might pull the head and then find a crack and now we are going deeper .... I suspect it is just a failed gasket .... check the head surface is flat before going to far.
-
I would just toss a guess out there .... I'm not convinced it is a stuck oil ring .... that might be a common issue on our old iron ... I think I have one on my 1949. On a modern engine with modern oils .... I do not think so, or it would be my last possible guess. You never did post what the compression readings were. Anytime two adjoining cylinders show less then normal compression and those 2 cylinders have the same compression .... good chance it is a blown head gasket. If the gasket is blown between a oil port, it would allow oil to get into both cylinders when the head is draining oil back into the pan on shut down. My past experience with 4 cylinder engines, not all but some it is common to blow a head gasket. The small engines do not have a lot of room or surface area to install adequate amount of head bolts. Then modern engines really do have more compression and work under harder loads .... We get so much more horse power from a engine today then 30 years ago. Just not uncommon to blow a gasket. If I was a betting man, I would bet on a blown head gasket before a stuck ring. .... Easy fix.
-
Er oh .... someone get up on the wrong side of the bed this morning .... and such a beautiful day it is I love old Hoopty's and stand behind them .... in case the brakes fail My philosophy is they are cheap to run if you take care of them. .... Key is to choose one that has a proven track record for dependability. When you price a transmission rebuild on a modern car the price is crazy..... the electronics are a headache and expensive. A replacement motor cost more then my first house. A 1993 Caravan Rebuilt transmission $2K Used 135K engine ... $600 New tires $400 .... Shocks, struts, brakes, axles .... every sensor, tps, maf, egr, 02, coolant, .... You can basically rebuild a complete older car for $5K and make a very dependable car out of it. Basic insurance for the van and my truck is $230 every 6 months. Registration is cheap. Naturally you need to do the labor yourself ..... One major repair on a 10 year old vehicle can can require a shop to do the repair and exceed $5K Very cheap to maintain and drive a older vehicle.
