rb1949
-
Posts
770 -
Joined
-
Last visited
-
Days Won
4
Content Type
Links Directory
Profiles
Articles
Forums
Downloads
Store
Gallery
Blogs
Events
Everything posted by rb1949
-
Always a project to keep busy. Is it close to the original 'rib' design? Looks easy to sweep out. I just bought one that's a pretty good fit. Hoping to be careful, the cut-out for the spare will stay attached, yet lay down in the well for protection.
-
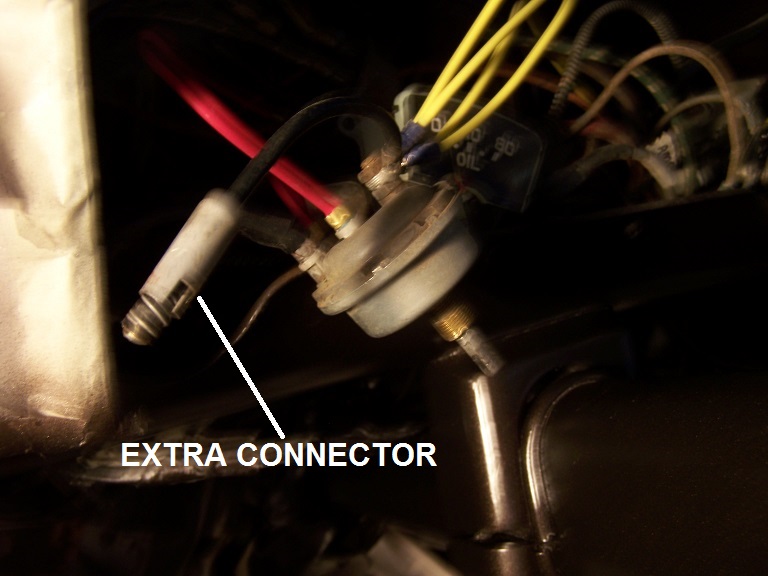
Yellow are my new wire for the dash lights. As I found (post #6) this odd ball thing is for the radio light. All to same switch terminal to illuminate when on. Doubt I be putting that ungodly monsterous radio back in. Could leave extra lead coming off to light up something else at a future date, just make it more accessible than that stubby thing.
-
The tips are slow, steady and meticulous. Are you up to the job? I redid inside the trunk. Not too bad, tracing & replacing one by one, only 8 wires. Up front was a different story. Seeing that bowl of spaghetti was beyond my comprehension and ability. But was able to accomplish a partial rewire, replacing the obvious defective ones. Again one by one. Takes time. Also cleaned, reworked or replaced all the pigtail connectors in the lamp sockets. Make sure all connections to ground are clean. If ambitious, and can identify which wires, start jumping power to each lamp to see if they work. Label what's what in the process of elimination. Good luck.
-
HOLD IT HOLD IT. Just went and looked at non-functioning radio, which was removed. There is the other end of this connector! So it must be to illuminate the radio dial when the lights are on. The schematic does not indicate an in-line fuse. Pretty hefty cable for a light bulb. Remove it, not needed.
-
Clock & Radio have separate wires. A fuse, to what? All lights were working, spotted this when the switch was pulled. Will dig again and try to fine the other end. Schematic does show a circuit breaker off the B terminal.
-
Glad you asked and told the facts before shopping.
-
Any idea what this connector is for? It comes off the light switch. Have not seen another wire nearby that would have the other end to connect to it. This is on a 1949 Chrysler. It's on the terminal that illuminates the dash lights when turned on.
-
Follow good advice above. Power the bulb itself to make sure both filaments are lighting. Socket and pigtail contacts clean, providing power & ground. True, bulb fits 2 ways and try rotating. One by one in the process of elimination. I identified old crumbling oxidized wires to be a problem, so replaced all in trunk. Trace and replace one by one, not too hard, which included new pigtails in each socket. I reconnected wires by using a terminal block in trunk. Stick around to give, or ask advice.
-
Beautiful set of wheels. Enjoy the ride(s).
-
Great to hear. Having fun is the best part when you have old iron to drive.
-
Caution to the wind. Drills and saws helped dismantle things and production moved forward at a better pace. Getting the instrument cluster housing out gave room to work on necessary wiring. Think odometer, trip odometer, and trip odometer reset cable are working. Had to make a new fiber gasket for the cluster. (Posted the template). Now, will all these pieces go back together?
-
Glad you are alert so the funds can be applied to something useful.
-
Hey Mr. Indiana, hoping you can maintain a decent quality of life for the things you enjoy. And can continue to be a helpful inspiration. We don't want to miss your wisdom here. Slowing down means we adapt to new habits. Health issues had me hesitant about getting an old jalopy, how long could I enjoy it. Crap, just do it. Sorry about having to part with your fine machine, but the desire will have you motoring again in due style.
-
Version PDF
31 downloads
This is a PDF template for the one piece paper (fiber) gasket for the 4 gauges and odometer housing that mount to the rear of a 1949 Chrysler Instrument Cluster. I believe 1950 used the same cluster. Made to keep dirt, dust, etc. from getting into the gauges. Cut with a sharp instrument to avoid 'tearing' the material edges. Punch the screw holes slightly lager than the screw. Print the template at 100%. -
Did see that some of those with the single piece rubber 'strip' do include the center bar piece. The one piece molded does sound advantageous. Got the interior trim off, one piece. Not the center, which I see the inside strip screws into the outside chrome strip. Loosened screws to remove the outside visor. Evaluating set-up. If I have it installed, should be a savings if I can remove the old glass and rubber myself, and clean up channel. Getting it to a shop with no windshield would be windy. Holy cow, that old rubber is HARD!! Not a bit of flex. Is it correct thinking to start cutting the rubber from the inside? Heat gun to warm/soften it a bit? Then the glass should push toward the outside? The current glass isn't broken/chipped, but has some cloudy edges. Was reading that silicone sealer/adhesives may be the culprit, leaching into the laminate. Each project is try to learn as you go. No response yet to compare local glass prices. ADD EDIT: the exterior stainless trim is also quite challenging, 'stuck' into that hard rubber. Nothing thin wants to slide under it. Is it just some flat tabs that slide into a slit in the rubber? Picture by chance.
-
Obviously the divider makes it a 2 piece. Yet some sell rubber which seems to be missing that piece, so it's incomplete. Haven't found any detailed installation talk. Some say "X" doesn't fit. Others say "X" fit perfectly. Some recommend "Y" or "Z". Most fairly recent, so a bit early to determine quality/durability regardless of price. Can order glass online. Waiting to compare what local prices may be.
-
I meant the ones used as 'cabins', not boats. Costs a lot to fill that tank and drive it.
-
Checked out good prior discussions, and lots of opinions on which windshield rubber to use. Mine is due, the 2 piece flat. Also checking on new glass, and if it can be cut locally. And paying attention that is has to have the "slot" rubber for the exterior stainless trim. (Which may be difficult to remove, stuck in the old, dry hard rubber.) Questions, not only on the fit of the rubber, but on the wide range of prices and what you get. It could be a roll having a seam, or a 1 piece. The less expensive rubber seems to be the perimeter of the glass. The one that cost much more says it has the center divider bar. Being 2 piece, isn't that center section necessary? Why would you replace the perimeter, and not where it seals in the center? Or does the product on a roll also fit the existing center bar? If one piece, with the bar, then the rubber has to be pre-mounted to both sides. Tales indicate using the string/rope from the inside. With sealant. I'm hesitant about this being a DIY project. Thanks.
-
 Looks delightful, and a bargain too.
 -
Why not be clever. I'd guess that 70% of the boats in the local marina serve as floating weekend cabins, not going anywhere.
-
1,000 HP, each side. Not for fishing.
-
50¢ dozen last week.
-
An old tool, handy when you own an old car.
-
Good pictures and advice. Goofy bulb is still reluctant. Seems to 'wiggle' but not come out. More spray before freeze plug attempt. Got mad, and pulled the 2 gauges from the cluster to get it out of the way. Slightly more room to work. Can remove switches. Wiring is a disaster, thanks to Chrysler. Anyhow, did spin the speedo, and it works. (Nobody ever said it works counterclockwise.) Trip odometer rolled over, but not the regular mileage dial(?). Gave it some oil. Trip odometer reset cable is frozen. Lots of complicated gear mechanisms in there.Will proceed with caution.
-
If the car was disassembled for a paint job, you're lucky. Otherwise I agree, no judging, no big deal.