Jump to content

JSabah

Members
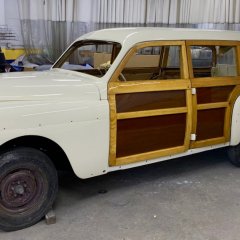
  • Posts

    384
  • Joined

  • Last visited

  • Days Won

    3

Everything posted by JSabah

  1. Does the steering box need to be out of the car in order to install new seals? If so, other than using a grease to slow the drip, is there any “stop leak” which can be used (I’ve used an additive on another car for a rear main seal and a Lucas product for a power steering rack.)
  2. Thanks. I think I'll try and anneal them and reuse...just because I like to have original type parts when I can.
  3. I seem to have these odd crush washers on my ‘49 P18 (woodie). The wheel cylinders are obviously held in place by the adjustment bolts but these also seem to cover the backing plate .... but since they are “soft” I don’t see the point (other then sealing). Are these original, and needed or can I just use 7/16” regular crush washers from big box store? If I need these, should I heat to red hot and let cool to re anneal? I could not find details on this in the service manual.... thank you
  4. Knowing that those disks had to come off made all the difference.... afterwards it was easy peezy. Boot done, now shocks installed, suspension painted, all greased up, new bearings and dust seals, shoes adjusted, and all nuts torqued to correct values. Only things left to do on this side are make sure the axle nut is tightened correctly, install cotter pins, get a copper washer for brake hose and install/connect to hard line..... then do the other side of the car
  5. FYI, those discs came off. Right front brake, suspension and tie rod all cleaned, painted and put back together
  6. Thanks for the heads up. I was surprised as to how thick and stiff the ones I got are. I’ll watch for any issues. Thanks again
  7. my 3/4" MDF form worked great with a bit of slowly applied hand pressure. The fronts of the front pieces needed a little extra attention as they had the sharpest bend. Did the final shaping of the front on the car by unscrewing the front clip, slipping some wood shims behind it (so as to not scratch the car and allow it to be slightly over-bent allowing for spring back) and applying more hand pressure.
  8. Which ones? the thick ones, AB's or chain store ones?
  9. Thanks for the heads up. I was surprised as to how thick and stiff the ones I got are. I’ll watch for any issues. Thanks again
  10. Perfect. I recently found and purchased an Autolite 12v regulator (rebuilt) for a 56 Dodge/Plymouth/Studebaker .... and had had my generator rebuilt/modified to 12v .... we are on the same page. Thanks!
  11. Just found this “before” pic in which you can see the lighter color and just a bit of the darker (low in the picture)
  12. I just painted mine the same bone color as my car.... which turned out to be very close to what my wheel was. But then when I sanded it a bit, I found two more slightly darker colors (more tan) .... sorry I can’t be more help
  13. Well that makes sense now. This discs will come off one way or another tomorrow. I had tried gently to pry it off with a flathead screwdriver but it started to bend so I stopped to ask/post. I’ll use a pickling fork and a bit of force tomorrow... or a grinder
  14. sorry for my denseness, but Im just not understanding.....does the threaded portion come off? if so how? If not, how are you supposed to get the narrow end of the boot over the discs? If the discs are supposed to be inside the boot, then the boot isn't long enough . Thanks you your patience and help
  15. Was not going over the old boot. Just took the picture in advance of trying. In this picture you can see where the lower portion of the old boot was pressed in to make a seal. I understand that the new will just fit over the bottom of the swivel housing. I just don’t see how the upper cone of the new boot will fit over the approx 1.5” dia disc with its 5/8 hole .... seems like a stretch (pun intended ?)
  16. What is throwing me off is the metal disc on the smaller end that looks like the rubber is supposed to go over .... and then get pinched in the lower portion. Are these original type? Never seen ones like this, but that’s not sayin’ much.
  17. I bought some tie rod end boots from AB but I find see how they go on. They are very thick and I don’t think they will stretch that Mitch even with some heat. Am I missing something? How are they installed? Did I get the correct parts?
  18. thanks but no need. Steering wheel project is done.
  19. It was loosened but still on in case the steering wheel piped off onset pressure
  20. Wrong “pop”! so I used a bolt in the shaft instead of the washers (as the washers were bending). Also added more penetrating oil. Then cranked and got excited when I heard a “pop”. When I removed the puller, I found that I cracked my steering nut (and the steering wheel was still hard on). So since the only reason I was trying to remove the wheel was to have an easier time refinishing it, I decided not to risk damage and refinish it in the car. Masked and primed on day one, sanded painted with airbrush and 2k clear on day 2 .... job done (now if I only had a nut I could put it back together and check off that box)
  21. Not ignition... spare tire compartment. It has an offset pin/cam which slides a bar side to side into the latch. Most of the ones I found in big box and on line turn symmetrically or if they are offset (like for a glove box) the don’t seem to be the right size pin ....
  22. Is there a part number list anywhere listing what locks were used in what cars? I did not have a key and the cylinder was locked so even a locksmith couldn’t get the cylinder out to rekey (I took it to 4). So I ended up having to drill out the cylinder and was (fortunately) able to save the back of the cylinder (pictured below). I’ve searched high and low for something that looks like it but can not find. Looking on eBay there are many locks that are still in their latching mechanism so I can’t see. This is for a 49 Plymouth spare tire door (which may be the same as a 50 ). As you can see it has a very small offset cam on the back. thank you
  23. On a 49 Plymouth Woodie, what size tire looks best and what size wide whitewall. Note: wheels are 4 1/2 wide x 15”
  24. I actually narrowed one of those as well but the model I got didn’t allow the bolts to be as close as they needed to be. Also the body didn’t look as beefy as the one you picture. Maybe I’ll go to a different store and look again
×
×
  • Create New...

Important Information

We have placed cookies on your device to help make this website better. You can adjust your cookie settings, otherwise we'll assume you're okay to continue.

Terms of Use