


James_Douglas
-
Posts
1,923 -
Joined
-
Last visited
-
Days Won
23
Content Type
Links Directory
Profiles
Articles
Forums
Downloads
Store
Gallery
Blogs
Events
Everything posted by James_Douglas
-

After Market (Not stock) Wiring Harnesses
James_Douglas replied to James_Douglas's topic in P15-D24 Forum
Hi Sam, I never noticed your "cars". I am aware of that wire, although I have never used it. If my recent back surgery has a good out come, and I will not know for 3 or 4 months, sometime next year I want to start looking for one last vehicle. That will be a Waco UPF-7, A Fairchild KR-34, or if I can handle the fuel requirements a Vultee BT-13... As to fire and wire...let me tell you a story. I had about 6 ships going to dry dock in China. While they were there, my IT staff was charged with having the ships old Token Ring wiring pulled out and Ethernet Cat 5 pulled. When I talked by phone, from San Francisco with the Yard Master in Asia, I told him to get plenum rated Cat 5. His answer was is that 110V or 220V? I had to get our Port Engineer at the yard involved. The up shot was that in most of Asia, they use PVC even in the large skyscrapers. Can you imagine a two foot thick bundle of PVC wire running up 50 stories or more and then catching fire. I had to explain to our Chief of Engineering that I was putting seven or eight large spools of plenum rated wire on one of our ships to the yard in Asia. I did not want a fire to happen on a ship and have the guys die from the PVC going up. I also will not spend any time in a high rise building in Asia. James. -
After Market (Not stock) Wiring Harnesses
James_Douglas replied to James_Douglas's topic in P15-D24 Forum
Hi Folks, As some of the older posters know, I have a more than sufficient background in things electrical and electronic to do the whole thing from scratch if need be. What I am interested in is folks thoughts on the quality of components from the various players to their customer service when something is not quite correct. I have a preliminary schematic already on paper. Until I decide on which "computer" I will use for the fuel injection, the control of the electric water pump and fan, the electric power steering and some other issues...it will be some time until I can product a final schematic. One thing I am interested in, and the usual suspects give me dead air when I ask, if if they will make up a harness with cross linked polyethylene wire instead of PVC. The insulation has MUCH higher heat rating than PVC. When I replaced the engine side wire on the '47 Desoto in 2003 or 2004, used that. I may end up just end up purchasing parts from American Auto Wire and get my actual wire someplace else. Thanks, James -
That looks the "Tolex" upholstery they used on the 1946 to 1948 Desoto Suburbans, just in pain. You could get some from SMS, who makes it now, and upholster the dash...but the stuff is $120 a yard. I have a '47 Desoto Suburban and will need to upholster it in the next couple of years and just got there sample a month or two ago. JD.
-
After just commenting on another topic about how I had a good experience with Harnesses Unlimited for the restoration of the 1949 Desoto, I wanted to ask everyone a question on non-stock harnesses. Next year I will be staring in on the 1947 Desoto Suburban, preparing it for out retirement and x-country driving. As some of you know, it will keep the flathead but the entire car will see extensive modifications including the change to 12 volt. I think the expense and trouble of using a stock harness will not be worth it due to all the electrical changes my modifications will take. Therefore, I think a modern or hot-rod wiring kit will be in order. My question to anyone who has used such a kit is what is your impression of it? There are a number of makers out there and I would like to start to plan on which one I will use. I am looking for excellence, and not to concerned on price, as I never want to have any problems with wiring on this car. Thanks for any feedback either directly on this topic or via a private message if you like. Best, James.
-
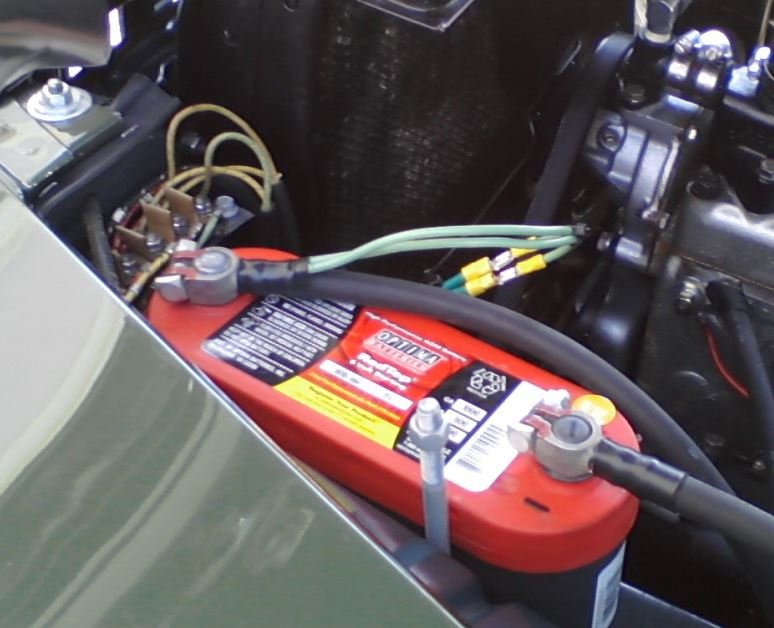
I used Paul Little of Harnesses Unlimited for the restoration (Concourse) of the 1949 Desoto Convertible. The work was very good and I had little trouble using his kit. The one thing I did that was not stock was to run a set of #10 green wires from the headlight cans (I used a long machine screw that went through to the inner fender and used a ring terminal) to the positive cable at the battery. I had the cables made and the #10 wires were crimped with the actual round wire in the lug. I also run a small ground strap from one of the engine side of the motor mount bolts to the mount side. I also run the factory ground from the engine to the fire wall. Lastly, I run a ground at the rear of the frame to body. I think the direct ground from the bucket to the battery makes a large difference in the voltage delivered to the headlight. James
-
Front Clip Frustrations! Need advice - 46 Chrysler
James_Douglas replied to ebruns1's topic in P15-D24 Forum
I went and looked at some old photos of my body, 1947 Desoto, with the front clip off and I counted at least 5 bolts on each side at the cowl. James -
If you swap the head onto a new block, use clay and check the valve to head clearance. Sometimes the DECK of the blocks have been cut and you can stick a head on that has been milled and the valves will hit. Better to be safe than sorry.... James
-
As someone who has used a fluid drive in a daily driver for 18 years, they can be fine. I have had a seal go, even one that was supposedly rebuilt. Once you get one that is good and take care of it, it will last a very long time. Since I run mine in a Desoto Suburban, with the very high curb weight, if it will live in that car and the hills of San Francisco from a dead stop, it will live in anything else. A few thoughts. Read my long winded paper on fluid to use so you get a good understanding on how the thing works. If one goes to take it out, make 4 wooden wedges with a slot on the large end and tap them in light between the flywheel and the coupling BEFORE you take a transmission out. What you do it take the lightly the 4 blocks then run a length of bailing wire around them to keep them in place. You have to spin it around to do this. You do this for shipping and on the installation as well. If you do not, the flexing of the plate can crack the carbon seal and it will leak. The special products shop at DACCO transmission was closed down about 24 months ago then they went bankrupt and was purchased by another company. So as of today, I do not know of anyone that can cut open a fluid coupling and replace the inner bearing. The pinion bushing and seal can be done from the outside, but that bearing requires it to be cut open. The issues, unlike a torque converter, is that without a flex plate, the two sides of the coupling have to be perfect when welded together. Even a couple of torque converter shops I have talked with say they do not have the jigs to do it. They could make up a jig, but the cost would be in the 3K to 5K range for the first one. NEVER open the plug on a fluid coupling unless the engine has been off for at lease 4 hours. If you pull the plug and take a Popsicle stick, you can rotate the inner hub around you will see some larger holes than the many smaller ones as you spin it around. A local three generation repair shop, Bob Senior is 85 and looks better than most 50 year olds, told me that if the thing fails on the road, to have a correctly sized bolt in the glove box to fit the threading in the outer shell oil plug (the plug TPI) and grind lower end of the bolt to just fit the larger inner hole size, the better the fit the better as you want no slop. On the road, take the plug out and rotate the thing down to 6 O'clock and drain out all the fluid, on the ground if hung out someplace. When it is all out, rotate the unit back up to the floor board hole to get at it. Then run bolt, with a copper washer under the head into the coupling and the inner hub large hole. The inner hub is the part that is attached to the transmission pinion. The outer shell is the part that is attached to the crankshaft. The bolt "connects" the outer (the crankahsft) to the inner hub which is connected to the transmission. Use a VERY good grade 5 or 8 bolt. Once done, you can drive it like a three speed stick. Good luck, James. PS. If some of the above reads weird...I am home after two surgeons spend 4 hours in my lower back. My head is not quite clear and I am looking at a month stuck in our flat here in SF.
-
I have been through this more times that I want to remember. In California here is the issues: 1. The local CA-DMV offices know nothing. In fact they know less than nothing when it comes to the old plates or transfering and registering old cars. They get it wrong about 90% of the time. Do not call them or go see them unless you have talked to the SPU. See item #4 below. The SPU IS THE FINAL AUTHORITY ON ALL TRANSFER, REGISTRATION, AND PLATE ISSUES IN CALIFORNIA. All DMV offices have to defer to them. 2. About 10 years ago CA-DMV sent to the garbage heap all the old records of the cars. Due to that actress that got killed 25 years ago and the state legislature prohibiting the CA-DMV from giving out personal information from its records, they had no reason and no financial incentive to hang onto the records. All they will tell you is if that plate is currently registered to a car. If the car has been out of the system for more than about 5 years, they will not have anything on it. 3. You MUST have two plates. (1946 CA cars only had one). 4. Call the CA-DMV special processing unit in Sacramento if you can get anyone to answer the phone. The last number I had for them is (916) 657-8035, it may be good or not. 5. If you really want to run that plate, Go to the local DMV and see if you can get that as a "NEW" black specialized plate. Just run one old one with one of the new ones. Even a CHP would probably not notice. Of course you can always get a set of old orange plates and use them under the YOM (Year of Manufacture program) if you want for a 1953 car. 6. Under no circumstance take an old pate to the CA-DMV and hand it to them. You will never see it again. 7. Read and understand item #1. Then read it again! Good luck, James
-
Finally had some time to get the car apart today. I got the passenger side down to the spindle and measured it with a dial indicator and the spindle end plat was about .002 to .003. That 1954 Motors Motor Manual book had an entry that said to make sure you have .008 or tightness and wandering car happen. That is what is going on. In addition to that, the upper outer side of the king pin has some fairly good galling. You can see it in the photo. This is with 3K miles on it. I suspect that the line honing of the bushings in the Sunnen honing machine with oil provided too good of a fit. The pin fit like a high tolerance bearing. Spun perfect no movement. I suspect that the clearance was so good that no grease could get in there to create a film and hence the galling. I took out my new period reamer and ran the bushings. I did get some material. The pin now spins just the same but there must be more space given that material that was taken off. I also took out one shim and now have .0085 end play. The spindle definitely is more free than it was. It was free before, just a little more now. It will be interesting to see if the drivers side has the same issues. Once it is all done, over the next 3 to 5 days, it will be interesting to see if the steering is any different with all other things not being touched. James.

-
Installing a Spin-on Bypass Oil Filter (photos)
James_Douglas replied to Sam Buchanan's topic in P15-D24 Forum
On the future rebuild of my 265... I am thinking of doing a by-pass filter like this one, but, finding a VERY fine filter for it. In addition to this, I plan on doing a modification I saw some years back. That owner drilled and tapped the area of the oil pump. They put a plug in the gallery from the oil pan and forced the oil out and into a full flow head and filter mounted on the right frame rail. It them went back into the gallery and to the pump. I got the idea from an article I read a long time ago from a Fram executive who was talking with The Big Three about increased engine life by have a two stage oil filtration system. Fram had showed a great increase in engine life with their tests. But, the Big Three were concerned about the additional cost. I have been using the big full flow canister on my 251 and it works well. This is the conversion that Don used and documented on this forum. The only problem is that with that unit, you have to take it off to get the starter out. I do like the bottom valve to drain it before pulling the filter however. James. -
Don't shoot the messenger...should you not be out on the beach someplace :-)
-
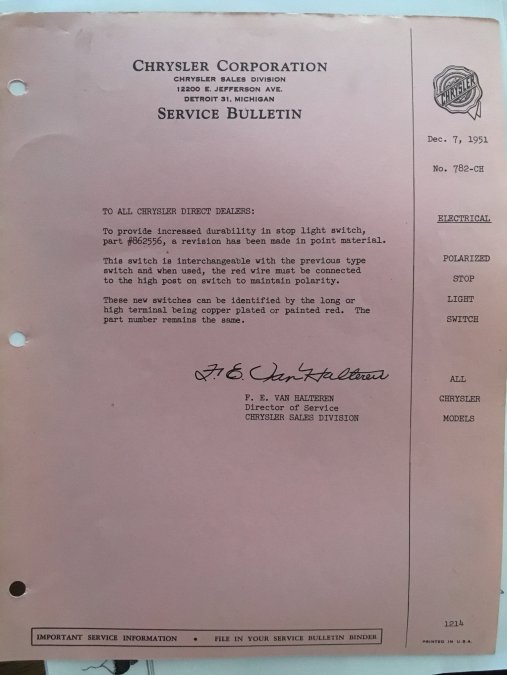
There was a Chrysler technical note, I have it someplace, that they went to a special switch to deal with problems of them going out. It turns out that the flow of the electrons was the problem. They came out of the switch that has a long and short post and was therefore polarity sensitive. When they went to 12 volt, I suspect it was not longer an issue. I pulled my binder with the service bulletin...
-
My Desoto Suburban has those big ass drums. I took the front off and went to disc's so it stops with less wander at freeway speeds. If I were to do the swap, I would look to see if the knuckle arm height was the same to that one could swap the spindle. BUT. One must be careful with a spindle swap as the kingpin inclination is set by the casting of the spindle and the geometry of the steering knuckle and the control arms. I am not sure if the smaller and large spindles have the same KPI. James.
-
I would be more concerned about the amount of crap in the jackets from just looking at the photo. Since the cost per a sleeve is several hundred dollars done correctly, you can find a better core for that price. James
-
That is a good short to the point article. I have been trying to find something like it in my radial and front end alignment thread. I contacted SEMA on that and they do not have anything. This is good on the wheels. But, On my 1947 I had a new set of wheels built as I have disc's on it. I have had micro cracks where the centers meet the wheel. They did not dress the center "edges" before pressing it in and welding it. The weight of my big 1947 Suburban plus the radial stiffness causes the center to flex and the sharp edges to "dig in" to the wheel outer rim and cause the cracks. We have over welded them a couple of times. I finally just put a set of tubes in. They do make a wheel where the center is round and not attached on four points. I may have a set like that made up as they do a continuous weld to the wheel outer rim on that one.... James.
-
"Not to be blunt but that seems like a lot of effort for something that is well known. You need positive caster for stability no matter what kind of car it is." Then why did the Engineers at Chrysler have the cars in 1949 go with negative one to negative three degrees of castor? My issue is that there is a lot of common mythology running around and too little data on the subject of radial tires on cars that were not designed for them. That is why I am trying to run down facts, data and not repeated "well know" suggestions. James.
-
Yep, that is what I mean....
-
One thing to keep in mind on the front mount... The stampings on the front mounts, in the corners where the stamping is a little "rippled" take a good hard look at it. I found that three different ones had slightly different shapes. On one, I got an idle vibration that took months to run down. Even with a new front motor mount if the mount moved just a little (there is slop in the mount holes) the two can touch and cause a vibration when the engine is at idle. It drove me nuts! Now on all of my cars I take my grinder and work those edges down a bit to make sure they cannot connect. Just a little thing, but it can save you from pulling out your hair thinking you have an engine problem. James.
-
The information on the contact patch moving to the rear with bias and not radial is very interesting. Thanks for the link. However, if one searches for the text on that link, it shows up a lot of places and it has no reference or anything to show where it came from. I am not saying it is not correct, but I am looking form something a little more comprehensive and well documented. One thing is that my 1947 is using the same tire as the 1949 and it tracks straight as an arrow with the castor at positive one (the spec is -1 to +1). Although the 140 inch wheelbase may have a little to do with that. The 1949 has a range of -1 to -3 and mine is at -2 on the right and -1.5 on the left and wanders like a snake. It will be interesting to see if the king pins are causing the issue as the "Tech" booklet states and the later Motors manual implies with the note to make sure one has .08 inch clearance in the thrust direction on the spindle. I really suspect my is too tight as I am sure I followed the insert which said t remove all thrust clearance. I have a request in to the man who brought the radial tire to the USA when he worked at Ford in the 1960's. He is still alive, although getting up there. He runs a tire engineering consulting group. I may have to pay for his service. What I sent him was a request for what his recommendations would be for classic car people using radials on pre-radial suspensions. In some of his writings he talks about several things they did to "tune" suspensions to utilize the positive aspects of radial tires. It was much more complicated than it looks at first blush and they did a number of things to accommodate the radials. I figured that since he IS the "horse's mouth" on this subject, perhaps I can get some definitive guidance form him, even if I have to pay for it. That is if he will give me the time of day on this... James.
-
There is a Dodge truck from the 1990's I think that has the correct track width and one model also is within an inch on the 139.9 inch wheelbase. I looked into it a little bit for my Desoto Suburban. I decided to stick with the flathead and mostly stock suspension. Mostly, I just converted it over to disc brakes. I am also looking at either Don Smiths power steering conversion or a electric power steering conversion that uses the stock steering box and has the power assist under the dash. My stock steering is great going down the road. Only parking is a PITA. I am also going to use a Powerflite Automatic with a gear vendors OD with a 265 I am building. The only thing to consider suspension wise is to move the front shock top tower from the control arm to the frame. Other than that the long wheelbase cars drive read good to great. James
-
You know...I have head the comments about radials needing more positive castor for years when running radials. However, I cannot find anything in writing on the subject. A lot of stuff on car forums on the internet, but nothing from the tire or car companies. I know that when power steering came along, they went to more positive castor as the power steering removed the need to go to zero or negative to make the steering easy. I would love to read something scientific on the subject if anyone has a reference. If one is to use more positive castor in a car designed with negative castor, I assume one heads toward zero and not the other way. In a positive castor design it is obvious, but there was actually a discussion at lunch the other day as to if you want more "castor effect" on a car designed with negative castor as to what direction you go. In 1949 Chrysler-Desoto went with -1 to -3 negative castor with -2 preferred. If one wants more castor effect on a 1949 does one go to -1 or to -3 ? I found my MOPAR instruction sheet that came with the NOS king pin kit I put in the car. It says to "...use shims to remove all up and down movement..." when installing the thrust bearing and shims. I found a note in one of my period "Motors" manuals that said to make sure you have 0.08 inch of free play in the thrust bearing or you will have wander and return issues in the steering. I am sure I did what the insert sheet stated and the problem fits both the Motors comment and the "Tech" booklet on the subject. I suspect that my steering not returning on its own and the wander at highway speed is a combination of the king pins binding and the car needing more castor. The king pins will be checked next week. Then the only question is do I go from the -2 preferred castor to -1 or -3 for more castor effect? James
-
I wonder if they did something to give it a better rear main bearing seal...
-
AAJ Rear brakes on a Forward Look car, who's done it?
James_Douglas replied to samdjr74's topic in P15-D24 Forum
I cannot speak to AAJ rear disc brakes. However, several companies that make disc brake conversions specifically avoid rear conversions on cars with tapered hubs. Why? I was told that they had too many problems with them. The issue is that the disc in many instances does not sit exactly perpendicular to the center line of the axle shaft. With a drum brake, this is not much of an issue as if the drum moves a 1/6" to 1/8" the drum face has enough room to deal with that via-vie the brake shoe. With a disc if it is off at all one will get a pulse on the pedal. In my case on the '49, I built my own set up using some parts from one companies kit and some I custom made on a jet cutter. The one thing I did do was to take my axles and hubs to my general machinist who has a big ass lathe. I mounted the hubs on the axles, with keys and all. He them placed the axle-hub in the lathe and turned the fact of the hub so it was perfect. In the end we ended up with a matched set of axles, hubs and keyways. I even stamped the keys with in and out side and side 1 to 4 to make sure it went back the same way. The rear works fine. If you are going to do the rears, you may want to try what I did. I know that several people here have had good luck with bolting on the AAJ kits, but given the issues some of the other supplies talk about one could get lucky or one may not. Given the issue of the tapped axles, it makes sense that this could be an issues. James PS, make note of the wheel pin. We made one and used one of the old rivet holes (threaded) to hold the disc in place and to help when mounting the rear wheel under the low slung fenders.
-
On Sunday, I did a front end alignment on the 1949 Desoto using the new tools I purchased. All in all it went fine. But, the end result is not what I wanted. The tendency to feel twitchy and wander is still there. Better, but still there. All the specifications are within the range. My thinking is that the king pins are to tight. I think it is the thrust washers. The car also does not caster back to straight ahead even though the castor and king pin inclination are all within spec. James.

