


James_Douglas
-
Posts
1,927 -
Joined
-
Last visited
-
Days Won
23
Content Type
Links Directory
Profiles
Articles
Forums
Downloads
Store
Gallery
Blogs
Events
Everything posted by James_Douglas
-
On cars with Fluid Coupling the bell housing is longer. The standard three speed will not work unless it was one that came on a car that had a fluid coupling. They used longer input shafts. On a car that had a fluid coupling, you can use the semi-auto (M5-M6) or a proper three speed with the long input shaft. The 1949, second series or true 1949 models, used a slightly different M6 that had a different set of wiring and controls. If using a three speed with a fluid coupling of course this is not an issue. James
-
I will be doing a dual conversion on the '48 Desoto later in the year. I will use the modified version of the ECI kit as used by Don Coatney and James Curl. You should look up their old threads. What I am going to do is a variation of what I did on my '49. I will use the dual MC under the floor with a firewall mounted remote fill and I am going to use the SSB Dual power remote booster which will fit under the car near the MC. Basically like Chrysler used in 1951.
-
 Anyone have any photos from all angles on both sides of a successful firewall mount M/C with a booster? I hit the search and what I came up with was not what I need. I am thinking of doing that on my 1947 Desoto. Best, James
 -
I would have to go look at my '47 Desoto, but, I thought one went up and one went down on these?
-
Hey Greg, 8.7 to one on regular with normal timing and no detonation? Maybe on the coupe, but I have 8 to 1 with a stock cam and no way I can run regular with the 5000 pound Desoto without it pinging on the hills. Even when the engine was new. I have run a single carb manifold set up as well as a Edmund with two carters. Same result. I personally CCed the cylinder heads and checked the piston height. So I know mine is at 8 to 1. I suspect that you may not have the compression ratio you think you do. If you do, then I need to take lessons from you on how to not get detonation above 8 to 1 on regular gas with a flathead six ! James.
-
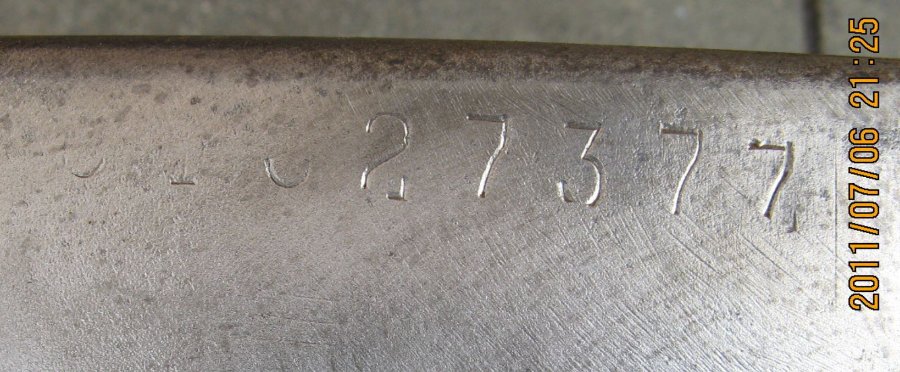
Pressure washed my 48 DeSoto frame today.
James_Douglas replied to MarcDeSoto's topic in P15-D24 Forum
Thanks..I missed the reply on the serial number location. It looks like Desoto used the top of the frame rail (Drivers side on my 1949) as opposed to on the wheel well arch. No way to see it without the body off. Also, the number is the engine number and not the number on the plate on the drivers side door hinge pillar. The car when registered in VA in 1949, I have moms paperwork, they used the engine number. When they came to CA in the 1950's that was carried over. Now my 1947 Desoto which was first sold in CA used the serial number on the door pillar and not the engine number. Since the flathead engines get the blocks changed or "decked" the factory engine number is often long gone. It took some doing with the special processing unit in Sacramento, but I got DMV to change the Pink to use the serial and not the engine number. That said, when I rebuild the engine I have in the car now, I stamped the correct engine number on the boss so it matches. Thanks for the technical confirmation on the location. James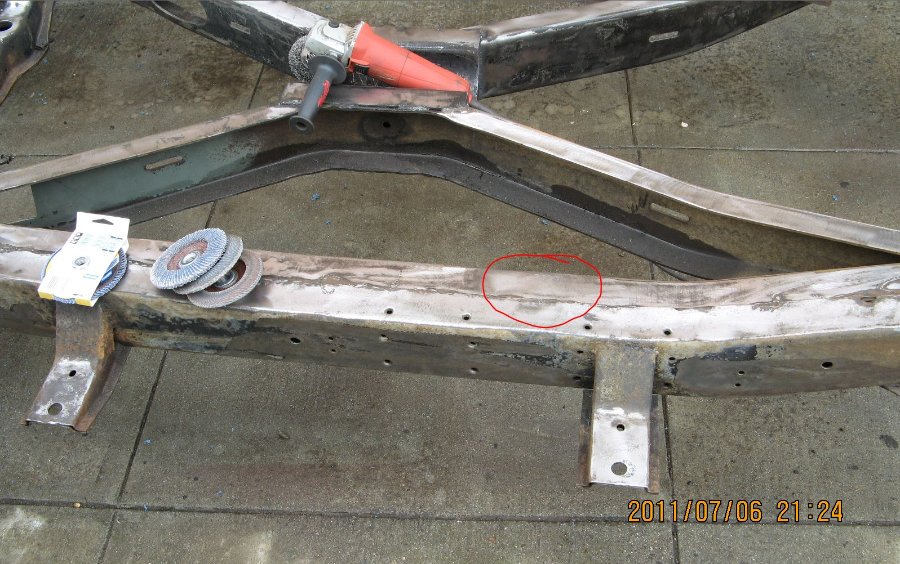
-
Pressure washed my 48 DeSoto frame today.
James_Douglas replied to MarcDeSoto's topic in P15-D24 Forum
Marc, You are lucky you live in Temecula. If I tried to de-grease a chassis here on the sidewalk in San Francisco I would have the Eco Police on me in a heartbeat! Did you find the stamped number on the frame? I would like to know where it is so I can look for it when I pull the body up to replace the rubber on mine. I will stick my cell phone camera up there and take a shot. James -
I thought I saw a NOS one on ebay...
-
I have done a lot of work on the sixes and I have done work on my friends 1946 Town & Country L8. In fact I was the one who climbed into the engine bay and got the head off and then spent a couple of hours with a hand grinder with a wire wheel on it cleaning all the carbon off of the valves, the deck and the pistons. I would take my time and pull the oil pan. Then I would pop off the rod caps and with a block of wood, assuming you have cleaned the cylinders as good as you can from the top and after removing the ridge with a ridge reamer...pop the pistons out. With the rust showing, I would suspect that the rings may be rusted and will not move in and out of the piston slots as they should. If the ridge was not too great, then I would go hunting on ebay and see if you can find some of the Chrysler special ring sets for "worn" engines. It is in the mater parts book. I have used these in the past and they do work. They are special sets with special wave springs that go behind the rings to make up for tapper and wear. You can clean the valves on a wire wheel and use some good old valve past with the wood tool with suction cups to re-seat them. Assuming you take your time and clean up the cylinder walls, the pistons with new rings and the valves you could come out with basically a solid engine that will run strong for years. The key it to take your time and do not me in a hurry. So what if it takes a couple of months or more. One thing I would different than some is when it is time to fire it up get something thin like 10W to start the engine with. It will flow into spaces that may be partially plugged. I would also put in a pint of kerosene in with it. That will help get the crud out of the oil galleries. Do not drive it or load the engine in gear during this part. Run the engine for like and hour at about 1000 RPM. Then dump that oil and do it again for another hour. Then dump that and out in some straight 30 weight. Then try driving it. I assume you will flush the fuel lines, check all the other fluids, and the like. I think you have a great car and if you watch the details and take your time, you will be quite happy with it. I drive a long wheelbase Desoto every day. Man how I wish they would have given Desoto the L8 for that car! When I drive my friends T&C I can sure feel the difference. Best, James.
-
I have a couple of those...they sure help!
-
Oh...a photo is worth a thousand words. That is a M5/M6 Semi-Automatic. There is no Borg Warner overdrive for that unit. You could go to a modern Gear Venders overdive, but be prepared to spend about $4K to $6K to do that by the time it is all done. Go find a three speed stick with the overdrive on it and rebuild it with the fluid coupling input shaft. I use my in San Francisco traffic all day long and leave it in 2nd gear and just use the OD in second. On the highway up to my place out of town, I run at 56-70 all day long in third overdrive. James
-
My first OD trans for the '47 Desoto I purchased from George Asche. I would not use him again. After I took apart the transmission and replaced all the parts that were worn beyond specifications, and made sure the inside of the case in all it little nooks and crannies were actually cleaned of gunk, it has worked great for 15 or more years. I also have a spare. What I found is that a LOT of the internal parts on these are worn to the point where they will work, but how well over time if driven a lot is an open question. These are not hard to rebuild as long as you get all the books (I have them electronically) and take your time. If a part looks worn or measures out worn then replace it. Sure you will spend a couple of months and about $2K to $4k in parts by the time you are done, but you end up with a basically as new transmission that will live a lifetime if you keep the oil changed. Do not pay more than $500 to $700 for a core no matter what the seller tells you. Unless he has photos and receipts for internal replacement parts. Like I said in the opening, I learned the hard way. Once you source one from a 1946 to late 1950's MOPAR the things that make it work on a Fluid Drive Chrysler or Desoto are as follows: 1. You need the input shaft from a fluid drive 3-speed transmission not a M5/M6 Semi-auto transmission. 2. You will need to double check the output housing to get one that can take the BAND and not the drum style parking brake. 3. You will of course need the electronic parts. The booklets go over that well. 4. You will have to cut the drive shaft for the difference in length. A couple of specific points. The second gear comes in two versions. For a lighter car the so-called fast second gear is not a bad choice. For a heavy car however, use the regular second gear. I would also use the regular second gear when using a fluid coupling. You can go find my threads on that. The Borg-Warner OD main shaft is very hard to find NOS. The problem is that the second gear rides on the shaft and the back end of it "pushes" against a step on the shaft. That is at the flutes. What happens is the shaft wears. I had a situation were even with an NOS second gear and the largest snap ring there was still too much end play to be within the specifications. What I did was take this NOS second gear to an Industrial hard chrome shop. They build up the back thrust side of the second gear to my specifications. When done the second gear end play was at the very bottom of the specification range. The second gear has been VERY quiet for 15 years. Just this last year I found a NOS 3-speed (BW) main-shaft. It cost me a couple of hundred but that is the same I had to pay to plate the second gear. I am going to be rebuilding my spare to as new condition and crating it. If I ever have a problem on cross country retirement trips...it will be ready to go. James.

-
I think it will, but I would check the Hollander Interchange to make sure. James
-
Finally removed 48 DeSoto body from chassis!
James_Douglas replied to MarcDeSoto's topic in P15-D24 Forum
Marc, Please take a photo and document where exactly you find the back up serial number on the frame. On my 1949 Desoto Convertible it was about mid frame on the drivers side in the TOP of the frame. No way to see it with the body on. I am curious as to if the 1946 to 1948 Desoto's used the same location or not. Often people talk about them being on the real wheel well section in a place you can see with the body on. I have not see that on a Desoto however. Best, James -
Oh, those clips... As far as I can tell, looking at a Suburban in a bone yard some years back, I would not try to remove them unless I had the interior out and could tap them out from the inside. The odds are that many of them are rusted and if you try to pull them they will break. At some point, I will have to try and find some. James
-
My 1947 Desoto Suburban has that as well. I don't use it as I use suppression core spark plug cables and I add body to block grounds in several places. James
-
Kristina, Welcome to is motley crew of old car people. I started to work on cars in high school and it has been a life long journey not just in understanding how mechanical things work, but also the history of Industrial Revolution and the history of much of America for the last 100 years. If you embrace this hobby it can take you to many places and some of them to places you never thought it could. I would encourage you to spend some serious time over at the Chrysler Imperial Club Website. They have posted for all to see the Master Technician Service Conference booklets as well as the Master Technician Service Conference Films. Although calling them films is a stretch as they are basically slides with an audio track. You can see them here: http://www.imperialclub.com/Repair/Lit/Master/index.htm and here: http://www.imperialclub.com/Repair/Lit/Films/index.htm If you read over and look over the sections that apply to what you are working on, it will show you everything you need to know. These resources coupled with a Master Parts book and a Service Manual for your specific year and there is nothing you cannot fix. Good luck on you new interest. Best, James
-
I just got an entire set of the trim, which for my 1948 Suburban is unique do to the larger rear door, but I have not unwrapped them yet. I have never taken them off my '48, but I will in the next year or so when I paint the car. In the photos it looks like there is a "key" connector and each section can come "in" to pull them off. In the master parts book it only shows SIX (6) clips which would mean the "key" connector one for each of the six trim parts. I do not think they have clips but fit the body at the window. Now if you are talking about the very thin little bead trim that runs the entire length the odd thing is it is not shown in my 1946 to 1948 Master parts book for Desoto. It is called the "belt reveal molding" and in the master parts book says it is only on cars with two tone paint jobs like the Desoto Suburban. Post a photo and we can comment better...
-
I did not notice any schematic's at harnesses unlimited website and the online ones at classic wiring are just EXAMPLES not the actual one you will get. The one I got for the 1949 was exactly like the one in the service manual, just really large, in color and laminated so my dirty hands did not mess with it. James.
-
Go over to the Imperial Club and read how to do it: http://www.imperialclub.com/Repair/Lit/Master/040/Cover.htm
-
I used a harness from Paul Little https://harnessesunlimited.com/ and got a schematic from https://www.classiccarwiring.com/desoto/ Nice big schematic that I stuck it on the wall. For the 1947 re-wiring I am going modern and custom. The 12 volt conversion, the fuel injection, the electric water pump and radator fans, the electric power steering the AC and everything.... ...it will just be less trouble than getting a nice new harness from Paul then cutting it up to make the changes. James.
-
carb issue with 1950 Dodge Wayfarer Fluid Drive
James_Douglas replied to Bill Stephens's topic in P15-D24 Forum
If the engine has sat for the last 4 years, and I am assuming the fuel was not drained out and or a pickling agent added, the water tied up in the alcohol in the gas probably separated and may have caused some corrosion in the carb. Pull the carb and tear it down and check it. Read my old posts on the BB carb and alcohol water separation and the step up piston sticking. Get a good car manual and just go through it and make sure it is in good shape. While the carb is out of the way, tighten all the intake nuts and exhaust nuts. Then try it again. James -
Comfort Master No. 53 Remote Water Valve
James_Douglas replied to Art Bailey's topic in P15-D24 Forum
When done as I did it 100% of the water flow is stopped. James -
Don went into this years ago. Use search and read his threads...
-
I had issue with the brass plugs. Mine were failing on a new rebuild. I ran the issue down and the brass plugs were a couple of thousands smaller than the steel ones. When used in engines that are old and have had the holes "cleaned up" in the rebuilding process the interference fit is not as tight as it should be given the slightly larger ID of the block holes and the slightly smaller OD of the brass plugs. I changed to steel and did not have an issue. There is an old thread someplace here where I gave the measurements.
