


James_Douglas
-
Posts
1,923 -
Joined
-
Last visited
-
Days Won
23
Content Type
Links Directory
Profiles
Articles
Forums
Downloads
Store
Gallery
Blogs
Events
Everything posted by James_Douglas
-
There was a Chrysler technical note in the early 1950's on this subject. I have it someplace. Basically they knew they were having problems with the switch on the 6 volt cars. What they did was to create a new switch that was POLARITY SENSITIVE that addresses issue ---supposedly. These can be identified by the fact that one of the two studs or mounting points is longer then the other. I never have noted the difference in longevity. I always keep a spare in the car and a long socket with me just in case. If you are quick the fluid just runs out and no air gets in. James PS. On the '49 when I did the 4 wheel disc with the remote power brake booster I put the switch in there and can sit in the trunk and change it easy. It is also out of the dirt and heat of the engine bay.
-

Can brake line be used for the fuel line also?
James_Douglas replied to MarcDeSoto's topic in P15-D24 Forum
WONKING... There are some difference in the flow when the pipe size increases. Steel is not particularly smooth like some other materials. One can get better laminar flow if increasing the diameter. But for the purposes of classic car use, the differences have little real world meaning. I like using larger brake lines for brakes. Why? The fluid has more volume in the system and as such will absorb more water between flushes every few years. With gas lines one benefits of larger lines in the engine bay is more time before it heats up in stalled traffic situations and hits the vapor point. Of course once it does get hot, it takes longer to cool off. James -
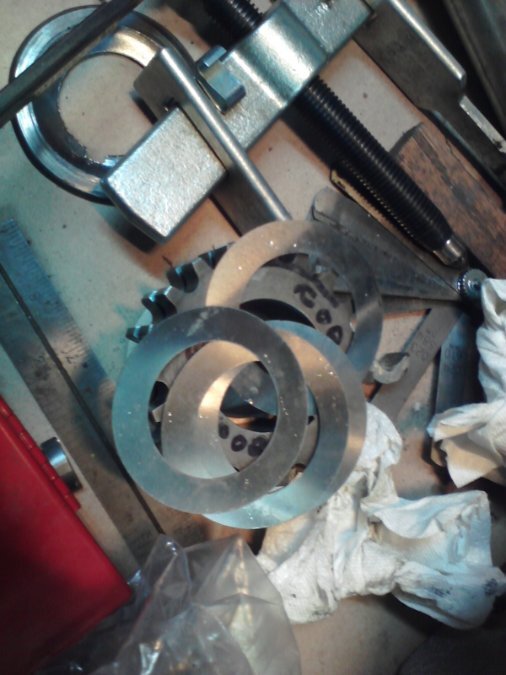
I purchased stock and had a machine shop cut them out on a jet cutter. One pass on the shim stock mounted on a block of wood and they cut out a bunch of 10 thou and one thou shims for me. James
-
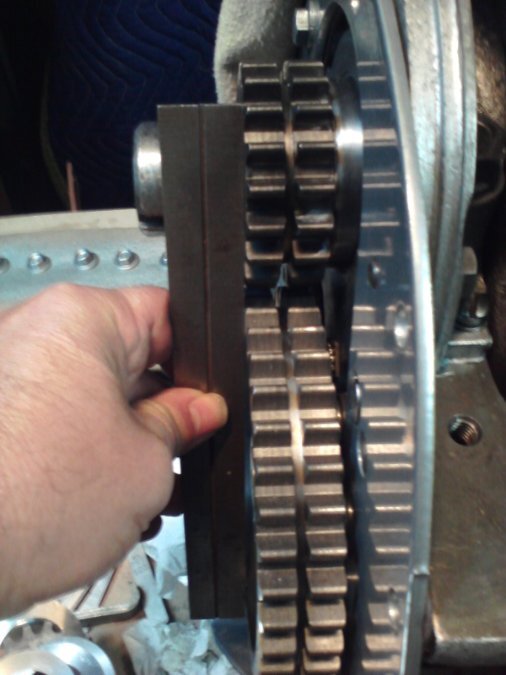
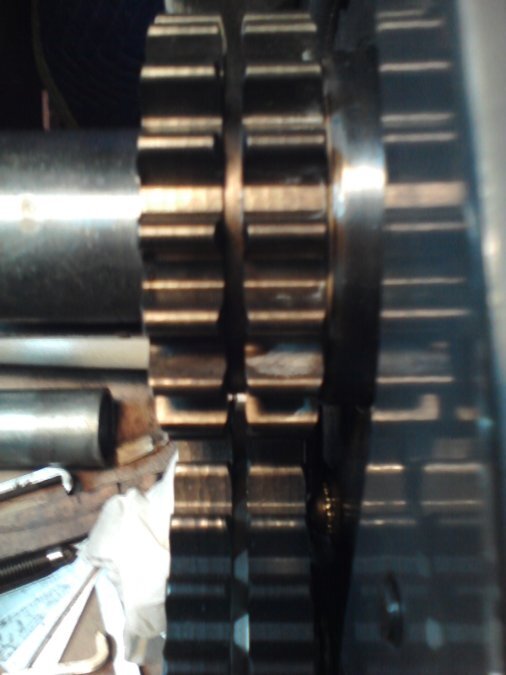
I think is was a lot more on the order of 30 thousands. I have a photo that is labeled "thirty-three-thou". In any case I would mount what I was going to use and do what I did which was take a long straight edge and place it on the large gear and see if the small gear is on the same plane. If not, shim it out until it is. The shims do not rotate separate from the gear or the shaft to once on they will never wear or cause any other issues. Having the chin not have any side thrust is a very good idea! James
-
Three Speed with Overdrive Reference Photos
James_Douglas replied to James_Douglas's topic in P15-D24 Forum
What a PITA! So, one of the things that has made my transmission, not the overdrive, run so nice is that I held very close to the bottom end of all the specifications for end play on everything. Like the second gear at .003. (Second gear is supposed ot be .003 to .008) Well, I pulled the NORS main shaft, the NORS clutch gear (Syncro) and the NOS second gear. I clean them all good and placed them on the clean shaft and took a measurement. What do I get? I get .012 to .014 inch. F&*#&#&#&K. I used the largest snap ring that is made which is .097 inch. So, her we go again. I will have to take the second gear to the industrial hard chrome shop and have them plate the back side of the second gear to make up about .010 to get it to .003 to .004. That costs more than the gear itself. I tried the old clutch gear and it comes out a little better about .008 to .010. A classic case of stacking tolerances, but in this case in the wrong direction. One could see if a larger snap ring can be found, it would have to be one larger than the factory ever showed in their parts books, and lathe the groove open to take it. The only problem with that is that it would push the clutch gear back and affect the position of the shift fork. I think plating the rear of the second gear is probably the best thing to do and it has worked for 15 years on the current trans. Time for a drink! James -
what fluid for transmission with a fluid drive?
James_Douglas replied to harmony's topic in P15-D24 Forum
I have a pile of documentation from MOPAR Service Manuals, to Borg Warner Service Manuals, to 3rd party Service Manuals. In some cases I have them over a few decades. If I go through them all, some state to use a particular motor oil and some say to use a particular gear oil. All in the same transmissions. When one takes those recommendations and plots them onto one of the charts as above they all fall on, or near, the same horizontal line. One thing to note. Viscosity IS NOT the same thing as Viscosity Index. Viscosity Index (VI) is the measure of how well any particular viscosity hold up to increased heat. This is important in things like the fluid coupling and to some extent to the engine. It is not terrible important in a manual transmission or rear-end as the oils do not get nearly as hot. One of the things that the VP of Engineering told me at Gyrol was that in a fluid coupling the VI is very important and that the additives that increase VI do break down after 5 to 7 years. Even in the can of unused fluid. Interestingly, my Borg Warner Service Manual for the overdrive in addition to stating the "Under no circumstances must a lubricant of the Hypoid Axel Type be used in an overdrive." also states that a, "Most satisfactory all-around lubricant for the overdrives is SAE No. 40 Engine Oil of a good grade. For extremely hard driving in hot climates, SAE No.50 may be used. Straight mineral oils of the transmission type, SAE No. 80 for all around use or No. 90 for hard driving in hot climates, will also be satisfactory." Borg Warner made a lot of the internal parts for Chrysler for the 3 speed transmissions. James -
I would grind them off flat, then drill a hole. Then buy some weld nuts. Weld them in. Treat the metal bracket so it does not rust. Then you can get at McMaster-Carr brass studs. Screw in the brass stud to the welded nut then install the part with a stainless nut on the stud. By doing this the trim part nor the stainless nut will ever rust in place again. I did this on all my Desoto's and it works great. Be happy your grill is not diecast. The Chrome bill for a 40's grill is in the thousands of dollars. James
-
what fluid for transmission with a fluid drive?
James_Douglas replied to harmony's topic in P15-D24 Forum
SAE Engine oil weights ARE NOT the same as Gear Oil Weights. So a 75 weight gear oil is about a 15 weight motor oil as far as viscosity goes. James -
The one thing that tossed me for a loop was after I mounted the thing in place I noticed that the two gears were NOT in the same plane. I had to order shim stock and jet cut some shims to move out the crankshaft sprocket a little to have both gears dead flat on the same plane. All new gears and chain. When you start mixing crankshafts, camshafts and new gears, sometimes something is not going to line up. James
-
Three Speed with Overdrive Reference Photos
James_Douglas replied to James_Douglas's topic in P15-D24 Forum
I am slowly collecting up everything I need to have a near new transmission and overdrive. I would be happy if I could find a NOS Planet (Pinion) assembly for the OD, but I have never even seen one for sale. James -
what fluid for transmission with a fluid drive?
James_Douglas replied to harmony's topic in P15-D24 Forum
Everyone should print this out and stick it on the garage wall...James viscross.pdf -
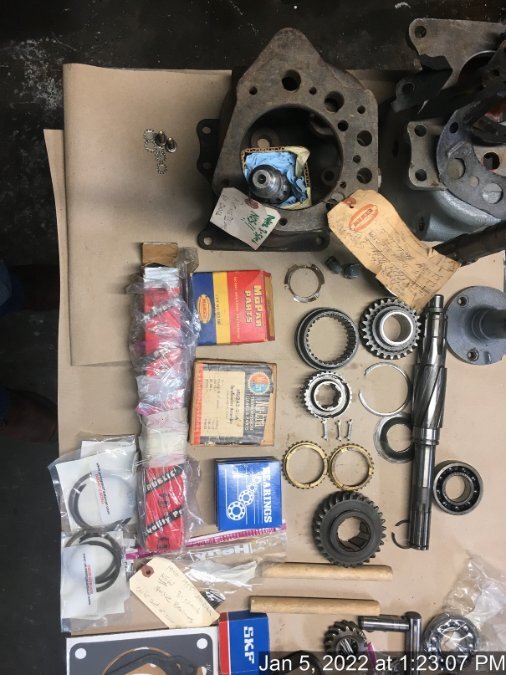
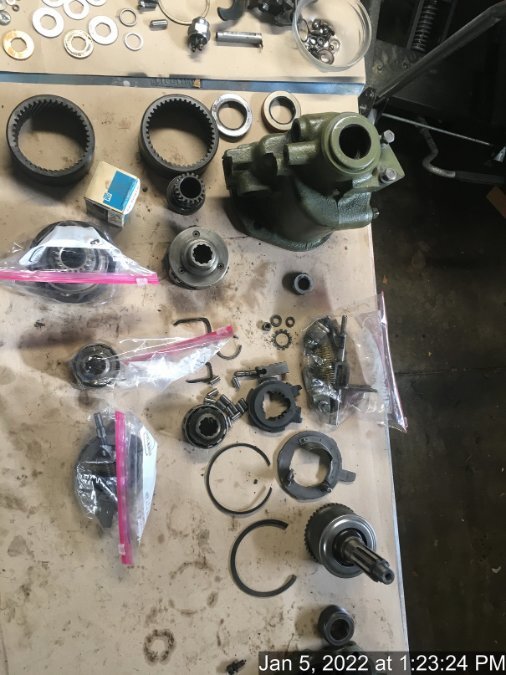
Hi All, I have my spare three speed with overdrive all torn down and am starting to get in the replacement parts. I took some photos of all the parts. In the event that anyone would like some reference photos, I decided to post them. The painted case is the one I cracked 15 years ago. It could be welded, but I found a NOS one to use. If anyone has a OD Planet assembly with stripped out gears I would love to get it and see if I can get the shield off nice and if one can get the pinions out of it. If a method can be found to do this then going to some gear makers may we worth the effort to be able to rebuild the pinion (planet) units. James


-
Dodge Dual Intake...anyone here have one?
James_Douglas replied to James_Douglas's topic in P15-D24 Forum
No reason to use phenolic spacers since there is a lot of air flow in the design as well as the fact that it is all aluminum and not cast iron. If anything it may well need to warm up longer when it is cold...but at least the A/F will be regulated by the computer. James -
Dodge Dual Intake...anyone here have one?
James_Douglas replied to James_Douglas's topic in P15-D24 Forum
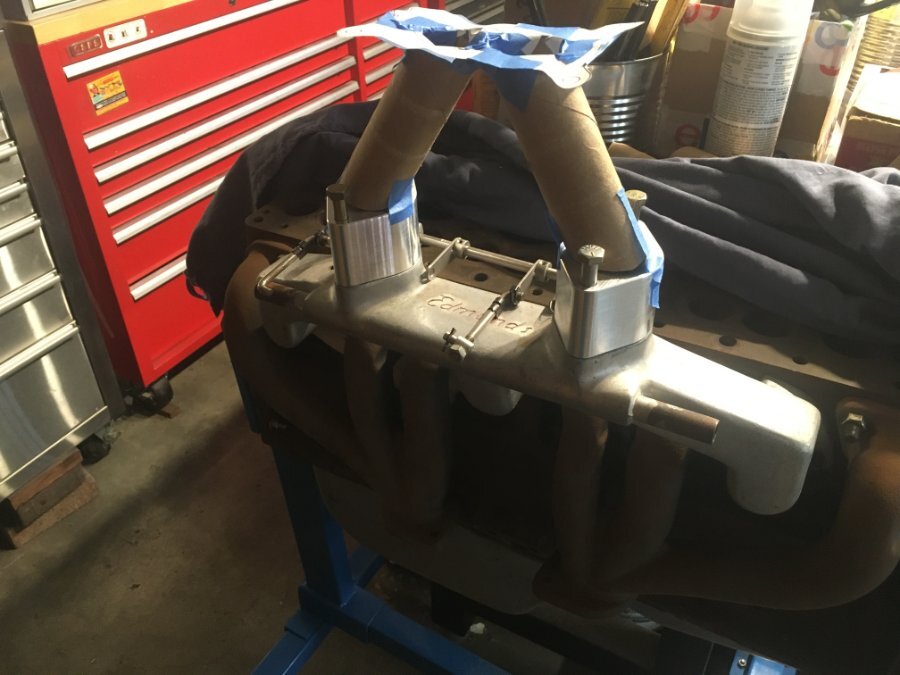
Thanks. Interesting in that the Dodge art work shows the center line of the throttle shafts about an inch or move above the 90 degree spark plug boot. Your real world photos show that it is much lower than that. I may be making the riser too long. James -
There was actually a strike at the Carter Plant that stopped production in 1946. Chrysler actually shipped cars to the dealers and then sent Strombergs out to then to put on the cars to sell. Depending on the trans, both will work. In the case of an M5 or M6 you need the version with the switches on the carb for the trans. The Stromberg is a better carb by all accounts. James
-
Dodge Dual Intake...anyone here have one?
James_Douglas replied to James_Douglas's topic in P15-D24 Forum
Perfect. With the balance tube please. What I am trying to do is to match the total length of the runners from the carburetor flange to center line of the intake ports. I know from my reading of intake manifold design that the length of the runners can affect the torque curve. I am trying to keep it close to what the Dodge Engineers did. Thank you, James -
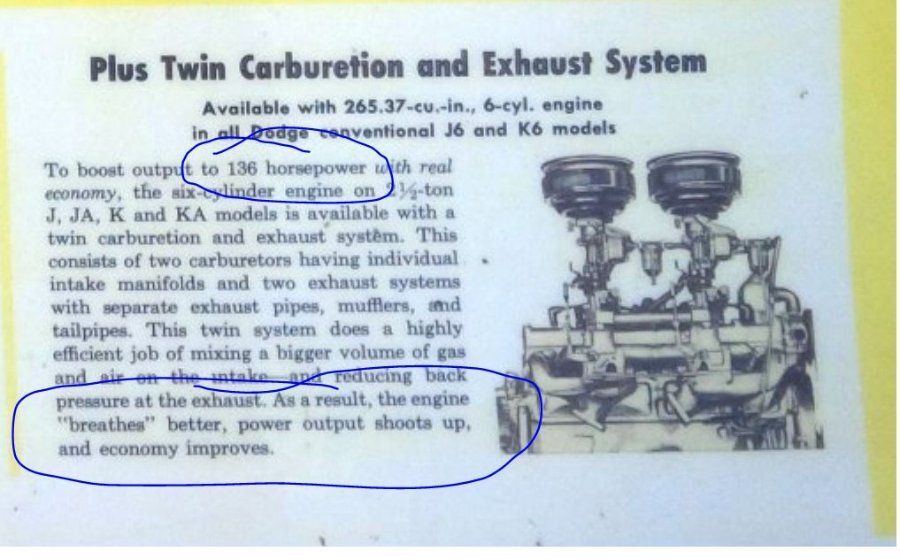
Hi All, If anyone here has one of those early 1950's Dodge Dual 1BBL intakes...I have a question. What is the center-line height from the middle of the intake ports (block side) to the mounting boss of the carter 1BBLs ? I want to see if the final height is going to be close to my first mock up my Edmund's to Holley Sniper adapter. I know that some of the after market intakes used quite tall risers. I am trying to keep mine in the ball part of what Dodge did in 1952-1953. Thanks, James
-
I just happened to read this old thread and have one comment... About 15 years ago I was at the top of a very big hill here in San Francisco. Doing work at UCSF. It was very early on a Sunday morning. I was heading home down the hill. I pressed the brake and the pedal mushed to the floor. I am heading down this very steep grade toward a 4 way stop. I pulled hard on the parking brake and the can slowed to almost a stop. I mushed about half way into the intersection. I managed to drive the car home picking mu route carefully using the parking brake. Turns out it was a new, less than 1 year, wheel cylinder had a seal fail. It was bad from the factory. I now open up and check all brake parts not matter what. The short story is that the parking brake will stop one of these cars in about a 1/2 city block at 30 MPH if it is properly adjusted. On the freeway at 65, not a chance. Keep in mine this happened in my big Suburban. A lighter car would likely do better. James
-
Buy the shim stock sheets the thickness you need (McMaster-Carr) or a bunch of them and find a shop with a water jet cutter and have them cut them out. You can set a LOT of shims that way. I needed shims to move my timing sprocket out a bit as it sat a little deep in the crankshaft and I wanted that chain dead even. So I had my guy cut them out. He just mounts it in a board and the jet cutter does the rest. James
-
Well, First of all get that input shaft out as it will act as a fulcrum and crack the carbon seal. Next get 3 or 4 wood tapers made up and lightly tap them around the flywheel so the thing cannot move and use bailing wire around those wedges to keep them in place. You cannot "see" a cracked carbon seal and you will kick yourself if it leaks a month after you put it back in. Now, you mention that some of the studs are missing? This is a real problem. It is possible that someone cut them off to place this coupling into a non-fluid drive crankshaft. If that is the case then I would suspect that the remaining studs are over stressed and could be bent. Hence why the thing will not just drop off like it should. Take a flat metal bar and a small flat of wood and see if you can pry between the block and the studs to back it off a little. If you can then stick a pry bar between the crankshaft flange and the center of the coupling. I personally would not use a fluid coupling if someone cut some of the studs off of it to fit it onto a non-FD crankshaft. Good luck, James
-
I did a 4 wheel disc on the '49 Desoto. I am using the stock mater cylinder with a remote fill. I also am using a midland-ross remote power brake booster mounted in the trunk next to the spare tire. (see my old threads). I works almost too good! You may want to try it without a power assist first to see how it feels. One thing to note and it is important. The rear axle shafts are tapered. You MUST take the axle shaft and the hub you want to use and take it to a serious machine shop. Put the hub on the shaft and torque it down. Then have the shop turn the face of the hub so that it is perfectly perpendicular to the center line of the axle shaft. Like 0.001". Then engrave the axle and hub as a matched set. If you do not do the above, the disc when mounted to the hub will very likely be out and you will get pulsing. A couple of the makers of conversion kits do NOT make a rear conversion kit for these tapered axles as they told me that got too many call backs with pulsing issues. If you do ask I said, it will be smooth as silk on application. Best, James
-
Like I said above, I am only considering this for the big heavy 1947 Desoto that we use as our daily driver. Do remember that we do not own a modern car. Although after 45 years, I am considering buying one... The 1949 Convertible has a basic 251 rebuild and that is just fine for a car that goes to shows and Sunday drives. Since I have documented the pressure drop in the big car over the last 15 years and have confirmed, by talking to a couple of others who experienced the same thing; doing things to slow that pressure drop is warranted in this case. I can tell you that when I had the interior out except for the front seat when I first purchased the Desoto Suburban, with its old and tired engine, there was a marked difference pulling up Waldo Grade to the Golden Gate Bridge. The interior parts added up to about 400 pounds. That was enough to effect the power to weight ratio and made a very big difference. I do not think that many on this forum understand how close these cars are to "edge" power and weight wise. Add 500 to 1000 pounds to your car and see how it goes up a hill. You would be surprised. My convertible with the same engine goes up a hill with ease, albeit at 750 to 1000 pounds lighter. So, is spending $4500 on rods and pistons too much? Perhaps, but the cost of tearing the front end apart, and the steering, to put in a V8 is a lot more costly not to mention the work involved. Food for thought. Merry Christmas all. James
-
Tony lost his access to a machine shop for small weekend work like doing rods. His day job is in a manufacturing plant. He is sourcing Carrillo Rods and forged pistons for the small flatheads. But the cost is steep like in the $4K to $5K range. He said he would do Carrillo Rods and forged pistons set for my 265 but it would take six months and about $4500. Now that IS a lot, but I REALLY want to get the bore wear down. On the big Desoto after about 50K miles went from about 140 down to about 80. In the big Desoto it is very noticeable as the pressure is goes down. Tony tells me that the Carrillo Rods and forged pistons have a weight saving is 25%. That is a LOT. Also, remember what Tom Hoover said when asked what if anything he would do different in the development of the Max Wedge and the 426 Hemi. He response was to do one thing and that is to lower the engines reciprocating weight. Since I run the engines hard to push that heavy 140 inch wheelbase Desoto around, anything that lowers the load on the wrist pins or the crankshaft is not a bad thing and the bonus would be more HP out the crankshaft. James
-
Thanks. As you can see the 1959 shows three different ones... James.

-
Has anyone ever found someone that is rebuilding the BW-OD pinion gears also know of as planet gears? These are the three little gears on a housing that was never meant to be rebuild but replaced as an assembly. Of course, I have never seen an NOS unit. I may look into, with others, in having a few sets of the pinion gears made and rebuilding the assembly. If one scrounges hard the sun gears and the ring gears show up new from time to time. I have one NOS sun gear and one NOS Ring gear and I am looking for a couple more. I really love these overdrives, I just wish that there were more new parts around for them. James


