


Merle Coggins
-
Posts
9,388 -
Joined
-
Last visited
-
Days Won
87
Content Type
Links Directory
Profiles
Articles
Forums
Downloads
Store
Gallery
Blogs
Events
Everything posted by Merle Coggins
-

Oil pressure relief valve
Merle Coggins replied to johnsartain's topic in Mopar Flathead Truck Forum
I wonder if an internal pipe wrench tool would be able to grip it enough to get it loose...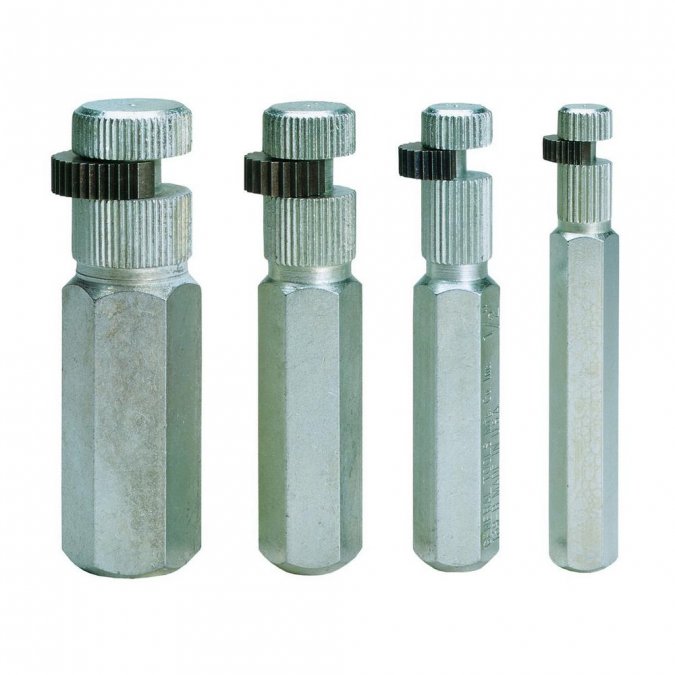
-
Another quick one Please
Merle Coggins replied to 56 c3 & 47 wfa 32 dodge pu's topic in Mopar Flathead Truck Forum
If you're not worried about locking up the truck, why not visit your local hardware store for some knock-out plugs for electrical panels. You may be able to find one that will pop right into the hole. -
Remove 21-61-66 and 21-61-40, from your picture. I have found it easiest to remove the speaker grill and speedo so I can reach one arm through those holes, and one arm up under the dash, to remove the side hinge bolts, as you will need 2 wrenches for the bolt head and nut. Merle
-
Flathead 6 for 1933 Dodge to drive Peking to Paris
Merle Coggins replied to Patrick De's topic in P15-D24 Forum
The pipe to the left of the distributor is NOT the draft tube. That is the oil fill pipe, and crankcase breather. The draft tube is on the other side of the engine near the rear. It connects into the valve tappet area and hangs down into the air flow under the car to draw crankcase vapors out of the engine. Air is then drawn in through the crankcase breather filter at the top of the oil fill pipe. -
Hopefully they had Farmers Insurance... LOL
-
Did the engine run with good oil pressure before you had it rebuilt?
-
1950 Chrysler Windsor turn signal wiring???
Merle Coggins replied to Windsor50's topic in P15-D24 Forum
That's pretty much the method I used to figure out the wires on the used Signal Stat switch i put in my truck. Sounds confusing if you don't understand the function of the switch, or basic electricity, but it works very well. Just have to keep some notes as you go so you don't end up confusing yourself. -
Pretty much like adjusting any other drum brake. Pull the rubber plug from the inside and use a brake adjustment spoon to spin the adjuster wheel until there is some drag when you spin the wheel, then back it off a click or two.
-
What type of parking brake assembly does the Exploder axle have? Is it drum brake inside the brake disc hat? If so, are they properly adjusted? Maybe if properly adjusted that will reduce the amount of pull needed.
-
Also, note that the one pictured from your parts manual page has the groove around it with holes through it. This is to allow the oil from your filter a place to return to the sump. Without this passage the oil can't get out of your filter, rendering it useless. Your picture seems to match up with the one someone posted from a Kaiser manual. I'm thinking someone swapped in a valve from a different engine somewhere along the way.
-
Help, thrust bearing out on rebuild
Merle Coggins replied to Pat McCabe's topic in Mopar Flathead Truck Forum
As I recall, on the 23" engines the rods have a slight offset to one side or the other. Essentially there are 3 of each offset. I remember when I was assembling my engine I had everything layed out and I was dropping the pistons into the cylinders. I mistakenly grabbed the wrong one and when I got it in the rod fit very tightly onto the crank. I knew something was wrong and upon investigation I saw that I had grabbed the wrong one. I pushed it out again and dropped it into the proper hole and all lined up as it should. I have to wonder if they got at least one rod in the wrong spot so that the offset is to the wrong side. This would explain their thinking that the bore is off. It's probably not the bore, but the con rod offset is wrong. Merle -
New 1950 dodge Truck to me
Merle Coggins replied to 5027 steve's topic in Mopar Flathead Truck Forum
Yes, the mobile version has some limitations. I prefer to use my computer or iPad when available. -
New 1950 dodge Truck to me
Merle Coggins replied to 5027 steve's topic in Mopar Flathead Truck Forum
Step 11. This must be done with both axles installed as they both rest against a thrust block inside the differential. Doing this adjustment with only one axle in place will cause the thrust block to be off center.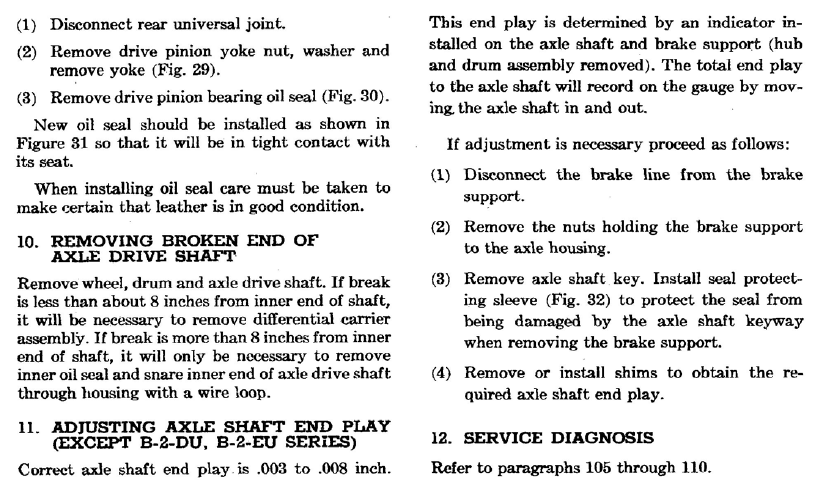
-
New 1950 dodge Truck to me
Merle Coggins replied to 5027 steve's topic in Mopar Flathead Truck Forum
Bingo! -
New 1950 dodge Truck to me
Merle Coggins replied to 5027 steve's topic in Mopar Flathead Truck Forum
I've seen some that will argue against using a grease gun for this maintenance, which is called for every 20,000 miles. Instead they claim to work the 1/2 oz. of grease into the hole with your finger. This should eliminate the possibility of blowing out a seal. Here's a cut-a-way image of the rear axle bearing.
-
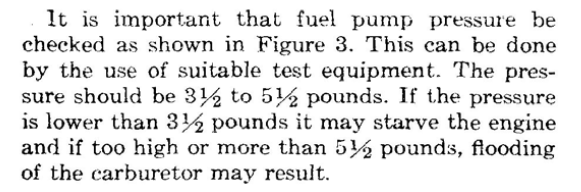
jmooner, you are correct. T176 is the engineer's model designation for your engine. 7672 is the serial number of your engine. And if mechresto is correct, the orientation of the inlet can be changed to meet your needs. I got a straight one once and re-indexed it to match the old one. I then rebuilt the old one with a kit from Antique Auto Parts Cellar, and later needed it as the "new" one failed when the pin walked out. That seems to be a common thing with modern replacement fuel pumps. It too got a rebuild kit from the Parts Cellar and now resides under the seat "just in case". The rebuild kits have pins with retaining clips to eliminate this problem.
-
New 1950 dodge Truck to me
Merle Coggins replied to 5027 steve's topic in Mopar Flathead Truck Forum
The "X" explains it all. Your truck was likely in the early transition... It got the updated parking brake, but not the column shift upgrade. Pull the rear brake drums/hubs, then disconnect and remove the brake assemblies, including the backing plates. The backing plate is the bearing retainer for the axle shaft bearings, and holds the outer seal. Once that is all removed you will likely need a puller to remove the axle shafts. The cup for the bearing is pressed into the axle housing. Once you get them out you can clean, replace, or re-lube your bearings. When they go back in the end play / bearing preload can be adjusted with the shims behind the brake backing plates. You need to have both sides in before making any shim adjustments. -
Apparently the Carter B&B's that Chrysler Corp. used are more forgiving. This is from my service manual...
-
Wow, that's in good condition. Where I live that would be considered normal paint wear with minor oxidation.
-
That was going to be my suggestion. The clutch disc likely got slightly out of position along the way. It's close enough to get everything lined up, but off just enough to properly line up that final bushing. If you can depress the clutch pedal slightly, to release the pressure on the clutch disc, as you push the trans in, it will allow things to self align and pop right in that final little bit. Works every time for me.
-
That's a new one on me. Never heard of that.
-
Shim the pump???
-
New 1950 dodge Truck to me
Merle Coggins replied to 5027 steve's topic in Mopar Flathead Truck Forum
I've never heard of that happening. Some of the very late '49 B1's started to get the B2 features and were designated with an "X" at the end of the Serial Number. B2 upgrades included column shift, under dash park brake, and 45 Amp generator with 50-0-50 ammeter. -
New 1950 dodge Truck to me
Merle Coggins replied to 5027 steve's topic in Mopar Flathead Truck Forum
That wouldn't be an original trans. Probably out of an earlier truck. A 3 speed would be column shift. Only the optional 4 speed would be floor shift. -
New 1950 dodge Truck to me
Merle Coggins replied to 5027 steve's topic in Mopar Flathead Truck Forum
You have a 3 speed floor shift in a B2? Anyway, the top cover should come off, with the shift lever. The knobs should unscrew from the cables. Then the retaining nuts unscrew off the front. Check with Eric a.k.a. Town wagon for a tool for the retaining nuts.
