-
Posts
9,393 -
Joined
-
Last visited
-
Days Won
87
Content Type
Links Directory
Profiles
Articles
Forums
Downloads
Store
Gallery
Blogs
Events
Everything posted by Merle Coggins
-
I don't have an answer for that. As I recall when I put mine back on, the nuts had one shiny side due to previous contact with the flange. The other side was oxidized/dirty. I put them back on the same way.
-
Sweet!. Lookin' good Joe.
-
Yup, it's a tight fit up in there. Only an open wrench will work. To use a torque wrench you'd need a special adapter, like a crows foot wrench with a long reach, to get the head of the torque wrench out in the clear. I just use my 5/8" open end wrench and get them as tight as I can. You probably also found that you can't start a nut on the studs if another one has the unit snugged up tight. It has to be backed off a little bit, then get all 8 started, then snug them all up.
-
Before you start tearing things apart, get a mechanics stethoscope and listen around to see where the noise is coming from. A broom handle or long dowel rod will work too, but the mechanics stethoscope is much easier to use. Touching different parts of the engine while running you will hear many noises. When you get to the one that sounds like what you are hearing, only louder, you have found the source of your noise. You can find a mechanics stethoscope for $8-$15 on Amazon, and you can probably find one locally too. I don’t know how well they’ll work with hearing aids. May need to remove those first.
-
Before you start planning a retrofit upgrade, open it up and inspect what you have. It may be a simple fix.
-
-

Voltage regulator interchangeablility (and other questions)
Merle Coggins replied to thebeebe5's topic in P15-D24 Forum
Yours is a bit different than what I have in my truck, but on mine the regulator is grounded to the body via the mounting bolts. It needs to be grounded somehow. If there isn't a separate ground wire it would need to ground via the mount bolts. Also, in regards to filing the points, I found this in my truck's shop manual -
This again confirms a possible ignition issue, not a mechanical issue inside the engine. You have mentioned the work done on the distributor, but it sounds to me that either you have a bad wire that is shorting out when the points plate moves with the advance mechanism, or you don't have the points installed correctly so that there is too little spring tension. I did this once and when the engine got over 2500 RPM the points would bounce and the engine would stumble greatly. I couldn't get over 35 MPH. A deeper investigation of the replacement points revealed that I didn't get the additional spring connected properly. Once I figured that out and got it corrected it ran great again. I highly recommend a thorough inspection of your distributor and points again to verify that everything is correct. Also, if you have a timing light, connect it and run the RPM up until it "shutters violently" (as you state). If the timing light starts to flicker intermittently that will verify that you have a points issue.
-

Voltage regulator interchangeablility (and other questions)
Merle Coggins replied to thebeebe5's topic in P15-D24 Forum
Maybe you just need to open it up and clean up the contact points with a points file. Sounds like one of them is sticking, or making intermittent contact. -
LOL ? "Majestic". I like that term. My truck has Fluid Drive with a spur gear 4 speed. I'll sometimes come to a stop without depressing the clutch, then forget to downshift out of 4th. I realize it quickly when the light goes green and I crawl away from a stop. It'll pull it though, as long as it is fairly flat.
-
Yes, but "Fluid Drive "only refers to the fluid coupling between the crankshaft and clutch. It could have a standard 3 speed transmission behind it or the fancier semi-automatic M6 transmission.
-
As far as I know all 3 speeds were synchronized since at least the 40's. The B-2 series, in 1950, was the first year that the trucks used the column shift 3 speed and it was certainly a synchronized transmission, at least in 2nd and 3rd. If you need to double clutch your shifts your synchronizers are not functioning properly.
-
Is the shutter/vibration coming under acceleration under load, or with no load? I concur with the engine mount checking. Could also be a rear spring shackle issue, allowing a little axle hop, or twist that puts the u-joints in a bind. The 3/4 ton trucks originally would have had tubes with bias ply tires but can be cleaned up and used tubeless with modern tires. I’m running 235/75R-15’s on mine. It should have 5-1/2” wide rims.
-
-
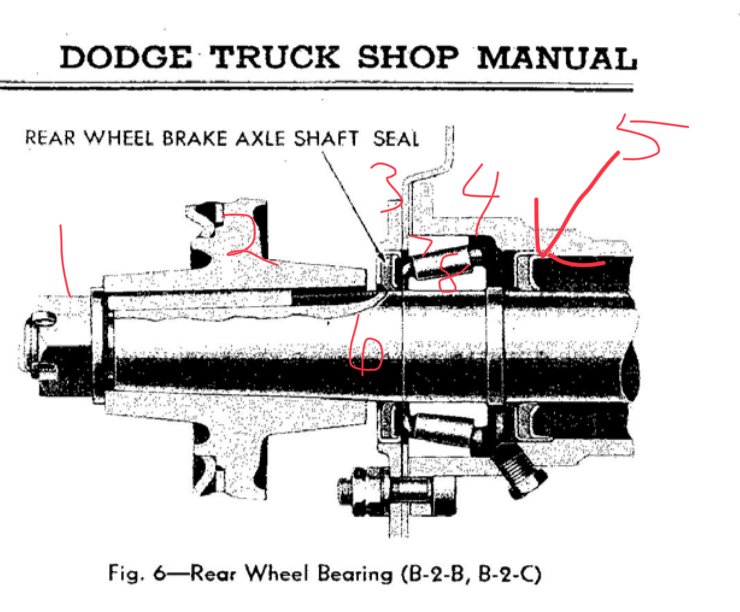
That is a very good question. Refer to my previous posted picture... 1. Hub retaining Nut 2. Brake drum/wheel hub 3. Brake backing plate 4. Axle housing Between 3 and 4 are shims. No gasket. The shims are used to set the bearing preload upon assembly. 5. Inner seal. (Retains axle oil in the axle housing) Rear Wheel seal already identified, and noted that it is a dust seal for the bearing 6. Axle shaft 7. Bearing Cup. As noted it is a press fit into the axle tube and is retained by the brake backing plate. The puller is needed to pull the assembly out as this bearing is a tight fit into the housing. 8. Bearing Cone. This bearing is grease packed like the front wheel bearings. The bearing is press fit onto the axle shaft.
-

Posting some pix of the '51 pickup I recently got.
Merle Coggins replied to Dodgeed's topic in Mopar Flathead Truck Forum
Yup, like they’ve said. Rear fenders, “DODGE” on dash, and “DODGE” name plate on the nose all make it a ‘53. Take your serial number and put in in the decoder at http://t137.com/registry/help/decode.php -
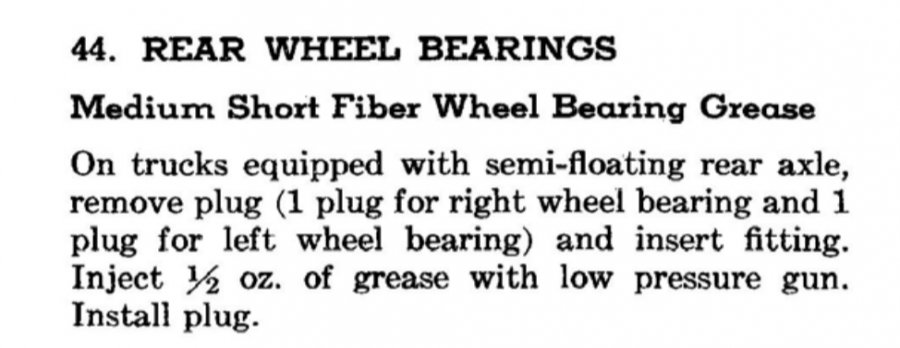
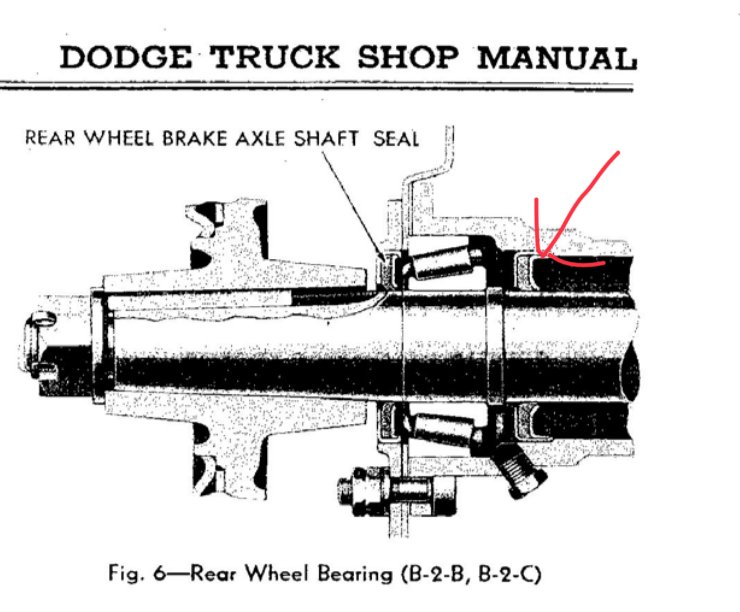
Also from my truck manual, Lubrication Section, Every 20,000 miles. This would be the same as your Suburban axle as the 1/2 and 3/4 ton truck axles were the same design as the cars. In reference to the plug in your photo...
-
I have had good luck with a slide hammer. Others have reported having good luck using the brake drum as a slide hammer. Put it back on loosely, with the nut on a few threads. If that doesn’t work find some spacers to put between the drum and the axle flange, then tighten the drum retaining nut to pull out on the axle shaft. You may need to reset with longer spacers a couple of times before it’s all out. I was able to use some deep well sockets and washers to accomplish that task once. The washers and sockets sit nice over the brake backing plate studs.
-
Should be the same setup as our trucks have. Outer seal is dust seal for the bearing, inner seal is oil seal for the axle oil.
-
That seal is just a dust seal for the grease packed wheel bearing. The oil seal in inboard of the bearing.
-
OEM drag links are fixed length and ball joints are not replaceable. DCM Classics are reproducing them with tie rod ends so that they are replaceable and adjustable.
-
I didn’t look at their movement while installed, and once removed there doesn’t seem to be excessive movement in the joints. I figured that since it was still the original piece it was probably worth the effort. Plus the adjustable ends allowed me to re-center the steering wheel. It was a little off since doing the disc brake conversion because of the steering arms moving inward to fit the caliper brackets. And I didn’t do any measurements before and after the drag link change, only after that and the steering box slack adjustment. I’m wishing I had done this years ago. The steering is much more responsive and easier to drive down the highway.


