


Dodgeb4ya
-
Posts
10,004 -
Joined
-
Last visited
-
Days Won
181
Content Type
Links Directory
Profiles
Articles
Forums
Downloads
Store
Gallery
Blogs
Events
Everything posted by Dodgeb4ya
-

how to remove a truck from what was its final resting place?
Dodgeb4ya replied to 41/53dodges's topic in P15-D24 Forum
Be sure to bring along your chimpanzee-he will love the ants you stirred up! -
how to remove a truck from what was its final resting place?
Dodgeb4ya replied to 41/53dodges's topic in P15-D24 Forum
Thats right -they (tires/rims) still should always be in a cage at a repair shop---Unless you are at home and don't have or want a cage, then there are other safe ways as to safely inflate these multi-piece rims. I have heavy equipment to place over the rim/tire assemblies with 1/2" chain in and out through the hand holes. Then use a lock on inflation Chuck-it's all safe. Bob -
I think this is what you are looking for-although this is the complete piece that holds the 3/4" wide weatherstrip that supports the forward edge door glass channel for a truck with the wing vent windows with the weatherstrip fuzz channel already rivited in by 2 rivits. Your truck with vent windows uses a #12197021 RT. and a 1197022 Left. I could not figure out from the Dodge truck parts books what the actual part #'s were for just the individual weatherstrip channels front and rear. The 1950 parts book is unclear as was the up to 1953 Master book. VPW or Roberts should be able to help.
-
Yea, I imagine ether in bulk is kinda hard to get today unless your registered. I re-did these back in the late 70's. The explosion was not funny at the time. All my friends sure thought it was funny too. No compassion at all !
-
I used to repair my old temp guages. There is a tapered cone plug under the solder at the end of the bulb. I cut the copper tube off flush at the bulb right where it was soldered to the bulb-used a drill same size as the copper tube. Drill whats left of the copper tube out of the bulb. Carefully Filed the solder covering the tapered cone plug at the other end of the bulb just till I could just see the outline of the plug-1/16" dia. Then used the drill to pop the cone plug out of the bulb. Then resoldered the tube to the bulb. Got Dentist grade ether from my Dentist -a lead 2 lb can. Used a syringe to inject the bul 3/4 full of ether. Tapped the cone plug back in tightly and used a small torch to solderseal over the plug. Now days you could probably find something a little less risky to seal the plug. WARNING- I had one blow up- Ears rang for a day. Did about 20 of them and got a little careless on one- young and dumb I guess! I must warn that no one on this forum should try this! This is just what I did! It was fun and worked too Bob.
-
how to remove a truck from what was its final resting place?
Dodgeb4ya replied to 41/53dodges's topic in P15-D24 Forum
The rim that started all the split rim/ring trouble is called a Firestone type RH5° 2 piece- it's a split in the center design of the rim. It uses a 5 degree interference angle fit- thats the weak spot of this rim. They also can get rusty and the tire shop guy did not check/clean the 2 rim pieces at this critical area and did not use a cage either upon inflation. The rest is already known! This type of rim is dangerous. Replace it with a better type. Any big truck rim/tire repair should only be done by a knowledgeable person capable of doing this type of work in a proper safe manner! Always inflate with a safe way to restrain a possible explosive rim separation, and always stand off to the side of these type of wheels/rims when inflating-you will only lose an arm or leg! I use chains and or a backhoe front loader bucket for safety when I do all my off truck tire repair work. I always check for excessive rust and rim damage-bent rings ect. Most of our old Dodges up through 1953 at least use a plain 2 piece RH type rims. Single ring on the outside edge of the rim. A profile pic of the "Widowmaker" Firestone RH5°. Also a pic of a "safe" plain RH rim on my 4 ton showing the silver outer split ring. I'd just get that old dodge drug up to and on a trailer with a whatever will do it-and get it home then worry about the wheels and tires. Never weld on rims! Bob -
new guy- need help w/ pilothouse front brakes
Dodgeb4ya replied to 41/53dodges's topic in P15-D24 Forum
??? -
Hope your picture was not promoted by the POC. Some of the hood ornaments are mis-identified! Bob
-
new guy- need help w/ pilothouse front brakes
Dodgeb4ya replied to 41/53dodges's topic in P15-D24 Forum
I would try to find good used stock drums-they won't be anywhere near $500.00! Stock brakes work good too- some one here might even have some good used stock drums. My trucks are all stock drums and work well. Bob -
One easy last request for the end of 2009!
-
I always adjust the valves for the cylinder the rotor is pointing to, with the points just starting to open to fire that cylinder. I start at #1 then 5,3,6,2,and finally#4. Simple. Bob
-
Tuning Carburetor - Power Wagon
Dodgeb4ya replied to sams50b2d's topic in Mopar Flathead Truck Forum
You better close off that tube at the rear of the intake- that will cause idle stall and popping. You cannot adjust the mixture screw till thats fixed and the timing points ect are correct 1st and the engine is fully warmed up.That vacumn leak is a major issue 1st off and was probably the original issue! -
The best Christmas to all. Hope ya all get a great MoPar goodie gift from the MoPar Santa too!
-
Here is a picture of a new .062" asbestos MoPar choke gasket. As Normspeed said a very accurate snug fitting allen wrench or nail or the OE tool should be used to set the choke accurately as to original specs. Bob
-
End this awful thread!!!!! Getting tired of this people bashing crap!
-
Here is a pic of the insides of the Carter 1BBL.
-
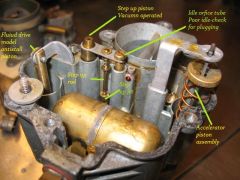 Internal parts ID of a Carter 1BBL 1946-8 Chrysler 6 cyl.
 -
I am in the middle of a frame off on a 1952 Chrysler. Have done a couple of cars complete this way. Bob
-
Grade 5 is more than adequate. OE is most likely a grade 5. 12-17 Ft.Lbs. is the maximum torque on the pan bolts. I always run a thread chaser into all the tapped holes and lightly oil each bolt before installation. Bolts need to screw in freely into each hole. I just tighten by experienced feel. Done this job many a time. If you where to use a torque wrench @15lbs.=180" lbs.- you would need a 50-250" inch pounder to go that low and keep the reading in the approximate center range of the torque wrench to be anywhere accurate. Bob
-
The oil pan bolts originally looked just like the one in the pictures-takes 20 of them. The star lock washers won't easily come off the 5/16" X 18 bolt. This is off a original 1951 plymouth P23 motor. All 1946 and up 218-230 motors use this style. Bob
-
The 42's did have air available but not the P23 cars- was just jokin with ya! Bob
-
Oh, I thought it was a factory option like 1942 Chrysler and DeSoto's had back in the day when AC was really something to be had!
-
Wow, That car looks like it had factory AC-the 2 big round holes!
-
Rear fender mouldings look like 1946-8 Chrysler- those are way too rare and valuable to put on a Plymouth. I want em.
-
Make sure on your hub area that the seal lip rides on is not grooved or worn-otherwise the front seal will leak. You might have to Speedi-Sleeve the hub to fix this common issue. Bob