JBNeal
-
Posts
7,184 -
Joined
-
Last visited
-
Days Won
79
Everything posted by JBNeal
-
The '48-'49 frames and '50-'53 frames differ in the mounting of the steering column, and the '53 frame has a different cross-member mount for the fuel tank...from what I've seen, the '48-'52 had one style of fuel tanks, and the '53-'56 had a different tank.
-
 the '49 1-ton had been parked many years in Western Oklahoma, then a decade more in the Panhandle near Shamrock before I dragged it home. It had buckets of Panhandle sand in the cab, so I swept out as much as I could after removing the spare parts and bricks in the floor board. There was a piece of low pile carpet in lieu of a floor mat, and it was plenty old as it fell apart when I tried to peel it out of the cab. Once I got it scraped out, there was more caked-on sand to sweep out...and on the passenger side of the floor board, cemented into that sand, was the original ignition key--JACKPOT!
 -
Today's cautionary tale: I picked up a donor steering column, and set out to remove the steering wheel using a bearing splitter and gear puller setup similar to those shown, a setup I've used on three other occasions without problems. But I was in a bit of a hurry and didn't notice that I had booger'd up the steering shaft threads until I tried to remove the wheel from the shaft. Apparently, the bolt & washer I used in the shaft for the puller drive screw were too small and my torque/hammer blow/repeat cycles started to drive the bolt/washer into the shaft, mushrooming the shaft at an angle. I have another steering wheel to pull at some point, and hopefully I'll remember to used a bolt that just fits into the shaft, as well as leaving the steering shaft nut on the shaft but backed off a few turns...as well as taking my time and not trying to muscle the thing off.
-
Since I don't have the specifications on the stock idle orifice, I can't say for sure if it has been replaced, but I'd be willing to bet $$$ that it has not been replaced. I am assuming that the PCV replacement orifice is only a few thousandths different from the stock tube. The idle screw can be adjusted to offset the additional air introduced to even out the idle speed, rather than doing precise surgery on the carburetor. Of note is one of the Chrysler air filter housing modifications that points the crankcase gases from the filler tube towards the carburetor throat. I have seen similar setups in other engines where PCV fumes are directed through the air cleaner and directly over the choke valve into the carburetor. If there was enough room on the carburetor, a fitting could be installed to direct PCV fumes directly into the carb. But since there isn't enough room or a flat boss on which to drill and tap an adequate port on the carb, the air cleaner housing has to be used to locate this port.
-
The function of the PCV system was also discussed here & here...
-
I found this in Hemmings years ago, dunno if he's still in business...
-
here's greybeard's installation...it's a variation on the original Chrysler vacuumatic setup. There's other variations out there that modify a sealed-off replacement oil filler cap, but there has been some disagreement on whether a sealed cap is necessary to remove crankcase combustible gases or if it would cause some pressure build-up in the crankcase that may result in rear main seal leakage. At any rate, my thinkin' is that those flathead valve covers that have been modified for a PCV system were done by someone who mimicked what was found on OHV engines, where PCV valves were placed in a rubber grommet atop the engine. It has been pointed out that the flathead valve cover would see more oil tossed at it than the oil filler tube or cap, so there may be more oil seepage at the valve cover than normal, and the PCV valve may get clogged up faster. Is the PCV system necessary to make the engine run better? no, but it helps...I think the 180F thermostat would make for a better running engine as sludge can be greatly reduced; the PCV system just makes it run cleaner.
-
it kinda sounds like the plunger inside the carb is not returning to the idle position. The leather seal needs to be soft, so let it soak in gasoline for a day or two so the leather will be saturated & lubricated. The plunger's movement is impossible to check with the air horn in place, so you'll have to pull the air horn & approximate where it sits to verify plunger movement. I had a similar problem with a Carter B&B and found that the plunger linkage wasn't set properly using this approach.
-
Electrical Question - Probably Simple
JBNeal replied to tdkibbee's topic in Mopar Flathead Truck Forum
I figgered grounding the horn button was what actuated the horn vibrator. The horn button doesn't work too well with corrosion at the brass plate, mounting collar, steering box, etc. The horn in my '48 is about as loud as a squeak toy, but when I test it on the bench, it rattles my fillings, so it's an issue to wade through at some point. -
A Question of Dollars and Sense
JBNeal replied to SmokinStanley's topic in Mopar Flathead Truck Forum
Tackling the restoration of one of these trucks will be an educational experience. If the truck isn't running, determining the root cause helps in getting it back on the road. This can range from wouldn't start (bad carburetor/electrical issues) to poor compression (engine wear) to mechanical failure (cracked block/no brakes). A truck that has been sitting awhile will require thorough examination as corrosion will pit machined surfaces and affect electrical performance. Corrosion can also make sheet metal repair questionable if the damage makes the part too far gone to save. Mechanically, I reckon $5k can get a chassis rolling under its own power with a large majority of the work being done on your own. Cosmetically, the sky is the limit...it is tempting to start making the beast look purty before fully making it functional, and that can be a problem when it is realized that the motor has so many problems that it would make a better boat anchor. What is important when starting is to have plenty of patience. Parts can be hard to find. Vendors may seem like they are dragging their feet when taking weeks on end to return parts. Learning new skills when doing the work yourself can be frustrating. Knowing when to take a break is an acquired skill. Also important is to stay focused. Taking on too much at a time, then taking an extended break while building up cash or dealing with life or whut have ya is a recipe for losing interest. Stay organized and tackle what you can handle can lead to satisfying project results. How many people have seen one of these trucks get completely dismantled and then show up on eBay or Craigslist as parts, or turned into a trailer-load of scrap yard material... But if you are on this site asking questions, you're off to a good start. There is a ton of information here on a wide range of topics, and lots of experience to back up opinions voiced. Doing research here, on other websites, in books and manuals, etc. will save $$$ and time in making repairs one time instead of repeatedly and fewer parts (and knuckles and eyebrows) will be sacrificed. -
I'm gonna guess that number probably reads T146-...look below the distributor to find the casting date on the side of the block, and behind the coil to find the casting date on the head.
-
when I first started working on my '48 back in jr. high, somehow I knocked the timing pointer off of the cover and reattached it with some JB Weld. This was all with the engine in the truck and the fenders attached, so I had to stand on my head to line it back up with the shadow lines of the cover paint. Eventually I read somewhere that the oil pump has to be carefully installed so that the distributor rotor would be in the correct position for ignition timing. So there might be a cumulative effect with engine performance if the crank, cam, and distributor aren't synchronized properly.
-
why build a replica when Chrysler might just start selling these things...
-
when these trucks were new, not much was thought about how they would perform in an Interstate Highway System society 6+ decades after they rolled off of the assembly line. A valid point has been made about checking everything since you don't know the history of the truck...ya don't necessarily have to replace everything, just make sure the engine specifications are within tolerance. Completely go through the brakes & fuel system as corrosion from moisture can cause failure. Check the bearings in the transmission, differential, and wheel hubs & axles as spalling can cause failure. Plan on replacing every seal and gasket as they have probably dried up and gone brittle. Replace the original wiring harness and battery cables; they may look okie dokie, but the insulation is prone to breaking down, allowing corrosion on the strands of the conductors, increasing internal resistance and putting a load on the 6V system that it was not designed for. And make the 180F thermostat and PCV system upgrades and see about getting the compression ratio up to 8:1 so the motor will run cleaner & with more power.
-
From the parts manual, serial #82295516 is a late 1952 half ton (108" w.b.), with a 218. From what I've found, the number on your title could be from anything; some registrars used serial numbers, some used (partial) engine numbers, some used the body tag...the frame number should match the serial number that was on the ID tag. The engine block will have a flat boss located above the generator, below the head, behind the water pump. The casting date is located below the distributor. The head will have its casting date above the distributor. Originally, your truck would have an engine number code T306; it sounds like you have a Plymouth engine instead of a Dodge truck engine (what I have in my '48). Usually, a matched engine will have engine & head casting dates within a few days of each other.
-
truck picture B-4-B-116: The Spring Special is looking better already
-
International Work On Your Classic Truck Day....
JBNeal replied to 48Dodger's topic in Mopar Flathead Truck Forum
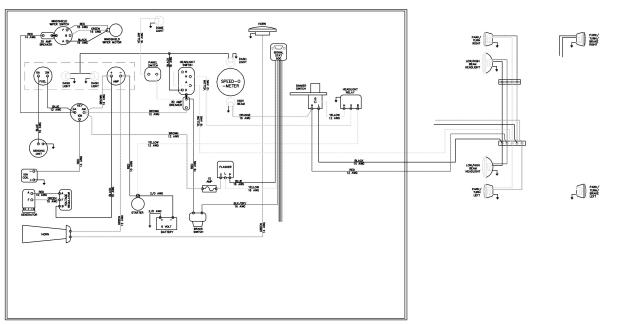
This has been off & on the backburner for over a year, but I reckon I'm purty close to assembling a wiring harness to test this configuration:
-
the speedometer cable slips into the gear inside the transmission and should not be forced loose with a pair of pliers or the gear gets cracked and those gears are hard to replace them original battery cables, even though they look okie dokie, could have enough corrosion on each strand inside the insulation to bog the starter motor down enough to leave you stuck at a roadside diner in the summer for four hours until everything cools off enough that the internal resistance drops enough for the starter motor to engage properly if you're gonna replace the rotting wire harness with one made from parts at the hardware store, not only match the colors to the circuit, but pay attention to the wire size because too small of a wire will not a properly functioning circuit make washing your flathead may seem like a great idea, until ya realize that the starter motor is not sealed, and all that crud ends up inside the starter, which requires the starter to be pulled, disassembled, and cleaned so that it will work again practice making tubing flares on scrap pieces before trying to make one on the coiled section coming off of the master cylinder do all of your research before purchasing parts so that you'll know the motor in your truck is not original and that you'll have to order engine parts for a different model year than how the truck is titled even though bias ply tires were what came with the truck when new, they are a real pain to drive with in today's traffic do not handle as well as the radial tires that everyone else is driving on in today's traffic, especially in wet weather when taking the truck to get a state inspection, be sure the inspector knows: *that the truck has a foot starter pedal before he nearly twists the key off in the ignition switch *where reverse & first are on the transmission before he nearly backs into a nearly new Cadillac *that the truck does not have power brakes before attempting to make a new doorway in an old service station
-
Help request, stock electric wiper retrofit on B1
JBNeal replied to a topic in Mopar Flathead Truck Forum
the wiper arms should slip over the threaded pivot shaft onto the shaft splines, and a chrome acorn nut should retain the wiper arm. -
Help request, stock electric wiper retrofit on B1
JBNeal replied to a topic in Mopar Flathead Truck Forum
the parts manual exploded view isn't entirely accurate, as it shows those dog-legged formed links and a passenger pivot that is missing its arm. The straight links that have an offset would be cheaper to make than the dog-legged links, so the parts manual exploded view may be an early production drawing. The ones pictured look similar to the ones I have. Verifying the part numbers and from what dimensions I have measured, the electric motor & linkages for the B-1 & B-2 are different from the B-3 & B-4. -
Help request, stock electric wiper retrofit on B1
JBNeal replied to a topic in Mopar Flathead Truck Forum
1.) screws mount up for lubrication 2.) wiper pivot arm has a dog leg as pictured 3.) yes 4.) center-to-center distance is 8-3/4" 5.) link 23-67-79 has edges that are parallel to a line from hole center-to-center; the surface that mounts to the wiper arm pivot and the surface that mounts to the motor arm pivot are offset by about 1-7/8" -
maybe this goes along with having plenty of patience, but try not to pigeon-hole a task into how many minutes it should take to complete. That's just askin' for a headache.
-
I used a thin paper bag to make those gaskets...the gaskets allow the vibrator to move; without them, the horn only makes a buzzing noise. I haven't tried it yet, but if too thick a gasket is used, I reckon the horn wouldn't be very loud.
-
SWEET MOSES don't that feel good to roll that thing out for a spin after all them problems?!? well done! My two cents: drive that thing around for a few months before fiddlin' with that muffler, and put several hundred pounds of ballast in the back to test how far down it drops
-
I found my cracked originals in the attic and thought I'd try to sketch them up quick-like, but what I found confirmed a suspicion that I have had for several years. I replaced the glass in the 1 ton & '48 at the same time, and immediately had problems rolling them windows up & down. I assumed that the new window channel felts were just stiff, but after 5+ years, I'm still having the same problems. My guess is that the guys who cut my glass got lazy and cut the top & rear edges parallel with the bottom & front edges. The originals have the front & bottom edges perpendicular to each other, and the edges are flat. However, the top & rear edges of the originals have what I'm assuming is some sort of GD French curve. I laid the original out on a work table and took some measurements with drafting triangles & straight edges to confirm what I was seeing. Without the slight curve on the rear edge, the glass gets jammed in the channel and requires a little persuasion that requires the vent window to be open in order to grip the front edge.