


JBNeal
-
Posts
7,190 -
Joined
-
Last visited
-
Days Won
81
Everything posted by JBNeal
-
When I re-worked the brakes on the '48, I ran into the same problem. I found that the bore of the MC had pitted from moisture in the brake fluid. The new rubber in the MC could not seal off the bore enough to build hydraulic pressure, but the MC piston was able to move some fluid through the lines as fluid would also bleed past the MC piston. I ended up getting my MC sleeved for about $150 since I was not able to locate a NORS unit back in '99. I drove the truck the other day, and the brakes still hold pressure
-

Just when you thought you were finished.
JBNeal replied to Chester Brzostowski's topic in P15-D24 Forum
just to pile on: from what I've seen, moisture in the air supply will show up as blisters immediately upon top coat application. Crazing or blisters that show up gradually as the top coat cures is outgassing of the base coat as its chemicals react to the chemicals in the top coat. This is usually attributed to mixing paint systems from different manufacturers (primer from company A with top coat from company . One approach to avoid this is coating the base primer with a primer that is compatible with the desired topcoat. -
1) the driver door opens by rotating the handle down, and locks by rotating the handle up 2) cain't lock the hood, but maybe ya could invest in a rattlesnake or a loaded beehive to keep in there
-
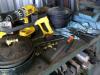
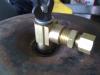
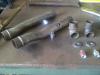
I put together the shown contraption as an alternative to the practically impossible brazed air cleaner housing setup specified by Chrysler back in the 40s. The specifications are pending following road testing, but the picture shows the general parts & tools used. I probably spent way more time thinkin' bout it, but I only had to cut once, so I reckon this is a sound approach. This setup allows the use of the oil bath air cleaner with no modification to the base as Chrysler suggested for their PCV setup. The modification to the air cleaner housing requires cutting down the spot welded 1/4-20NC rod, threading part of the rod, and adding a coupling nut and some length of threaded rod. Of note: Pittsburgh Tap & Die Set (Harbor Freight) is JUNK, as they overcut the specimen and standard bolts/nuts fit loosely. I took them back, told the nice goth gal running the cash register what happened, she gave me the ol' deer-in-headlights look and refunded my $$$. Alternatively, I found a nice Irwin [made in USA] Tap & Die Set at the Ace Hardware in the next county over (was in town there on business)...it cost three times as much as the Pittsburgh set, but they worked like they should...$$$ well spent I lucked upon some brass 90 fittings at Lowe's that work almost perfect for fitup, although there were only two available of the machined style shown. The other fittings, as well as those seen at a couple of area Ace Hardware stores, were of the cast style and would not work well. The alternative to this 90 is to plug a tee and drill a hole in the plug for the threaded rod. A rubber washer is under the zinc plated washer, and a flare adapter & bushing screw into the 90. Total cost for the air cleaner adapter is in the $10 neighborhood. Right after this picture was taken, I got the butterfingers and dropped the air cleaner, locating an Oreo sized dent in the top. That should be fun to pop out The crankcase adapters used the existing draft tube and oil fill tube. Trimmed air hose adapters were brazed to these tubes...these are my first tries with brazing, so they are taking some time to clean up the slag & whutnot to look presentable. Cost to make these modifications is less than $5. I look forward to putting these to road use, not only to see how well they work in keeping the oil clean, but to see how well they hold up to vibration. But I reckon I'll need to upgrade that 160 thermostat to a 180 thermostat to get the full effect.
-
Thanks to some unwelcome changes at my bank of several decades, I made changes to my accounts several months ago. This affected my PayPal account, and I attempted to update that account information a few weeks ago to complete a small transaction on eBay. The bank account change flagged my account, and I was prompted to verify my identity by submitting 1) a photo ID, 2) proof of physical address, and 3) copy of social security card. I've had this PayPal account for several years, so I was a bit annoyed at having to prove my identity again, but the other side of that coin is that this is a security measure to protect my account, so I begrudgingly supplied a copy of my ID. I had scanned my TX DL a few weeks ago for an application of lost title to the '53 Spring Special just last month, so I had it on file anyway to send. Yesterday PayPal accepted my photo ID as partial proof of identity, but still required proof of address and my SS card. My address was on my TX DL that they had just accepted, and there was no way I was sending my SS card via the internets, no matter how safe them folks tell me that this might be. So I got on the telephone to hash this out, bypassing the automated service by speaking authentic frontier gibberish, which prompted the computer program to send me directly to a representative. I was simmering at this point, thinking that if a person with a thick accent answered the line, I was gonna hang up and try later in a few hours. Luckily, a nice English-speakin' lady from up yonderways greeted me with a request for my date of birth. I responded that my ID that I had just supplied had that information, and was concerned that there was a problem with my verification process. She put me on hold for about 3 minutes to look up that information, and verified my identity on the spot. This was simultaneously a relief and annoying: PayPal's system is highly automated, but it took a phone call to straighten out an error on their end that luckily went well. I do not recall having this much trouble when I set up this PayPal account, but the original verification email mentioned "recent changes in federal law", I'm assuming this has something to do with combatting money laundering and The Patriot Act. I have dealt with identity issues stemming from The Patriot Act before, but this time it rattled me a bit because an automated system was borderline invasive with the request for an electronic copy of my SS card. I've heard stories about identity theft, and release of SS card information is just asking for trouble. In this computer age of convenience & commerce, staying vigilant with the finances & whutnot is never-ending. All this to buy a barn-find NOS flathead crankshaft pulley...
-
flatheads were engineered to a driveline that was designed to operate in the 40-50mph range, and that was pushing it. Changing to an overdrive transmission and/or highway-friendly rear axle keeps the engine top speed about the same to achieve the 60-70mph range. So you can keep the flathead as a reliable novelty, coupled to a newer transmission / rear axle setup to get down the highway without impeding traffic, or replace the entire powertrain to have something that's a little easier to get parts for while being housed in a classic ride. Or keep the entire vehicle stock and roll down the backroads & slow lanes. It's up to the enthusiast to determine which route to take
-
here's one way to check the starter circuit...if the starter motor was rebuilt, were the starter button switch contacts adjusted? If they are not in good contact, the contacts will arc and corrode their surfaces. If they are clean, the next thing to check would be those cables. I had starter problems on the '49 for several years, only in the summer though. I was using the original battery cables, which looked fine, but when the starter motor would drag or not turn over, them cables were blistering hot. Out of curiosity, I peeled open the sheath at the halfway point on each cable, and them copper strands were black, so the entire lengths of cable were corroded, boosting starter circuit resistance. I replaced those cables with new 1/0 tractor cables, and the starting issue went away (only to be replaced with this problem
-
If'n ya think that new Dodge is big compared to the ones made six decades ago, compare their respective prices...HOLEY SCHMOKES btw when the '05 Dakotas were just coming out, I parked my '92 Ram250 CTD next to a club cab...they were almost the same size, although the Dakota had more cupholders. Just the other day, a brand new F150 4x4 parked next to my '02 Ram 2500 CTD 4x4, and that Ford made my Dodge look wee. But there's a guy in town who's fixed up a '72ish toyota hilux, that thing looks about as big as a Smart car.
-
These center caps were used on the last few years of Ramchargers & D-150s and were bolted to the wheel...Ram 1500s used similar caps that had a flange for the lugnuts, but by then the bolt pattern had changed to 5 x 5.5. This place has them up for sale, never dealt with'm though... Anyhow, I ordered these NAPA 730-2409 and since they're not zinc plated, looks like I have something else to paint with the PCV system parts I've been working on. The relief cut shown defeats the sealing function of these caps and eventually those caps will vibrate out of their seats. If those caps are set in some RTV sealant, that might seal them off & hold them in place...I had plastic center caps on my '89 Dakota that were 30 bucks when they popped out of the aluminum rims. RTV on the cap lip held them in place up & down the road, and was easily removed when tire balancing was needed. At any rate, these dust caps need to be set with a tube or pipe or some other whutzit that rests squarely on the lip provided. The cap is supposed to have a tight fit similar to the wheel seal. The only modification that should be done on these caps is to put a small chamfer on the leading edge so that the cap can be started in its seat. The cap is then to be driven up to the lip for a full seal.
-
FEF build card shows the aux.tail lamp punched out.
-
Build Record Request Information has been moved on their website, but the mailing address has not changed. What caught my attention was 'proof of ownership', as I have a Spring Special that I am waiting on a valid Texas title. Also, the photographs they are selling...are they of random trucks, the trucks they have in the museum, or for the vehicle that the information is being requested? Cuz that'd be something to see, a photo of yer truck coming right off of the line all those years ago
-
I found some more info from wading through my box o' seals: rear seals - inner: National 55010 Chicago Rawhide 500650 National 417485 rear seals - outer: National 6077-S Chicago Rawhide 20766 NAPA 20766
-
I went through my box o' seals, and found a pile of inner & outer seals for the rear; then I remembered that those are the same as on a Power Wagon / M37. Since the '49 is still up on blocks and the front wheels are off, I pulled one of the hubs to check on that number and the brake shoes I adjusted by ear (they're a li'l off). Looks like I used: National 5836 Advanced Auto has an on-line listing that shows 1.734 / 2.73 as its dimensions. SKF 17145 shows 1.73 / 2.73 as its dimensions...dunno what size is required as my micrometer has gone AWOL.
-
If you are pushing in the starter pedal and the starter motor does not turn, then try going under the hood and push the starter motor button switch (not the lever) by hand to see if the motor will turn without the starter pinion engaging the engine flywheel. If the motor still does not turn or turns slowly or intermittently, then the problem is either in the starter button switch (misadjusted or corroded contacts) or the starter ground circuit is at fault. If the starter motor turns fine when the starter pinion does not engage the engine flywheel, but the motor bogs down or does not turn when the pinion does engage the flywheel, then 1) the battery might be too weak, 2) the battery ground may be faulty, or 3) the starter motor may be weak from worn, dirty or corroded internal parts. The starter is not sealed, so moisture can condense on brushes, stators, etc., attracting dust, etc. and ultimately boosting the starter system resistance. That's when it's time enjoy the removal of the starter and getting it serviced
-
I thought I would try to install a crankcase ventilation system in the '49 while I had the inner fenders out of the way for the fuel line replacement. I originally wanted to follow the vacuumatic crankcase ventilation service bulletin from way back when to see how well that system worked. I had chanced upon 5 NORS PCV valves on eBay last year from an unheard of manufacturer, but the boxes appeared to be from the late 60s from their application tables printed on the backs. I was able to get the seller to get some critical dimensions off of these, and they appeared to be similar units to those sold by VPW...I made an offer on all 5, and got them to the house for less than the cost of one from VPW Being *ahem* frugal and laden with extra odds & ends in the parts shelves in the garage, I thought I'd try to make my own crankcase adapters rather than purchase the ones from VPW. So I've cut down a couple downdraft tubes and brazed on a fitting for the PCV valve side of the PCV system. I've also brazed on a fitting to the oil fill tube, similar to the ones sold by VPW, for the air flow side of the PCV system. I attempted these modifications before trying to make the oil bath air cleaner modifications. With the thinner sheet metal of the air cleaner housing, I have been hesitant to get out the brazing torch for fear of ruining one of these. The housings I have are in very good shape and I don't want to run the risk of butchering these specimens. But first things first: a hole would need to be drilled into the base of the housing throat. This task is practically impossible as it is not a straight shot for a drill bit, nor for a center punch to start a pilot hole. The only straight shot is to drill a hole through the side of the air cleaner housing and into the throat, then braze a horizontal tube through both holes. This would put the tube below the oil fill line on the housing, and my brass brazing practice is a work in progress so I'm not that confident that one of my submerged braze welds would not leak. Maybe with enough practice material to perfect the brazing technique, I would attempt this tube installation...my guess is that is the same reasoning why I've never seen one of these air filters modified per the service bulltetin. If I was converting to a paper element, I could probably try something like this modification... While reading up on brazing techniques, I turned the problem upside down and thought about putting some sort of fitting on the air cleaner itself. Brazing was out of the question for fear of damaging the cellulose material. Drilling a new hole in the cleaner was out because there was no good way to access the innards of the cleaner. But there was one hole already in the cleaner, where the wingnut clamps the cleaner onto the housing. So looking at some brass fittings, doing some air volume calculations, and mocking up some fittings to check for clearances, there appears to be a way to have a PCV port at the top of the air cleaner that requires very little surgery. With a bit of finagling and some sealing washers, we'll see how well this works out
-
I cringe when I see a 'nice' paint job on an old truck and wires hanging out from under the dash, especially considering how little wiring there is on this one. The cab/bed alignment would make me want to put that thing on a lift to get a good look underneath. The frame may have been damaged, and weld repairs may have arched the frame rails. Or the bottom of the cab has rotted away and a makeshift fish-plate repair was made that has caused some misalignment. There are missing trim details in the sheet metal but no visible mounting holes in those locations, so I may assume that under that non-stock color paint is a slathering of bondo. Askew windshield wipers could be a sign of another annoying repair that needs to be made. Bottom line: there are way too many little things wrong with this truck, its patchwork of repairs spell "WALK AWAY" to budget-minded folk
-
you're gonna hate that truck if'n ya go from radial to bias-ply tires; also, that Firestone tire is for rims up to 5" wide. Coker lists the Excelsior Sports Radial as made in the USA and for rims 5" to 6.5" wide, but they are nearly a Franklin more per wheel. Choose wisely...
-
almost sounds like that last leg of yer trip was akin to the end of the road for the Blues-Mobile...GOOD TIMES!!!
-
Diamond Plate beds/photos and opinions please
JBNeal replied to NobbyofTexas's topic in Mopar Flathead Truck Forum
Polished aluminum tread plate decking on service bodies of utility trucks, brush fire trucks, etc. usually has black grit paint applied to the horizontal surfaces, as that noonday sun will blind ya if you're working in the vicinity. I've seen the polished tread plate floors at hot rod shows, and they look nice indoors and early & late in the day outdoors, but they have the same blinding effect in the noonday sun. So a body color or black tread floor could be sunny-day safe...if ya could find some checkerboard tread plate, then ya got somethin' -
hex nuts are cheap: cut them stuck ones off carefully with an abrasive disc on a dremel tool or die grinder or whutnot. I haven't done this on the D-O-D-G-E emblem yet, but I've cut hex nuts off of other studs, and the cutting does two things: heat from friction can break the nut loose, and material removal releases the tension inside the nut so it'll let go of the threads; this can be seen as removal of a corner of the hex nut will allow the nut carcass to be peeled off of the stud threads. I've recently taken up brazing, with steel and brass rods on sheet metal and tubing, with improving results. I'm gonna try that silver solder on one of the mangled D-O-D-G-E emblems and see if I can make the magic happen
-
found this one near Selah yesterday, odd rear bumper
JBNeal replied to buds truck's topic in Mopar Flathead Truck Forum
I picked up an aftermarket bumper made from channel; it has a similar bump in the middle, but bent towards the truck, for a trailer hitch. -
that's a good-lookin' starting point...if ya could scare up a 230 and hook up a T5 overdrive, ya might have yerself a nice driver
-
that thar is a steering column bracket for all column-shifted transmissions '51-'53
-
the tail light bracket you have and its mounting location are correct for 1-ton flatbeds, etc., not the Express models, as there would be interference with the bed sides. Further study of the parts manual shows an error in Group 23 Body illustrations and Group 8 Electrical parts listings for the Bracket: 8-55-75 shown for all chassis & non-Panel body configurations in Group 23 does not match the Group 8 parts description, as 8-55-75 is for Express models only. Arm 8-55-111 is for all models except Panel & Express. From Bunn's Dodge...Ref.Guide & History, tail light location can be seen on pp.29, 48, 50, etc. Also on p.48 is a close-up of tail light installation. From what I've seen from The Money Pit, there appears to be a provision for self-tapping screws on the passenger side, as the sheet metal is formed in a way to double its thickness in this location. So I reckon the driver side was installed the same way at the factory. But since this is sheet metal that sticks out, the bracket can be easily ripped out. I've got three beds that this bracket is re-attached with nuts & bolts & a variety of washers, both flat & locking. Another bed has the bracket brazed back onto the sheet metal. The Spring Special has its original mounting intact, with bolt heads visible from outside the truck, but no nuts visible inside the stake pocket, only the bolt threads. Bottom Line: Express tail lights mounted to the bed; flatbed tail lights mount to the frame
-
how'bout this: take a hex head bolt that's a tight fit with a glob of RTV or JB Weld on the threads and plug that thar hole but good


