JBNeal
-
Posts
7,190 -
Joined
-
Last visited
-
Days Won
81
Everything posted by JBNeal
-
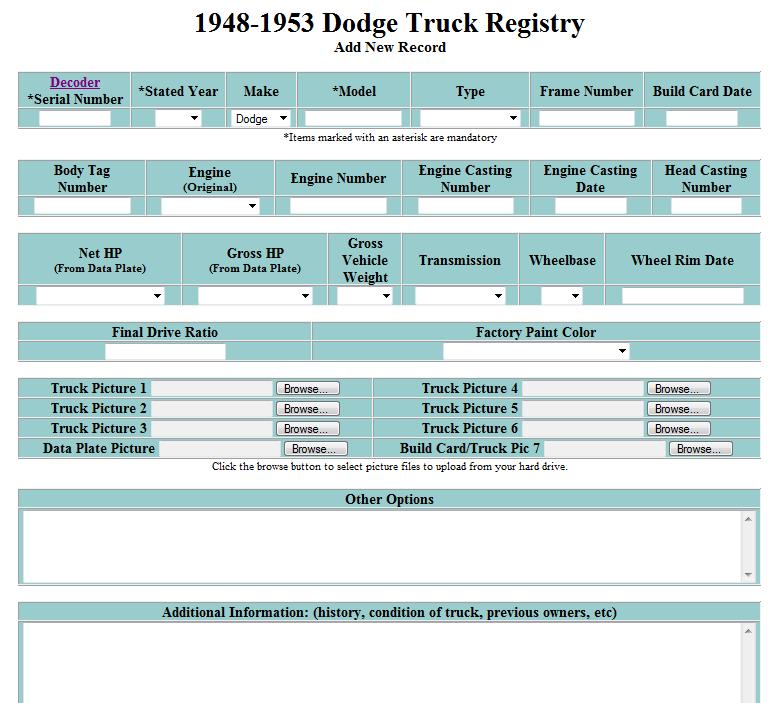
I clicked on "ADD TRUCK" and copied this from the screen:

-
it took me awhile, but I found it
-
hey look another SpringSpecial !
-
the seal installs beyond the side of the tank, and the lip braces the seal against the side of the tank and the bottom of the cab. Without it, the foam rubber would eventually sag on that end and the filler neck area would not be completely sealed. I made a piece without the lip out of some closed-cell foam rubber, and though this foam rubber is much stiffer than the original, it has sagged in this area but is still sealing the cab. Agreed, this is a part that is not seen so accuracy should not take a back seat to functionality. There are better materials available now than 6 decades ago, so creativity + low cost would be more prudent than trying to reproduce the original part. My next approach is to make this seal a two-piece design: a flat piece of closed-cell foam rubber for the filler neck cutout, and a second piece adhered to the flat piece to act as the lip. The only reason I'm sticking with the closed-cell foam rubber is that I scored a wore-out work station mat at the machine shop that I grabbed off of the top of the dumpster.
-
IMO these seals are less than perfect because as soon as a pedal is engaged 1/4", they no longer work. Being a cheapskate, I'm gonna try rectangular pieces of .060" EPDM roofing rubber with a X cutout and a mounting flange under the cab & inside the cab. It won't be original equipment, but it'll take less cussin' to get installed, plus they'll work even when a pedal is engaged.
-
the fuel tank/cab floor seal (14-86-60) mounts to the fuel tank as shown in the catalog listing, and is compressed between the top of the fuel tank and the underside of the cab floor to keep moisture from water-covered roads, as well as dust. A thin seal placed on the inside of the cab on the floor can be used with the same effect if it's sealed to the cab with a silicone caulk.
-
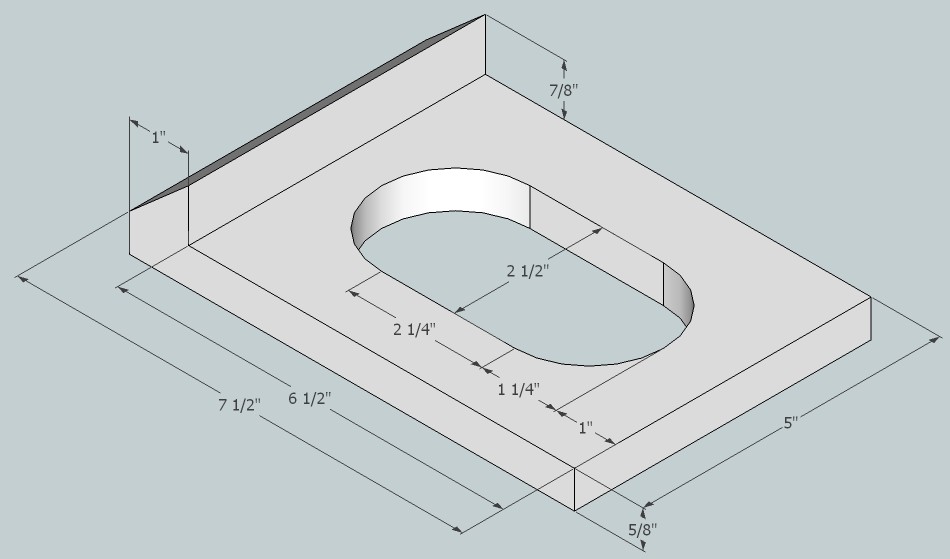
A couple of days ago, I accidentally found my old gasket in one of the work benches in the barn where I had hid all my gasket making stuff. This gasket came off of the '48 1/2 ton and matches the catalog view. The material appears to be a closed-cell foam rubber, as it is still spongy albeit crusty. I used the Google SketchUp program to jot this out while watching Lethal Weapon 4 on the TV during lunch today. It's a basic sketch to get the seal around the tank as well as the lip that holds the gasket square to the side of the tank under the filler neck. I recall trying to make one for the '49 1 ton, but the cab mounts are so worn that the original was way too thick; I ended up using an old inner tube as a temporary until I replace the mounts.
-
***got the '48 on the road in '99, have put 10.5k on it since in road testing; the last 500 have finally resolved the intermittent carb issues and hot hard starting. ***got the '49 on the road in '04, put 1k on it in road testing, finally resolving the hot hard starting just in time for that tow-truck induced steering failure....cain't wait to tear that beast apart to fix that, knock out the dents, replace the wiring and whutnot
-
whar do ya wanna start? this may seem tedious, but I've read purt'near every post on this site (truck, car, tech., archives) and took notes in a spiral notebook while bookmarking interesting and/or relevant sites. I found out I was using the wrong oil filter, the fix for low oil pressure after warm-up, what can be done to sleeve shafts for proper sealing, how to set the brakes with a home-made tool, how to pressure bleed the brakes, how to paint with a roller for less than $300, the need for a 180 thermostat, how to set up a crankcase ventilation system to reduce sludge, how to set the timing while the engine is running, how to increase fuel economy and top speed with transmission+axle swaps, and enough about wiring to start re-wiring one of my trucks with relays to maximize candlepower from the headlights while running on 6 volts. There's even literature out there that covers the history of these trucks. Lots of good reading here & there, it all depends on where ya wanna start.
-
Great install, and the antenna location is something I might try. Standing on one's head ain't no easy feat in these trucks when ya gotta work under the dash.
-
...and I bet that ol' beast rode reeeal smooth with all that weight in the back. I know my '48 cruises nice & smooth when it's got about 500# over the rear axle; my '02 CTD 4x4 is rough as a buckboard, but put 1000# over that rear axle and it floats down the highway like Grandma's Newport did...glad to see this truck ain't all hat & no cow
-
The firewall on the '49 has clear grease pencil markings, presumably from the quality control inspector on the assembly line, so I plan on cleaning off the dirt and maybe doing some touch-up work on that detail to preserve these fingerprints from the past. The '48, '51 & '53 have faint markings, but the '52 parts truck's hood has been gone for many years so that firewall has been weathered too much.
-

Rebuilding the electric wiper motor?
JBNeal replied to B1B Keven's topic in Mopar Flathead Truck Forum
DUDE--ya went to all that trouble to clean up that motor but ya kept the original corroded wires?!? Say it ain't so... I've had good luck with old Dodge electric window motors by degreasing, removing corrosion, lubricating and re-assembling. I reckon the same goes for these wiper units, but it also helps to run a separate ground wire to a chassis ground circuit. As with the light bulbs & the fuel level sending unit, the electric motor uses the chassis as a common ground. Unfortunately, corrosion at frame rivets, bolt & casting threads, internal/external lock washers, and the stranded copper conductors cause a cumulative voltage drop as current is restricted. Separate ground conductors for these items in place of the mechanical fastener ground circuit should provide less resistance for full power. When I installed my fuel level sending unit, I added a stud to the sending unit for an extra conductor that I ran to the battery, and the intermittent fuel gauge readings I had been getting went away. Knowing this, I plan on running a conductor throughout the truck as a ground circuit. It may be overkill, but I'm running 6V so I don't want any unnecessary voltage drops for maximum electrical performance. -
here's one for a plastic master cylinder reservoir; the metal reservoirs would be similar: http://www.ibmwr.org/ktech/pressure-bleeder/bleeder.shtml
-
If you're looking for a pcv system, search "crankcase ventilation" as this site's search engine will not look for "pcv" as it is too short of a word. One method is to get a sch.40 tee, a pipe nipple, a pipe plug, and a pipe bushing (cain't remember what size was best to try). A hole can be drilled in the plug for the mounting bolt; the nipple can be trimmed back as it is only needed to provide a shoulder for the adapter to center itself in the block opening; and the bushing to reduce the tee to 3/8"NPT. I think that totals to around $5-7, and can get the job done. How ya plumb the PCV valve into the manifold will determine how ya route yer PCV line.
-
have ya tried the pressure-bleed contraption ya can make from a hardware store pump sprayer and an adapter fitting to the master cylinder? I plan on making one of those when I get 'round to it for the '49, it's had a spongy pedal since day one. It takes two pumps before the pedal firms up...no visible fluid leaks in the system, but I reckon there's some air in the lines I cain't bleed out.
-
Clean the water pump hub real good to and put some penetrating oil where the fan mounts on the hub. After polishing off a beverage, small hammer tap the fan at the hub in a few places, then use the long handled screwdriver as a wedge between the fan and the pulley.
-
1953 B-4-B-116 BUILD THREAD Spring Special
JBNeal replied to JBNeal's topic in Mopar Flathead Truck Forum
The previous owner mentioned that his original plans included wedging a 440 in place of the flathead and painting the truck fire engine red. But he ran out of time before his health went south, so he called in the car crusher to help clear off his place, a former mechanic's shop / salvage yard. I couldn't get a clear picture because of all of the weeds & piles of scrap metal, but the crusher was less than a 100 yards away. Also noticed in one of his dilapidated barns was a complete Sun testing machine. When asked, the previous owner told how he taught folks how to use it, but that it had been some time since then. He then abruptly changed the subject, so I might call him up in a few days to see if he had any plans for that relic. -
1953 B-4-B-116 BUILD THREAD Spring Special
JBNeal replied to JBNeal's topic in Mopar Flathead Truck Forum
Note the wheel cylinder hose hanging down and spring bushing backed out: -
1953 B-4-B-116 BUILD THREAD Spring Special
JBNeal replied to JBNeal's topic in Mopar Flathead Truck Forum
The previous owner hired a flatbed tow truck to extract this SpringSpecial from its hillside perch, but it looks like he snagged the 260Z that was partially buried next to it and dinged up the driveshaft in the process. -
1953 B-4-B-116 BUILD THREAD Spring Special
JBNeal replied to JBNeal's topic in Mopar Flathead Truck Forum
An interesting detail popped up while doing the initial inspection. Shown is the paint detail on the cab that denotes a SpringSpecial. But also shown is a plug in the bed fender for the hole that accesses a grease fitting for the rear leaf springs. It looks factory installed on both sides, but haven't ever seen these before, so I don't know if it was a SpringSpecial detail or a model year detail. I'm not sure why this truck has the center bumper guard in place of a license plate. The bumper guard is a B-1 / B-2 era detail, but this is on a B-4, complete with oval head bolt. From the stories I've been told and from what I've seen of the truck, this SpringSpecial was used for work. -
1953 DODGE Spring Special Lone Star Edition... Since hauling this Spring Special home, I've received congratulations from friends & co-workers for the find, as well as derision from neighbors & relatives for dragging more junk to the house. My plan is to restore this rarity to like new condition with a frame-off tear-down and rebuild+repaint. I've started by carting off three trash cans full of garbage out of the bed & cab, which revealed the original pine flooring and original maroon seat cover. A quick inspection has located a pin hole in the passenger hood between the handle and the emblem, as well as bondo on almost every fender. The only cancerous rust appears to be the rivet area on the front fenders. The drive shaft has a peculiar flat spot mid-section and is bent. This flat section corresponds to dents in both runningboards. The left front wheel cylinder, brake shoes & hardware were in the floorboard, as was the choke button. Missing is the throttle cable, ignition key and hubcaps. A little lubricant on the hinges & mechanisms, and the doors opened & closed almost effortlessly. The bed boards still had the original black paint underneath, with two boards split and no apparent rot. The original spare tire carrier is present, but it was bent when retrieving the truck from its hillside perch. Practically all of the wiring is present, though its insulation is broken in a few places, so the harness would only be good for a replacement pattern. From the gripe-fest I endured and the subsequent diplomatic tap-dance I performed a few days ago, I will be postponing the heavy work on this SpringSpecial until I have completed my great-grandfather's '48. It needs some frame work, a new wiring harness & tires, motor tweaking & detailing, and lots of sheet metal TLC + paint. Once we get the barn addition finished, it's next up on the queue for work. In the meantime, I reckon I can do the Spring Special little stuff quietly (refurbishing lights with shiny relfectors & bull's eye lenses, wiring harnesses, battery tray, etc.) while having the '48 in teardown. I have camera and notepad, so each will be getting fully documented...yeah, that's the ticket
-
truck picture B-1-B-108: the '48 still has work to do, watering trees at daybreak until 8 when it's 90:


-
VINTAGEPIC: found this on eBay awhile back, looks like a super-rare B-2 Spring Special
-
VINTAGEPIC: found this in my Grandma's box of pictures, Dad says that it was one of Grandpa's cousin's '49 B-1