


JBNeal
-
Posts
7,188 -
Joined
-
Last visited
-
Days Won
80
Content Type
Links Directory
Profiles
Articles
Forums
Downloads
Store
Gallery
Blogs
Events
Everything posted by JBNeal
-

48, 1 Ton, Model B1D passenger side tail lite bracket
JBNeal replied to Tomarsha's topic in Mopar Flathead Truck Forum
the passenger side tail light bracket is a rare part to find, and some of the ones I have found are actually driver side brackets that have been carefully bent over backwards, probably using a stout bench vise, a blowtorch and a BIG crescent wrench. Or if ya wanna get creative, make one from scratch. Trace the one ya have on some paper, transfer that to some equivalent gauge steel, and break it over in a vise. Once it's painted up & installed, who'll know that it's an original work of art? -
several fellas have tried finding replacement rims for the 1 tons, and I think the consensus was that late 50s / early 60s Dodge & Internationals had a very similar one-piece wheel, but those are becoming very hard to find. And newer style drop-center rims have interference issues with the 1-ton brake drums. So if ya replace the front & rear axles with newer style wheels & brakes, then it may be easier to put new tires on when needed. OR...find a heavy truck tire center that works on these split-ring rims on a regular basis and keep the axles & brakes original
-
While replacing the wiper blades on the '02 CTD, I noticed that the spring steel strips that secure the wiper blade rubber to the wiper blade frame are about the same thickness & width as the float pin retaining spring. I'll have to do some carb work on the '49, so I might be able to confirm this soon
-
I've been teaching myself how to paint by reading as much as I can, asking a few tactfully worded questions to guys in the body shop field, then practicing techniques on different assemblies (home LPG tank, lawn tractor parts, engine compartment parts, etc.). DO choose materials carefully, as mixing & matching paint systems / manufacturers can produce unsatisfactory results. If you want to 'hurry up & finish', the end result will show this lack of patience. But most of all, inadequate prep work will undermine any work done with the presence of fisheyes, blistering, crazing, delamination...many things can go wrong if not enough attention is paid to detail. And a decent paint job can be had if good materials are chosen and prep work & application are done per manufacturers' instructions. I restored Dad's '67 Farmall 1206 using CaseIH primer/paint over Rust-Cure, sanding smooth rough spots between coats applied with a non-HVLP Tractor Supply paint gun. The only issue has been some chipping of the paint that I think may have been caused by using too much hardener. During the process of painting that tractor, I found out there was a definite difference between body shop supply store lacquer thinner & cheaper Lowe's lacquer thinner (the cheap stuff made the expensive paint look like carp when reduced, but the cheap stuff cleaned the paint gun just fine). The finish is not show-car glossy, but I've been told it looks as good as tractors were painted back in the 60s, and the paint color/condition has held up well in the past 8+ yrs. Since I did that tractor, I've learned about painting with a foam brush, then a foam roller. From what I've found, painting castings with a foam brush does much better than spray painting, as the foam brush can be dabbed into the casting surface, eliminating shadowing that can occur when using a spray gun. Foam brush / roller painting is cheaper as less paint is needed to get decent coverage, but it takes more time than spray painting. I plan on doing sheet metal with a foam roller with a possible sprayed top coat for a smoother finish...but if the roller application works well, I may skip the paint gun altogether
-
In my opinion, that external bypass water pump (which has been out of production for decades) should go back on the shelf and a new internal bypass water pump should be installed on your motor. There is a seal in that pump that most likely will fail from its age, and that's if the impeller shaft bearings don't give out first. The new pumps are lubricated by the coolant like modern water pumps, so there will be no need to grease the bearings. And if those shaft bearings fail, the fan will carve chunks out of the radiator as the vibrations will cause the blades to fly apart...very messy and inconvenient. The new internal bypass pumps will fit external bypass motors as the bolt pattern is the same, and the bypass port on the pump can be blocked off by a supplied gasket and the engine block, as DC's & Ed's photos show. The difference between internal & external bypass pumps is not so much the back plate but the pump body casting. Drilling a hole in the back plate will not access the flow from the pump impeller as the casting will not allow this, and to do surgery on cast iron with a hand drill can be a 'creative' waste of time. As much as I'd like to keep my old flathead original looking, the newer style water pump looks close enough to the original for me, and it gives me the peace of mind of knowing that water pump won't fail anytime soon. More information can be found in Merle's thread on water pumps
-
The first time I took apart the Stromberg on the '49, that spring split in two...that was back in '04. I took a battery contact (made of spring steel) out of an old radio that had gone kaput and made a replacement...it took some whittlin', but I made it fit. All that clip has to do is keep the float pin in place, so it don't have to be perfect
-
yep, them frustrating ol' rebuilt Dodges...holey moley
-
one test: have'm take a pic of the car with a newspaper on it (or some other inanimate object)...if they cain't do that, then it's just pie in the sky. As for CL, I had an odd experience in Oklahoma looking for a parts truck. The ad was placed in OKC, the guy tells me that it's near Kingfisher, then once I crossed the Red River, sent me onto Hennessy...then tells me to drive thru Hennessy, dang near to Kansas...a total of nearly 100 miles further away than we had originally discussed, out in the middle of nowhere...you could almost hear the banjo music playing. Sure enough, the truck was in much worse shape than his pictures showed, and I walked away with a few odds & ends instead of the entire truck, as he had nearly doubled the price of the truck once I laid eyes on the beast. Up until that point, I thought the CL stories were all hokum, but now I can see how squirrelly folks can make folks see what they want to see and trouble can ensue.
-
I've read several books (found several at the library and picked up a few online) and have practiced with different techniques, and multiple thin coats with progressively finer sanding grits provides glossier top coats, even with flat paints. I've also painted without sanding between coats, and the surfaces can be rough which can be a problem with coating durability, as rougher coats are more susceptible to chipping, and generally look like carp. When I painted my home LPG tank last year with a foam roller, I wet sanded between coats with 120, 320 & 400 grit with impressive results. For a much glossier finish, I could have progressively gone up to 1600 grit for the mirror finish...but for the LPG tank, I figgered 400 was good enough. With this finish, lines can be seen in the finish from the foam roller, but from 20 ft away, the tank's flat aluminum finish will blind ya in the summer sun
-
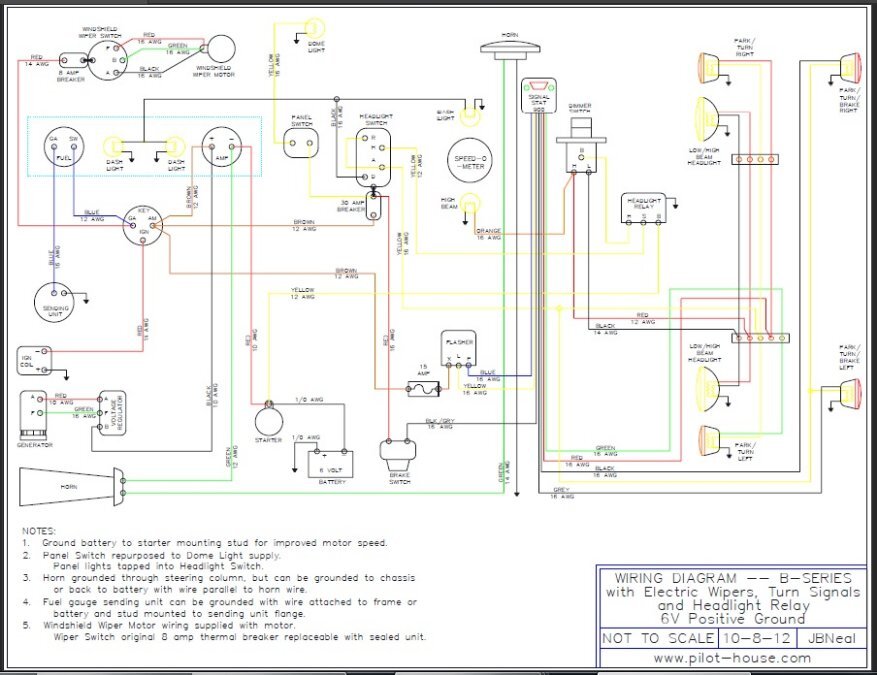
After multiple software & hardware technical problems were addressed, I finally got a wiring diagram put together in AutoCAD. This includes the Signal Stat wiring diagram and a headlight relay to improve lamp candlepower output. I've also routed the PANEL switch to control the dome lamp, linked the front & rear park lamps at the HEAD switch, and shown a ground wire to the horn (something I've been tinkering with, details to follow). The wiring insulation on the '49 is falling apart, so it'll be the first to get this tryout. The next thing I want to figger into this is an electric fuel pump with relay & oil pressure safety switch, as well as a fused power tap for a radio & a fan. I've read articles on the dangers of overloading this simple circuitry that's choked off by that AMP gauge, so I've been considering doing a partial bypass...anyhow, more to fiddle with; at some point I'll put it on paper, figger up a wiring jig, and slap it together B-WiringDiagram3.PDF
-
...looks like the gremlins of the internets have struck again...registry down
-
The flathead gear type hydraulic pump has a gasket & a square o-ring that is supplied in engine gasket kits to seal up potential fluid leaks. If the gears &/or cover plate are worn enough that the pump isn't building adequate pressure, odds are that the pump body has wear on it too that is detrimental to building pressure. Some hydraulic pumps have removable inserts that allow the machined-surface parts to be replaced, but the flathead pumps do not have this feature. It'd be cheaper to get that new pump then trying to make the old one work when it's past its prime
-
1948 B-1-B-108 BUILD THREAD Papa's Dodge
JBNeal replied to JBNeal's topic in Mopar Flathead Truck Forum
That '50 Plymouth motor that I have sitting behind the house is looking like it's a good candidate to replace the '54 Plymouth I have in the truck. That motor has been sitting untouched out in the elements, I think I might have spun the crank back in March. I pulled the spark plugs, put a couple of capfuls of ATF in the cylinders, fiddled 'round the yard for 'bout an hour, then took the big crescent wrench to the crankshaft. It was a little stiff turning at first, but within seconds, that motor was spinning, wheezing & whistling as I spun that crank, could even hear the valves clickin' away. And within a couple of minutes of working that crank, it was taking little effort to make things spin. Even though the '54 motor runs like a top, it is much more difficult to turn by hand than that flathead that hasn't run in decades. I've got a few spare manifolds & distributors stacked up, I may just fab up an engine stand to see if I can get that li'l machine runnin' by year's end -
How Many Pilot House Trucks Have Survived?
JBNeal replied to Bradley S.'s topic in Mopar Flathead Truck Forum
SURVIVOR: this ol' beast is on some property with a fence that says "GO AWAY" in two languages, in between a creek that's chock-full of rattlers and a hill that's got a few mountain lions:
-
LPG runs best on compression ratios akin to diesels, so a straight conversion of the fuel storage & delivery systems will not yield spectacular performance results. While at Texas Tech, the mech.eng dept had a donated GMC truck from a CNG design competition and wanted it converted to LPG to utilize the university LPG fleet fuel service. That 350 had been modified to a 12:1 CR to complement the supercharger that had been mounted onto the intake system. The supercharger went away and a simple 2bbl LPG carburetor was installed. That higher CR made the truck much faster than a similarly equipped university fleet GMC, had loads of torque for pulling and on road testing we were averaging 19mpeg (no load with 4:11 rear axle). Because of this, I've never been a fan of dual fuel systems when the fuels' energies are maximized at different CRs. I reckon the main reason trucks were easy to convert to LPG was that there was plenty of room to install the cylindrical LPG tanks. I've seen LPG powered taxis, and LPG fuel tanks take up so much room in the trunk that storage is down to nothing sizable...you could put yer golf clubs back there, but not the bag. On wide bed trucks, LPG tanks can be mounted external of the frame under the bed sheet metal. More commonly (and for less cost), tanks are mounted at the bed bulkhead, and a cover/shelf is installed to protect the tank's surface coating & plumbing.
-
1948 B-1-B-108 BUILD THREAD Papa's Dodge
JBNeal replied to JBNeal's topic in Mopar Flathead Truck Forum
this may work with Bendix drive starters found on cars, but the trucks have the older style starters that are switched at the electric motor. Even if the starter switch is engaged, the starter pinion still requires manual engagement to the flywheel. For the best results, the truck transmission is placed in neutral; voltage regulator charge circuit is disconnected; jumper cables are attached to the starter motor switch lug and a mounting bolt or the engine block. From under the hood, the starter can be manually engaged and quickly disconnected once the engine fires up. CAUTION: the jumper cable attachment to the starter switch lug can be a li'l sparky, especially if the jumper cable clamp terminal is the type that can clamp onto GM-style side terminals. The clamp can touch both the lug and the starter motor, completing the short-circuit -
Convert floor shift to column shift
JBNeal replied to Charles Furman's topic in Mopar Flathead Truck Forum
according to the parts manual, late '48-'53 1/2 ton 3spd transmissions are the same less cover and controls, except for those with fluid drive. I assume the only change with the fluid drive is the longer input shaft needed to mount through the coupling. As for the controls, the steering column is a crucial change to make the linkages work as there are mounting brackets located specifically for precise gear shifting. I've seen a steering column where the column-shifter was worn so much that the shifter was 'applied' with such force that one of the lower linkage mounts tore the sheet metal tube of the column, further worsening the precision of the gear shifting. I haven't operated one of these Pilot-House column-shifters yet, but I've worked with other linkage control setups from that era and they had their share of problems. When all was new, linkage attachment points were tight; but as these points wore, there were no bushings to replace so shifters had to be forced to get some momentum behind the linkages to 'jump' the travel gap that was being caused by wear. With the floor mounted shifters, there is direct control of the shifting fork inside the transmission, so this eliminates the shifting problems inherent with the column-mounted shifters. But I do remember teaching my neighbor how to row the gears & find reverse in her dad's well worn column-shifted C10, so they are fun to operate when ya can get the hang of it -
1948 B-1-B-108 BUILD THREAD Papa's Dodge
JBNeal replied to JBNeal's topic in Mopar Flathead Truck Forum
jump-starting a 6V system with a 12V system is possible if the charging circuit is disconnected and all accessories (lights included) are turned off. The two wires at the voltage regulator are the ones to disconnect, although I think it can be done by only disconnecting one wire but I opt to pull'm both. Also, it's a good idea to only use a 12V battery source that is relatively low in amps. I was tempted to jump-start the '48 with the '02 CTD, but that's well over 1000 amps available to smoke some expensive parts. Instead I jump-started the '48 with the JD Gator, equivalent to a lawn mower. If the 6V system has an electric fuel pump, I don't know for sure if it is a good idea to put 12V into that circuit as a relay or electric motor might get smoked. -
1948 B-1-B-108 BUILD THREAD Papa's Dodge
JBNeal replied to JBNeal's topic in Mopar Flathead Truck Forum
I took some time to tinker with the '48, specifically the steering gearbox. After rebuilding & adjusting the gearbox on the '49, I got a good feel for how the gears worked to center the steering output when properly adjusted. This got me to wondering if the thrashing I've done in the '48 over 10,000+ miles was due to an improperly adjusted gearbox. So I jacked up the front of the truck to get the wheels off the ground, centered the steering wheel, and adjusted the sector...I reckon it was off by three full turns. Down the lumpy road to town I went in the moonlight, and that truck tracked straight and the steering was effortless for the first time. It also helped to have a spare 230 and four flywheel/pressure plate assemblies weighing down the bed to smooth out the ride a tad. It rode so smooth that I'm reconsidering using that spare set of bias ply tires I found. But I'd like to try the electrical upgrades to get bright headlights/taillamps & turn signals first, so I should finish up the wiring diagram I've been working on to get a start on a wiring jig -
was looking up some stuff on Wiki on the 'smart' phone and accidentally opened this link...twas a pleasant surprise
-
The condition of the block needs to be verified by checking for cracks by magnafluxing after hot-tanking (chemical cleaning). The cylinder bores need to be checked for taper, as excessive taper will require sleeving or condemnation of the block. Once the block is cleared for rework, then focus on the guts of the motor. If the block is useless, better to find out before investing too much into it
-
what is the current bore vs. the standard bore? If the bore has been increased, then that 218 can become a 230 without modifying the stroke, but it would be more likely that the displacement is somewhar in between. A machine shop that doesn't need to be motivated to do a good job should be able to determine bore, stroke, crankshaft etc. But the flywheel welded to the crankshaft? YIKES...hope they balanced the thing, excessive vibration can be the death of any casting. From what I've read, a 218 can be changed over to a 230 by changing the crankshaft and connecting rods. Like any close tolerance machine, every part dimension has to be verified to eliminate any possible interference. It's easy to get in a hurry and start throwing parts at the mess and hope that it works. From my experience, a good machine shop can botch a 'small' job just as easily & quickly as a wet-behind-the-ears shadetree mechanic. The end result is the same: a big pile of disappointment on top of an empty bank account. These are quite the motivators for the hobbyist to become very involved in a project that is being sub-contracted
-
this site's search engine has a little trouble finding 'PCV' but 'crankcase ventilation' or 'draft tube replacement' will kick out some results...here is a post that shows one method of draft tube replacement when converting to a PCV system. There are other variations (I'm working on one that needs road testing before showing my modifications), but they all aim to do the same thing: move blow-by gas vapors from the crankcase through the combustion chamber & out the tail pipe, rather than letting the vapors exit into the engine compartment and cabin areas. Not only does it clean up the inside of the car, but also the inside of the motor
-
When I re-worked the brakes on the '48, I ran into the same problem. I found that the bore of the MC had pitted from moisture in the brake fluid. The new rubber in the MC could not seal off the bore enough to build hydraulic pressure, but the MC piston was able to move some fluid through the lines as fluid would also bleed past the MC piston. I ended up getting my MC sleeved for about $150 since I was not able to locate a NORS unit back in '99. I drove the truck the other day, and the brakes still hold pressure
-
Just when you thought you were finished.
JBNeal replied to Chester Brzostowski's topic in P15-D24 Forum
just to pile on: from what I've seen, moisture in the air supply will show up as blisters immediately upon top coat application. Crazing or blisters that show up gradually as the top coat cures is outgassing of the base coat as its chemicals react to the chemicals in the top coat. This is usually attributed to mixing paint systems from different manufacturers (primer from company A with top coat from company . One approach to avoid this is coating the base primer with a primer that is compatible with the desired topcoat.


