-
Posts
3,462 -
Joined
-
Last visited
-
Days Won
193
Content Type
Links Directory
Profiles
Articles
Forums
Downloads
Store
Gallery
Blogs
Events
Everything posted by keithb7
-

New Member, with Handling and Drivability Questions
keithb7 replied to Jfleming's topic in P15-D24 Forum
I agree with @desoto1939. If your steering components are all in good condition, and the bias ply tires wander...This is how it was meant to be back in the day. It was all they had. My 1938 got a brand new set of bias Coker tires this spring. It feels and drives like a stock, 1938 car. Sometimes I get surprised when the car decides to take its own path when you least expect it. The bias tires, the firm side walls, get up on the center hump of the pavement on a well traveled, worn road. Hang on and be ready! I have no fear or problem with it. Slowing down and enjoying life in an old car is a great way to relax. 25 mph in a 1930's car can be very satisfying to many, including me. In my opinion it's the same situation with the brakes. No seat belts. Mechanical fuel pump. No A/C. Hand window cranks. Vacuum wipers. 10,000 grease zerks, and more...It's all just part of the charm of driving an old car. Now if your steering components are not great, king pins worn, ties rods worn, steering worm gear set out of adjustment, needs an alignment, etc...Then yes I agree something is wrong with the steering and you need to right it. -
Period correct hot-rodded flat 6!
-

Small drip at new rear main seal- have it replaced, or wait?
keithb7 replied to '41 Fat Bottom Girl's topic in P15-D24 Forum
I'm on the same page here. A 1938 Sedan, mostly stock. Driver, that looks like to just came off the farm. Currently has a 1954 228 CI 25" long Canadian engine in it. It runs just fine. However I could use a little more torque. The steep hills here with the 4.11 in 3rd gear, 1:1, the engine manages, but barely. Ain't nothin left up a steep hill. With no run-up to gain momentum, the throttle mashed I get 30 -35 mph. And fuel burn on that long hill? Oh boy yes, considerable, as the throttle is wide open and the engine is burdened down pretty good. I have my sights set on a 1949 251 CI Chrysler engine. 25" as well. I'd rebuild it to stock specs. Bore it over as needed. It should net a considerable power improvement in my little 2800 lb 1938 sedan. It should fly up the hills around here. -
The water flow control valve to the cab heater core opens and closes automatically I believe. The brass tube goes inside the heater duct. As it gets hot, it closes off the water valve. When its cool it opens the water valve more.. I believe its a temperature regulator. Without the valve you have full flow, hot water, coming in all the time. It makes a lot of heat in the cab! Only way to control the heat temperature with no regulated valve, is by turning off the blower fan. Off and on as needed. Or opening The fresh air cowl vent to let cool air in. Not ideal. My original regulator valve was not working. I removed it and plumbed my cab heater system without the regulator valve. I have no thermostatic control any more in my ‘53. Off or on is all I get. Smokin hot or cold as ice these days. In the summer I close the water valve at the rear of the head, so no hot coolant gets to the heater core. If I recall the temp probe tube has ether inside it. As the ether heats it creates pressure. This pressure opens and closes the heater control valve. I am not trying to win a Concourse show. The price to replace my damaged valve was too much. So I plumbed it out. We’re all happy to have heat again when needed. Original valve seen here. Bottom left Keith
-

A most recent pic, and the story...Share your old Mopar!
keithb7 replied to keithb7's topic in P15-D24 Forum
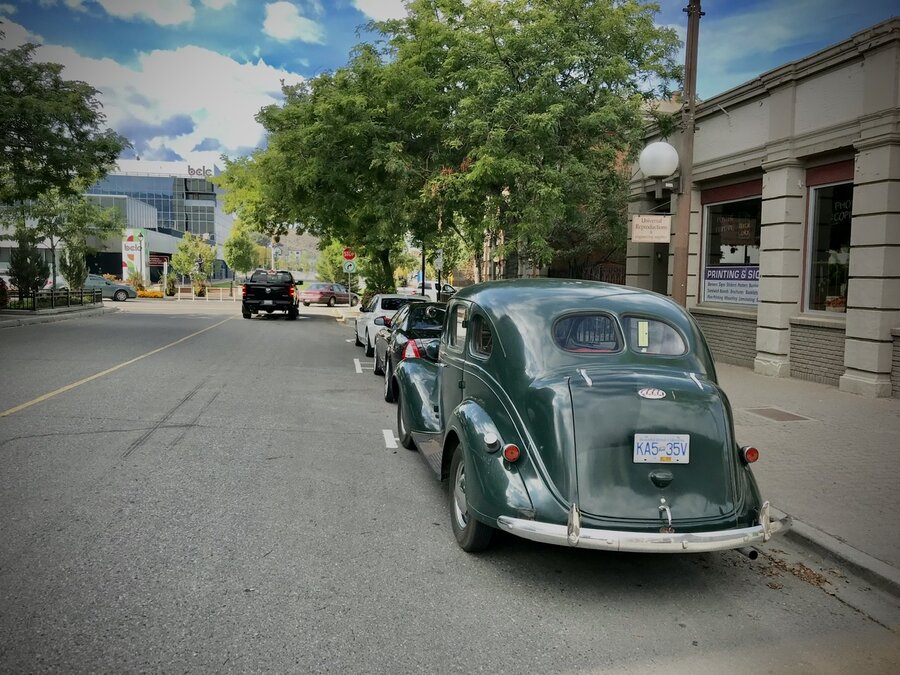
Summer is about wrapped up. I have 3 weeks left on my car’s insurance. Then its all over but the ensuing pouting. I was running errands today in my ‘38. The miles keep adding up and the car seems to keep getting better. Its reliability seems to have reached the mark that is comfortable in my mind. Its been trouble free for quite a while. The initial bugs were all worked out and its been fantastic. I often find myself thinking, am I ever going to desire a modern cruiser car? At this point I’m certainly doubtful. Rock solid reliable. Fun to drive. Easy to fix. Cheap to own this old driver. A 1938 Mopar checks a lot of the boxes for me. -
Your video:
-
Looks awesome! Thanks for posting.
-
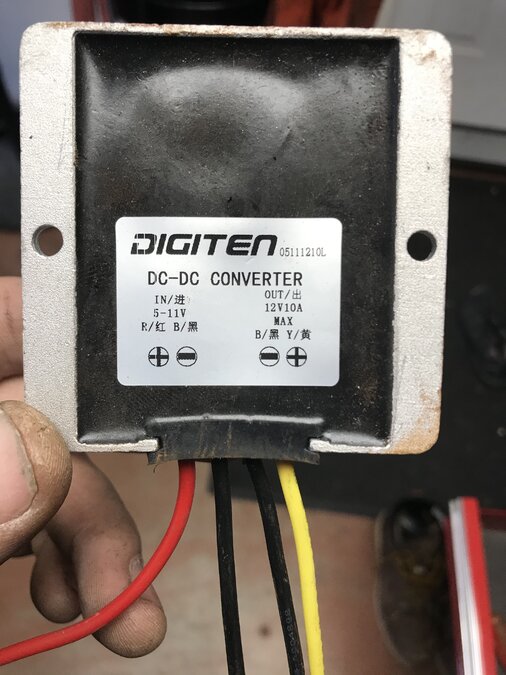
The pic above shows how my 6V-12V converter hooked up. The left 2 wires are for the 6V going into the converter. On this one, red is positive, so wire it to a metal ground on your chassis. Second from left, black wire will be connected to your 6V power source from your car. Whatever you choose it to be. Something switched with the ignition would be my suggestion. Fuel level gauge is, for example. Could splice into that power. I did, and it works great. The right two wires, yellow and black, just temporarily clip them to the connection of your new USB charger socket. If it powers up, great! If not just switch these two wires only.at the USB socket. Firm up and secure all connections. Add an inline fuse it you like for extra protection. That's it. Good to go.
-

Small drip at new rear main seal- have it replaced, or wait?
keithb7 replied to '41 Fat Bottom Girl's topic in P15-D24 Forum
I have two leakers over here....Seems to be par for the course with these rear seals. With tranny out, it may still be challenging to remove upper seal retainer bolts. They are in between the flywheel and block. Although I have not done so, I was thinking maybe a person could unbolt the flywheel. It won't be able to exit out of the bell housing unless housing is removed. Somehow push the flywheel aside up in there. Access the seal, change it and reinstall everything. Could it be done this way? Anyone able to confirm? I suppose other option is to remove the engine, put it on a stand and roll it over. Oil leaks are annoying. Especially after you've done all that work to rebuild an engine. I tore into a rear seal to learn, last fall. First time I was in there, is seen here: -
So you are running points now again? Pentronix is out? Glad to hear its running again. Points worked very well for many decades. As long as an owner is ok doing basic maintenance. Breaker-less ignitions were supposed to be easy and trouble free! Lol. Hmmmm.
-
I suspect the only engine tougher than a Mopar slant 6 is it's predecessor.. The Mopar L6 Flathead. Darn those flatheads engines are tough. Performance? Not a high priority compared to later engines. Fuel economy? Don't make me laugh..It could be good, but if you live in the hills of Tuscany its similar to a 400 bog block V8. True grit? There may not be a better engine that will continue to run and propel a car after decades of neglect and abuse. The Mopar L6. What a tank. Will it run on almost any combustable fuel? Likely. These old engines, like Zombies, come back to life daily to get the work done. Many, many, many decades later.
-
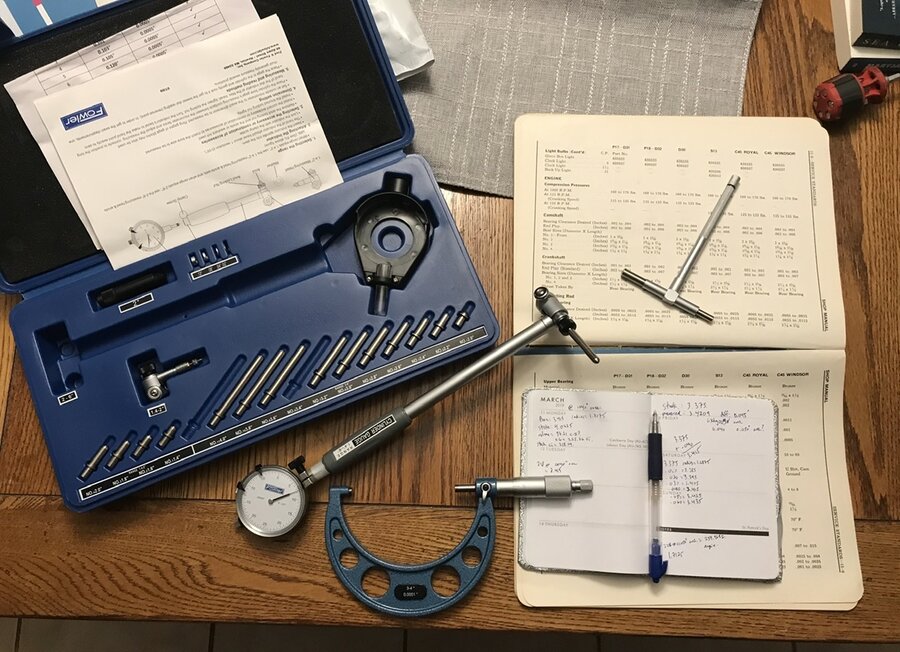
I decided to invest in a cylinder bore gauge. I have 4 Mopar flathead engines to deal with at some point. It makes sense to me, to know the wear condition of the blocks. Or at least have fun learning how to blue-print a block. For home hacks, do we need a proper bore gauge? That’s certainly questionable. A Starret or Mitutoyo brand would have been nice. A new Fowler (currently made in China) will suit my needs fine. Measures down to .0005” My new tool arrived today. A spare 1949 Canadian 218 block lays-in-waiting out behind the shed. This evening I spent a little time learning how to use the tool, also brushing up on my math. Stock bore Canadian 218 is 3.375”. A snap T-gauge test told me this block has been bored .040” over. Setting the 3-4” caliper at 3.415”, then zero-ing the bore gauge in the caliper gets me bang-on. (Well close enough, for an old flathead) By now its getting dark outside. I headed out behind the shed with a flashlight. Hmm. Bore seems to be about 0.0015” larger than when it was last rebuilt. That seems reasonable. On the thrust side the bore is about .0004” larger. The cylinder being 0.0025” out of round. Spec in the 1949 Chrysler manual reads “max allowable out of round , 0.002”. Ok, so early indications are we have a tired block that likely needs full machining services. I’ll practice more measuring in the daylight. I’ll measure each cylinder for taper too. Exciting stuff!
- 1 reply
-
- 3
-

-
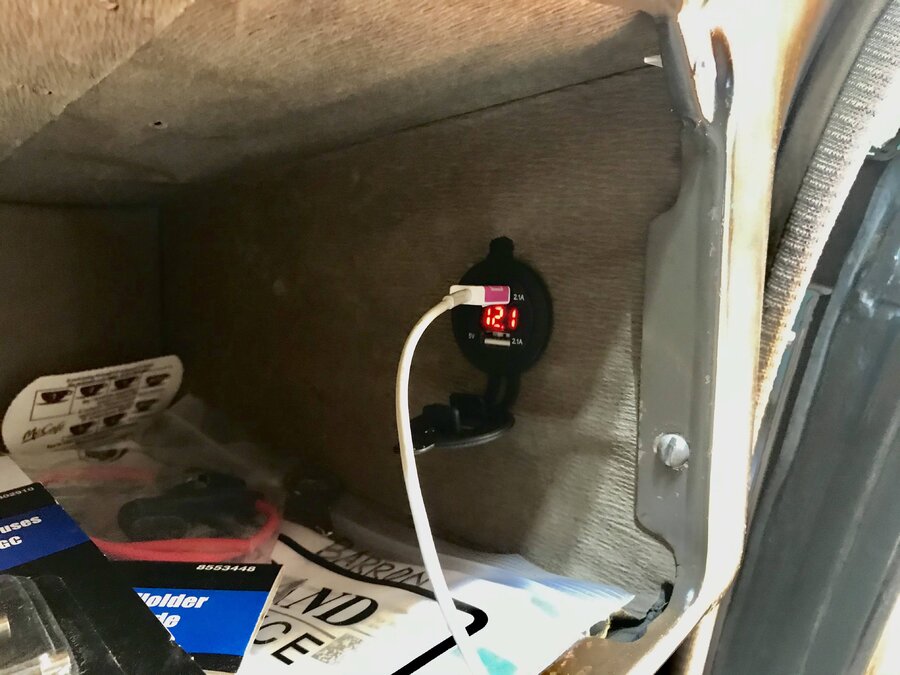
Cell phone chargers are interesting. They charge at 5 to 6V. Yet try and find one that will run off a 6V car. The chargers take 12V in your car, or 120V in your home and step it down to 5V. I bought the 10W 6V-12V step up transformer. If I recall it was about $20 on Amazon. Then I installed a USB charger. Mounted to the wall inside my glove box so it is not seen. I know you said you'd rather not buy the transformer. $20 seems cheap to me. Yes, you can easily hook a phone charger socket up directly to your small 12V battery that you mentioned.
-
I am happy to say my blower is back together and propelling under its own power again! I ended up stripping it down pretty far. Transmission completely disassembled. Engine and hand controls all removed. Frame split. The main frame housing welds were cracking up. The mainframe box was skewed. Main shafts mis-aligned. We put it in a Hydraulic press to hold things back in proper position, and welded it up. I have to say, friends with a press and a mig welder are very nice to know. I had no shop manual. By trial and error I reassembled it all. Taking things apart again upto 3 times to get it right. These blowers truly are contraptions by design. Hidden hardware that is blocked-in by other parts. Assembly in the wrong sequence, and its all coming apart again. Lol. I got it now. I’m now ready to take on snowblower repairs for cash! 420 chain is used. Double reduction final drives with pressed together chain loops. Non-servicable, no master link drive chains . I visited the local small engine repair shop guys to purchase a couple of the 420 sized master links. I was surprised to learn they did not sell or use them. I sourced them elsewhere. I ground a few pins off to split the chain loop. Then installed new master links. Otherwise, future chain service means a complete tranny teardown again. Seems weird to me. Anyway, Its ready for winter!
-
I can relate to the cabin fever statement. It's been a long year with few engaging car events. I've not been to a swap meet since last Sept. All events continue to be cancelled. In addition to all the Covid related stuff, the news media is really dragging people down. On top of that, this week we're socked-in with wildfire smoke here in my area. I had a trip planned in my '38. I cancelled it as I was headed to an area that is even closer to the fire source. The air is thick. The sun blocked out. It's feeling sort of apocalyptic around here lately. Not too fun. Many of us will surely be happy to see the calendar roll over to 2021. Hopefully bringing more good with it, as we say good riddance to a year of gloom.
-
I measured 9,420 ohm from either the positive or negative post to the center of my 6V coil. -`1938 Ply.
-

New felt tranny felt rear oil seal leaking- suggestions?
keithb7 replied to '41 Fat Bottom Girl's topic in P15-D24 Forum
By chance I happened to be under my 1938 car today. The rear leather tranny seal was originally leaking, as I mentioned above in post. #2. Today the situation looks good. I had degreased it a while ago. It's all dry back there still, as of today. I suspect the seal softened up over time. Break-in time has led to the desired results it seems. -

Anyone expressed interest in your cars when you pass?
keithb7 replied to knuckleharley's topic in P15-D24 Forum
I figure this is my hobby. May family only loves that I am happy tinkering with my old cars. They get to ride along and smile when we all jump in. They have no interest otherwise. They have no idea on value. I don't expect them to take care of my old cars and spare parts to generate as much money as possible when I am gone. It's all only worth what someone else is willing to pay. That's it. No these aren't old Camaros or Mustangs. They won't be attracting much in the way of dollars. My family can give it all away if they want. They can try getting $xx,xxx dollars if they want. When the cars sit and parts sit unsold for months, perhaps they will lower the asking price. Keep lowering it until potential buyers start to make inquiries. That's how I'd do it today. Used parts? Well old Mopar guys who love the hobby sometimes see young up-comers. Some are apt to give away their spare old used parts to a good home. Where a younger guy will be likely to use them. That's happened to me and I intend to pay it forward when my time comes. Yes, I have a growing pile of spare parts. I find that when I get a good deal on a lot of old parts, paying cash, often that when 1 or 2 spare parts are used, I've already easily saved what I paid for the entire parts lot. I don't care if what's left of the spare parts pile can generate $1 at that point. For example a spare sized engine core. Maybe it costs $75 . A year later you pull the water distribution tube you need. Then your generator bracket cracks. You use the spare. Next thing the old pressure plate and clutch disc on the old engine are good and you use them. You're way ahead now on your initial $75 spend for the whole engine. When I am gone if someone in my family has no interest, so be it. Send it all to scrap if they want. If they want to try sell it, that's fine too. I will be having a chat with my family about market value and how to get it, if they want. While I am here, I will enjoy the cars and the parts immensely. -
Hi Worden, I reviewed your resistance numbers. If you like, for comparison I can record some of the same measurements on one of my cars. However both of mine utilize breaker points. If I recall you are using the Pentronix system. I have no idea about it other than it's solid state and I suspect uses a hall effect, or magnet of some type, to trigger the spark. I am suspicious about that Pentronix system, possibly being the source of your trouble. My points, file, condenser, & dwell meter, have all performed rock solid so far. I'd be inclined to make a new separate post, just addressing the electrical issue. Copy and paste your same post above. You may likely get a lot more views and responses. Some of these long threads, people get lost in. If they aren't following along the whole way, they may get behind and give up following.
-

New felt tranny felt rear oil seal leaking- suggestions?
keithb7 replied to '41 Fat Bottom Girl's topic in P15-D24 Forum
I am experiencing the exact same thing. The oil leak did get a little better at sealing after a while. Seems that maybe is softened up more in use? It still slings a bit, not as bad. Next time my tranny is out I am thinking of matching up a modern seal to replace it. -
Lots of ideas. I can’t offer much more insight. Its starting to sound like a “Spray & Pray” job. You spray different controlled areas with new parts and pray that you solved it. If. Not spray and pray some more. Reading what I have here so far, I’d probably start with those two front brakes and the master.
-
Lots of ideas. I can’t offer much more insight. Its starting to sound like a “Spray & Pray” job. You spray different controlled areas with parts and pray that you solved it. If. Not spray and pray some more. Reading what I have here so far, I’d probably start with those two front brakes and the master.
-
Each fall change the headlight fluid, grease the muffler bearings, rotate the brake shoes, add a little glycol to the fuel tank, check the water-pump timing, re-set the dwell on the float, swap out air for nitrogen in the tires, and change the dust bag on the vacuum wipers. These tasks will keep you busy for over the winter. Next thing you’ll know it’ll be spring and time to reverse all the damage again!
-
Hopefully you get it sorted out. Hopefully its not related to the Pentronics.


