-
Posts
3,462 -
Joined
-
Last visited
-
Days Won
193
Content Type
Links Directory
Profiles
Articles
Forums
Downloads
Store
Gallery
Blogs
Events
Everything posted by keithb7
-
Maybe one way to make a half decent buck off an old Moapr might be to part it out? Over 2 years ago I made an offer on a '49 straight 8 NY'r. Sunk up to the axles. I figured I'd sell the exhaust manifold and break even. The guy refused my offer. Too low he said. He "had other hot buyers in waiting". It'll be 3 years this summer that the car is still there, sinking deeper. I see it every time I drive by. My offer now would be ½ of what it was a few years ago. Make me make the 35 minute trip 3X will ya? Found a pic of it!
-
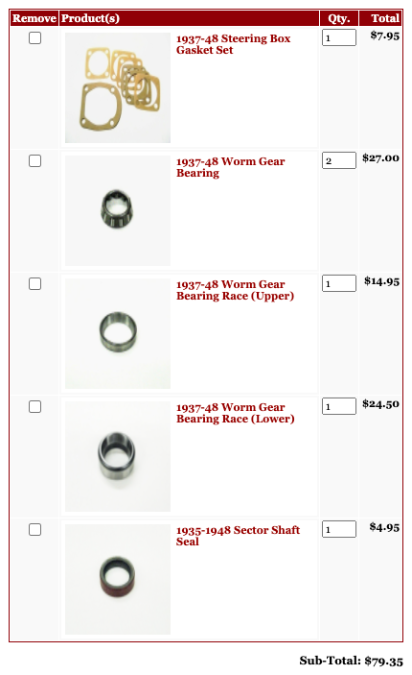
Eueka! The light bulb just came on. My Motor's manual tells me that the same Gemmer 305/335 model gearbox that's in my '38 Plymouth is also used in '37-42 Fords. The Motors Manual was published in '42 or so. However they carried on to use these same Gemmers up to '48 in Fords. (several years after my book was printed) There's a billion old Fords guys out there buying parts compared to us Mopar guys. So I found a popular old Ford site. They have all the parts readily available! For cheap by comparison. Seen here: https://www.earlyfordstore.com/index.php/cPath/85_165/sort/3a/page/3 Odd bearings. Gaskets. Shim packs. Rebuild kits. Brass bushings. Worm gears. Looking at the photos, these look correct. $80 for all I need. I'll be placing my order very soon. We’ll see what develops.
-
Thanks @JBNeal. I have been doing lots more research. I thought I would share that my Dyke’s Encyclopedia 20th edition has very thorough Gemmer gearbox setup instructions. It seems that Dyke’s book holds a nicely preserved set of instructions right from Gemmer back in the day. There’s very good descriptions listed about the differences between the various Gemmer models. It appears that I have the 305 or 335 type. I also suspect the 305/335 models do not use a thrust washer or shims on the roller shaft. Due to the external adjustment ability. I did not see any thrust washer or shims on my roller shaft upon removal. Earlier model Gemmers had to be removed from the car completely to set he worm mesh adjustment with shims. My Gemmer has the external set screw adjustment. It claims that a thorough set up can be accomplished with the Gemmer 305/335 remaining installed in the car. My 8th edition Motors Manual lists the 35/335 type as used in 40-42 Plymouths. I suppose anything could have happened in the last 83 years. Parts could have been swapped for some reason or other. I do see repair work on my car, what I think was the result of an accident. Could have needed a steering gear box replaced? It may have had a 40-42 Gemmer installed...Seems believable. My original ‘38 parts manual has been somewhat helpful. It does leave some gaps that I’m still trying to fill. It appears that USA built and Canadian built cars have something different about Gemmer’s used in each. I can’t quite put my finger on the exact reason for the different Gemmer parts listed for each country or origin.
-
If I recall, aren't NC residents allowed to carry side arms? Thieves on your private property are bold! The drug addicts up here lately have been stealing our rural mail compartment boxes. We have to go to a nearby central location to gather our mail and parcels. So far this week two complete units have been stolen on two separate nights. They get everyone's parcels and mail. The red-circles indicate where the two missing compartments were. Gets me thinking, I have been to NC. Flew into Rayleigh. Went to Clayton and Sanford. Drove east out to Nag's Head. Kitty Hawk too. Speaking of snakes I recall seeing hunters in a private treed lot. Bear hunting they said. Claimed the bears there don't hibernate. They had thick leather gators on to prevent snake bites in the swamps. They carried side arms to quickly deal with the snakes. Beautiful area you have there @knuckleharley
-
No thanks! Maybe they'll sponsor my YT channel and send me some free parts! Lol. Not likely.
-
I’ve recently read that these Gemmer worm gears are extremely difficult to machine and reproduce. Only 3 machines were ever built to cut these worm gears. Only 1 machine remains in use today. It’s in Buenos Aires Argentina. I have contacted them for parts that I’d like. The local bearing specialty shop could do nothing with the cone and cup I brought them. These are odd bearings that seem to stump the experts. The seal mentioned above seems right. I’ve considered my options to scan and cut my own gaskets and shims. I know I can do that. However if the specialists in Argentina have everything I need, they might as well throw all I need in one box and ship it to me. I can’t imagine what the price will be...Standing by. By luck, my worm and sector gears seem good. I suspect I caught this impending failure at a good time.
-
I suspect I am at at the apex, or nearing it when it comes to investment and recovery costs at sell time. As I mentioned above, that is not a driving factor for me. I am rebuilding my engine now, it will likely take me over the apex. To the land of diminishing monetary returns. Smiles per mile, the feeling of accomplishment, and experience, charted on a graph, the chart still going up. Steep. I look around and see really nice looking restored '38 Plymouths. Thousands and thousands spent. Countless hours. I could pick up a very nice restored 4 door sedan for $12K USD. It cost plenty more to build! Plenty. How boring would that be for me? Owning a fully restored one, at this point in my life? We'll I'd probably need a second one to keep my busy. Me at 70? Well, I might very well have a different outlook! ? Maybe not, plenty of guys here having fun at 70 and up. Still dropping trannies and pounding off seized rear drums.
-

Hey! There's no drain plug for the differential on my 48 DeSoto!
keithb7 replied to MarcDeSoto's topic in P15-D24 Forum
I also purchased one of these. About $5 US Funds. I needed it or my engine oil gallery plug removal. https://bcfasteners.com/shop/jet-h3700-21-3-8-drive-5-16-square-oil-drain-plug-socket/ -

Hey! There's no drain plug for the differential on my 48 DeSoto!
keithb7 replied to MarcDeSoto's topic in P15-D24 Forum
These work very well. I own one: I have MV7201. Great for pressure feeding or vacuum removal of fluids. https://www.skf.com/mityvac/products/fluid-evacuation-and-dispensing-equipment-and-accessories/fluid-evacuators -
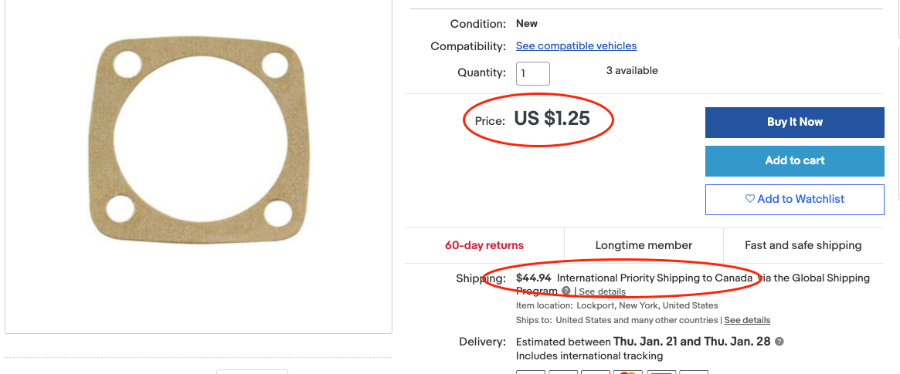
Seeking out parts, I thought I'd share what many of us are up against. This is ridiculous. The part is priced fine. Look at the rate to ship it to Canada. It's a flat gasket that would easily fit in a small envelope. It's frustrating sometimes as we try to keep these old cars on the road, and also manage our costs. ETA over a month. They are not kidding. Likely longer. The Ebay Global shipping program seemingly straps your part to an old wandering dog with only 3 legs. I will try and cut my own gaskets and shims.
-
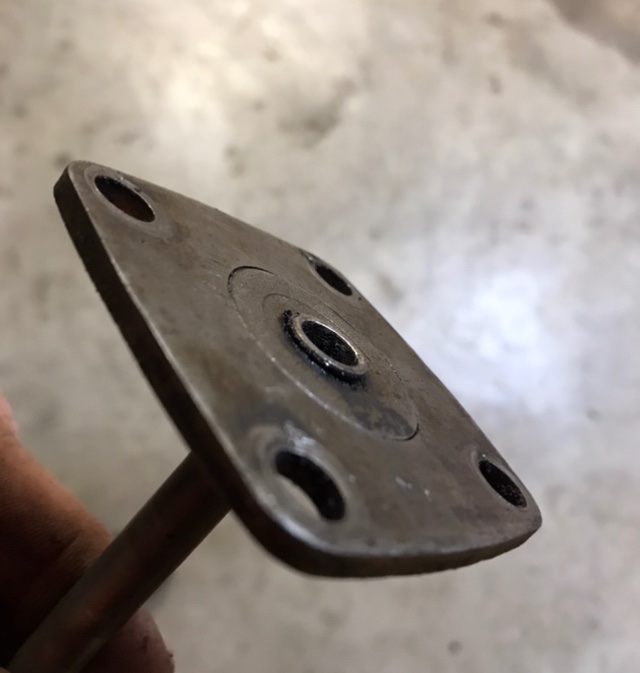
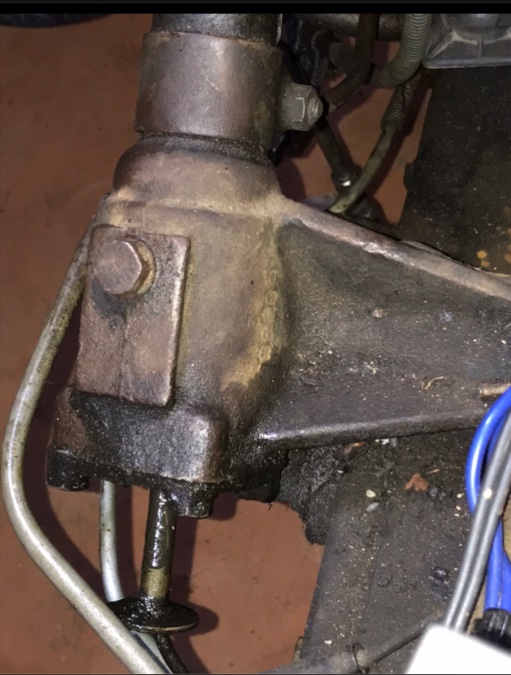
Thanks @MarcDeSoto. I did forget to go watch the Master Mechanic video. That helped me grasp a lot. I read the 1940 Motors Manual that I have too. Lights started coming on. I think I have found the worn part causing my symptoms. A photo below shows the lower steering shaft/worm gear support bearing. Lots of cage wear. End cover was actually cupped slightly from stress. Bearing cup was milling into the end cover. Allowing the center circular piece to pop out. Been 83 years in the making. Worm and mating roller gear looks good. New bearings, a new seal and some shims, should be all good again. When I took my end cover off there were no shims left. As bearings wear shims are removed to tighten up bearing wear. With all my shims gone, I’d wager they were pulled decades ago, to tighten things up. Now the bearing is totally spent, no make—up room left. This was a fun and interesting project. I learned a ton again. I couldn’t quite accept what was going on. Why the symptoms were occurring. Then I saw the cage wear. I think I’m content to move ahead with the repair now.
-
Have done anything related to the points yet? Sounds as though you are at least partially through a 12V conversion? At what point during the 12V conversation have you noticed the back firing? Valves set? Compression test results acquired yet?
-
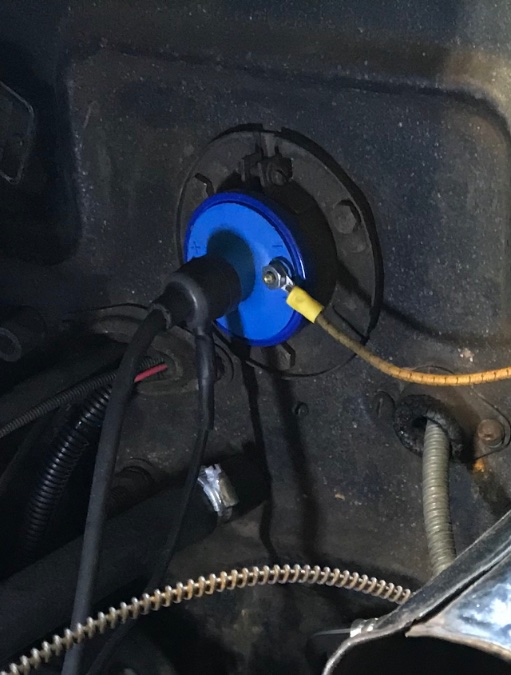
Your original coil has the wire from your ignition switch, entering the coil at the end. Hidden in behind the firewall. The other small wire going to the points is on the engine side of the coil. A new 6V coil on Rock auto (Or anywhere else) will have the rear hidden wire moved up to the front of the coil beside all the other wires. You can easily wire up a newer modern coil. An original type with the rear mounted wires ia about $250 US. A new one, what, about $20? You can see my modern coil wired up here. Harder to see the smaller black wire headed to my points in this pic. Yellow wire goes to my ignition switch.
-
The small red wire from the coil goes to a mechanical switch. When the switch closes 6V voltage goes directly to ground. This switch is also known as “the points”.
-
I’m not entirely sure of the path that this thread has taken. I do enjoy the comments. Old Mopars, I don’t care much about their worth. The experience, education and joy they bring me is priceless. If someone miraculously showed up at my door and said “I’ll give you $50K for your 2 cars, all your tools, and spare parts”. The deal was subject to me selling my house so the garage was gone too...I‘d pass. I don’t know what the heck I’d do with myself. My tools allow me to do so much. Not just on my old Mopars. I’d be wrecked. Retirement plans destroyed. I can’t put a price tag on the things that bring me joy in life. A life time of acquiring tools, then all my tools vanished? I can’t accept that. I like to compare my situation to a friend who is an avid golfer. He spends thousands per year on golf fees. Clubs. Gear. Etc. A lifetime of that, adds up to a considerable amount too. Does he care about recovering his investment when he gets out? When he can’t golf any more? Our old cars and tools fare pretty well by comparison. Sell my cars and tools and take up pickle ball? Naw. No interest. When it comes time to sell off an old Mopar I’ll probably start with a higher asking price. After a while of inactivity I’ll drop the price. I’ll keep doing so until I start getting inquiries. Then I’ll know I’m just about in the right price range. Until then I’ll just keep pouring time and some money into my cars. It makes me happy. The whole experience is fun. Part of it Includes coming here. The experience is not for sale.
-
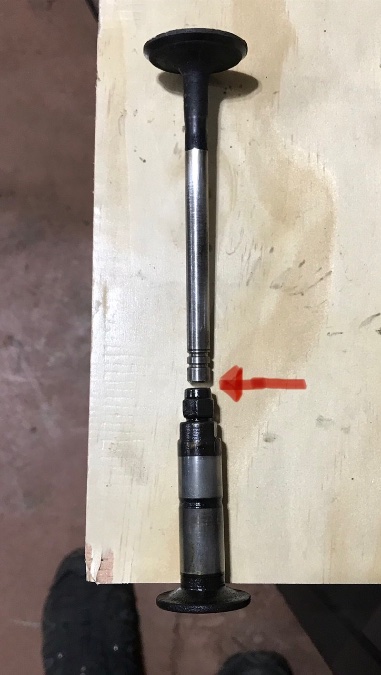
You are to measure the gap between the top of the tappet, and the end of the valve stem. Exaggerated here for clarity. Area indicated by red arrow. By twisting the top tappet hex cap, you are either increasing or decreasing the tappet overall length. Changing the measured gap. What I’ve learned: It may take a few times to get them all set properly. Don’t beat yourself up when one or two valves may be clacking away when you’re done. An automotive stethoscope may help you dial in the exact valves that are still ticking. Use It while the engine is running. Get back in there and re-set the clicking ones again. Why do we need to set valves when hot? 1. Siamese block castings: Each two pairs of cylinders have no coolant flowing between them. This creates uneven cooling within the engine. 2. The water distribution tube: Valves nearer to the waterpump get cooler water than the valves at the rear of the engine. So the valves will operate at different temperatures. Metal expands when it heats up. The hottest valves will create tighter clearances, as those hot valve stems will elongate more. Some folks set the valves when they are hot. Some folks, even set them while the engine is running. Lots of guys will take the published hot tappet clearance spec and add .002”. Then set them all when cold. I’ve done it both ways. Both methods provided good results. Start with Piston number 1 at TDC. Compression stroke. To ensure, grab a tappet at #1 between your fingers. You should be able to wiggle both intake and exhaust tappets a teeny amount. Up and down. This is your valve clearance that you’re feeling. This is usually positive insurance that both valves for #1 are fully closed. Check you valve clearances. Adjust as needed. Turn your fan blade 60 degrees. (Easier to rotate engine when all spark plugs are cracked loose) Go to the next cylinder. (Firing order 1,5,3,6,2,4) Repeat all the steps described and set valve clearances. Repeat until all valves have been set. Something to consider: A valve clearance that is too tight gets tighter when the valve gets hot and elongates. Now this valve will be lifted off it seat sooner. It also takes a little longer time to set down in it’s seat again. This severely limits the valve’s cooling time. Less cooling time means you’re probably gonna burn that valve. It gets so hot chunks can burn away. Then that valve won’t seal and you’ll have a dead cylinder. Have fun! It’s rewarding.
-
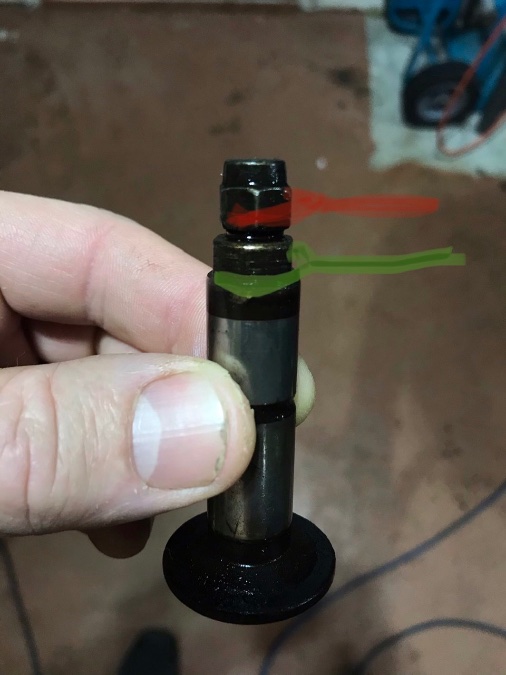
Seen here is a removed tappet. Green lines represent the lower wrench. It holds the tappet firmly in place. Preventing it from twisting. Red upper line represents the tappet adjustment wrench. You twist the top nut to increase or decrease valve to tappet clearance.
-
Merry Christmas to all the fine helpful and supportive Mopar folks here. 2020 was another great learning year for me. In large part due to the support I receive here. Thanks. No new tools or Mopar related loot this year. That’s a clue to me that my family knows I go get what I want when I need it. Lol. Mid-job I don’t wait until Christmas to get the puller need.
-
I’ve no experience with these steering gear boxes. I need to get tuned up. Of what I can see, I suspect the worm gear lower bearing cone is milling itself into the cover. Maybe about .005 is gone. The square cover is concave slightly too. Perhaps so far out of adjustment for a very long time? Much reading and research to come. It’s quite an intriguing gear set. I don’t think I’ve ever seen a worm gear outside of a book. Quite robust! I get the feeling I’ll be making shims. This little side project is certainly somewhat intimidating.
-
Ouch! Holy.... I'd try and find a way to make this work: https://www.amazon.com/Four-Seasons-74828-Heater-Valve/dp/B001B7BUAU
-
Thanks Westaus29. Merry Christmas to you and your family as well. I’m enjoying the scope of work. I’m not in hurry. I’m poking along as time allows. I suspect I’ll be waiting a while for my engine parts to arrive. USPS and other couriers have packages stacked to the ceilings in warehouses. Seems as though Christmas and Covid have created a prefect storm over here. I’ll track down and purchase the National seal you provided. Thank you.
-
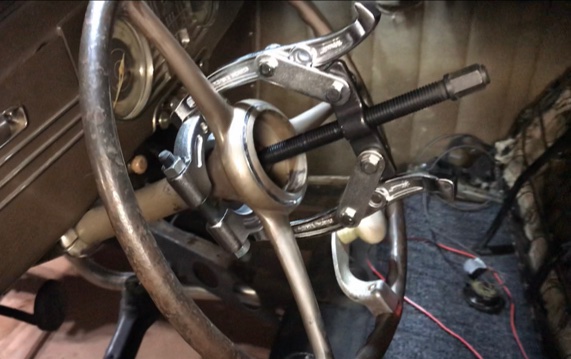
Thank you @Loren . Your description makes sense. I will pull it out and try brazing it. Hopefully it’ll secure and seal, holding oil. I saw some concerns about steering wheels being stubborn. A 3” bearing separator and a 2 jaw 6” puller made for quick removal. It took under a minute to have the steering wheel off.
-
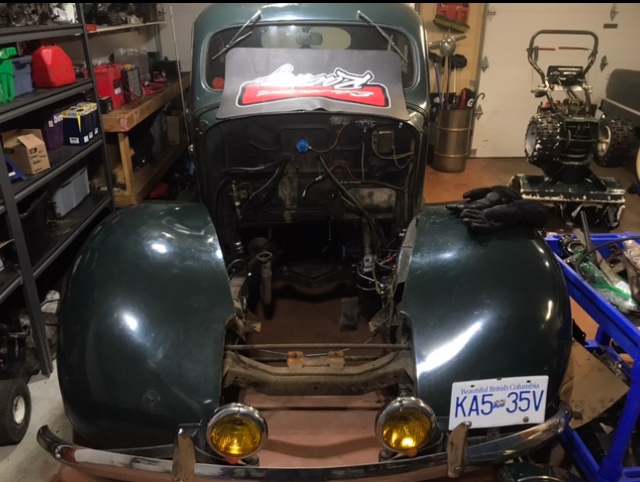
I’m this far into my ‘38. Seems like a great time to learn what exactly is going on with the steering gear box. At the low end of the box, where to horn wire comes out, there’s what looks like a poppet-valve. Its hanging down in the pics below. The wire goes In thru the piece. At this point I don’t quite grasp how it’s supposed to be retained in place. Looking in my service manual, the illustration there seems different than mine. As it sits, the gear box won’t hold oil. Nor grease. The grease gets hot in the engine compartment and globs out. It makes a fine mess. I figure I need to pull the gear box and have a look. A few questions I have about pulling it: It seems I need to pull the steering wheel. Then disconnect the drag link. Use a puller to remove the steering arm. Then lift the whole unit, including steering wheel shaft and tube, all out together. Is this correct? I’ve never done this sort of job before. I think its time. I’ve not looked into a seal kit yet. Fingers crossed I can find one somewhere. Thanks for any guidance or tips.
-
I should have clearly stated that there are generally two water valves. The manual shut-off valve, often seen at the left rear of the head. No cable attaches to it. You can use it to completely isolate your heater core up in the dash. It will shut off any water flow to the heater core, from the head. Any old manual valve will practically do in this spot. Which is often why we see garden tap shut off valves placed here. Then there is the auto regulating water valve that that regulates cab temperature. It has your heater temperature setting control cable hooked up to it. This is the pricey one to replace. As discussed in my post above.
-
Fluid drive is not directly referring to the transmission type. It is the fluid coupling between the engine and the transmission. There are two types: A simple fluid drive, or the more complex torque converter. The main difference being the torque converter has internal stators that multiply torque at lower RPM. The basic fluid drive does not have stators, nor multiply torque. The dry clutch is still present and used in both systems. I've never owned the basic fluid drive. My understanding is the basic fluid drive can be placed in front of a manual 3 speed tranny, or the semi-auto M5-M6. With the manual 3 speed you shift it manually still. A three on the tree shifter. The fluid coupling allows you to come to a stop and leave the tranny and clutch engaged. Still in gear. Engine won't stall with either fluid coupling type used. You only use the clutch to shift gears. You do not need it to come to a stop and take off again. The M5-M6, you are using the clutch way less, as it has an auto shift. The M5 or M6 semi-auto tranny you manually put in hi or low range. As engine RPM increases, you lift your foot off the throttle. The tranny hydraulic power creates a shift. 1 auto-shift only, either up or down. It too can be left in gear when stopped, clutch engaged. Engine will not stall. Here I explain some of the differences between the two types fluid drives: I suggest you get under your car. Look at the tranny. The right side. Does it appear to have a couple of cans bolted to the side of the tranny? Some wires? One can is a 6V shift solenoid, the other smaller can hosts a spinning set of contact points. Wires and cans indicate M5-M6 semi-auto tranny. If no cans or wires, you likely have a standard fluid drive that does not auto shift.


