55 Fargo Posted March 15, 2014 Report Posted March 15, 2014 No front primary short lining shoe or rear secondary long shoes are used on our B series trucks like what the man was talking about. The linings on the B3 P/U's should be the same length for front and rear brakes. Do you know the oversize of each drum? I think your shoes need to be properly arced to each of the drums to get the shoes to work and wear in properly.Your shoes are way out of adjustment -only the heel is contacting the drum. Always arching the shoes if you can saves a lot of time and frustration. Well for a quickie test I think I'd try putting the lower anchor bolt arrows back to stock position pointing to each other , readjust the cams so the shoes lightly drag against the drums and do a good road test. They might work a heck of a lot better-hopefully! Re check the wear pattern location after the road test too. Bob I agree, and this has worked well for me. Quote
Dave72dt Posted March 15, 2014 Report Posted March 15, 2014 I've known of the primary and secondary shoe placement for years and I still check for it when doing drum brakes. Not all manufacturers used unequal length shoe linings. I recall some shoes being marked primary and secondary. Manufacturers also occasionally used different material composition between pri. and sec. shoes. When the friction material is a different length or different composition is when primary and secondary placement is important. Mixing between brands of linings can create issues as well with brake performance. So much for the history lesson. Quote
Dodgeb4ya Posted March 16, 2014 Report Posted March 16, 2014 (edited) Most all newer modern cars use primary/secondary shoe linings. Edited March 16, 2014 by Dodgeb4ya Quote
wallytoo Posted March 16, 2014 Report Posted March 16, 2014 ** for those modern cars that haven't switched to 4-wheel disc brakes. Quote
HanksB3B Posted March 17, 2014 Author Report Posted March 17, 2014 What I've decided to do and it makes perfect sense to me is to visit CH Topping this Monday and bring along with my drums and a set of brake shoe cores with me. He can get a look at my drums and fabricate (it would be great if he had exchanges) new shoes to specifications. I could drive home with them, install them and see where it goes from there. Appreciate the support and comments keep them coming, Thanks, Hank Quote
Dodgeb4ya Posted March 17, 2014 Report Posted March 17, 2014 You might want to look at the springs too. Proper spring tension is critical . None should be bent or have odd gaps between the coils when streched. Quote
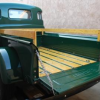
HanksB3B Posted March 19, 2014 Author Report Posted March 19, 2014 (edited) Guys, It's been a couple of days since I posted to this thread and like most component truck projects, I know a lot more than when I started and that's what I think it's all about. I'm no longer puzzled or challenged by our brakes and now know that while owning an Ammco 1750 or the Miller Falls Brake Tool would be very nice, unless you live far out in the country somewhere (as some of you are lucky enough to live) it is not necessary to do the job right. What is necessary however is to start from square one, that is having the drums turned and the shoes cut to match the drum. In the photo above, please notice that the linings do not run the proper length. Would you believe these were purchased new from on of our contributing vendors ? This Aamco machine is is the commercial equavalent of the 1750 for honing brake shoes and cuts the shoe .003 under the diameter of the drum. Although the hand application tools would make centering the shoes for drum installation easier it is not completely necessary. I think after my truck is in running order (please god let it be today) I'll write a condensed version of this thread that incorporates the trick and tips I've learned from some of it's contributors and what I've learned in the fied if it helps other fellow Pilothouse owners. Here are the new shoes I picked up at CH Topping (note how they match the parts figure 16 in post 74. Because the tolerance between the Shoe and Drum is only .003 I found it necessary to bleed the wheel cylinder so that the brake assembly can be made as small as possible to get the drum to fit. This and adjusting is the painstaking part of the process. It's important to recognize and set the lower cam pins and the upper cams to the lowest possible setting. _____. My brakes still are locking up. Even after both front brakes have turned drums and new shoes honed to fit. I thought it was only my left front wheel. I dismantled the left front wheel cylinder. CH Topping said it looked fine and did not need replacement. He suggested replacing both front hoses (I still have the right hand hose to replace). On the test drive I discovered my left rear wheel was locking up as well, and most likely if I had a co-pilot that hung his head out the window I'd probably hear that the right side was locking up alsol. According to CH Topping, ALL WHEELS LOCKING points to the master cylinder, so as it stands now my truck is on jack stands with the new Master Cylinder from VPW has now been bench bled and installed, turned drums, shoes. Looking forward to bleeding and test driving today. Crikey it's been like wrestling an old crock. I'm sore as can be who needs to go to a gym when you own a Pilothouse. Hank P.S. It turns out that the drums I found in my old locker (see the first post) were .005 under and .015 under with an allowable tolerance of .060. They both only required an additional .002 to re-surface so virtually they are like NOS drums. Edited March 19, 2014 by HanksB3B Quote
Brent B3B Posted March 19, 2014 Report Posted March 19, 2014 Hank, is there a "max" stamp on the drums or in the book for turning? Quote
HanksB3B Posted March 19, 2014 Author Report Posted March 19, 2014 (edited) Brent B3B. Welcome. Let me look to see if there is a specifications page...I couldn't find anythig but if you send me a personal message (PM) with your email I should be able to email you the brake section from the truck manual. Hank Edited March 19, 2014 by HanksB3B Quote
55 Fargo Posted March 20, 2014 Report Posted March 20, 2014 Hank, is there a "max" stamp on the drums or in the book for turning? up to .030, or a total circumference measurement of 10.060, larger trucks may allow to .080 oversize... Quote
HanksB3B Posted March 20, 2014 Author Report Posted March 20, 2014 Well I guess I get 100% on front brake workmanship and a 0% on diagnosis. Seems all along it was the left rear wheel locking up. Decided to get my truck up to about 15mph and slam oln the brakes. Only the left rear wheel locked up and left a skid mark. Somehow without looking, going just by feel, it felt as if the front right was diving and locking up. Not so! It's not the master and it's not the front brakes. The good news is as planned I have a spare master cylinder (my original was found to be fine and will serve as the spare) The newer drums turned, the new shoes made to factory specifications and fitted to the drum, the re-worked cam pins and well adjusted brakes are the way they should be. I do have a wheel puller and I guess I'll have a chance to use it. More tomorrow, Hank Quote
55 Fargo Posted March 20, 2014 Report Posted March 20, 2014 (edited) Hank, adjust em up like Bob mentioned, and put some miles on with periodic minor adjustments. Do this once you have all air out, an MC i correct working order. I did this with my ex 47 Chrysler, and after a some wear and added minor adjustments , the world was happy. I know where you live, and having good brake response is a must. Either get these to work well, or convert to front disc for added safety and brake response...good luck PS back brakes may lock up much easier, for 2 reasons, dual WCs, much more efficient, and a lot less weight in the box.... Edited March 20, 2014 by Fargos-Go-Far Quote
HanksB3B Posted March 20, 2014 Author Report Posted March 20, 2014 (edited) Fargos, I plan on converting to disc brakes with the Rusty Hope Kit I already have. Believe me, I am looking forward to it but funding is not quite there yet. It'll happen around the time I upgrade my differential. Once the brakes are behaving themselves, things should be good for another one or two seasons. Anyone care to guess what's going on with my rear brakes? Pads are relatively new as are the slave cylinders...my guess a sticking slave cylinder? Hank Edited March 20, 2014 by HanksB3B Quote
Dave72dt Posted March 20, 2014 Report Posted March 20, 2014 Do they release when you let off the brakes? They will not work like a modern vehicle with ABS and brake locking with full pressure applied to the brakes will happen. It's difficult with manual adjusted brakes to get both sides 100 % equal in braking effect. That brake may be set a bit tighter than the other, there may be some brake fluid contamination of the pads. Not releasing is different that grabbing and there are different things to look for with each. Quote
HanksB3B Posted March 20, 2014 Author Report Posted March 20, 2014 Do they release when you let off the brakes? They will not work like a modern vehicle with ABS and brake locking with full pressure applied to the brakes will happen. It's difficult with manual adjusted brakes to get both sides 100 % equal in braking effect. That brake may be set a bit tighter than the other, there may be some brake fluid contamination of the pads. Not releasing is different that grabbing and there are different things to look for with each. Thanks Dave, once they grab, they do not release immediately. It helps to put it in to reverse step on the pedal and the brake jam frees up. Not something I'd like to do in traffic at a stop light. Hank Quote
Dave72dt Posted March 20, 2014 Report Posted March 20, 2014 Sounds mechanical on that wheel and not hydraulic, maybe some broken hardware. Quote
HanksB3B Posted March 21, 2014 Author Report Posted March 21, 2014 (edited) I faced the enemy and the enemy was me...(something I did wrong in a rush) The result of poor workmanship on my part. I replaced a line without cutting the line to size and flaring, I just installied the shortest pre-flared line I could find. The line must have been weeping and over a two year period saturated the brake shoe which caused the lock-up. The right hand side is original. Should be a bit tricky to achieve such a tight radius but with the right tool it should be no problem. The left side and my poor workmanship... Lesson learned...Brake problems Step 1: Did you know you should remove all four brakedrums and do a visual check before jumping to conclusions. Did you know that Pinnochio was a bad motivational speaker Hank P.S. It would help and be greatly appreciated if anyone that can advise me how or knows some tricks to accomplish what looks like a radius smaller than 1" Edited March 21, 2014 by HanksB3B Quote
Jeff Balazs Posted March 22, 2014 Report Posted March 22, 2014 Hank; At least now you know. I almost asked this question a while back but I..... just like you.... assumed all was fine at the rear. I guess sometimes it is hard to know what corner the real problem is lurking in. And having to use a puller to get the drums off is probably just enough of a roadblock to give this sort of problem a good place to hide. As an aside it seems to me I read somewhere about a mod to these drums to make them removable without the use of a puller. You know of course that now that you have put all this effort into fixing these drum brakes you will be even more reluctant to move forward with a rear end swap and disc's. I am a lousy tubing bender so I will not offer any suggestions on making that piece. If you are going back to C H Topping to have these relined and matched up maybe they can help? Jeff Quote
HanksB3B Posted March 22, 2014 Author Report Posted March 22, 2014 (edited) Hank; You know of course that now that you have put all this effort into fixing these drum brakes you will be even more reluctant to move forward with a rear end swap and disc's. Jeff Jeff thanks, but that's not the case. It's a matter of time, other priorities and money. To me, there is a certain satisfaction to making things right, discovering and fixing all the things that were done wrong or not maintained properly by previous owners. My to-do list has become much shorter and there is starting to be time for finishing touches like driver side and passenger side visors and arm rests. There's no question that a taller rear end coupled with discs front and rear would make anyones truck roadworthy for todays driving. That's sort of has been your mantra whille mine has always been to make my truck like it just rolled off the assembly line. For this season, I'm hoping to get tires for my newly restored stock wheels and the correct hubcaps from Gary Roberts. As far as bending tubing, maybe I've made myself my go-to person after retrofitting the fuel line, fuel pump to fuel filter and vacuum line. Work in progress.. The line at the top was the driver side brake line within the drum linking the upper and lower wheel cylinder. The line obviously was make-shift not geometrically correct. Additionally it was not a good idea to leave it uncut (2" longer). By allowing the longer nut to remain, I removed the ability to visually see that it did not look like all the others and was not as tight as it should have been. The leak or seep took a couple of years to finally saturate the brake shoe. I started by first scanning the part and then imported the .pdf into AutoCad where a grid was established to what I call "finding the magic" of what the original draftsman had in mind when he laid out the part and assigned the bend radii. The new line shown above is made from soft aluminium, suitable only for use as a template. My next step will be actual fittment on the truck followed by fabrication of two identical lines made from steel brake line. Only hours away from driving my truck, Hank Edited March 22, 2014 by HanksB3B Quote
deathbound Posted March 22, 2014 Report Posted March 22, 2014 Hank; At least now you know. I almost asked this question a while back but I..... just like you.... assumed all was fine at the rear. I guess sometimes it is hard to know what corner the real problem is lurking in. And having to use a puller to get the drums off is probably just enough of a roadblock to give this sort of problem a good place to hide. As an aside it seems to me I read somewhere about a mod to these drums to make them removable without the use of a puller. You know of course that now that you have put all this effort into fixing these drum brakes you will be even more reluctant to move forward with a rear end swap and disc's. I am a lousy tubing bender so I will not offer any suggestions on making that piece. If you are going back to C H Topping to have these relined and matched up maybe they can help? Jeff Grind off the rivet heads & remove the rivets holding the drum to the hub. Press properly sized studs in from the backside of the hub. This eliminates the locating pin, but the studs take care of that. Quote
HanksB3B Posted March 23, 2014 Author Report Posted March 23, 2014 Grind off the rivet heads & remove the rivets holding the drum to the hub. Press properly sized studs in from the backside of the hub. This eliminates the locating pin, but the studs take care of that. When you say locating pin, are you referring to the slot and wodruff pin. The reason a wheel puller is needed is not because of that but rather the tapered axles. II think the only reason I'd remove the rivets was if somehow thaty facilitated attaching new drums to the hubs (if that were possible). Pulling drums off a well maintained truck with a wheel puller is no big deal if the right kinds of lube or antiseize are used in re-assemble. The reason things become a problem like not being able to do a simple on-the-road brake adjustment is changing brake shoes and reassembling everything dry without first removing rust and dirt and using the proper lubricants. Hank Quote
deathbound Posted March 23, 2014 Report Posted March 23, 2014 When you say locating pin, are you referring to the slot and wodruff pin. The reason a wheel puller is needed is not because of that but rather the tapered axles. II think the only reason I'd remove the rivets was if somehow thaty facilitated attaching new drums to the hubs (if that were possible). Pulling drums off a well maintained truck with a wheel puller is no big deal if the right kinds of lube or antiseize are used in re-assemble. The reason things become a problem like not being able to do a simple on-the-road brake adjustment is changing brake shoes and reassembling everything dry without first removing rust and dirt and using the proper lubricants. Hank Hank, I wasn't referring to the slot/woodruff key. I have a '38 Plymouth Coupe.....the drums have a locating pin (4 rivets & 1 locating pin-which doubles as a rivet that holds the drum to the hub), which makes installing the wheel easier while threading the lug bolts in the hub. Not sure if the trucks have the same locating pin on the hub/drum assembly. My post was in response to Jeff's post about a mod to make the rear drums removable without the use of a puller. Also, from what i understand, you are not suppose to use ANY kind of lube or anti-sieze on a tapered axle when re-installing your drums.....if that's what you were getting at. Quote
ggdad1951 Posted March 23, 2014 Report Posted March 23, 2014 hank, have you thought about using the cupro-nickel material for the lines, WAY easier to bend a tight radius on and will NEVER cause a rust issue..... Quote
Jeff Balazs Posted March 23, 2014 Report Posted March 23, 2014 Hank; What I was getting at in my post was I had just figured that you had inspected the rear brake shoes as part of this whole exercise. And the fact that you must use a puller to get them off may have been a reason why you didn't. When I was starting to re-work the drum system I had come across this mod which makes things a bit more convenient. Of course I ended up going to disc's so I never pursued it. As an interesting side note I recently watched an episode of the Brit car show Wheeler Dealers that highlighted a very effective method used to set up a car with 4 wheel drum brakes. They had an old Corvette with drums that had been reworked but was pulling badly to one side. The mechanic took it to a MOT station that had a brake testing machine that gave a percentage readout on the braking of each wheel ....front and rear. Basically a set of powered rolling wheels. By using this info he was able to zero in on the issues right away and a get the braking balanced to within a couple of percent. This has to be one of the most accurate ways to get braking truly sorted out. Far more accurate than the typical "seat of the pants". It would be very cool to have access to this sort of equipment. Apparently this machine is a part of all of their MOT stations and you can just pay a fee and test out your work. If you have never watched this show check it out. The mechanical aspect is far more involved in this show than most all of the other car shows. The mechanic Ed is very clever and does an excellent job explaining repairs and tool use. They flip cars but they actually fix them.....instead of adding phony drama. Well worth watching in my opinion. Jeff Quote
HanksB3B Posted March 23, 2014 Author Report Posted March 23, 2014 (edited) Good idea but what is MOT? Edited March 23, 2014 by HanksB3B Quote

Recommended Posts
Join the conversation
You can post now and register later. If you have an account, sign in now to post with your account.