ssnowden Posted December 29, 2015 Author Report Share Posted December 29, 2015 Thanks. I'll check them out. Quote Link to comment Share on other sites More sharing options...
YukonJack Posted December 29, 2015 Report Share Posted December 29, 2015 Those new wheels look like they are 14's. Maybe a 15 would clear. What is hub centric? Quote Link to comment Share on other sites More sharing options...
Plymouthy Adams Posted December 29, 2015 Report Share Posted December 29, 2015 wheel is located to the hub all around and centered ..in this case, the adapter is centric hub flange and then again cut so the wheel and adapter center cone will also match and center before nutting up the lugs.. Quote Link to comment Share on other sites More sharing options...
Plymouthy Adams Posted December 29, 2015 Report Share Posted December 29, 2015 the ones I first posted are not hub centric...but do show you basically what a billet adapter will look like this is hub centric but again...measure your hub opening..note on the added link centric positioning top and bottom of the adapter.. http://www.ebay.com/itm/5x4-5-to-5x4-5-Hubcentric-Wheel-Spacers-Adapters-Ford-5lug-Hub-Centric-Spacer-1-/271994955908?hash=item3f5429a884:g:ehUAAOSwYHxWGgxH&vxp=mtr Quote Link to comment Share on other sites More sharing options...
dale Posted December 30, 2015 Report Share Posted December 30, 2015 Hook-up a couple comealongs to the garage ceiling and remove the body, roll out the frame and go to work.. Spray penetrating oil on every bolt you can for a couple weeks.. If you dont pull off the body you will surely wish you had when you are done.. It makes it soooo much easier in the long run. IMO Quote Link to comment Share on other sites More sharing options...
ssnowden Posted December 30, 2015 Author Report Share Posted December 30, 2015 @dale It's awfully tempting to do that. Quote Link to comment Share on other sites More sharing options...
mrwrstory Posted December 30, 2015 Report Share Posted December 30, 2015 Just clicked on this thread so I may have missed some of the earlier comments, But,.......if you've already invested in the wheels/tires, hub spacers is the easiest most cost effective fix. That being said, check (as mentioned) if they are 14"ers and in particular of they are for a front wheel drive car. You can get 15" Ford or Mopar wheels all day long, for RWD cars that should solve your problem and could cost little more than the good quality spacers. 1 Quote Link to comment Share on other sites More sharing options...
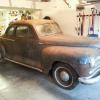
ssnowden Posted January 2, 2016 Author Report Share Posted January 2, 2016 Now that it's running, I wanted to degrease the engine and start cleaning it up. So I pulled it out this morning put some degreaser on the engine and gave it a bath. I got them because they were cheap and I needed them to move the car around, but the wheels and raised white letter tires are actually growing on me. I remember seeing it back in the 70's with this look. They also had bright yellow traction bars on it too, like it needed it. They were the first things I took off back in the 80's when I got it. https://goo.gl/photos/ahv9xv7X8t7eZV4W6 https://goo.gl/photos/56xhe2zHYAyJRUDt5 https://goo.gl/photos/wTVH2ziQao3FpMJc6 Quote Link to comment Share on other sites More sharing options...
casper50 Posted January 2, 2016 Report Share Posted January 2, 2016 nice car nice shop 1 Quote Link to comment Share on other sites More sharing options...
ssnowden Posted January 4, 2016 Author Report Share Posted January 4, 2016 I dropped the gas tank getting ready for the new one I ordered. It was pretty much rust with the varnish holding it together. The straps aren't in too bad of shape. I may try to clean them up and reuse them. https://goo.gl/photos/Qkd3NsJazSJXE1ze7 https://goo.gl/photos/hVXMMoVR27T1EG9p8 I've got to fix the transmission leak. When I fill it with oil, it leaks out pretty quickly. I've been reading over other forum threads about leaks as well as the shop manual. I think I'll pull it out and while it's out, clean it all up put in new gaskets and get the emergency brake working. It's covered with oil. https://goo.gl/photos/fuCpveGQkSe3gR58A https://goo.gl/photos/FA1B3yt9HdduVasw6 https://goo.gl/photos/sY35uU8sSDGNzeSJA https://goo.gl/photos/p9MAWXTmjkwQ8i5R6 https://goo.gl/photos/v1gySFRAzMkJVaGL9 Quote Link to comment Share on other sites More sharing options...
ssnowden Posted January 7, 2016 Author Report Share Posted January 7, 2016 (edited) I got the drive shaft out last night getting ready to take out the transmission. It's going to need refurbished before I put it back. Even though the boots are torn, they moved freely on both ends. https://goo.gl/photos/taaYAYZ3vfny8aTC9 The transmission end of it was a greasy mess. https://goo.gl/photos/8SiruNpBXuaM6PUt5 Edited January 8, 2016 by ssnowden Quote Link to comment Share on other sites More sharing options...
ssnowden Posted January 10, 2016 Author Report Share Posted January 10, 2016 I got the hub centric adapters installed. They look to be really well made and they did the trick. Now I have plenty of space. Quote Link to comment Share on other sites More sharing options...
ssnowden Posted February 28, 2016 Author Report Share Posted February 28, 2016 (edited) Since I had to fix the leak, I removed the transmission and replaced the hand brake pad while it was out. The old one was effectively gone and covered with grease/grime. I did the dime trick to seal the transmission leak. It worked just like you guys said another thread. I noticed that the clutch fork didn't feel right when I went to put the transmission back in, it turns out one of the retainers on the clutch release bearing sleeve was broken. I orded a new one and a bearing from Andy Bernbaum. Since I had the transmission out and I had to replace the motor mounts, I decided to pull the engine out where I could clean it up and paint it. The front motor mount wasn't in the best of shape. Since it's all out and I have no idea what shape the clutch or flywheel are in, I removed the clutch housing and pan assembly. I'm thinking I'll send it to the place Don recommends in Tennessee and have them rebuild it where I will have a fresh clutch when it all goes back together. Since I've never removed one, I'm reading other threads how to best remove the clutch the right way. I don't have any reference to know if this looks good or bad. The flywheel seems to be in pretty good shape. All the teeth are in good shape, I don't see scratches in it. In the bottom of the clutch pan assembly, there were two little rings like this. I have no idea where they would have come from. Edited February 28, 2016 by ssnowden 1 Quote Link to comment Share on other sites More sharing options...
Don Coatney Posted February 28, 2016 Report Share Posted February 28, 2016 Clutch pressure plate removal is simply un-bolt it. If you remove the flywheel suggest you mark it as it only goes on one way. The clutch fork spring retainers are critical. Glad you found some replacements. I found that used king pins work well to install the new through out bearing on the sleeve. 1 Quote Link to comment Share on other sites More sharing options...
ssnowden Posted March 2, 2016 Author Report Share Posted March 2, 2016 I found what that little spring was in the bottom of the pan. It's one of the broken clutch springs. Also I found the bushing was broken and fell out. Good thing I decided to open this up and get it serviced before putting it all together. Should I plan on just getting a new clutch and not get this serviced? Also, I'm going to get the flywheel smoothed out as well. Quote Link to comment Share on other sites More sharing options...
ssnowden Posted March 3, 2016 Author Report Share Posted March 3, 2016 I also wanted to ask, why would the bushing be worn on the engine side? It looks like something was rubbing it like a lathe would. Quote Link to comment Share on other sites More sharing options...
Don Coatney Posted March 3, 2016 Report Share Posted March 3, 2016 I also wanted to ask, why would the bushing be worn on the engine side? It looks like something was rubbing it like a lathe would. Possibly someone greased it thus causing it to seize to the transmission shaft. The bushing is made from a Chrysler innovation called oilite, a porous bronze that should be soaked in oil prior to installing. If grease is used it can clog the porous bushing allowing no lubrication. 1 Quote Link to comment Share on other sites More sharing options...
TodFitch Posted March 3, 2016 Report Share Posted March 3, 2016 Regarding refurbishing/rebuilding the clutch disk and pressure plate: I've had that done twice over the 40+ years I've had my car and each time I simply went to the nearest brake and friction place to where I lived at the time. That is a pretty standard job that any competent local rebuilder can do. Don will probably post the link to the one he used and which others on the forum have also apparently used with success, so that could be an option if you don't have or don't trust the rebuilder most local to you. 1 Quote Link to comment Share on other sites More sharing options...
Don Coatney Posted March 3, 2016 Report Share Posted March 3, 2016 Don will probably post the link to the one he used and which others on the forum have also apparently used with success, Sense you mentioned it. I have no connection to this company other than they did a good job for me at a fair price. 1 Quote Link to comment Share on other sites More sharing options...
ssnowden Posted March 3, 2016 Author Report Share Posted March 3, 2016 Thanks for the information guys. This is one of the biggest benefits of this forum. The nuances and background of the components are really interesting to learn past what the service manual or parts lists will tell you. Quote Link to comment Share on other sites More sharing options...
ssnowden Posted March 4, 2016 Author Report Share Posted March 4, 2016 (edited) When I start putting together the clutch again, I see in the service manual that there is a tool for that. I don't have the C-360 Clutch Disk Alignment Arbor and I suspect many, if not most people don't. Is there a known, readily available substitute that will line things up like the tool? Edited March 4, 2016 by ssnowden Quote Link to comment Share on other sites More sharing options...
TodFitch Posted March 4, 2016 Report Share Posted March 4, 2016 When I start putting together the clutch again, I see in the service manual that there is a tool for that. I don't have the C-360 Clutch Disk Alignment Arbor and I suspect many, if not most people don't. Is there a known, readily available substitute that will line things up like the tool? Don't know if they have them in the correct size for our old cars, but I've seen plastic alignment tools in my local auto supply. Might want to check there. If you have a spare transmission input shaft, you can use that. An old timer back in the '70s told me they used to use a broom handle whittled down to size. Or, worse comes to worse, leave all the pressure plate attaching bolts loose, make some long guide studs for the transmission top mounting bolt holes and slide the transmission on with it in gear. You can turn the hand brake brake drum to rotate the input shaft until the splines match up with the clutch disk and jiggle things until everything is aligned and the transmission slides all the way to the bell housing. Then tighten all the pressure plate mounting bolts. 2 Quote Link to comment Share on other sites More sharing options...
ssnowden Posted December 30, 2016 Author Report Share Posted December 30, 2016 Since I got the Wagonaire, and the B4B is in better shape than I expected it would be when I bought it, I've got a new plan of what I want to do with each one. I'm all but certain that I want to put a Mopar small block and automatic in the B4B and make it more modern driver. My wife wants to be able to drive it and she is no longer able to drive a manual due to back issues. The Studebaker will be a full frame off restore. So that leaves the P15. I don't want to spend much on it so I can spend more on the truck and Wagonaire. I did a quick inventory in the garage, and I pretty much have all the parts I need to put it together and just enjoy it while I focus on the other ones. So that's what I'm going to do. I have a few days off during the holidays and have been working on the P15. I've really spent some quality time learning welding and grinding. I now have repaired all the floor pan and repaired the rocker and bottom of the totally rusted out area behind the passenger door. I did the same repair to the outer rocker on the driver's side as well. It will be a while before I am ready to do body filler so I wanted to prevent the rust with the primer. Quote Link to comment Share on other sites More sharing options...
ssnowden Posted January 3, 2017 Author Report Share Posted January 3, 2017 I got the engine and transmission and radiator back in the P15 this weekend. A new Rebel wiring harness and gauges are next. Quote Link to comment Share on other sites More sharing options...
Dartgame Posted January 3, 2017 Report Share Posted January 3, 2017 Probably too late - but I would install a borg and beck clutch and disc. Those auburns are kind of wimpy looking clutches. Earlier in your post you mentioned the trans leaking. There is a gasket that must be installed between the trans and the bell housing. There is a hole in the face of the trans that is open to the gear box and will leak oil if the gasket is not in place. Car looks good ! Quote Link to comment Share on other sites More sharing options...

Recommended Posts
Join the conversation
You can post now and register later. If you have an account, sign in now to post with your account.