-
Posts
1,860 -
Joined
-
Last visited
-
Days Won
10
Everything posted by MarcDeSoto
-

Fixing inside bumper rust with POR 15 on 48 DeSoto
MarcDeSoto replied to MarcDeSoto's topic in P15-D24 Forum
If I did send my bumper out to the plater, I don't think they could take the POR 15 off. And when they dipped the bumper to plate it, I don't think the plating could bond to the POR 15. I think I remember plating bumpers cost about $500 a pair back in the 80s. Today, I don't know. I don't think plating shops are allowed in California anymore. Maybe they still have them in Nevada or Arizona? I've the heard the cost of plating has skyrocketed into the thousands. And my bumpers I think are still good enought to buff out. My diecast chrome pieces, and there is a lot of it on a 48 DeSoto, like the big toothy grille, the front fender moldings, the tail light and brake light frames, etc. are good enough to also buff out and polish. There will be some minor pitting, but it would look fine I think, unless I was going for a 100 pt. concours restoration. It's expensive to get there though. -
Which one of you is a Hatfield and which one is a McCoy? I also have the FD kit that I bought from an out of business Chrysler dealership in WI by mail. I have a old FD that I took out of a part cars 48 Dodge I had in the 80s. wish I had kept it in the garage instead of out my the yard where it got sprinkled everyday. Maybe I will use it as a tear down learning experience to see how my tools work.
-

Fixing inside bumper rust with POR 15 on 48 DeSoto
MarcDeSoto replied to MarcDeSoto's topic in P15-D24 Forum
There are a few videos on Youtube saying POR 15 is crap and don't use it. I watched one of those videos and this guy had painted his frame that was so bad the rust had worked its way almost all the way through! The metal was coming off in 1/4" sheets, which he blamed on the paint! -
I finally thought it was high time to get my bumpers out of the weather and starting cleaning them up. I cleaned the bumpers and then started the three step POR 15 method of fixing the inside bumper rust. That area is not chromed, so it is always rusty back there. First, I got my hand drill and a wire wheel and knocked the loose active rust off. Then, I used Marine Clean to clean the area. After washing the Marine Clean off, I used Metal Prep, which acts as a rust neutralizer and a pre primer. Then I applied the POR 15 gloss black. After two hours, I applied a second coat. On the first bumper I did, the rear, I forgot to put masking tape over the bolt holes. As a result, paint ran through the hole and ran on the chrome side of the bumper. Bummer! This paint is so tough, you can't take it off, even after just 30 minutes. You are supposed to top coat it if it will get any sunlight. I don't think the inside of the bumper gets much sunlight, but I could paint it will Rustoleum silver if necessary. I even did the same process on the insides of my bumper brackets. I'm thinking of also doing the insides of the doors and any other hidden place that might rust. I think the chrome side of my bumpers are good enough to clean up just with using some chrome polish and steel wool 0000 fine on them. In fact, the rear bumper was purchased 40 years NOS for about $75. I was covered with hardened cosmolene. I had to use paint stipper and spatulas to get it off. I have two front bumpers and three rear bumpers, so I chose the best of each for my restoration. I wonder what the going price is today for getting a pair of bumpers rechromed?
-
I don't know if this video will help you or not, but if you have a P-15 Plymouth, the ihazwings series of videos are outstanding. here's a video about window mechanism installation. https://www.youtube.com/watch?v=5Iw6kkwPhtM&t=289s
-
wow! what an easy fix from James' know-how!
-
There's a good MTSC filmstrip from 1952 just on the subject of glass in these cars. Worth a look! https://mymopar.com/mtsc-1952-volume-5-12-windshield-and-rear-window-service/
-
I should buy a few in case they stop production!
-
Do they still make that SFE 30 amp fuse? I've never seen the inside of a trans. relay. Back in the 80s, which I think of as the days of cheap NOS parts, I bought a NOS M-5 trans. relay as a backup to my original.
-
Bob's sounds like the go to vendor for antique auto glass. They also sell the rubber gaskets. I only had one cracked window, the driver door, and I already bought a new window for $45 a few years ago on Ebay. Now I'm going to have to make that same decision that you made: whether or not to replace just one window, or all the flat glass. I looked on Ebay and there is a seller who sells antique flat glass that is clear or green. Why would anyone get green? Does green glass sheild you from summer heat better? Looks like you better not crack your rear window glass! No one makes it because it's curved. I knew that back in the 80s when I was removing the rear window on my 48 DeSoto business coupe. The back window comes out inside the cab. I had cut and chipped away the rubber gasket around the window and was gingerly hammering, with a rubber mallet, the rear window toward the inside of the cab. Hammering even with a rubber mallet might not be the best method! Then after just a few light hammer blows, it fell inside the cab down to the floor! I thought Oh NO! If it's cracked I won't be able to the get another one except from another MoPar business coupe. Luckily, the glass still had the rubber gasket around it, and I had a blanket on the floor inside. Close one!
-
Donald, that wiring terminal block to the right of your relay is an add on, right?
-
Or just look under the hood. The semi automatics has a transmission relay on the left inside fender or on 49 and later had a circuit breaker over the engine. And semi automatics have a clutch pedal that said Safety Clutch on it.
-
All Gyromatics are the semi-automatic transmission. The FD with the 3 speed manual transmissions were on the 41-48 Dodge, and the 49-52 Wayfarer models.
-
Here is the fluid for the Fluid Drive, not the transmission: https://www.amazon.com/Mobil-DTE-Light-ISO-gal/dp/B07CSLKT1J?psc=1&pd_rd_w=7Ra2V&content-id=amzn1.sym.196c39f6-1a02-4bc2-9ca8-81b9c650421e&pf_rd_p=196c39f6-1a02-4bc2-9ca8-81b9c650421e&pf_rd_r=31CM1D3BXYE8P1B24Q0F&pd_rd_wg=7rjUT&pd_rd_r=209fe500-4bb6-4b30-b944-5495eb2abf61&ref_=sspa_dk_rhf_yoy_pt_sub_6&spLa=ZW5jcnlwdGVkUXVhbGlmaWVyPUExWTZNVFRIQkFDRkJGJmVuY3J5cHRlZElkPUEwMzM0MTM0MTk3Sk41N0tKWDdHUyZlbmNyeXB0ZWRBZElkPUEwODI2NDY5M0E1TklHRU5XWU00MiZ3aWRnZXROYW1lPXNwX3JoZl95b3kmYWN0aW9uPWNsaWNrUmVkaXJlY3QmZG9Ob3RMb2dDbGljaz10cnVl Unfortunately, you have to buy 5 gallons, when your FD only needs 7 qts. If you live close to me i could sell you what's left of my bucket.
-
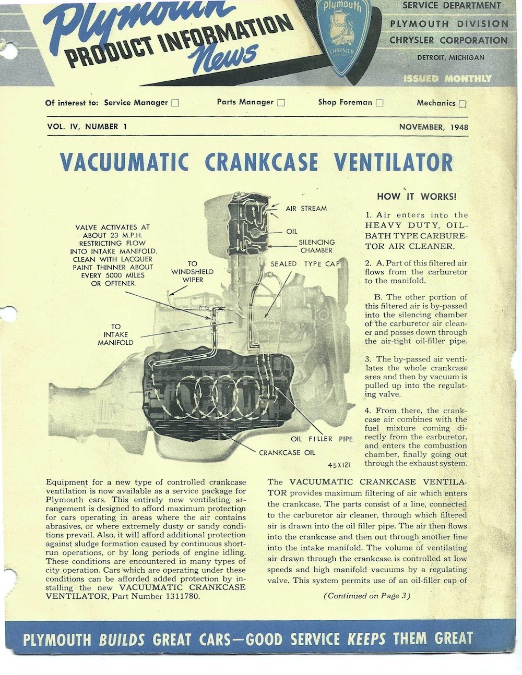
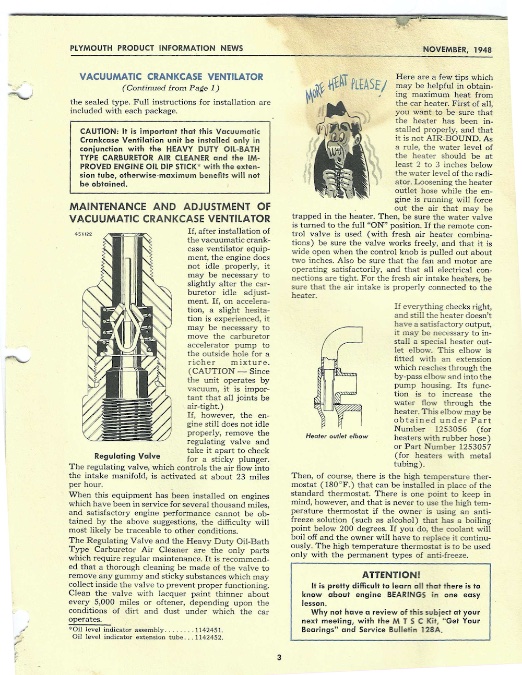
I was surprised to learn that Plymouth offered an early Vacuumatic Crankcase Ventilator system as early as 1948. It was invented during WWII for tank engines to be able to ford streams without flooding their engines with water. In this 1948 version, it doesn't mention smog reduction, but for use in very dusty areas, and for diverting engine blow by so it doesn't form sludge in the crankcase.
-
I found an old brake shop in Long Beach, C. H. Topping, and they were the only ones who could arc my brake shoes. They are the perfect place to take an old car for a brake job because I looked around and saw nothing but old cars like a 40 Ford and 57 Pontiac etc. But they have about a two month waiting list of customers. https://www.longbeachexecs.com/automotive/item/167-c-h-topping-brakes
-
Good job on that pulley! However, I bid $10 on it, so it's rightfully mine. My bid somehow didn't go through. Jk, Marc.
-
Whoever wrote the description of this tool got it backwards. This tool is designed to service female square plugs!
-
Mine was a problem taking it out. The dogbone didn't work. The 3/8 rachet didn't work. Nothing worked because the hole was rounded out and it was rusted in place. I had to use a kind of easy out to get it out with some heat added. I decided to not replace it with a female plug, and bought a male pipe plug instead. Now, it will be easy to remove the next time I drain the diff.
-

Worn valve guides in-car fix... R&R or sleeve?
MarcDeSoto replied to bamfordsgarage's topic in P15-D24 Forum
i did this job on my 48 DeSoto and a couple of other MoPars flatheads some 40 years ago. It's an easy job, just press the old ones out and new ones in. I remember the exhaust valve guides were put in opposite or upside down to the intake ones. All you need is a valve guide driver, common tool. I just used the common tool in my auto shop class. Of course you will need to remove the valve springs and valves first. https://www.amazon.com/V-twin-Manufacturing-Valve-Driver-16-0132/dp/B002BCW3F0/ref=sr_1_7_mod_primary_new?crid=AYNCHPNH1WF6&keywords=auto+valve+guide+press&qid=1676349008&sbo=RZvfv%2F%2FHxDF%2BO5021pAnSA%3D%3D&sprefix=auto+valve+guide+press%2Caps%2C137&sr=8-7 -
There's a guy in San Diego who is selling or parting out a 52 Plymouth engine. $300 for the engine. https://forums.aaca.org/topic/392133-complete-engine-tranny-1952-plymouth-p23-for-sale-or-part-out/#comment-2488638
-
It seems that no. 1 cylinder should have both valves shut and the piston at the top when the timing mark is at TDC. Something does seem wrong. Keith would be a good one to chime in on this. Is there any way the timing pulley was put on wrong?
-
I remember those flippers on my 50 Chrysler Windsor. But mine were all chrome with no plastic. They are plastic not stone by the way,. Those 40s Chrysler dashboards and interiors were so deluxe!
-

Does anyone have a pic of their shift linkage?
MarcDeSoto replied to OUTFXD's topic in P15-D24 Forum
Mine was too on my 48 DeSoto. Very easy to align. Just loosen the shift lever nut and put shift lever in horizontal postion. Then re-tighten the nut. Takes about 20 seconds for me, but my body is off. -
Chrysler put their first AC in the 53 Imperial, then offered on more makes in 54. They had been planning this since pre-war, so it could be a punch out hole for AC or heated air even if it wasn't offered that year. Packard was the first to offer AC in 41. I read that several 42 DeSotos had AC. Chrysler was really big on pushing AC as Chrysler himself had his engineers produce a superior AC system for his Chrysler building in 1930. Those engineers created the Air Temp Corp. It could also be for a rear window defogger, but I'm not familar with that accessory.


