


MarcDeSoto
-
Posts
1,860 -
Joined
-
Last visited
-
Days Won
10
Content Type
Links Directory
Profiles
Articles
Forums
Downloads
Store
Gallery
Blogs
Events
Everything posted by MarcDeSoto
-
I've already checked for spark at the plugs. I have spark at the plugs. I also checked my spark plugs and they look dry and clean. I checked my carburetor by pulling the accelerator rod and I have a squirt of gas in the carb. The condenser is new, but I will check or replace it next.
-
My engine has become a non starter. It started great, then it quit after one minute and won't restart. I'm trying to Sherlock Holmes the answer. First, I'm checking on the ignition system. I do have spark at the plugs, but I'm looking at the ignition system closer. I pulled the distributor and it looked like the points were at .030 instead of .020, so I adjusted that. I examined the points and did not see any signs of burning. I tested the coil with a multitester and got these results: Primary circuit: 50 ohms. Secondary circuit, both positive and negative, about 7K ohms. Is that a good result for this 48 DeSoto six volt coil?
-

How long does a rebuilt flathead engine smoke out the tailpipe?
MarcDeSoto replied to MarcDeSoto's topic in P15-D24 Forum
Now I have another problem. The engine won't start now. So I will have to start the trouble shooting process. I will become like Sherlock Holmes and try to use deductive reasoning to pin down the reason or reasons. I will look for problems in the ignition system by checking the coil and condenser with a multimeter. I'm hoping the specs for the coil are in the shop manual. I do have spark, but am not sure if that's enough to rule out the ignition system. -
How long does a rebuilt flathead engine smoke out the tailpipe?
MarcDeSoto replied to MarcDeSoto's topic in P15-D24 Forum
Thanks for that great tip! I just ordered new points and condenser from Rock Auto. Maybe I should also order a new coil! -
How long does a rebuilt flathead engine smoke out the tailpipe?
MarcDeSoto replied to MarcDeSoto's topic in P15-D24 Forum
There is no ignition switch yet. That's why it is hot wired. I'm confused. Why does my engine start up perfectly then stop after a minute or so. Then I can't start it anymore? Very troubling. I have spark, fuel, and compression and timing, but no start. Maybe my points or condenser got damaged the other night, but I do still have spark at the plugs. -
How long does a rebuilt flathead engine smoke out the tailpipe?
MarcDeSoto replied to MarcDeSoto's topic in P15-D24 Forum
Thanks Joe, you're a real friend! I cut off the bolts today with a cut off wheel. I went to the hardware store and bought new grade 8 bolts and nuts. I asked for 2" bolts and he gave me 2 1/4" bolts. So I had to drive all the way back to ask for the 2" bolts. He got them and measured them, and I took them home, only to discover that he gave me 2 1/4" bolts again. So that means I have to install the bolts from the bottom instead of the top. I put in a new gasket too and took out the old one which had lost the top part exposing the metal part below. I put some gasket maker for exhaust on the gasket and am waiting til tomorrow to test the connection. Also a couple of days ago I forgot to disconnect my ground cable and drained the battery with hot wire still connected! So I charged up the battery overnight and luckily the engine started right up with one click of the button without priming the carburetor, just like a modern car! I've heard that when you leave the hot wire hooked up, the battery could fry your points and coil if the points are closed! -
How long does a rebuilt flathead engine smoke out the tailpipe?
MarcDeSoto replied to MarcDeSoto's topic in P15-D24 Forum
Now I have a new problem. I tightened the exhaust pipe's bolts so tight that I stripped the threads. Now I can't remove the bolts and nuts. They turn, but they don't go anywhere! I guess I have to use a cutting wheel on a grinder and cut the nut or head off? -
How long does a rebuilt flathead engine smoke out the tailpipe?
MarcDeSoto replied to MarcDeSoto's topic in P15-D24 Forum
Do you mean bored? Yes it was bored out .030 and .030 oversizeds pistons and rings were installed. -
How long does a rebuilt flathead engine smoke out the tailpipe?
MarcDeSoto replied to MarcDeSoto's topic in P15-D24 Forum
Of course I do know about the exhaust gasket. You probably can't see it. It's stuck on the ex. manifold. So you think I shouldn't use the Bernbaum pipe? I installed it today and cranked down so hard on the bolts that I squeezed a washer in half. And I think I bought the bolts at Home Depot, so I don't think they are automotive quality. Something happened when I cranked down. Instead of getting tighter and tighter, the bolts got looser and looser as I cranked down! So I'm going to go to Hank's tomorrow to get some grade 8 or higher nuts and bolts. The Parts List doesn't show any washers, so I won't get any. Just two 7/16-20 X 2" bolts and two nuts. Is is OK to put two gaskets on this? -
How long does a rebuilt flathead engine smoke out the tailpipe?
MarcDeSoto replied to MarcDeSoto's topic in P15-D24 Forum
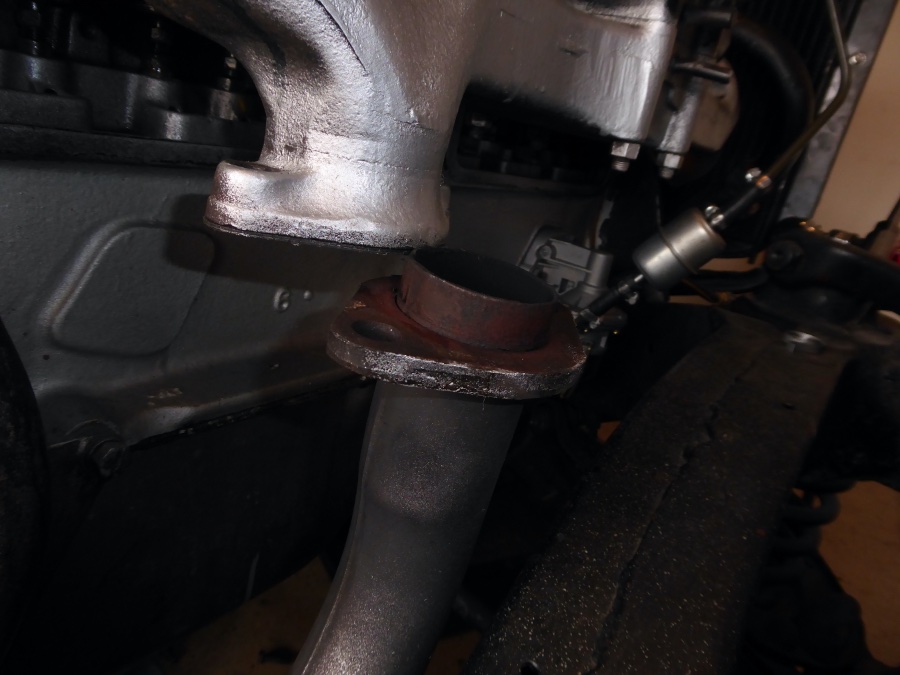
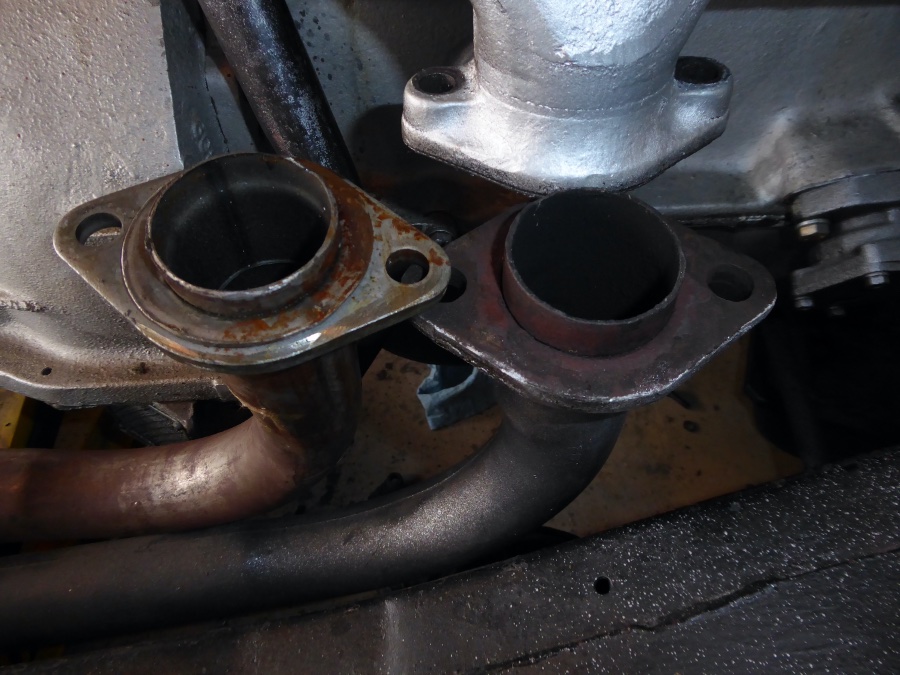
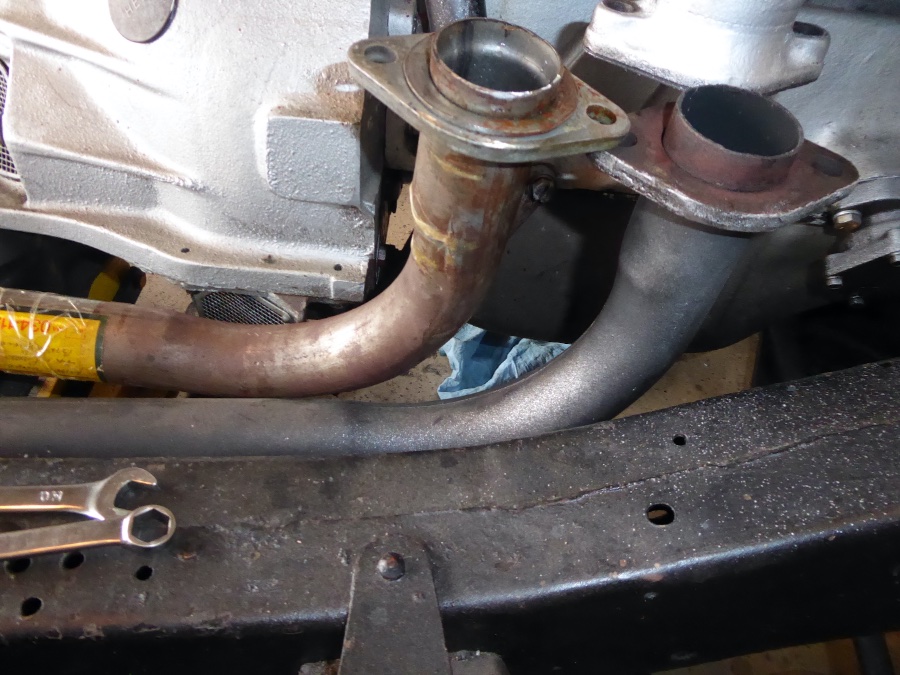
Today, I removed the exhaust pipe to examine it. It does have a 1/2" flange, but I do have a "new" exhaust pipe from Bernbaum's that I purchasesd around 1991. I put the Bernbaum muffler and tailpipe on the DeSoto already. My helper said he was having some trouble fitting the new exhaust pipe, so I gave him the old pipe which seemed like it was in good condition. If you look at the photos, you will see that the Bernbaum pipe as a circlular metal "washer" on the pipe that goes on the exhaust manifold. The old pipe doesn't have that metal circular washer. Maybe that washer is important? I tried fitting the Bernbaum ex. pipe on, and it seems to fit fine, so I'm going to install it and see if it makes a difference.

-
How long does a rebuilt flathead engine smoke out the tailpipe?
MarcDeSoto replied to MarcDeSoto's topic in P15-D24 Forum
Yes, a German car auto mechanic told me to put MMO in the spark plug holes to make sure the pistons and rings had lubrication for initial start up. I checked my spark plugs since the engine had become hard starting again and they were black with burnt oil on them. I still don't know why smoke is coming out of the ex. manifold to header. I tightened it as hard as I could. -
How long does a rebuilt flathead engine smoke out the tailpipe?
MarcDeSoto replied to MarcDeSoto's topic in P15-D24 Forum
I still have smoke coming out of the joint between the ex. manifold and the exhaust pipe. The engine today has become hard starting again, maybe because of oil getting on the spark plugs. I'm also trying to align the shift linkage. When I put it in gear either low range or high range, the prop shaft turns a few turns and then stops. Also the prop shaft seems to have a bit of lop sided wobble to it. I might have to experiment with putting the shaft on different studs so it's balanced. -
How long does a rebuilt flathead engine smoke out the tailpipe?
MarcDeSoto replied to MarcDeSoto's topic in P15-D24 Forum
Joe, I can tell you've been paying attention. Yes this engine was rebuilt around 40 years ago!!! Sometimes I worry that the rings might be rusty or rusted. I was told way before I started my engine to make sure the engine has a lot of oil so the rings would be lubricated when I started the engine. I put Marvel Mystery oil through the spark plug holes. The smoke I see is not water, it's either oil or fuel and is blue black. Well, I'll just keep running the engine and hope the smoking stops or gets much better. The engine sure starts nicely now with no hard starting. I think I timed the engine well and put in new points, condenser, rotor, spark plugs and wires. I also checked the point gap in my distributor and found that it was about .030! It's supposed to be about .020, so that's where I put it. -
I have heard from someone here that a new rebuilt flathead six can take up to two hours running time for the excessive smoke to cease coming out of the tailpipe. Does that sound right? My engine only has about 20 - 30 minutes of run time on it, but it's still smoking out the tailpipe. I guess it takes time for the oil control rings to seat? Just want to know how long your rebuilt flathead ran before the smoke stopped out of your tailpipe?
-
Yes, I know all about that short circuit since the guy who rebuilt my solenoid switched terminals on me! Engine starts right up and is running great right now. Check out my other recent post.
-
Static timing rotor at 6:30 not 7:00 on 48 DeSoto
MarcDeSoto replied to MarcDeSoto's topic in P15-D24 Forum
I don't think I need to adjust the oil pump. Today, I did another static timing this time following the directions in the manual. They say to loosen the major adjustment bolt under the distributor. It was hard trying to tighten that bolt without turning the distributor, but compensated for that with the minor adjustment screw. The engine started up on the first crank of the engine, so I must have done something right this time. And I have no starter run on after the engihe starts, since an expert rebuilt the solenoid. -
I have never connected one wire of my remote starter switch to ground. One wire goes to the NEG battery post and the other to the solenoid switch. Will it really work that way?
-
My rotor looks like it's at 6:30 when the timing damper is at TDC on no. 1 cylinder. I wonder if that could be contributing to my hard starting problem. I watched Keith's great video on this subject and he mentioned the major distributor adjustment. I made a major distributor adjustment some time ago and I think I moved it too far. I could probaly get the rotor back to 7:00 with another major adjustment?
-
Yes, the specialist who rebuilt my solenoid reversed the wiring for those two upper terminals. I don't know if it would be an easy job to reverse the reversal, but the starter works now. The battery cable still goes to the big lower right terminal.
-
Yes, now I see that. It's just pointing to the whole solenoid as the switch. I guess now I should just reverse what goes to those two terminals, with the generator now going to the upper right terminal.
-
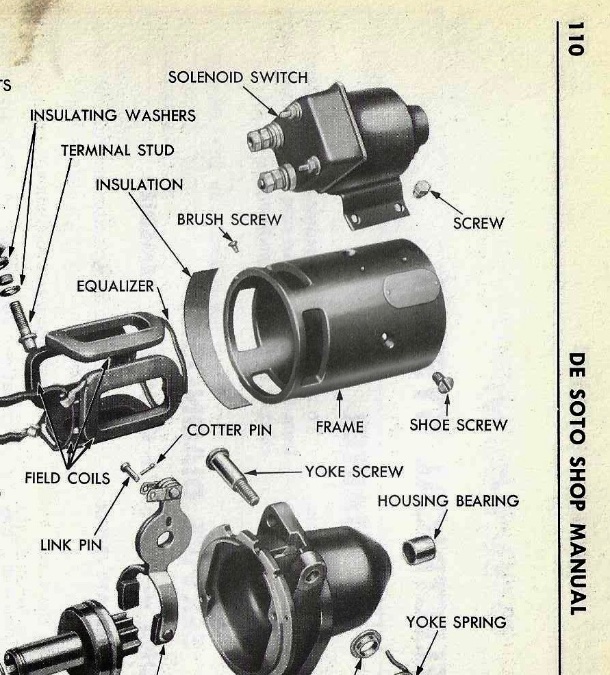
That's what I thought and that's the way I always connected it in the past. But after they rebuilt my solenoid switch, I connected the remote starter swtich as you say and got short circuited! The wires got smokin hot and no cranking! Did you see the blowup of the solenoid above. It contradicts the wiring diagram with the solenoid switch on the upper left. And that's how my solenoid was rebuilt with the switch terminal on the left.
-
As you know from my previous post on my starter, when i installed it and connected the remote start switch to the upper right terminal, the wires on my remote start switch got hot and the starter didn't crank. When I took it in the electric shop, they said I was connecting the switch to ground! But it always worked before when I connected it there! And I just checked the shop manual covering 46-50 DeSoto and it shows the push button start switch connecting there. Check my video of the blown up wiring diagram that I made. But on the blow up of the starter in the manual, it shows the upper left terminal on the solenoid as being the solenoid switch. The wiring diagram shows that terminal going to generator! Did DeSoto change the solenoid wiring during production of the S-11?

-
The shop manual has a schematic of the wiring diagram that will tell you where the wire comes from. On my 48 DeSoto, the glove box light wire goes back to the instrument light switch, which goes to the headlight/ tailight light switch.
-
Major brain fart! Grounding was NOT the problem. I could swear on a stack of Bibles that when I connected the remote starter switch to the solenoid before, I connected it to the upper outer terminal, not the inside terminal closer to the block. I took the starter in to the shop today and asked them if the specialist might have rebuilt my solenoid for a negative ground car. I showed them where I connected my starter switch and he said "that's ground". He said "you connect it here" pointing to the upper inner terminal. He asked if I would like to see it run on the bench, and I said yes. So we went to the bench where my starter ran like a top! I said how I really feel dumb right now, and they said better you than us! Now the starter is installed in my chassis and is cranking as fast as any 12 volt starter I know of. The blow up of the starter that I included here clearly shows where the solenoid switch is, right where they said it was!
-
No I didn't. I don't know enough about starters to mess with it. I called the shop and they said that the starter should be grounded with the bolts that hold it to the bell housing. I will know more about tomorrow I hope.
