Desotodav
-
Posts
1,912 -
Joined
-
Last visited
-
Days Won
14
Content Type
Links Directory
Profiles
Articles
Forums
Downloads
Store
Gallery
Blogs
Events
Classifieds
Everything posted by Desotodav
-

Looking for 1953 b4b hood latch handles
Desotodav replied to MMcKinney's topic in Mopar Flathead Truck Forum
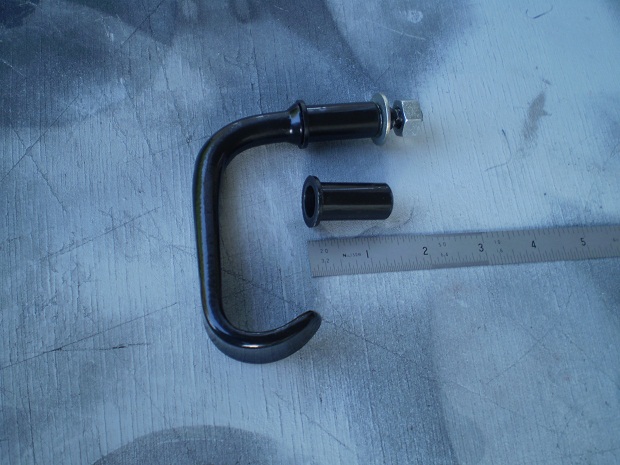
I find that most of the hood latch handles that I come across have rusted pretty well around where the handle goes through the hole in the side of the hood. I installed both of my handles and adjusted the hood lock-down mechanism on my truck yesterday. I used small plastic sleeves mounted over the handle where it goes through the side of the hood. I am hoping that the copper anti-seize compound that I have used (on the powder-coated handles) will prevent further rust. I found that the sleeves also eliminated the play usually found in the area between the handle and the hole in the hood. The photo attached shows a sleeve fitted to the handle, as well as one not fitted. The sleeve when fitted is not very noticeable - even to the trained eye! Desotodav
-
Dan, You should have an inner and an outer trim piece and a piece of 'T' rubber. I hope this helps... Desotodav


-
Bob, It's a pity that you are not a little closer to me here in Oz as I ordered a few extra T200's from Andy B the last time I got parts from him. Did you get the usual "we're out of stock, call us back in about 3 months" comment? I'll probably source parts from over there elsewhere now. Desotodav
-
Thanks Ed. Seems to be what we had over here. I'll install it today. Desotodav
-
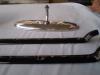
I scrolled through this post reading with great interest as I am about to install the inside factory mirror in my truck. I was fortunate enough to come across a truck with a factory mirror installed. I found that the factory mirrors were hard to come by in the Oz trucks that I have seen, so I was more than willing to agree to the terms of the transfer of ownership of the vehicle - just in order to secure that mirror and post! I also stumbled across a factory mirror in better condition than the one that I already had, and I think that it polished up quite nicely. My questions are: as the factory mirrors that I have are curved on one side and flat on the other, does the curve in the mirror go to the top or bottom? and... the arm attaching the mirror to the windscreen inner centre post is curved, does the curve in the arm go down or up? Desotodav
-
Butch, I thought that you might have just forgot to add it. Just copy it from the site search box at the top of the screen when you're in looking at the item and then paste it onto your post. Desotodav
-
Dave, I'm not quite sure which panel you are talking about. Can you post a picture of what you have so that I (and others) may be able to help you? Desotodav
-
There's probably someone here already bidding, but here's the link for those interested...http://cgi.ebay.com/ebaymotors/RARE-1948-T0-1956-DODGE-TRUCK-BUMPER-GUARDS-/110739947784?pt=Motors_Car_Truck_Parts_Accessories&hash=item19c89d8108#ht_500wt_1182 Desotodav
-
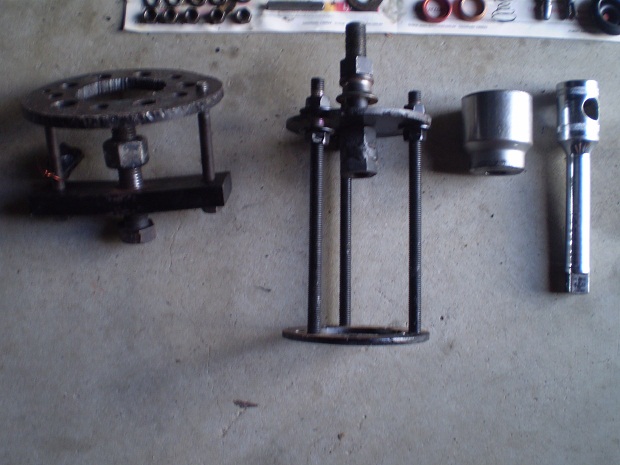
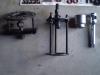
Ahhh, the memories... I used a few home-made tools for my inner bearing and rear brake job. I found that a good size socket with a short extension bar was just the tool to tap the inner bearing in with. All is now well again! Desotodav

-
I just added my truck to the registry too - # 35 for me. Desotodav
-
I have spoken with numerous older car enthusiasts here and have been told stories of using shellac flakes (bugs wings) mixed with methylated spirits to provide a long-lasting sealant to gas tank corks for sender units. It sounds like one of those old farm tales, but it would appear that it was a common practice in the old days and was proven to work. Desotodav
-
Welcome aboard Chris from one of the Oz members. You have certainly come to the right place! Desotodav
-
Looks like the lip on the end just goes down over the edge of the tank Merle - maybe to hold the piece in place? (see post # 9 for picture). Strange looking part though! Desotodav
-
Good job, thanks 49D. Desotodav
-
I saw your photo earlier in the thread about your inner guard spring Mark. I thought that I'd throw the idea out there for comment and see what we got back. I have a suspicion that the springs were possibly factory installed because I have come across a few of them on the trucks that I have had or seen. I am happy with the one fitted to my 51 truck, and I think Hank was going to try and hook his up the same. I haven't got a reply on the pedal return springs yet. The spring maker said that they were factory wound, but he will have a think about them and come up with something. He is quite talented at what he does. I just had him make up some springs for Richard's 47 Deluxe seat rails - oh by the way Richard they were sent a few days ago. I will get back to all down the track if I have any luck on the pedal return springs. I would love to have them installed on my truck too. Desotodav
-
Thanks GTK. The car pedals are smaller than the truck ones aren't they? I'll give it a go after the next few major hurdles are completed. Desotodav
-
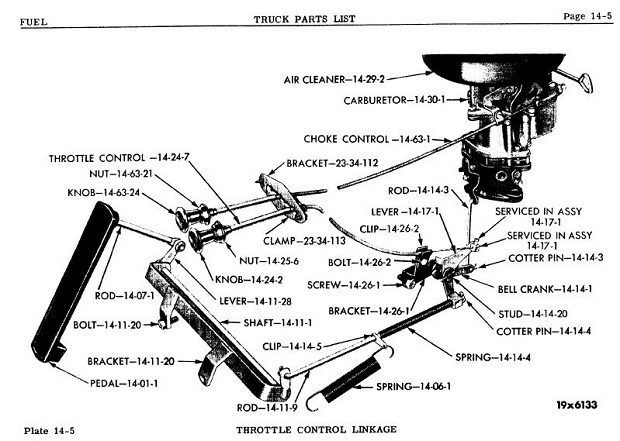
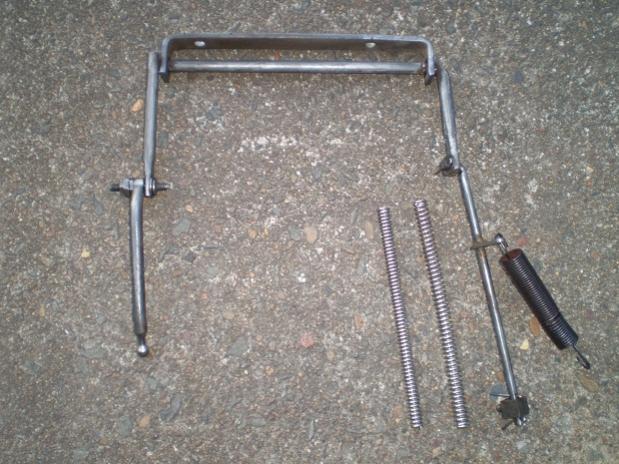
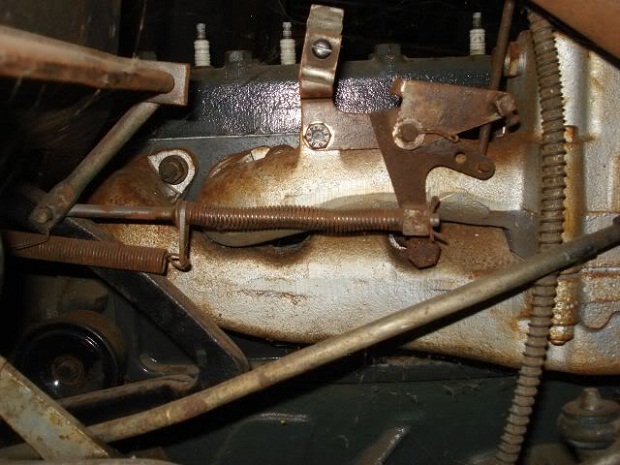
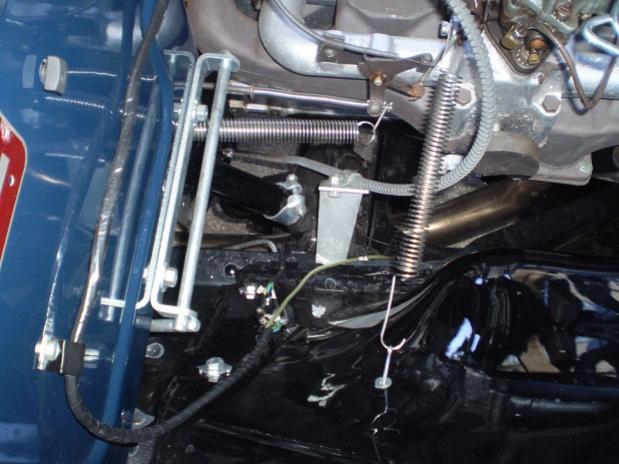
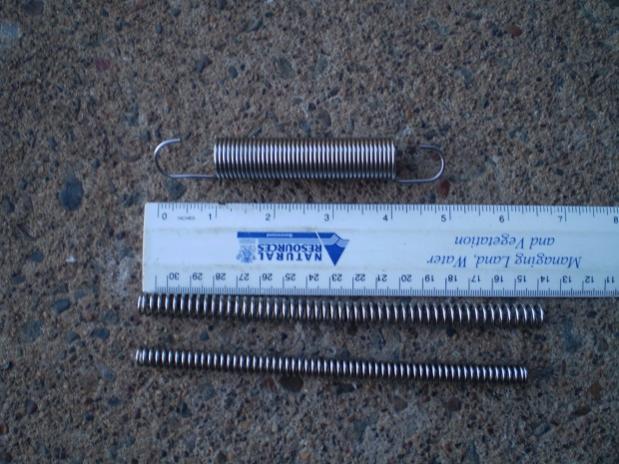
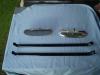
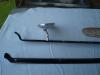
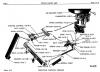
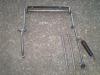
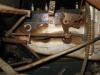
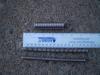
Apologies for the delays - work has had the better of me lately! I have finally managed to get a batch of stainless steel throttle linkage springs together which I plan on sending over to Hank within the next week. The springs are made from stainless steel and are as close to original as I could have them done. I have attached a few pictures to try and explain things to the best of my knowledge. The springs are labelled 14-06-1 and 14-14-4 from the workshop manual diagram . The 14-06-01 spring can be better seen in the 3rd attached photo that Tony posted earlier on this thread. My truck set-up shown in the 4th attached photo has the 'clip' 14-14-5 set to the rear of the 'cotter pin' 14-14-4 for some reason (although I have seen other trucks like this). I have had springs made for both set-ups, but would imagine that most trucks would be similar to Tony's. I found that the 14-14-4 springs came in 2 different diameters (0.380 and 0.440). The wire gauge seems slightly thicker on the one with the larger diameter too. I had a supply of both diameters made - but those requiring these springs will need to specify the diameter of this spring to Hank when ordering them. I am yet to find a solution to the spring that mounts from the throttle linkage to the inner guard as I have not been able to establish what an original (if there was such a thing) one looked like. The inner guard spring installed on my truck seen in the 4th attached photo is very similar to the 14-06-1 spring - I have just had the spring arms lengthened so that the spring entire length is about 7 inches. I have bent the legs of a split pin and used a couple of washers when inserting the split pin through an existing hole in the inner guard. I can have others of this spring made up quickly if this style meets with approval from others here. I have discussed the supply of springs with Hank over numerous emails and he has agreed to distribute the springs for those requiring them in his part of the world. I would be pleased to distribute them to any of our Oz members. We had considered offering them as a package, but this would depend on requirements and there would be no issues selling them individually. It is difficult to establish cost of these springs until the cost of freight is known. Hank and I will sort something out once he has the springs - but the prices won't be exorbitant. I would appreciate any feedback with regard to these springs. I believe that they would not greatly differ between trucks and cars. I am happy to help out members with other stainless steel springs as required. My spring maker generally works with rounded spring wire. I have not been successful with having him work with flat wires (yet!!!). I have found that freight costs are pricey between Oz and USA, but this varies with the quantity and the weight of the items sent. I am open to suggestion if anyone knows of a cheaper alternative to Australia Post freight. Desotodav

-
Let me know when you work it out too Mark. I bought mine from Andy B sometime ago but haven't been game to try and fit them yet. I'm thinking of just slicing them with a knife and then gluing them after fitting. Desotodav
-
Mark, I have a supply of the throttle linkage springs. I will arrange a post over the weekend to advise progress and gauge interest. I have spoken with Hank about them recently and should be sending a quantity of each to him soon for distribution. I haven't been successful on the making of stainless steel clutch/brake pedal return springs or the door escutcheon springs yet though. Desotodav
-
Good job gents. I'm thinking of pulling my transmission out again, but I'll probably just make a gasket to suit whilst it's out. I seem to have a small amount of fluid leaking from the countershaft hole at the front of the case, and the other leak appears to be from the retainer area. From memory, the retainer had a rubber seal ring on the inside of it and mine appeared to have a break in it. Desotodav
-
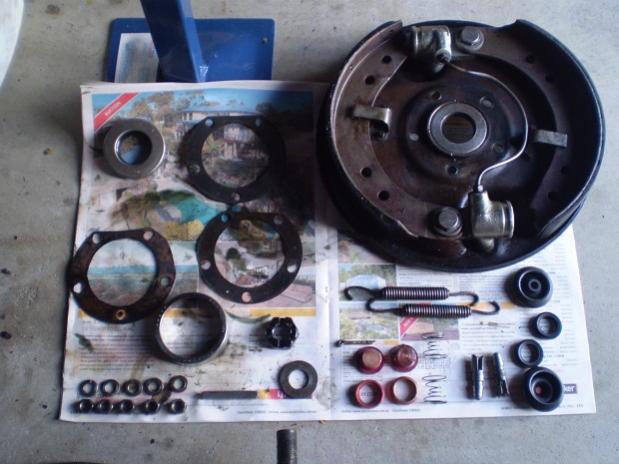
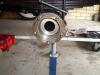
I know what you've got ahead of you all too well Mike - I just finished installing my inner seal on my 1/2 ton yesterday. Be sure to clean out the breather on top of your axle while you are messing around under your truck. That seems to have been recommended a few times on past threads. Have fun! Desotodav
-
The rivets that hold the speedo and instrument bezels on are called eyelets. I would imagine that they are available in your part of the world too. I picked up a pack of 20 (or so) from the local sewing supply shop for about $2. They were stainless steel and a perfect match for the original ones. The pack came with the little tool required to crimp the eyelet too. I can't show you any good photos as my speedo gauge (and pack of eyelets) is still down the shop having the indicator warning light installed. Take my word for it though, you'd have to look really hard to see that they're not the original thing. I also used them when installing the screws into the vent window channel rubber to prevent over-tightening of the screws. My original vent window rubbers that I removed seemed to have them installed - more as a 'sleeve' than an eyelet though. I'll send pics when I get my speedo back soon. Desotodav
-
Roger, looks like a handle that you're after for sale on Ebay in amongst these Chrysler handles. They're even in your neighbourhood too.... http://www.ebay.com.au/itm/VINTAGE-CHRYSLER-DODGE-DESOTO-PLYMOUTH-DOOR-HANDLES-7-/300591198440?pt=AU_Car_Parts_Accessories&hash=item45fca1b0e8#ht_500wt_1156 Desotodav
-
Welcome to the forum from one of the Oz member's. You have certainly come to the right place for the information that you require. Be sure to post a couple of pictures of your vehicle and tell us what you're up to. Desotodav
-
All this talk of transmission leaks has caused me to revisit my minor transmission leak again. I was visiting an Engineer mate yesterday and he raised an interesting point. He has recently used his lathe to cut a slot at either end of the transmission 'countershaft' (21-24-2) in order to insert rubber 'O' rings at either end to prevent leakage. I presently have a transmission leak from the point at the front of the transmission where the countershaft mounts into the hole at the lower front of the 'case' (21-03-1). 'O' rings which could be positioned at either end of the countershaft to press against the inside edge of the case would prevent any possibility of oil leakage from this area. It's a pity that I hadn't talked him at the stage that I was rebuilding my 51 truck gearbox, but maybe I'll consider this option for building my 55 truck. Just a thought for those out there who are experiencing a similar problem! Desotodav