DJ194950
-
Posts
3,789 -
Joined
-
Last visited
-
Days Won
3
Content Type
Links Directory
Profiles
Articles
Forums
Downloads
Store
Gallery
Blogs
Events
Everything posted by DJ194950
-

Having SERIOUS Trouble getting truck to start!!!!!
DJ194950 replied to fortunateson's topic in Mopar Flathead Truck Forum
My suggestion for checking timing chain gears/chains will Not tell if it has skipped a tooth(s) or not! Just slack. Ed I agree that even with a worn chain/gears and even compression in the 50's and up will Not prevent a flat 6 Mopar motor from running. My thought posted was to stop him from taking the front cover off to check this wear as others suggested. If there is a lot of Slop then he can decide before tearing into the engine. I kind of doubt that the steel gears and chain has skipped a gear also. DJ -
Tks, Keven, DJ
-
Buyer beware for sure, tks for the link Tod
-
Can you guys gave an Idea of the price for a stock type update repairs and maybe an updated (fm stereo and such) ? A friend is very good at electronic repair and such and i'm hoping he may be able to make a few bucks as he's disabled. He's thinking it is a lot or work for a small return. I've offered my stock 50Ply. radio to check it out and prices of replacement parts, but he's still skeptical. Just askin' Thanks DJ
-
Having SERIOUS Trouble getting truck to start!!!!!
DJ194950 replied to fortunateson's topic in Mopar Flathead Truck Forum
Thought it may be time to throw in an easy check for timing gear/chain wear. Turn engine over with the dist. cap off but rotor on until it just moves the rotor, then turn motor over the opposite direction. the motor Should turn over just slightly only before the rotor moves in the opposite direction with it. An easy way the check wear. If moves much more it's time to replace the gears and chain. I've seen some move and inch and more on the pulley. Good luck, DJ -
Just saw this in a 2011 (feb.) a friend gave me to read.1948 Plymouth Business Coupe - Rod & Custom Magazine.htm Seems that it may not have worked-sorry. Anyway anyone still wanting to see it search rodandcustom. Then in their site / February 2011 1948 plymouth
-
Linus- nothing to it. 10-12K in repo parts- like new! My buddy spent 10k for a nice 55 Chev and now has 22k in it. A nice driver, but still needs new paint. Interior OK, newer but not anything show! If it's what you want no price that's affordable is to much! Just ask most Mopar owners. It's not the resale price. Enjoy! DJ
-
Joe on my 50 w/OD trans I could Not use a bottle even with a tapered top-could not raise it up high enough to put much oil in. Low clearance of floor to trans tunnel I guess the p-15's must have more room. Borrowed a pump from a friend that came on a gal. bottle of 90wt. for rear ends to put the oil in my OD (i used gl-5 from a Qt. container). Does not even have to match the thread size as they have a hose to go into the container-just a bit more work if it does not really fit. Borrow or buy one, makes it easier to fill the 3rd. member also. DJ
-
I kinda like it but it needs duals on the back! DJ
-
Joe that can be done-keeping it in OD all the time, but you will need to take the governor out of the electric circuit. Easily done -no problem, but somehow I'm feeling you Jest! DJ
-
James, sorry no pics. I lucked into buying 2 OD trans at the same time for about the Cheap price of 1. 1 had the shifter arms the other not. The seller bought both at a garage/moving sale that this seller seemed to not be sure of what he had according to the man I bought them from. He did not know of origins either but knew the were earlier sought after Mopar OD's. He thought he was going to put one in his 50 Dodge truck. After some years realized that he was not going to do it as he was trying to downsize. I sold the rebuilt OD with the arms different from my original 3 spd. to a guy in N.C. Just looking saw that the one set of arms were different from what was on my 50 Ply.trans, so I just used the originals. Dodgeb4ya thanks for the info. Not sure Joe can see the described PT (if there) and #'s , as the 49-50 trans tunnel is Tight to side of the trans case as Joe has mentioned. Maybe a light and mirror? DJ
-
Never suggested using an old race with new bearings I Thought. Believe that he said he had New nos races and was only needing new bearings to match. Myself I'd certainly want to use a quality brand of new bearings And races in a set myself. Would never ever use new with old! I'm confused? Maybe! DJ
-
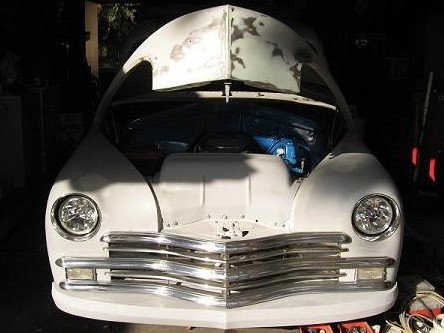
Prepping the 'ol girl for a new dress (painting the '48 Windsor)
DJ194950 replied to White Spyder's topic in P15-D24 Forum
Used that product several times, sprays and sands well. The one drawback vs. a 2 part hardened primer is that this will easily chip will a big buildup of the primer at edges. As long as your aware. DJ -
I'd use the set especially if of unknown origin. Why not get the #'s off the old bearings and go to your local bearing store, there seems to be some almost everywhere. Buy some bearings only of known origin and you should have No problems using your nos parts. These #'s almost always cross to something used in many apps. Bearing are the one of very few that can be easily crossed over! Made an assumption you were referring to bearing Races. If your talking about something else, disregard. Good luck, DJ
-
Thinking about it, I believe that I would Not pull the trans until I had hooked up and at least given the trans a good drive or two using the OD. That way maybe even if the main box needs some replacement parts in it, you may Not need to tear it the OD parts themselves. You still will need to do Some things with the OD to separate the main 3 spd. box and the OD unit but not dig into the OD part itself deeply! Will save a big part of the OD trans education. Hope all goes in your way! DJ
-
The older cars without a synchronized first quite often have a problem getting in to reverse with out first getting into first gear. Mine the same way, just got used to seldom going into reverse with out first. Just always do it now first/then/reverse without even thinking about it. The popping out of second gear I hope is now OK after readjustment of the shifter. If not the trans will need internal work on the synchro gear and blocker blocks(3) and expander ring. Usually all are in one kit. All assuming that your trans is not of the later pin type synchro Sure hope it's not needed. You really don't want an education on an OD trans dis-assembly if you can avoid it! DJ
-
Lot's of added sugars, and used hot animal grease to cook in a small building.
-
Paul, you still seeing dots before your eyes? Are they always blue? NSA? What you been looking at on the net? Suggest trying a different search engine to get to the site and see if the same. Just a thought, as you know that I'm computer retarded ! DJ
-
I had to do some bending adjustments along with tweaking the threaded adjustments to get my Used OD trans to shift properly, took me several days and a lot of trys. Did you use the shifter arms from the old trans? Had to change to my old ones plus all the other adjustments. Just for info, if still problems, do you still have the original 3 spd. trans? Not going to suggest you to put it back in, So don't worry! You're on the right track, Best of luck, DJ
-
Back a year or so ago when I bought my Champion 3 row rad. off ebay there was both 2 row and 3 row avail. for most Plymouth's. Just mentioning to make sure that you ask for and get whichever you may desire. DJ
-
Found these flashers with at least and audible click- Bussman # 535 6. volt 3 prong Amazon price 4-6 bucks- Summit Racing $6. Bussman # 550 12 volt. 3 prong didn't look for pricing. Audible beep- 6 v. avail. from Chevrolet of the 40's -But it's $34 !! DJ
-
Way too sad! Loved his work. Seems that the best have demons that they can't seem to shake. DJ
-
They (the brackets) bend Very easily. Just put a pull or c-clamp and pull together and use an long punch to align the bolt hole.! Done. I Hope! DJ
-
There should be and turn signal indicator green light just to the left of the red hi beam indicator on the dash above the speedo. According the 49-50 wiring diagram it should have a white wire from the "p" terminal of the flasher to the bulb. Ground? Bulb? wiring? It will flash green when turning left or right with the turn unit is on. Kind of diff. as no left/right difference, but you will get used to it. At least a reminder when you forget the turn signal on! DJ
-
Copied from 49 Ply. parts book-No spacers. DJ