Merle Coggins
-
Posts
9,390 -
Joined
-
Last visited
-
Days Won
87
Everything posted by Merle Coggins
-
Success, Todd That looks familure. Where's the trailer? Merle
-
There are two ways to post pictures. One way is to use the "Insert Image" button at the top of the text box where you type in your message. It is a small yellow square with a little picture of a mountain in it. This only works, though, if you have the picture stored on another web site. (I use Photobucket.com) The other way uses the "Manage Attachements" down below the text box. If you scroll down below the text box to the area titled "Additional Options" you will find the "Manage Attachments". This will open up another small window that lets you browse your computer files and attach picture files directly from your computer. It doesn't like large files, however. If your file is over 100KB you may need to resize it with a photoshop type software first. Good luck, Merle
-

Where does the oil fliter go on the 230 engine?
Merle Coggins replied to 47heaven's topic in P15-D24 Forum
That looks like the desposable canister type. From what I've heard/read these are no longer available. Merle -
Spin on/off full flow oil filters- The question is-Finer
Merle Coggins replied to Lou Earle's topic in P15-D24 Forum
Yes, by-pass oil filters do filter finer. In general, from what I've read, a full flow filters run in the 20-30 micron range, whereas a bypass filter could be down around the 10 micron range or lower. (smaller micron # = smaller particles) As for comparing different filter brands, check this site http://people.msoe.edu/~yoderw/oilfilterstudy/oilfilterstudy.html Merle -
Yes. Red = Positive Black = Negative Doesn't matter how it's connected to the vehicle unless you're not connecting directly to the battery. If, for example, you are connecting to the starter cable at the starter, connect the Black lead to the cable terminal and the Red lead to the chassis. But it sounds like you're connecting to the battery, so Red to positive and Black to negitave like normal. Merle
-
Where does the oil fliter go on the 230 engine?
Merle Coggins replied to 47heaven's topic in P15-D24 Forum
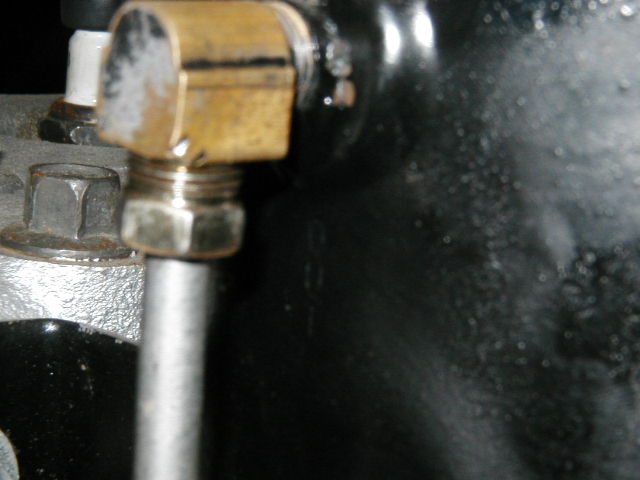
I guess it depends on what filter you have. After reading the posts I thought I had mine backwards, but I copied a picture I took of one of Todd B's trucks. (some of you may remember Todd. He was active on the old forum and has a 2Ton Pilot House with a cabin camper on it). I went out and looked again at my filter and just below the upper fitting is stamped "OUT". This would indicate that I got it correct. I've attached a pic of a close up of my filter canister, hopefully you can make out the lettering, and a couple of the pics from Todd's truck. Merle
-
I used pipe dope (pipe thread sealant) when I assembled my engine. So far so good. Merle
-
Where does the oil fliter go on the 230 engine?
Merle Coggins replied to 47heaven's topic in P15-D24 Forum
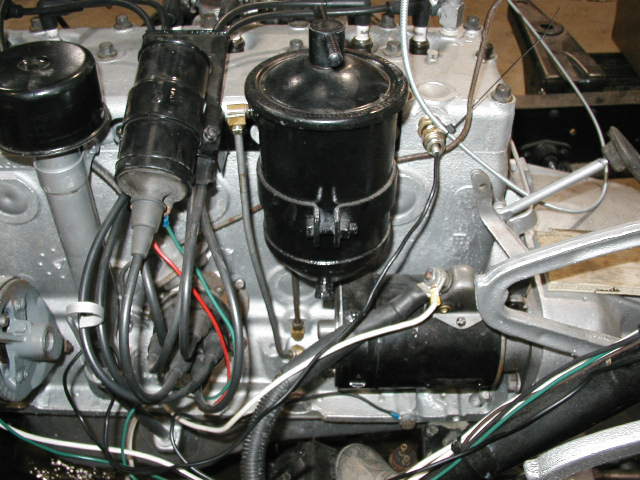
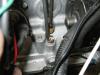
When I got my truck it didn't have an oil filter either. I found one on ebay, listed for late 40's - early 50's Dodge Truck. I bought it and when I got it and opened it up it looked like it was packed full of grease, but it was sludge. I feel sorry for the engine it came off of. It didn't even have the correct filter element in it. Anyway, after some cleaning, painting, and help from here, I got it mounted and a new filter installed. Here are a couple of pics of it. It is a Deluxe (name brand) filter and specifies a Deluxe JC filter cartridge, which crosses to a NAPA 1011. Merle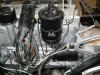
-
Nothin' like a little Skynyrd to get things rollin' Cool video. Merle
-
You've got a lot of work cut out for you, but it looks like you may have a few spare parts already. Steve may be right about the dash, but it's hard to tell. Do you have any better pics of the interier? The front clip is 48-50, including the hood. It has the notch for the upper stainless piece. It looks like your spare hood panels are the same way. I've never noticed any differences with the doors between 48-50 and 51-53, I always thought they were the same, but I won't argue the point. If you take a wire brush to the side of the frame just above and slightly forward of the left front wheel, you should find the serial number. Then go to http://www.t137.com/registry/help/decode.php and type on your serial #. It will tell you what year it actually is. It's possible that someone changed the front clip with an earlier version sue to a wreck, or it could have been a newer version cab replacement onto an earlier chassis. As for what to do first... Take lots of pictures, label parts as you dissassemble. Using freezer bags to keep the hardware works great. You can write on the bags with a Sharpie to remind you what the bolts are for. I also highly recommend this book Good luck, and welcome aboard. Merle
-
Welcome Jerry, I'm guessing you've already figured out that there are is a great bunch of guys here with an abundance of knowledge. By the way, you've got a nice looking ride.
-
Well I guess this still doesn't answer your question then, does it.
-
You're close. But actually it is exactly the same as what I refered to. Whether it's a series 12v or 24v system, you are doing the same thing. Using your analogy, "inner battery has the more constant draw servicing the needs of the car and the outer battery is servicing the accesories", actually both batteries have to work together to make 12 volts but one of the batteries is also called on for the 6 volt system. So this battery is doing double duty and the charging system charges accordingly which overcharges the other battery. If you are dead set on using this type of system, I would recommend a Bettery Equalizer. These are designed for this use and will keep the batteries charged equally. I'm not sure where to get one for 6/12v systems, but I have seen them for 12/24v systems.
-
Look again Dave. There is a center divider bar. And in the upper corner of the passenger side glass is written "1950 Dodge" Also looks like "For Sale" with something else in the rear window. And who was asking a while back about clip on mirrors for the trucks? It has one on the drivers door.
-
As Dutch said, the B1's ('48 & '49) are nearly fully interchangable with your B2 ('50). Even between 1/2 and 3/4 ton trucks there are many interchangable parts. The only major differences are a longer wheel base, smaller rims, larger front brakes, and heavier springs on the 3/4 ton. The B3's ('51 & '52) have a different nose and hood, and the dash is different. Other than that I believe everything else would be interchangable. The B4 ('53) had a minor change with the bed and rear fenders, but otherwise they are the same as the B2's. I highly reccommend this book. It is very informative about the Pilot-House trucks and the changes throughout the years. Merle
-
I remember seeing that one a while ago too. I thought it fit and looked good.
-
Restricting the air flow to the tool will reduce it's effective torque. That's how most torque regulators work that are built into the impact gun. Also, if you can't find the correct torque for you lug nuts, you can always use German Torque... Get them Geuttentiet
-
As far as I know, the front and rear axles are the same, but as you say the 3/4 ton would have 11" front drums instead of the 10" on a 1/2 ton. Also the 3/4 ton trucks used 15" wheels and the 1/2 ton used 16" wheels. I don't see any reason why you couldn't keep the 11" brakes up front. I'm not sure about your spring question. I think the only difference would be more springs on the 3/4 ton. As for your trans swap... I won't make any difference on final gear ratios. Top gear of both transmissions will be 1:1. What the 4 speed will give you is a stump pulling low gear. Other than that, the 3/4 ton chassis is longer. The 3/4 ton used a 116" wheel base and the 1/2 ton was 108" It should be a good parts truck for your project. Are there any good parts on that truck that you don't need? Merle
-
It would work, but you'll have charging problems with the batteries. The battery that's not connected to your accessories will get overcharged, reducing it's life. I've seen it happen many times on 24v systems (2-12v batteries) where they run a radio off of one battery. Just my opinion from experience, Merle
-
Merry Christmas..(It's a Southern Thang OT)
Merle Coggins replied to Plymouthy Adams's topic in P15-D24 Forum
The City Brewing Co. of LaCrosse, WI used to be the home of G. Heileman Brewing and Old Style. When they moved out a few years ago some of the employees bought the plant and started up the City Brewing Co. I don't know the reason for Heileman pulling out of LaCrosse, but their headquarters appears to be in Milwaukee now. I think it's part of Pabst now. Merle -
Don't know how the vinegar would work with the electricity. The electrolytic method uses the electron flow to remove or convert the rust. The solution is only to facilitate electron transfer. I have tried it with success on some items. I used a plastic 5 gallon bucket and mixed a solution of water and Washing Soda, not Baking Soda. Use about 1 tablespoon of Washing Soda per gallon of water. Also you need to hook up the battery charger the correct way. Get it wrong and your parts get eaten away. I don't think it really matters what the voltage is, but I used my charger on the 12v setting. There's a good article on the Stovebolt web site about it. http://www.stovebolt.com/techtips/rust/electrolytic_derusting.htm I also saw an article there about using vinegar. I don't think I'd mix the two methods though. Merle
-
Higher resistance (larger ohm value) will consume less amperage and more voltage. This can all be calculated with simple math. The formula is V = I x R (Voltage = Amperage x Resistance) Don't ask why "I" represents Amperage. I used to know, but I can't remember right now. With a little algebra we can convert the formula to find the missing value. I = V / R or R = V / I or V = I x R If you measure the resistance of your gauge and your resistor (voltage reducer) you can determine what the voltage drops will be. (Assuming this is on a converted 12 volt system, you should use 14 volts for your calculations because that should be your charging voltage.) Add up the resistance values of your gauge and resistor. Now 14 divided by your total resistance will = the amperage draw of the circuit. Now take your calculated amperage and multiply that number by each resistance value to determine what the voltage drop will be across each resistance. Example; Your gauge measures 3 ohms of resistance Your voltage reducer (resistor) measures 4 ohms Total resistance = 7 ohms 14 / 7 = 2 amps 2 x 4 = 8 volt drop across the resistor 2 x 3 = 6 volt drop across the gauge 8 volt drop + 6 volt drop = 14 volts (a way to check your math) Does this help clear it up? Merle
-
Sounds like they're up to their eye balls in snow in Denver.
-
Same here. Dead page.
-
Brake lines 28/29 Plymouth – Need Help OT
Merle Coggins replied to Chester Brzostowski's topic in P15-D24 Forum
Hey, cheer up, will ya? Great find. Looks like just what you need. You'll have her back on the road in no time.