


JBNeal
-
Posts
7,236 -
Joined
-
Last visited
-
Days Won
82
Everything posted by JBNeal
-
one alternative is to remove the damper component and replace it with a simple flange gasket...if the damper is made from rubber that is period correct, it will be destroyed by the ethanol in today's gasoline, possibly sending rubber chunks into the carb. Replacing the damper with a simple flange gasket allows fuel to pass through the bowl without the damping effect...add a paper filter to the bowl, and you've converted this damper into a fuel filter housing. The flange gasket material should be something that can withstand that ethanol component in gasoline, more than likely fabricated from sheet material. The trick I've used is to put a thin film of light oil on the flange then set the flange on the material firmly rather than do a tracing on the material. I can then cut the sheet material carefully with a sharp knife or scissors
-
the original truck was up for sale for almost 2 yrs, and from all of the pictures I saw from the previous owner, the beast was *ahem* a good fixer-upper. It wasn't a total basket case, but it had been parked out by the road in north TX and it showed: surface rust inside & out, wiring shot, powertrain needed a complete overhaul...it really needs to be completely dismantled in order to get it respectable, more work & $$$ to get it highway-friendly. That's a long row to hoe when there's a buggy closer to the finish line, sittin' in the driveway, ready to go to Dairy Queen on a Saturday. I've got a few parts trucks that I don't have a For Sale sign posted, but when folks roll up to the house to ask what they can drive off with, I motion towards them and shoot them a number cuz they could be fixed up if somebody had the means & motive
-
additional information - rear fender comparison additional information - rear fender part number change For the B-4 and later models up into the 70s, the 1-ton stepsides had two rear fenders: the styled fenders used on single wheel 1-tons, and the half-rounds with extensions used on duallies. I have seen the duallie step sides used on rural & small town fire trucks, but they are quite rare. As for the modified bed, who knows for sure what all changes were made to that beast, as its powertrain & suspension are far from original. My guess is that tailgate & bulkhead were yanked off a newer (wider) truck at a pick&pull yard and bolted to the older bedsides, with the bed supports & fenders modified to fit.
-
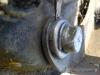
this damper device looks similar to the fuel filter bowl, but that diaphragm has me a little stumped. Why would this flow damping be needed? Maybe it was used in rough terrain areas to keep fuel from sloshing into the carb chamber which could lead to flooding, my best guess. At any rate, I have seen different styles of fuel filter bowl assemblies from Carter, AC, Fram, etc. attached to the carb, some with no filter, some with a replaceable paper element, some with a permanent stone element. I'm not too crazy about the stone elements because I've tried to clean a few and it's very easy to erode the stone when trying to scrub varnish from the surface, even after it has soaked in harsh chemicals for days. The paper elements have new rubber gaskets for the bowl, and I've monitored these paper elements on the '48 to watch for what kind of foreign elements that they collect. Since the sediment bowl on the fuel pump separates the heavier materials from the fuel, the much lighter elements collect on the paper that appear to be varnish-like. My guess here is that after prolonged periods of non-use, the fuel in the lines starts to gum up a little, and the fresh gasoline (now with ethanol!) has a tendency to flush the lines when the truck is in use. This gummy brown gunk gets caught in the paper filter before it has a chance to collect in the fine passages of the carburetor, which I assume is why I haven't needed to tear the carb apart and clean it thoroughly in the past 4 years. One option I have seen is to remove the fuel filter bowl assembly from the carburetor and place the fuel filter element in the sediment bowl of the fuel pump. Later engines would have a mechanical fuel pump that had no sediment bowl and a downstream filter element to catch all foreign material, and by moving the element to the sed.bowl mimics this later reduction of parts. My only question is finding the correct adapter at the carburetor to the fuel line, as the fitting between the carb & fuel filter housing typically contains the needle valve that works with the carb float to control fuel delivery. The fuel filter elements that I have used are the Wix 33034 for the smaller glass bowls and the Wix 33943 for the larger glass bowls. There are probably other elements available, but they should all fit to the glass bowl being used.
-
I've had a local shop make the exhaust from manifold to tailpipe and only had issue with the mufflers. The locals don't carry, nor could they find the original style from their sources, the straight-thru inlet/outlet muffler, so I went with the center inlet/offset outlet cylinder-style muffler they could get. It looks great when I'm rolling down the road, so I live with it...eventually, I'll go for the straight-thru muffler, if I can find one. Anyhow, I went with the locals cuz Robert's, etc. was about $100 more cuz of the shipping costs. To get the tailpipe right if'n ya don't have a pattern to go by, buying one from a supplier is probably the way to go. But the manifold to muffler is an easy bend & flange that a local shop can make for a reasonable price, if they have the same material that the tailpipe is made from.
-
some exploded views are found in the shop manual, but more are found in the parts manual and are helpful in repairs. I've already buttoned up the parts trucks as the weather is about to change again, but according to the parts book, the 1/2 & 1-tons have different washers, spacers & horseshoe clips, with the 1-ton's 11" drums having larger sized parts.
-
Dodge was playing with the idea of a "lifestyle truck" as a replacement for the Dakota before the economy tanked...kinda liked that term and the Rampage concept truck the rolled out. Anyhow, another option with the fuel tank is to check out that Tanks Inc. unit, I've heard good things about it. That way you can install it in the original location & reclaim the spot for the spare tire. As for the wiring, I replaced the entire wiring on my '48 cuz the insulation was falling off of the conductors. With the factory wiring diagram, you can replace each wire with hardware store conductors. I scratched out a modified wiring diagram that includes a relay to improve headlight performance.
-
The B-4 shop manual may be helpful, but I recommend getting your hands on a B-1 shop manual hard copy to flip through. I picked a reproduction up years ago, and made copies of specific pages that had instructions and/or diagrams that I would need to consult while working on the machine so that I could dirty up the copies & not the book. As for the assembly of the brake shoe, from the manual diagram it shows the brake shoe rides on the pivot bolt against the spacer on the backing plate, with the felt washer against the shoe, the metal cap over the felt, and the horseshoe clip in the pivot bolt groove over the metal cap. From the service section, I reckon there's mention of using light oil on the washers to keep the pivots lubricated when the shoes are to be adjusted every 10,000 miles.
-
The parts book shows different part numbers for 1/2, 3/4 & 1-ton front wheel cylinders for different years, but this was printed in '53. I pulled the drums off of the 1/2 & 1-ton parts trucks by the house, and other than the 10" drums & shoes on the 1/2 ton and the 11" drums & shoes on the 1-ton, the wheel cylinders & hardware look the same. The parts book also shows the same master cylinder used on 1/2, 3/4 & 1-tons for '48-'53. NAPA has only a listing for the '53, and 1/2, 3/4 & 1-tons use similar wheel cylinders. Rock Auto has a few more listings, and it looks like they are listing the same front wheel cylinders for 1/2, 3/4 & 1-tons, '48-'53. Looking back in the parts book, it appears they went from the step bore to the straight bore in late '52.
-

1970s-80s Book About Guy Restoring Pilot House Pick-up
JBNeal replied to Ralph Pearce's topic in Mopar Flathead Truck Forum
Finally finished this book this morning during a rain delay...I empathized with the narrative's salty language, high expectations and distractions from the task at hand. It's a good read for the Pilot House trucker, kinda wonder what happened with that ol' beater since it was 'fixed up' about 40 yrs ago, the serial number reported is not listed on the registry yet... -
FWIW: the 02 Ram CTD has an asphaltic sheet material on the firewall, a heavy rubber-backed carpet with a durable vinyl in the foot areas, a light carpet-like material on the back wall, and the foam-backed headliner. Rust-O-Leum has the bed liner in a can that I've heard is a good alternative in the floor area to the bituthane, but it's probably a li'l tricky at the battery lid, fuel tank sending unit access, filler neck opening, etc. Then a decent floormat can be laid over that for a good trim job. I did a search using "firewall pad" and remembered that the Quiet Ride firewall pad has gotten high marks from users as it is tougher than the cardboard firewall pads.
-
have ya tried to clip an old wheel weight & hammer it into the pits as a gasket filler?
-
sounds like somebody started working on it, then gave up; engine does not sound to be original and it may be shot...shoot 1500 at'm and see if that'll get the ball rollin'
-
FWIW: on cold flatheads (especially in temps below 50F), full choke, 1/4 throttle, stomp the gas 2x, crank the starter; upon engine fire, reduce choke to 1/4 and have throttle just cracked open to get idle rpm to about 1000 until the thermostat opens, then reduce choke to 0. In electronic fuel injection systems, the cold engine is in open loop mode, requiring a more rich fuel mixture to optimize power. Once the engine has warmed up, further engine re-fires shouldn't require choke and little to no throttle input, depending on ambient temperature. From what I've seen, automatic choke operates off of engine manifold heat, an early form of open loop engine controls. One of the driving instructions I was given by Dad was to drive the truck with the 1/4 choke when it was cold. Without 1/4 choke, the truck will idle fine, but stumble upon acceleration. With the increased rpm & 1/4 choke, the engine will warm up faster. Consulting the shop manual, there are different carb settings that will control the stroke of the accelerator pump lever, allowing for more fuel delivery with the winter setting. With the winter setting, maybe not so much throttle is required at cold startup. I might try that someday...without a heater in the truck, I'm not too motivated to drive the beasts when it drops below 40, so I'm on the intermediate setting year round
-
What is best way to refinish dash knobs?
JBNeal replied to BobB's topic in Mopar Flathead Truck Forum
haven't tackled the knobs just yet, but have refurbished some Farmall stamped aluminum emblems with similar recessed lettering details and had gotten some advice from a fellow Red Power enthusiast. Painting the background, then waiting a few days to letter by paintbrush works depending on a steady hand, a good brush & paint, and a good wipe cloth that is slightly moistened with a lacquer thinner (preferably a cheaper, less aggressive brand from the chain stores & not the body shops) and won't track any lint. An alternative to lettering by brush is to mask over with a quality tape and use a sharp knife to stencil in place, but that can be tricky as tape has a tendency to curl up when ya least want it to, especially at sharp points like the letter K. Another alternative that I've only read about is to paint the letters first, wet sand the excess paint, then fill the recessed lettering with petroleum jelly or grease, cleaning off the excess with lacquer thinner, then painting the rest. That one sounds kinda tricky, especially on these control knobs, and might be prone to having paint too thin at the transition from the black to the white. For best results, as with most paint jobs, applying multiple thin coats results in a robust appearance -
The concept of the fuel injected turbocharged flathead 6 reminds me of something I had to learn before I earned my engineering degree. My design group was tasked to develop a fuel injection system that ran on LPG. What we found was that extensive program mapping was required for the fuel injection system under a variety of loading conditions, something we did not have time to do in one semester. But the thing that changed the project direction was calculations that showed that in order to keep the LPG flowing under certain high acceleration conditions, that the fuel injectors could not open & close fast enough in a very short amount of time. The lesson learned was that before installing hardware, be aware of any of its physical limitations. When it comes to maximizing bhp in the flathead 6, increasing induction is one part of the equation that has to be balanced with managing exhaust. With the increased bhp, how will this affect the lower end of the engine? Will lubrication need to be increased to the crankshaft & cam? Will the valves & head gasket be able to handle the increased pressures? I don't know the exact answers to these questions, but I do know that Chrysler only did so much with the flathead 6, so I reckon they had good reason to limit the output of these engines because they may have found problems in their test labs that pointed them in the direction of going with the eventual slant 6 (rather than the Hemi V6). Heavy duty Dodge trucks had flathead 6s with dual carbs & split exhausts; later flathead 6s had increased CRs & sgl 2-bbl carbs, with optional 180F & 195F thermostats available; a factory aluminum head was available for a few years; and there were variations of a PCV system available as dealer installed items. These upgrades are practically factory approved for today's flathead 6 owner. As several flathead 6 owners can testify, upgrading the transmission and/or rear axle can make that flathead 6 come alive
-
sometimes it's a train
-
had to catch the light at sunset before it got away...catching light at sunrise don't take much skill cuz it's a-comin' right at ya
-
ya might want to stick that rubber to the drawers, cuz it'll slide on ya over time unless it's super heavy & thick. Putting the heavier, larger items in the bottom drawers helps to keep the thing from tipping over. Organization & labeling is up to the user, I've never seen two toolboxes organized the same way, with the exception of small tools (mini screwdrivers, razor blades, spark plug gappers, pencils/chalk/paint pens, etc.) in the small drawer(s) on the top. If ya wanna go all Martha Stewart on them tools, get'm all cleaned up & shiny before ya put'm away...it's a good thing
-
truck picture B-1-B-108: headed up the road to catch the light at sunset...
-
the '48 has been running much better since cracking open the carb to unstick the moving parts, it even started in 20F weather a few weeks ago. So yesterday, I fired it up for a trip to the post office as temps were in the 40s. Who needs a heater when most of the firewall & floorboard insulation is gone, the heater is on all the time. Later, I loaded some lumber into it (and a frying pan with some hamburger grease) for a ride up the hill to use my Dad's carpentry tools (and let the dogs clean out the pan). I'll even take a ride in it today to blow some more of the leaves out it
-
truck picture B-1-B-108: during a sight-seeing tour, I made a stop at the rock pile...
-
another possibility could be the rear cab mounts might be busted...the doors on my '49 were sagging about an inch, then I noticed the back of the cab sheet metal was resting on the frame rails. When I pulled the seat out, the cracks in the cab were obvious as they radiated towards the door jambs & sills. Had to fab up temporary brace plates to fix the cab so the doors could operate without using some creative german phraseology. Eventually I followed the instructions in the shop manual and strategically placed a wood block between the door and door jamb to bend the doors/hinges into position...it took a few days for my shoulders to recover from that
-
if ya disconnect the tube from the carb, the carb now has a vacuum leak, causing the engine to run a tad lean. Any moisture and combustible fumes in the crankcase would then stay there until they could escape through the vented oil filler cap and/or the PCV valve (if it was open). additional information - PCV system operation
-
1970s-80s Book About Guy Restoring Pilot House Pick-up
JBNeal replied to Ralph Pearce's topic in Mopar Flathead Truck Forum
I can't remember exactly when I ordered my copy, probably around '99, but I distinctly remember ordering it cuz there was a Pilot House on the cover and was disappointed at receiving a copy with a chewed up Apache. I was so miffed I never bothered to crack it open, just put it on the shelf and forgot about it. Now that I've found it again, flipping thru the pages I see plenty of references to the Pilot House...reckon I ought'a give it a read now that I've grown up a li'l bit

