


DonaldSmith
-
Posts
2,435 -
Joined
-
Last visited
-
Days Won
24
Content Type
Links Directory
Profiles
Articles
Forums
Downloads
Store
Gallery
Blogs
Events
Classifieds
Everything posted by DonaldSmith
-
Thanks for the info.
-
Ain't got no voltage drop. I've got star washers at the solenoid, and I keep the nuts tight. It's sort of like the old Sears Good, Better and Best. (Anyone else ready to admit that they have 1 gauge cables? I don't want to be hanging out here alone.)
-
The dogma for battery cables is to get 0 gauge cables made, maybe at a local welding supply shop. Or maybe 00. I beg to differ. Well. at least I'm asking politely to differ. I have 1 gauge cables from Tractor Supply that are serving me well. I even have the knobby disconnect clamps at the battery, so part of it remains clamped to the battery, and the knob part is clamped to the cable. Easy to disconnect the positive (ground) cable when the car is parked for a while. Of course, the clamped surfaces are covered with dielectric grease to prevent corrosion. I'll grant that in borderline situations, and where the battery is under the floor, the larger cables may make a difference. But for most cases, the 1-gauge cables are less expensive, more readily available, and more than adequate. That's my story and I'm sticking to it.
-
Similar problem? Oh, boy, ever. In my humble 'pinion... My DeSoto Suburban must take some bastard-sized seal. In 2013, I replaced a leaky seal. (While at it, I installed a Speedi-Sleeve over the worn pinion shaft, and this has stood the test of time.) Back in 2013, the seal was too small to fit tightly in the housing, so I filled the perimeter with JB Weld. This summer I noticed that the seal was leaking again, at the perimeter. It turns out that the I.D. of the housing is 3-5/32 (3.15625), and steps down smaller past where the seal should go. My rough measurement was larger, so I got a 3-3/16" (3.18750) seal, which I tried to press in place with the pinion nut, washers, and a block of wood with a large hole in it. The seal was barely pushed in. and its face was concave. It did not stay in place very long. I got another seal, and some huge washers. I ground down the first washer to a diameter somewhat under the O.D. of the seal. I drove this washer sandwich with the pinion nut, and pushed this seal further (farther) into the housing than the last seal. The seal is not flush, but farther in that the last one. Again, the face is concave. ("Farther" involves distance; "further" involves degree. In this case, take your pick.) I have not found a seal with a 3-5/32" O.D., so if this latest seal fails, I will try pushing home another oversize seal, with a larger washer. (Another thread discussed my agony in refilling the pumpkin with gear oil, before I bought the hand pump that fits the gear oil bottle.)
-
Pens and pencils work somewhat like Kilgore47's wrenches. One minute a pocketful, next minute none to be found.
-
The springs on my 47 DeSoto squeaked, They did not have the magic Mopar spring wrap, of great notoriety. Attempts to grease them without taking things apart just didn't work. I found some PVC spring liners at one of the speed equipment houses, and installed the liners. No squeak. (In the photo, I'm getting ready to put in 2-inch lowering blocks. Cool.)
(notetheliners)-Copy.jpg.b7870a52ce5e3987aaae9fd0e6e59e1f.jpg)
-
Shades of Gramma Klampett of the Beverly Hillbilllys, , or Imogine Cocoa, who didn't make it to Wally World.
-
I fixed the exhaust leak. I went with flat gasket and ample exhaust sealer. (A second trial donut was the right diameter, but still too thick.) I cut the pipe from the manifold at its joint with the smaller pipe downstream. That let me remove the pipe to straighten the loose flange and the ridge at the manifold end, and properly align the pipe with the manifold. I sanded, cleaned wetted down the mating surfaces of the pipe and manifold. per the JB Weld Exhaust Sealer instructions. I trial-fit the pipe to the manifold, so its other end was at the height it wanted. I undid the pipe hanger near the muffler, supported the muffler and its the pipe with a scissors jack, and aligned the pipes with a splice fitting, 2" to 1-3/4". I went with a new flat gasket, the same size as the old one. I was concerned that the gasket opening was noticeably larger than the 1-3/4" end of the pipe, but realized that the bolts would keep the gasket aligned. I thoroughly laid down sealer on the pipe ridge and on the top surface of the gasket. I tightened the bolts, and filled the annular (ring-like) space with more exhaust sealant. I followed the sealer instructions. I waited at least a half hour, and ran the engine for more than 10 minutes. At the coupling, I sanded and wetted down the pipe surfaces. I laid down a bead of sealant on each pipe, slid the coupling over the pipes, cranked down the nuts, and filled the annular spaces with sealant. I installed a hanger to support the pipes at their proper height. Again, wait a half-hour or more, run the engine for 10 minutes or more. Quiet, except for the muffler's usual burble.
-
Do you need 12 volts? Let's kick this around a little. For those of us married to our 6-volt system, maybe add a small 12 volt alternator, but it would still need a drive belt and pulley adaptation. Maybe an inverter, good for 20 amps, but that would suck up more than 40 amps from the 6-volt alternator. Maybe a 12 volt alternator, with some step-down for the 6 volt stuff. I'm tempted to put this on my To-Do Someday list. I put Saginaw power steering in my 47 DeSoto a few years ago, but had to cobble a lot to do it. I would put the P.S. motor under the hood, where I have already altered the steering column. Put back the manual box, splice in the motor, and undo some of the cobbling. One can always imagine.
-
For the record, The epoxy blob makes the cast iron look worse than it is. The casting extends past the bolt, and should be adequate, if I don't crank the bolt to try to align the pipe to the manifold. It would take some unusual stress to pop off the outer edge of the casting. Or maybe someone dropped the manifold, once upon a time. I just bought a donut and a conventional gasket, my choice, plus the adaptor to reconnect the other end of the pipe. (One of those hole-in-the-wall independent parts places that has everything, at a good price, D&D in Troy, Michigan. The NAPA guy sent me there. NAPA is usually better than O-Reilly and the lot.)
withJB-Copy.JPG.6fa4792d3b59fb3651b57d678ab988b5.JPG)
-
Ring - that's the word I was looking for. The pipe end is 1-7/8", the ring is 2-7/16", and the gasket hole is 2-1/4". Not much room for error. I need a smaller gasket or a lot of (cop-out) exhaust sealer.
-
(Where's my Edit button?) The highjacked thread is "1952 Cranbrook Exhaust Doughnut". So the earlier Mopars used a flat gasket instead of a doughnut. I saw a Plymouth parts diagram showing the big flange with the two bolt holes welded to the end of the pipe. My pipe may have been an aftermarket version.
-
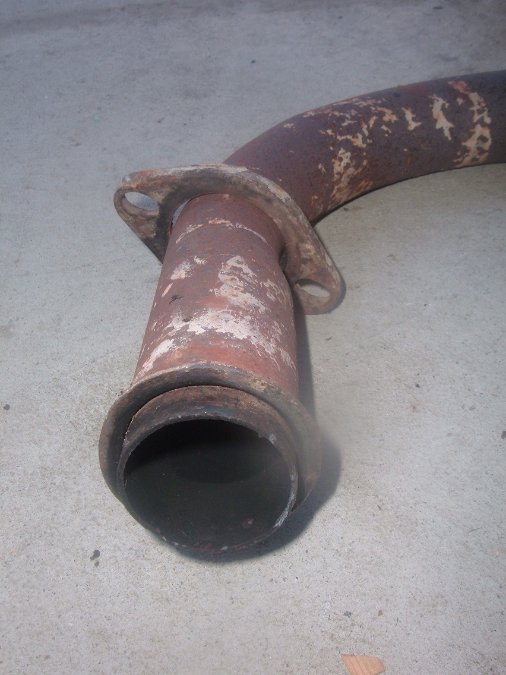
I am moving my situation to a new topic, so as not to get buried in the topic that I highjacked. My leak seems to be caused by the pipe not aligned with the manifold. The loose flange had been distorted by excessive cranking. But the gasket did not seal, so it leaked, both sides near the overworked bolt. The pipe is 2" O.D, and extends several feet under the floor, where it joins with a 1-3/4" pipe which extends to the muffler. I saw-cut through the smaller pipe near the joint, freeing the larger pipe. The pipe reduces to 1-3/4" at the (flange?) (ridge?) (boss?) where it fits into the manifold. So the original design, with a flat gasket, should work, with a little exhaust sealer for good measure. I'll keep the pipe in proper position by undoing the support by the muffler and and adjusting the height of the pipes with a scissor jack. Wish me luck
flangedistorted.JPG.69f4884de8e291feb9e207c41ededb45.JPG)
-
I've got a pump that screws into the bottle. I got it on line, from somewhere. I'll remember when I get the charge card bill. It works slick. So I've got replacing the pinion oil seal down to a system.
-

ANSWERED 1952 Plymouth Cranbrook Exhaust Doughnut.
DonaldSmith replied to Leo White's topic in P15-D24 Forum
Found the source of the exhaust leak where the manifold and the pipe are connected, on my 47 DeSoto. First, the loose flange on the pipe is distorted, and not applying even pressure to the pipe (boss?) and gasket. (Both sides of the gasket are stained by leaking exhaust.) Then, the (boss?) on the pipe is distorted. (Ignore the blob of JB Weld on the manifold flange. It surrounds the remaining cast iron. It has worked so far.) What to do: A: Remove the exhaust pipe and re-form the (boss?) and flatten the flange. (Or alternately, get a two-piece repair flange.) or: B: Slather the mating surfaces with exhaust system sealer, and wrench it together. or: Both A and B. By the way, the donut won't work. It fits over the exhaust pipe but does not fit into the manifold.flangedistorted.JPG.9c26295e8b8691f8471bbd9d11ec8ff2.JPG)
pipeflangedistorted.JPG.323f4a4581d684ff12a0f3a4385fc45b.JPG)
.JPG.910548f5aa4f00c94e9d002c65a8581e.JPG)
-
Update: To fill the pumpkin, I used the pump that fits the gear oil bottle. Then I did the DreamCruise. I drove across Woodward to the Olds Club hangout in front of the Shrine of the Little Flower Basilica. (They let me park there because our K of C Grand Knight, who got the Olds Club there in the first place, bragged up my car, and told them to be on the lookout.) The car got some Ooos and Ahhs from onlookers. But when I left, there was a puddle of gear oil on the pavement. I had measured the housing I.D wrong, so the seal was too big around. I had barely pushed it in with a block of wood and some washers behind the pinion flange nut. So the seal popped out. And of course the gear oil level is supposed to be above the bottom of the seal. I ordered a new seal. Then I concentrated on getting a better pusher. I finally measured the I. D. better. Should have gotten the 3-1/8" seal instead of the 3-3/16" seal. I ground a large washer to 3-5/32", and collected a number of other large washers. Today, with a sandwich of washers, I cranked on the pinion flange nut, and pushed the new seal in place. I think it's firmly in place, even though the face of the seal is now concave. I'm 27 percent confident that it won't leak. Oh, and when I tried to reconnect the drive shaft, the bearing caps fell off, and one roller stubbornly stuck to the bottom of the cap, keeping things from bolting together. (But better than flying off to regions unknown.) Some axle grease held the rollers in place while I held everything together and got it bolted up - 180 degrees off. Unbolt, rotate, re-bolt. Will I be doing this again in the near future? Stay tuned.
-
ANSWERED 1952 Plymouth Cranbrook Exhaust Doughnut.
DonaldSmith replied to Leo White's topic in P15-D24 Forum
The one ear has been reconstructed with JB weld. I think I drilled into the cast iron and looped a steel rod into the cast iron and where the B weld would be. We'll see how well it holds up. If not, there is a two-piece repair flange that I could install above the existing flange. I've got a pinion oil seal to install, and then I'll tackle the exhaust leak. Fun under the car, especially these days when it's so hot and muggy. Stay tuned. -
"Pipe Plug": There is an actual pipe plug at the No. 6 cylinder, over the piston, for measuring the stroke and finding Top Dead Center. . (The spark plug is over the valves, so it won't help finding the piston stroke.) No. 1 and No. 6 cylinders are at top dead center at the same time, but two cycles apart. There's a fine art to having a probe through the pipe plug hole, and finding top dead center. There's little vertical movement when the piston is approaching TDC.
-
ANSWERED 1952 Plymouth Cranbrook Exhaust Doughnut.
DonaldSmith replied to Leo White's topic in P15-D24 Forum
I'm about ready to try a donut for my manifold-to-pipe connection. Flat gaskets don't seem to work. I can hear and feel the gas escaping. Maybe the pipe is misaligned. (The photo shows a bit of JB magic where a part of the cast-iron flange is long gone. There still seems enough to engage the bolt.) Wish me luck. ..JPG.7eb10ec553efd7e5f3a2bc8170a2057e.JPG)
-
Thanks! A gear lube pump!
-
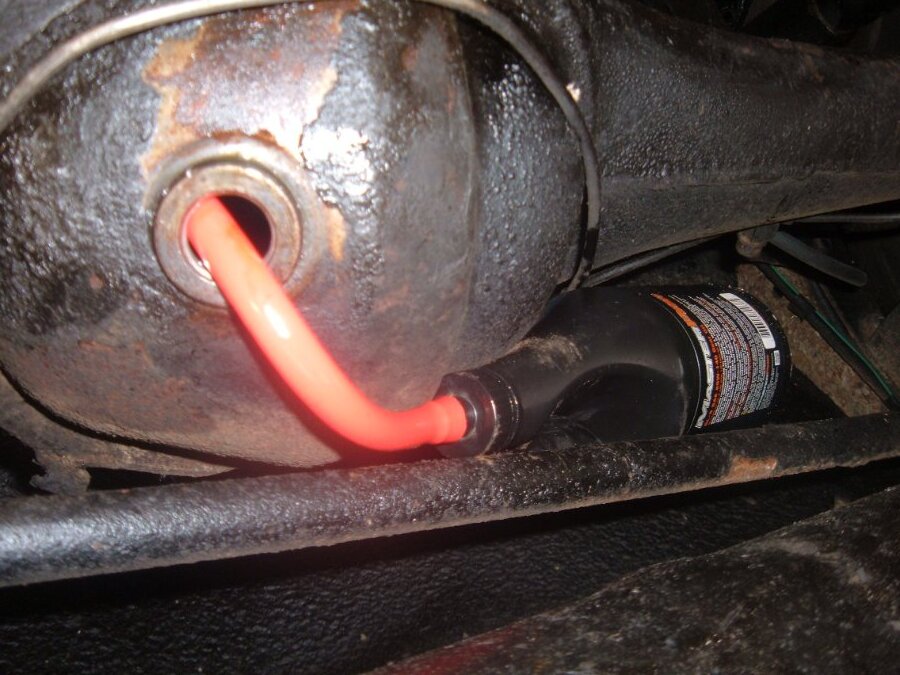
Well, I replaced the pinion seal on my 47 DeSoto Suburban, not too difficult, after ordering the right seal. Now to refill the rear axle with gear oil (available SAE 80W-90). It comes in a nice bottle with a pointy cap. Snip the end off, and squirt the oil in, I guess. No room to tip the bottle up. My lowering blocks keep the axle up a few inches higher than stock. The gas tank is in the way. Also, the sway bar is claiming its own territory. Get some tubing, heat the end, and force it over the pointy bottle cap. Lodge the bottle above the sway bar, and let gravity do its work. (Photo keeps coming over upside down). Gravity not enough for oil this viscous. Hold the bottle vertically above the axle. (The tubing decides to slip off.) Gravity now no hindrance the flow of oil all over the place. Rig a funnel with flexible tubing above the axle and manually pour from the bottle into the funnel. Going great, until the funnel overflows and I drop the bottle. (Seldom-used cuss words.) Time out. Commiserate with the guys. Maybe even take suggestions. I do have a HF manual pump. Does it pump uphill? What works?
-
Converting Air Filter from Oil to Paper
DonaldSmith replied to Sam Buchanan's topic in P15-D24 Forum
Here's my mod from years ago. Simpler air filter to work with. I dug out all the metal mesh. A Fram CA6370 worked for me. A cut-down coffee can, and some soft washers seal the top of the filter.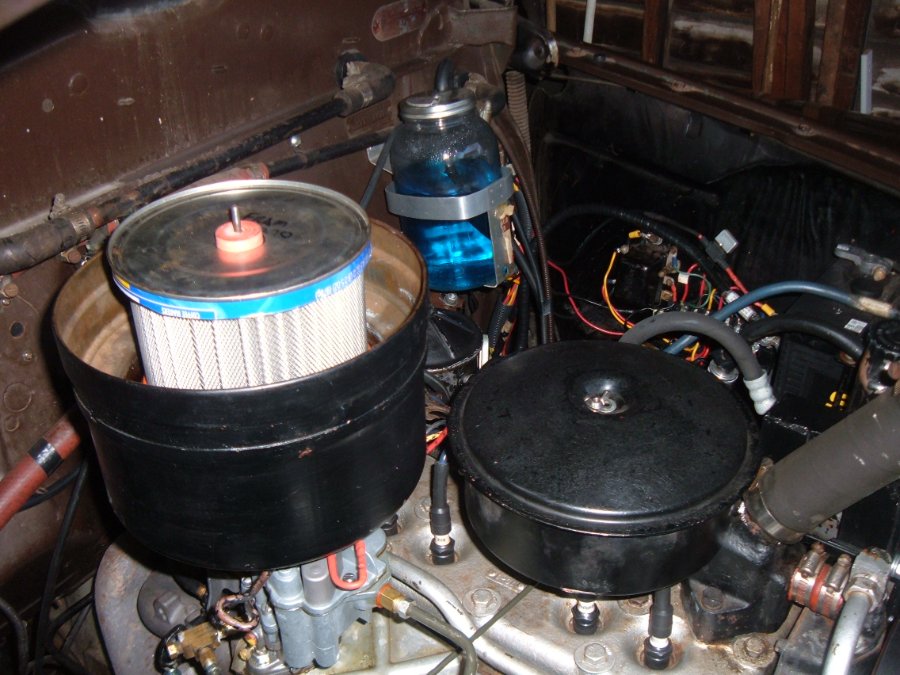
-
Is that an alligator grille, with a large slot to fit over the hood ornament? Unusual.
-
Smaller wheels on the front? We were visiting my mother's family, when my Uncle Arthur explained to my dad that if you had a wagon with large wheels on the back and small wheels on the front, the wagon would slope forward, and would roll forever. Perpetual motion My dad, the professional engineer, tried unsuccessfully and heatedly to explain why that was impossible. I think Uncle Arthur was just getting my dad's goat. Uncle Arthur operated a machine shop where all the machines ran off overhead leather belts powered by an old car engine. Uncle Arthur was no dummy.
-
Lessee, a wildass guess- It's on the exhaust manifold, so we don't want it to release exhaust into the engine compartment. So maybe it lets air into the exhaust system? There may be a valve under that dome. maybe the finned shaft is to disburse the exhaust manifold heat, to avoid overheating the valve mechanism. To quote my 2-1/2-year-old neighbor boy, "Why?" Why introduce air into the exhaust stream? Even out the pulses? Edit: Boost your gas mileage? Extend you r oil change interval?

