DonaldSmith
-
Posts
2,490 -
Joined
-
Last visited
-
Days Won
25
Content Type
Links Directory
Profiles
Articles
Forums
Downloads
Store
Gallery
Blogs
Events
Everything posted by DonaldSmith
-
JD, (When you read "JD", imagine that it's Uncle Jessie of the ?Dukes of Hazzard speaking.) JD, you had the luxury of fixing your car beside the road without having the wife doing a slow burn while you were planning and executing your masterful repairs. Circumstances dictated that your wife flew while you drove. Or did you plan it that way? My wife won't go any distance with me in the DeSoto. Strike one was running out of gas on the way home from a DeSoto meet. An hour, plus, with only imrpovised rest room facilities. Strike 2 was blowing the engine on the way to another meet. She got to ride in the cab of the flatbed, while I got the skyline view in the DeSoto. Since then, I've been fouling them off. - Granddaaughter's inertia made the middle seat lurch on its tracks, making a real scarey sound (Scared grandma, not granddaughter; concerned me, till I found out what the noise was). - Gas gauge reads zero until it warms up (I think I explained it adequately). - Klunk-o-matic made some indecisive but loud sounds as it attempted an upshift. (Hasn't done it since; may check the transmission oil level some day.)
-
What a roadside repair! Sounds like a real adventure. I'm glad you made it back, and didn't have to ride a flatbed home. Been there, done that. Glad we could meet.
-
I copied an article some time ago about Dodge fluid drives making noise when the clutch pedal is depressed. They talk about the "runner hub rear bearing", and removing the transmission to grease it. Put the grease on the end of a 10-inch stick and stick it. (I'm paraphrasing, to add an element of coarseness to the discourse.) Don't get grease on the clutch lining.
-
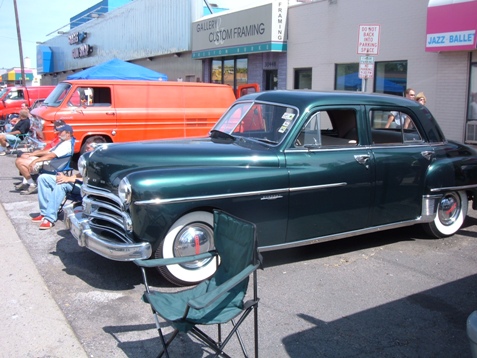
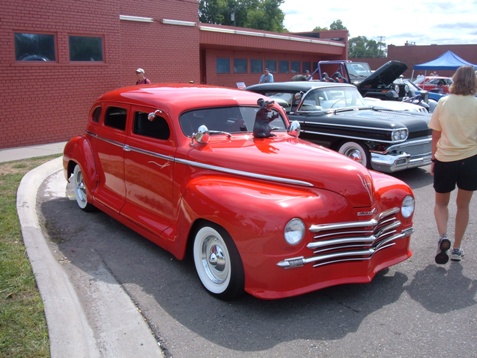
From Saturday, August 18, Woodward Avenue: 50 dodge in one of those expensive rented roadside spaces; postpwar plymouth, chopped top; 48 Desoto, in a see of shiny roofs (Northbound Woodward) (OK, how do you guys post a big photo, write some more, post another photo, etc? The paper clip only lets me post thubnails.)


-
My camera took the photo at 2272 x 1704. The last time I reduced it by 16 percent, to fit within 620 x 280, actually 373 x 280. this time I reduced it by 50 percent. Let's see, boys and girls, what happens: Hmm... didn't show up on the preview. Let's post it and see...
-
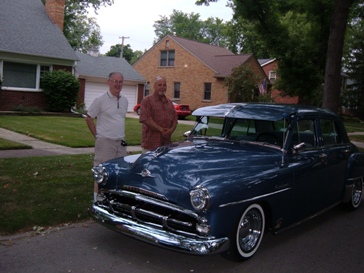
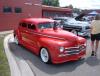
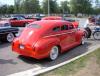
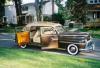
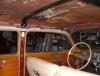
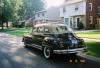
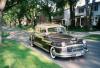
Here goes, with the photos from my camera: 1. Don's DeSoto and and John's Plymouth. 2, John's engine. 3. John's dashboard. 4. Don and John standing at John's car. (Why stand in front of the car and block the view?) (I gotta figure how to get the photos larger. They're at max size per the paperclip thing.)


-
jd52cranbrook (John Davies) took me up on my invitation to swing by when doing the DreamCruise. He and his wife stopped by this evening, and we admired each other's cars. I've got the huge DeSoto Suburban and he has the cool 52 plymouth sedan. We had a good visit. I'm glad they could swing by. John's been doing the DreamCruise since 2000. I'll see how many photos I can manage to post. OH, I forgot how. It's late. I'll try again tomorrow.
-
It doesn't really matter. What matters is where the rotor is pointing in relation to the plug wires. Usually plug wire No. 1 is at 7:00, and the rotor of of course points to 7:00 when the No. 1 piston is at or near top dead center (TDC) at the end of its compression stroke and beginning of its power stroke. (Read squeeze, bam.) The rotor goes around once for every two engine revolutions. The trick is verifying that the piston is TDC after the compression stroke. With a thumb over the plug hole, you will feel the compression as the piston rises. If you're 180 degrees off, no compression. Pistons 1 and 6, and other pairs, are at TDC at the same time, but only one is at the end of its compression stroke. My rotor is 180 degrees off, but so are the wires, with No. 1 where 6 should be, and so forth. It works. I'll leave it for now. If your rotor is 180 degrees off, you can pull the distributor up an inch or so, rotate the shaft 180 degrees, and lower the distributor to seat the end of the shaft in the slot.
-

Tune-up adventures preparing for the DreamCruise
DonaldSmith replied to DonaldSmith's topic in P15-D24 Forum
Southwest of Woodward and 12 Mile. Anybody want to drop by? Send me personal message. -
Must be air conditoning and refrigeration lingo, like in a building.
-
Somewhere I heard that an adventure is something that turns out unexpectedly because it was not adequately planned. Had to tune up my car before next weekend. My 47 DeSoto was running like crap. (technical term for $hitty.) At least the tailpipe was not sucking in the glove I held over the end, but the glove was flapping. Some time ago it would suck in a bill, but the hanging valves must have loosend up. I tightened the manifold nuts, to rule out manifold leaks. The nuts in the middle were loose. I removed the carb to remove the upper heat shield, to get at some of the nuts. The carb was loose, too. I crawled under the car and tightened the legendary thirteenth manifold nut. The vacuum gauge reading was good, but still some stumbling. (Tip to the not-so-swift: When you remove your vacuum gauge, plug up the pipe the hose was on, or the engine will really run like crap, if it runs at all.) Took the distributor out, to adjust the points. There was some minor roughness at the points, but no real burning or deposits. I filed the points and set them. An eccentric screw helps move the points for adjusting, after the lockdown screw is loosened. I set the points and then overtightened the lockdown screw and stripped something. (Somewhere in there is another tip to the not-so-swift.) Took the distributor to the bench and removed the plate that the points are mounted on. Luckily it was the the screw that was stripped, not the plate. Found a matching screw and cut it to length. Put everything back together and set the points. Distributor is 180 degrees off, with No. 1 at 1:00. Considered setting it right, but the plug wires not the right length. Will defer until the next set of plug wires. Went to a local car parts chain for plugs, anyone's but Champion. They had some AC Delco that were black, looked wierd. Went to another chain and got Autolite 258 plugs. (Lawn motor type.) Put them in, worked fine, but they are so short I had to cut about 5/16" off the silicone boots on the plug wires. Also 3/4" hex rather than 13/16, but what do you want on a Saturday evening when the good parts places are closed? You know, the places that have listings for 47 DeSotos. Besides, they were only a buck and a half each. So the car is running well enough that I can drive around in high range, leave the Fluid Drive clutch out at stops, start up with out stalling, and experience the mystical Tip-Toe upshift. I even cruised Woodward Avenue here in beautiful Berkley, Michigan, just across from Royal Oak. We are a week away from the annual Woodward DreamCruise, but the classic cars cruising Woodward each evening are getting as thick as flies on $... Each evening, people are out watching the cars. I'll have some family here this weekend. We can watch the Friday night parade and the all-day saturday DreamCruise. I'll even venture out with my 1947 DeSoto Custom Suburban 8-passenger sedan.
-
-
This tale takes the long way around, sort of like working on an old car. When I removed the windshield molding, to remove the headliner, to re-wire the cabin, I noticed a brown stain had migrated from the windshield and down the instrument panel. The stain was water soluble. Rust? But dark. Before replacing the molding, I water-tested the windshield and found a leak at the divider bar. I removed the inner and outer bar, applied clear glazing sealant to the gasket adn outer bar stop the leak, and reinstalled the bars. I water-tested the windshield again, and then noticed that the carpet was soaked. Tip to the not-so-swift: Close the cowl vent, or at least the fresh air intake under the dashboard, before water testing the windshield. After removing the carpet, drying it and re-installing it, I concentrated on the radio. Radio to-do-list: 1) Make a water shield for the back of the radio and for the circuit breaker I added, for protection from the air intake and cowl vent which are just above the rear of the radio. Old rust in the radio casing was testament that this wasn't the first time water came in the vent. 2) Take the front of the radio off and re-set the dial pointer. 3) Play with a stereo speaker abandoned by one of the kids, to replace the Mopar speaker which had one too many punctures through the cone. Sounded funny when the volume was turned up. While I had the radio out to re-set the pointer, I fashioned a water shield from a sheet of gasket paper, and secured it with one of the screws of the radio case. Then I layered clear shipping tape over the gasket paper. That takes care of 1) and 2). Of course there were two attempts to reset the pointer to get it close enough, and several trial fits of the radio, so that the circuit breaker which I added at the bracket would not interfere with the mounting bolt. I hooked up the new speaker temporarily. It worked. I removed the old speaker from the car. (Should have removed it one of the times the radio was out today.) To the bench! I removed the old cone, drilled out the rivets and removed the large, heavy electromagnet. I snuggled the new 4" speaker within the metal shell of the old one, and bolted it in place. I salvaged and reconnected the plug. The modified speaker assembly, being less bulky, went in more easily than the old one came out. It works, sounds good, and didn't costy anything. My kind of project.
-
Need some dial cord? I have 17 ft left from the 25 ft roll I bought for my recent radio restoration. I offered to donate the cord to nostalgia air, but have not heard back. If they don't want it, it's yours for the asking. I shocked my vibrator to life by running 120 v through a 40 watt bulb in series. I had saved the cord from an old electric drill, complete with trigger. I could blast the vibrator for a few seconds at a time, and with the trigger off I wouldn't have any live connections. The AC current gets the points moving, and the high voltage burns off the crud. It took a few treatments, but the vibrator is still working. I saved the drill cord, in the event the vibrator poops out again. Did you get those schematics from Nostalgia air? Those for my model were from a radio bible by John F Rider, and included diagrams on how to string the dial cord. I got my vibrator running, replaced the paper and electrolytic capacitors, and after a few false starts got the radio running, without any new tubes. But I had bought some tubes anyway. If you need any, I have two 7A7s and one 7Q7. I was always going to try to fix my radio some day, if only l had an adequate power supply for bench testing. I had once used a lantern battery to work on an auto clock, but that battery didn't last long. So my radio repair odyssey started with a bargain battery from Sam's club. That gave me power for bench testing. I wired in a 15 amp breaker. Worked fine. Good luck.
-
But the taxies were more like the limos and long sedans, with a full size permanent third seat, and two jump seats. N.Y.C. would not allow a passenger to ride in the front seat (despite scenes in the movie "On the Town"). So two couples going to the theater would need the jump seats and third seat. Some time ago, Suburban owner and forum frequenter James Douglas attached a few pages from a "Special Interest Autos" Drive Report from 1974. I was fortunate enough to order a back copy while they still had some of the issue left. Fascinating 6-page article on the genesis of the DeSoto Suburban and its features. "Special Interest Autos" morphed into "Hemmings Classic Cars".
-
Yep, it's stock. The first and second seats are split bench seats. The front doors are wide enough that you can get into the second seat through the front doors. The first and second seats are almost identical. The second seat frame has an extended apron across the front, and the seat moves 27" on a horizontal track. And the third seat is a jump seat with single seat cushion and split back, that folds forward to extend the cargo floor.
-
Thanks for the concern, but 16 gauge is good for about 10 amps. That's a lot of tail lights. The old wiring was 16 gauge, beneath much thicker insulation. I've got a wiring diagram for a newer car, but still 6 volts, that calls for 16 gauge for the back lights, dome lights, etc.
-
You mean they sell wiring harness already made up? Where's the fun in that! I figured the lengths of the longest wires which I would need, times the number of wires. I could get two lengths out of a 30 ft pack of wire at the local auto parts place. Much cheaper than buying it by the foot at the hardware store. I cleaned out six packs of 16 gauge wire, in different colors, from one store, and got the elusive brown from another. Here's my bundle: Blue and Yellow for the gas gauge sender. (I striped the yellow with black marker.) Brown and Green for the turn signals. Red for the brake light. Yellow, without a black stripe, for the dome light power. (I ran the yellow back to the taillights, just in case I wanted power there someday.) What the heck. White, and Blue with black stripe, for future who-knows-what. So I was stuffing nine wires throught the windshield post. Of course, the new insulation is much thinner than the old. Inside the cabin, I had to run back to the right side for the interior lights. I split off a branch of the yellow near the windshield, to run back to the rear door post for the door switch and manual switch. I completed circuits with left-over red wire (with black stripe added) and white wire (with red stripe added). I tapped into wires by removing about an inch of insulation, separating the strands, inserting the bare end of the other wire between the two groups of strands, and twisting the ends around. Reasonably strong physical connection. Then I soldered them. At the metal supports for the wiring, I wrapped the bundles of wires with friction tape, to bulk them out and protect them from abrasion..
-
Re-wired the cabin. Half-day job turned into the usual several days. Spent an entire afternoon trying to fish the new wires through the windshield post. (Hint for the not-too swift; use the old wires to pull the new ones, or to pull through a separate pull wire.) Finally got a pull wire in, but then tried to feed the whole armful of wires through the windshield post, all neatly wrapped up in tape. Mistaken assumption that the available space would be round. Un-bundled the wires and they pulled through. Ran a few extra wires to the taillight area. All splices soldered. Ring terminals at the main terminal block that I had added under the dash, and at a new terminal in the tailight area. Removed the cross brace between the door posts. Removed the existing fiberglass mat, which the mice had chewed into. Wire brushed and primed the underside of the roof. Most of the rust color was the previous primer, but there were a few spots of rust. Found a cheap and available insulation with separate facing. Home Depot sells insulating sleeves for ducts. 8-inch package, less than 6 bucks, yields about 1" fiberglass mat 34" x 60". Separate facer sleeve is aluminum one side and white the other, splits into 36" x 60". 3 packages did the long roof. Used up some old carpet adhesive to adhere the new fiberglass. Yuck! It was sleeting gobs of rubbery goo. But it worked. Used spray adhesive for the facing. I put it aluminum side up, following a thermodynamic hunch. Not that the underside is finished, but it is sort of white. It may have to do for a while. I will try to salvage the headliner, which is maybe 20 years old. I washed it out in the laundry tub in my shop (saves a lot of arguments, not using the wife's laundry tubs). The first tubful turned a dark tea color. Part asphalt from the fiberglass mats, part mouse secretions and excretions. Second tubful much lighter. Added a little TSP. Rinsed the headliner, hung it over the clothesline, sprayed it well, and dried it in the sun and breeze. Smells really fresh. I'll find out if the headliner shrunk much. A little shrinkage may be good. I have to sand, prime and paint the bows, or ribs. The cloth sleeves caught on them really bad when I removed the ribs. I wired one end of each rib, to hang the rib. The number of turns of wire corresponds to the number of the rib, so I won't get them mixed up, he said, optimistically. With luck, I'll have the headliner re-installed in a few days, and take a fresh look at my to-do list. Where was I before I was so rudely interrupted by a short? Way down on the to-do list is a new headliner.
-
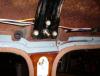
Here's my anchor point, with the headliner out. I don't have access to a welder, so I put the bolt behind the heavy metal and through a new hole, and secured the bolt with a nut and washer, so that the bolt acts as a stud through the headliner. Then there's a spacer on the shaft, and the seat belt anchor, and a nut. If I had a welder, I would weld a nut to a reinforcing plate and fix the plate behind the hole, so that there wouldn't be a stud protruding through the headliner. I wouldn't have to cut the headliner until I was ready to install the belt. And I would locate the anchor point forward of the post, so the belt wouldn't hang over the post light and grab bar. With the cheap shoulder belts, I clip the extra end back to the belt, so that when the belt is used it does not hang over the post. If I had the retractible belt, part of it would always be over the post, unless the retractor at the floor was mounted forward of the post.
-
drat

-
Donno if I can get my do-do list whittled down by then, so I can go cross state without trouble. Went to Gilmore last year on the way to my son's place in Indiana. I contacted the museum first, and they gave me free range of their 47 DeSoto Suburban.
-
I'll try to post photos of my 47 DeSoto Suburban: lessee . . .


-
It's like the long wheelbase sedan with a tweak not found in the long wheelbase sedans or limos. Since the trunk is open, there is a leatherette covered cardboard piece at the bottom of the rear window that extends to the trunk lid. The piece has cutouts to fit around the hinges.
-
The Suburban does not have a footrest for the second seat. The previous owner had seatbelts, so I used the same locations, with suitable inspection and reinforcement. Incidentally, the Suburban has a second layer of floor at the second seat, to close off the jump seat well for the long sedans and limos. For the shoulder belt anchorage, I drilled through the ends of the cross brace just above the "B" post. It should be strong enough, with several layers of heavy metal, but it drapes the belt over the post light and hand grip. If I get a new headliner, I will locate the anchorage forward of the "B post, with suitable reinforcing, of course. I got the cheap seat & shoulder belt from J.C. Whitney, when I should have bought the deluxe retractable seatbelts from J.C. Whitney. Maybe I'll buy the retractables for the front and move the others to the second seat, and use the plain seatbelts for the middle of those two seats. For the third seat, I don't know how I would work seat belts eith the wood cargo floor. Oh, I took out the complete headliner. Might as well clean everything out and get good access to the wiring. I bnought a few hundred feet of wire in assorted colors, so my afternoon is penciled in. Somebody out there knows who makes the headliners for J.C. Whitney. At your convenience . . .