


DonaldSmith
-
Posts
2,435 -
Joined
-
Last visited
-
Days Won
24
Content Type
Links Directory
Profiles
Articles
Forums
Downloads
Store
Gallery
Blogs
Events
Classifieds
Everything posted by DonaldSmith
-
Often times, after we have worked on the engine, our ignition system is dead or fires horribly, only to discover that the No. 1 position on the distributor cap is not at 7:00, and not even at the opposite side, at 1:00. The secret lies in indexing the oil pump properly, since the slot in the drive shaft receives the tongue of the distributor shaft. My Shop Manual hides this explanation after two pages of electrical diagrams. Paraphrasing, if you screwed with the crankshaft with the pump removed, (or screwed with the pump, or even installed it straight on,) you screwed up the distributor setting. Then the Shop Manual describes the method of determining top dead center of the compression stroke of No. 1 cylinder, which we all should know about by now. Then it says: (Underlining and asterisks added) "Turn pump drive shaft until the slot in the end of the drive shaft lines up with the slot in the end cap screw holes in the mounting flange. (Fig 14). * Then turn the drive gear one tooth counter-clockwise. Loosen the distributor lock screw and raise the distributor just enough to allow the pump to be installed. Tighten pump cap screws. With Distributor still raised, turn rotor as shown in Figure 15* until it points to about "seven o'clock", move the rotor back and forth slightly to allow the tongue of the distributor shaft to engage with the slot of the oil pump drive shaft. Install number one spark plug and distributor cap, adjust timing as outlined in this section. " * Figure 14: (Looking at the pump from the top of the engine, as one would install it, drive shaft up, opposite screw holes horizontal. ) ** Figure 15: (Distributor lock plate to the left, retaining snaps horizontal, rotor at 7 :00) Whew. Good luck. Remember, the damn gear of the pump will move one tooth when you install the pump, so compensate for it, or move your spark plug wires around. ,
-

Optima battery suddenly too weak to crank on 48 DeSoto!
DonaldSmith replied to MarcDeSoto's topic in P15-D24 Forum
Maybe the oil pump needs to be adjusted. I'm starting a new post, "Oil Pump Indexing." I tried scanning the page from the Shop Manual, but it didn't come out so well. Give me a few minutes to transcribe it. -
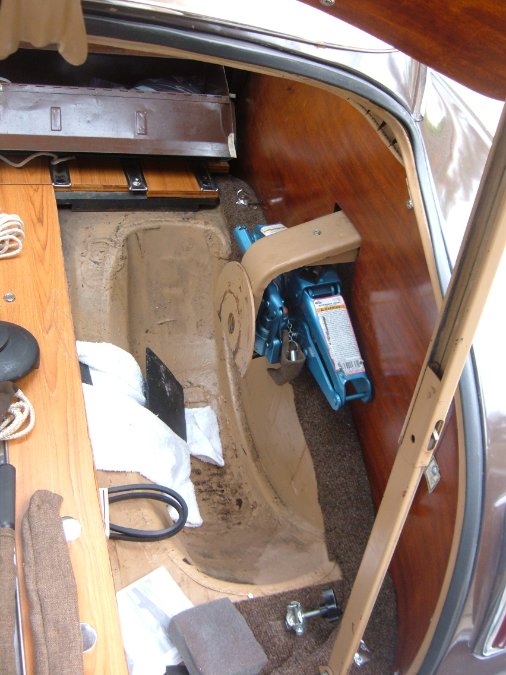
Jack storage on my 1947 DeSoto Suburban: Hydraulic scissors jack opened tight against a wood block that i added under spare tire support. (Original wood-grain Bakelite fender liner.) (The spare tire and the wood floor panel that fits around it have been removed.) (I made wood blocks and wheel chocks and I store them under the wood floor in a terrycloth pouch.) (The metal panel at the top of the picture is the open lid of a vintage toolbox.)
-
Optima battery suddenly too weak to crank on 48 DeSoto!
DonaldSmith replied to MarcDeSoto's topic in P15-D24 Forum
I recently learned that we should turn over the engine several times for compression testing each cylinder. Pump it up till the needle stops. I've gotten more uniform results that way -
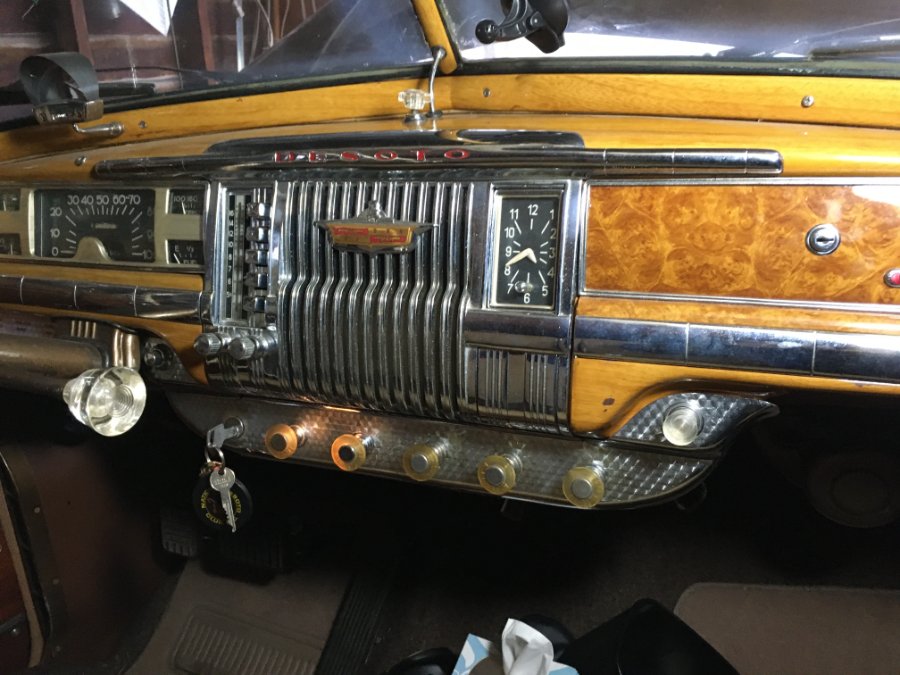
That's a period radio that I have. I brought it back to life in 2007, following on-line instructions. I replaced all the capacitors and revived the vibrator by zapping it in series with a household light bulb. I replaced the speaker with one that the kids left behind. The sound isn't great, but the radio works. The nostalgia is listening to the radio begin to hum as it is turned on, then as the radio warms up, the sound begins to reach its volume. It's alive! .. alive!
-
Wipers are electric, 2-speed. Clockwise: Off, slow, not quite so slow. Lower panel items: (Key Switch) MAP LIGHT; HEADLIGHT; TEMP CONTROL; DEFROSTER; HEATER FAN X
-
Cowl vent: probably massive corrosion on the pivots, all under the dash board for your inconvenience. Use lots of penetrant and work it slightly more as it begins to free up. Years ago I got my cowl vent working, so I'm probably forgetting something. When you do get it open, you will find slots in the screen, to access the screws that hold the vent in place. Have fun getting the philips head screws loose. I think I replaced the screws with stainless. Instrument panel: The engine-turned pieces are original. Left chunk: Starter button. Large bottom chunk: Key switch. Map light switch. Headlight switch. Cable to ? (plenum under cowl vent) (Air to heater?) cable to ? (heater box, for defrost?) Fan switch. Right chunk: Cigar lighter. Next I'm in the car I'll note what the buttons say.
-
Good quest. I put belt-driven power steering in a 47DeSoto. Electric power steering would have avoided much work with pulleys and pump mounting. As it is, I cut the steering column just below the shifting linkage, and used appropriate shafts and universal joints to connect to a power steering gearbox which replaced the standard manual box. (I thought that my report was in the archives, but i can't find it.) Some people have put in a rack and pinion assembly, for pump-driven power steering. Your quest would be for an electric rack, if there is one, or an in-line assist motor. There was an after-market electric system, but there was some issue whether the device would survive under the hood. Good luck - we're all counting on you.
-
Motor mount/insulator questions for a 1947 Dodge D25C
DonaldSmith replied to RonJ's topic in P15-D24 Forum
The fan belt should be in line with the water pump and generator pulleys. -
It looks like one pump has the arm riding on top of the cam, the other on the bottom. Look at the pivot points, and the angled ends of the arms.
-
I like the "optional delusion" in the Old Doge 41 photo. The top reflects the blue sky and the dark band of the building over the garage doors. Looks like a dark glass wraparound rear window. We need more photos to prove it ain't so.
-
Good job! (Nasty job, actually, but that never stops us.)
-
My 47 Desoto Suburban pulls to the left, after having been in slumber for a month or so. After a mile or so of hard stops, the pulling goes away. Last Fall, from highway speeds, I stopped late for a yellow light, and ended up a few car lengths farther than I wished. And is the pedal travel getting to be bit much? Next July we are going to the National DeSoto Club convention, in Chatham, Ontario. Ooh, ooh, cross the border. (Easier than it had been.) Anyway, the car is running well, but what about the brakes? Immediate jump-to-conclusion - disc brakes in the front. I even sent a message to James Douglas, to see how his Suburban Brake project is coming. Then i looked up his posts - Custom Fabrication. Lathe. Wheel Hell. I had fallen into the old car trap. A slight problem calls for radical solutions. "My starter won't crank - I need 12 volts." "The rear seal is leaking - I need a V-8." Cooler thinking - these brakes were good for their time. I've driven the car for 20 years, carefully, not following too close, and the brakes performed well. And Chatham is only an hour and a half from us, and I've gone that far before. Before ripping out the system, pop the drums and inspect what I have Proceed methodically. Follow the Shop Manual. (The Brakes chapter doesn't tell how to get the drums off, but the Forum has discussed front wheel nut tightening and cotter pinning, and rear wheel mega-puller pop-off.) I think I see the path before me. James Douglas, how's it going with the disc brake project? Just curious. No rush.
-
Each night I ask the stars above, why must I be an octogenarian in love? I would have never imagined that an 80-year old man could still do the things I do - like crawling under a DeSoto, climbing over the fender. lifting a manifold (But not both manifolds). We won't talk about the things I can no longer do.
-
Been there, done that. I removed the floor pan, of course. On my 47 DeSoto, I had to remove the transmission and drop the rear of the bell housing, to get enough height to tip in the motor mounts. (Maybe the 63s are different.)

-
ANSWERED Getting the engine ready to start on bare chassis, 48 DeSoto
DonaldSmith replied to MarcDeSoto's topic in P15-D24 Forum
Duplicate those parts of the wiring diagram that you will need to test-run the engine. I hope this helps: Low-voltage circuit: From the (+) battery post, heavy cable to ground, as at the engine block. From the (-) battery post, heavy cable to the large post of the starter solenoid. From the starter solenoid large post to an ignition switch or substitute: Coil: On-off switch for the wire to the (-) post of the coil. Start: Pushbutton for the wire to the small post of the solenoid. From the (+) post of the coil of the distributor (at the points). High-voltage circuit: High voltage wire (like spark plug wires), from the end of the coil to the distributor. Spark plug wires from the distributor to the spark plugs. Good luck, we're all counting on you. -
ANSWERED Can't find this broken spring on the column
DonaldSmith replied to mvpcustoms's topic in P15-D24 Forum
Once upon a time, I made a special spring for the window, from a binder clip part, as inspired by a safety pin. (I couldn't find a blanket pin, like I had in the Boy Scout days.) That was years ago, (the window repair, and also the Boy Scouts) and the window still works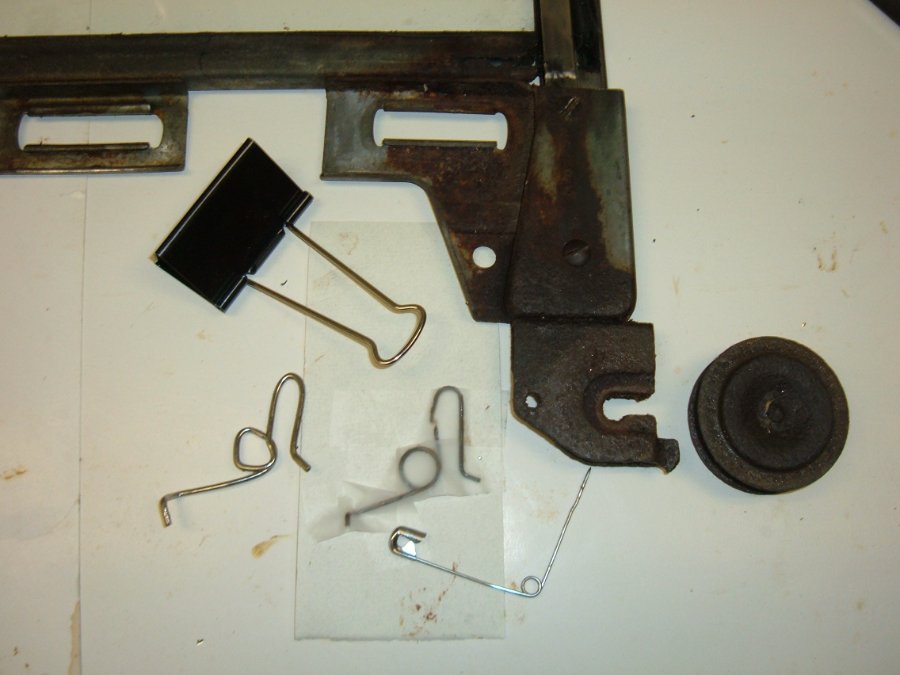
-
One Sunday, the Reading was how we are all part of the Mystical Body, how we all have different roles but part of the one body. After Mass, I commented to the priest, "Sometimes when I'm driving, someone will suggest what part of the body I was."
-
I like the zipper idea for merging. Something like yielding to traffic from the left in the roundabout. Something we are still getting used to around here. . As far as left turns, assuming that both the left turning car and oncoming traffic stop at the yellow light. it seems that if oncoming traffic is heavy, a left turn would be impossible. Around here, major intersections will have green left turn arrows timed with the other signals.
-
Does the middle seat fold down to form part of the cargo floor? I looked on line, and it seems to do so. The previous station wagon body, up to 1953, had removable seats. A pain. It also had a central light that pivoted when the tailgate was lowered. The 54 had tail lights in the fenders.
-
Maybe I'm old and cranky, but some things that the driver(s) in front of me do, irritate me. "Complete Left Turn when Traffic Clears" Car ahead of me in the left lane. We are waiting for oncoming traffic to clear. "Pull into the Intersection!", I yell. "If you pull into the intersection and the light changes, you have the right of way and can complete your turn!" "And maybe I'll get to turn." They can't hear me, and if I honk, they will get flustered. I get really flustered if the light turns red, and we couldn't move. Maybe some states forbid pulling into the intersection. Maybe the driver is a college kid from some other state. "Left lane closed 2 miles ahead". An interstate highway. So many people immediately switch lanes, I guess to get it over with. I'm the type that will stay in the left lane until the last minute. People get mad when I finally try to pull over into line. A recent example had three lanes merging into two and then one. Two empty lanes for a few miles - go for it! Why tell the drivers which lane will be closed? Maybe the signs should say, "Lane closure 2 miles ahead. Stay in your lane." Then "Merge Zone. Lane closed ahead, Merge right." Or maybe the orange cones will show which way to merge. Stopping at the red light. Some cars hold back one, two, or even three car lengths. "Move ahead; close it up! There's cars back there that are trying to get in this lane!" The light turns green, and there's no motion ahead of me. "Wake up." After a few seconds I give the car a quick beep. Not a mad honk, just a reminder to get moving. If no reaction, longer beeps. There. I've vented.
-
My head is exploding, but I think I figured out the heat riser valve, or flap. I studied and re-studied Keith's video, and my own presently disassembled, um, assembly. We want the flap to be vertical when the engine is cold, to divert the exhaust to heat the intake manifold. When hot, not - flap horizontal. The spring is counterintuitive. I would think that when heated the spring would contract and pull something. Just the opposite. The counterweight tries to close the flap, for straight-through exhaust, but when the engine is cold the spring keeps the flap vertical. When heated, the coils contract, but the effective length of the spring increases. The spring allows the counterweight to close, allowing straight-through exhaust . That's my story and I'm sticking to it.
-
Frustration over missing parts on 48 DeSoto!
DonaldSmith replied to MarcDeSoto's topic in P15-D24 Forum
I would forget where I put the notebook. -
If you screwed a filter directly into the tank, would you have to drain the tank each time you replaced the filter?
-
I put reading glasses behind my regular glasses. It helps for close-up and looking-up jobs.

