Leaderboard
Popular Content
Showing content with the highest reputation on 11/28/2024 in all areas
-
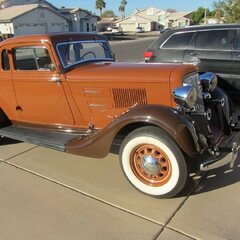
Drag me in to this will ya? Lol. I am still enamoured by old cars. Their simplicity. Doing the needed repairs and maintenance on them. It’s not much work to me. Keeps me outta trouble. Yes I still work full time. Another number of years before retirement for me. I don’t grasp the “time is more valuable after retirement”. Maybe I will get it once I’m retired someday. Yup, my old ‘38 is an old car. Old technology. Old axle. Old brakes. Ancient generator and regulator. Electric wipers were unknown still. But I like it. It takes me back to a simpler time where gas stations were all full-serve with energetic people who wanted to check your oil. Top up your rad. Clean your window. I’m not even allowed to do these things at a Costco gas station. They took away the paper towel. Get in, take your money and get out asap. Build your hot rods. Resto-mods. Or Keep it stock. Whatever you like. Whatever makes you happy. Have fun!3 points
-
I would try a 50/50 mix of acetone and automatic transmission fluid in the cylinders to try to free up the piston rings. I once dragged home a Ford 8N that had been sitting in a barn for years with the plugs out. I tried Kroil. Silikroil, PB, Liquid Wrench etc etc and nothing worked. 24 hours after using the acetone/ATF, the engine was freed up. You have to continually shake the container to keep it separated while spraying, I'd use a clear plastic spray bottle so you can see the mixture. A guy I met through the Dodge Cummins forum told me about this and he learned it from a shop that worked on turbochargers. Hope it works for you, it's always worked for me.2 points
-
I live in Australia and am in the process of rebuilding a 1948 Dodge Business coupe (American model) I ordered new hinge pins from Andy Bernbaum & they measure 1/4" dia x 2 5/8" long When I removed the very original looking pins from my hinges, the pins are 3/8" dia x 2 7/8" long. The weird thing about the whole exercise is, the genuine Dodge Passenger Car parts list I have, tells me they should be 1/4" dia x 2 7/8" long. To me the 1/4" pins look a bit small for the intended purpose. Does anyone on here have any information or experienced the same situation? Any help will be much appreciated. Cheers, Glen1 point
-
1 point
-
The problem with an annual inspection reporting your mileage and basing taxes on that is people will get a big tax bill once a year and raise Kane about it. Kind of like how the income tax morphed into a payroll withholding situation. What the states ought to do and most likely will end up doing is you pay the tax as you charge your EV much like you pay the tax as you fuel your gas vehicles. That way they bite you a little bit at a time instead of a big chunk all at once1 point
-
Vince while you have things apart this is a good time to check inner and outer tie rod ends also.1 point
-
Yes the push/pull movement is not good. Once fully assembled you can really see just a little movement yields a lot of slop in the steering wheel before there’s any movement in the pitman arm. Going down the road you’d have a real see saw battle to keep the car going straight. So you want it with some preload on the bearings. With the sector removed you should feel a very slight drag on the wheel. Lastly, the sector engagement with the worm should be left at the factory setting. This adjustment can be used to take up wear in the gears BUT and it’s a big but, if you get in tight in the center, it will be really tight on the on the right or left. ( as the worm wears in the center ) Thus I’d leave it alone. You would not want the steering to lock at right or left.1 point
-
Thank you, kind Sir, for kicking off the thread! And Happy Thanksgiving to everyone, however you may observe the occasion! Wife has started cooking, so I'm banished from the kitchen except to retrieve the occasional cup-o-joe (no back-story there, that's just how she prefers it). The dog has been taken out for her morning "patrol", nice crisp day out, although we're expecting that winter storm that the media has been touting this afternoon. We've done too much back and forth to NJ recently and are kind of tired of people, so it's just us this year.1 point
-
The reason for doing it is the cover won’t slide off the sector. A full turn will do it and it’s easy to put back to the original adjustment. I can’t stress this enough, the sector adjustment will not take the slop out of the steering. It only controls the engagement of the gears. The main culprit is the tapered rolling bearings on the steering shaft. The manual says to grab the steering wheel and see if there’s any movement. If you can feel any it really makes a difference if you can adjust it out. Do that check with the sector out of the box. Tapered rolling bearings seem to like some preload so don’t be shy about taking some shims out. Just make sure the steering doesn’t get heavy without the sector.1 point
-
I thought I’d start a new thread for this, although I’ve mentioned it in other topic threads. I’m fabricating a triple carb intake manifold for my B2B. I’m currently running the factory two barrel Stromberg that came on the 230 cars in the mid to late ‘50’s. It runs better than the one throat Carter B&B but suffers from the same design flaw as the factory Carter and intake manifold - the six cylinders do not all get the appropriate amount of fuel at the appropriate time. Hence, my adventure down the “design and build your own manifold” road. As you know, the MOPAR flathead six has three siamese’d intake ports - two cylinders sharing the same intake port. Now for many years this completely satisfied MOPAR engineers and customers. However, it is not the most efficient design in terms of speed, power and fuel consumption/distribution. The ideal setup would be for each cylinder to receive fuel through a dedicated intake port. Now you’re spending real money for an F head setup. Efficient but not very cost effective for most of us. The next best setup is to have each Siamese’s port have a dedicated intake runner/carburetor. I’ve seen several threads on this subject and I have borrowed shamelessly from them. My design will be a simply log plenum with three intake runners and three carburetor intake flanges. I’ve talked with George Asche several times and I think I’ve got the B&B sizes and jetting dialed in. If not, I shouldn’t be too far off. At any rate, I got my flanges back from the CNC shop today so the actual welding/fabricating is not long off. More to follow…1 point
-
Go grab a beer and relax .... is normal. You have a stomp starter and the stomper (solenoid) likes to rust up if not used. By adding water to the equation the stomper has rusted or corroded over faster. I use to take the solenoid on top of the starter apart and manually clean it to remove corrosion and get it to start working again .... probably a good idea to do it one time to see how it all works. Then I got lazy and just started pushing the starter pedal about 50-75 times and it would self clean and start working again without taking it apart. My truck is still not on the road, I do start it up and move it around the yard from time to time .... when I let it sit for long periods, the starter pedal does nothing and makes no connection. Hit it with water and will speed up the process ..... I use to take it apart and manually clean it .... now just stomp on it a bunch of times and it self cleans.1 point
-
Assembly line foreman to engine builder " I don't care what the build card sez, USE THEM TILL THE DAMED BIN IS EMPTY!" " Are we clear on that? GOOD."91 point
-
1 point
-
Before you do anything, check the brake adjustment. If your brakes are out of adjustment you'll have to pump them to get them to work. Get a shop manual if you don't have one and follow the directions.1 point
-
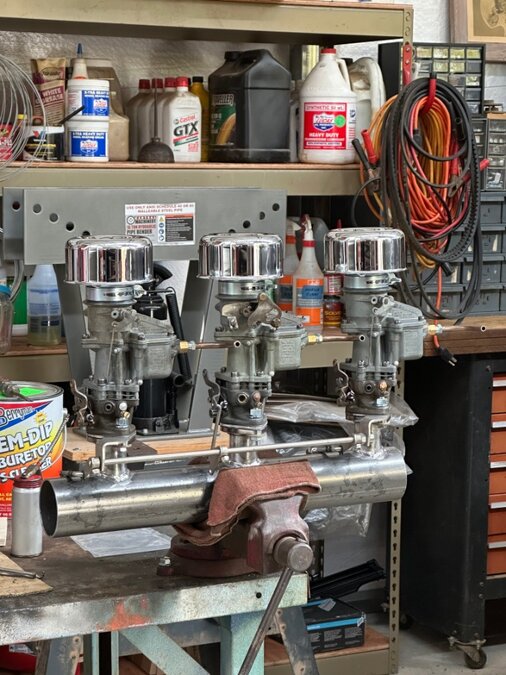
Got some more welding done. Also mounted George Asche’s linkage and finally found after market air cleaners that fit. As it turns out, I’ll have to modify the linkage some, but the main parts (rod, levers, flange bases…) should work. Gettin’ close to removing the stock intake and carb. Gotta be done by April 5 so I can show it off at Tim’s BBQ…1 point
-
1 point
-
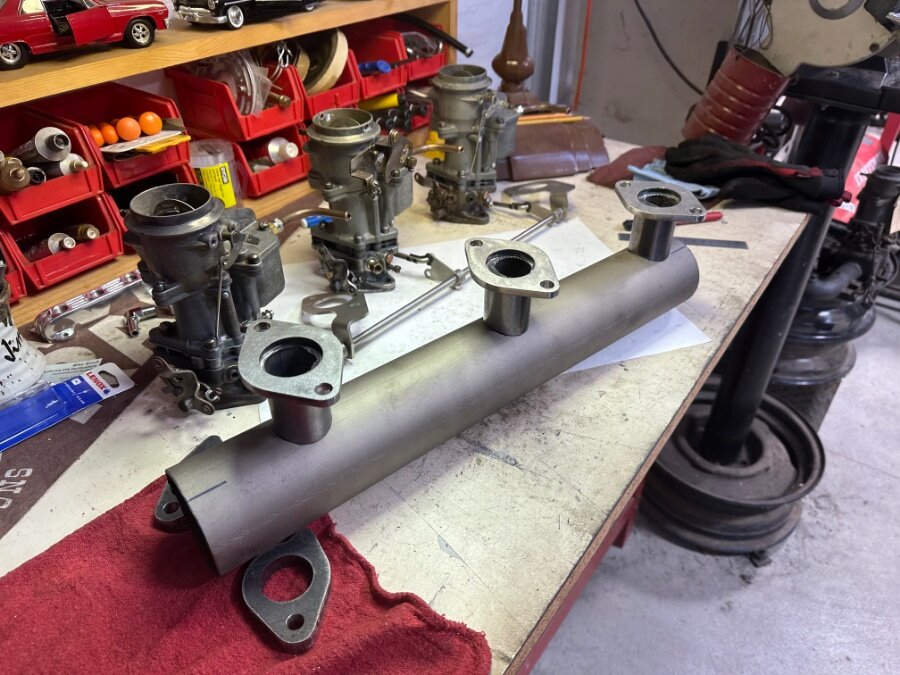
Well I thought I should start documenting this little adventure. Here’s a photo of the first mockup. Those are the three carburetor mounting flanges. They’re sitting on top of the “log,” which serves as a plenum chamber. Each carburetor sits slightly forward of lining up directly with its intake runner so as to clear the firewall.1 point
-
1 point

