Leaderboard


Popular Content
Showing content with the highest reputation on 02/04/2024 in all areas
-
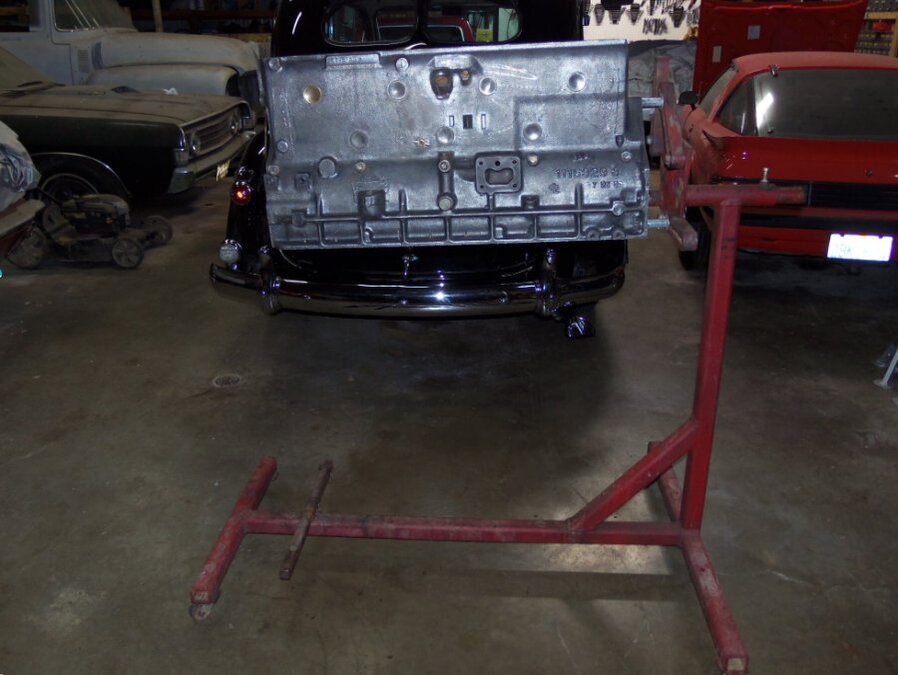
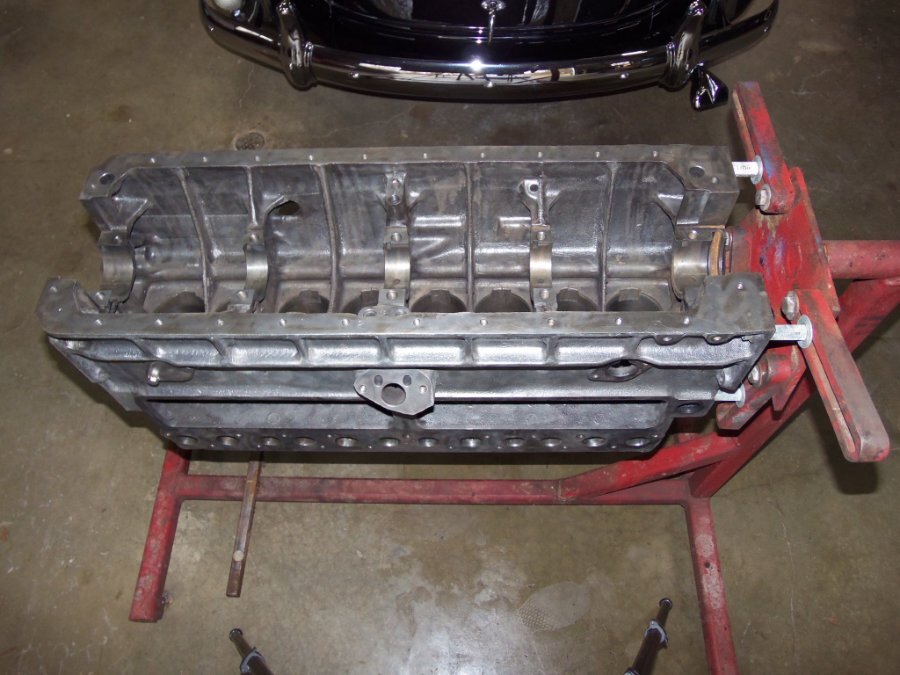
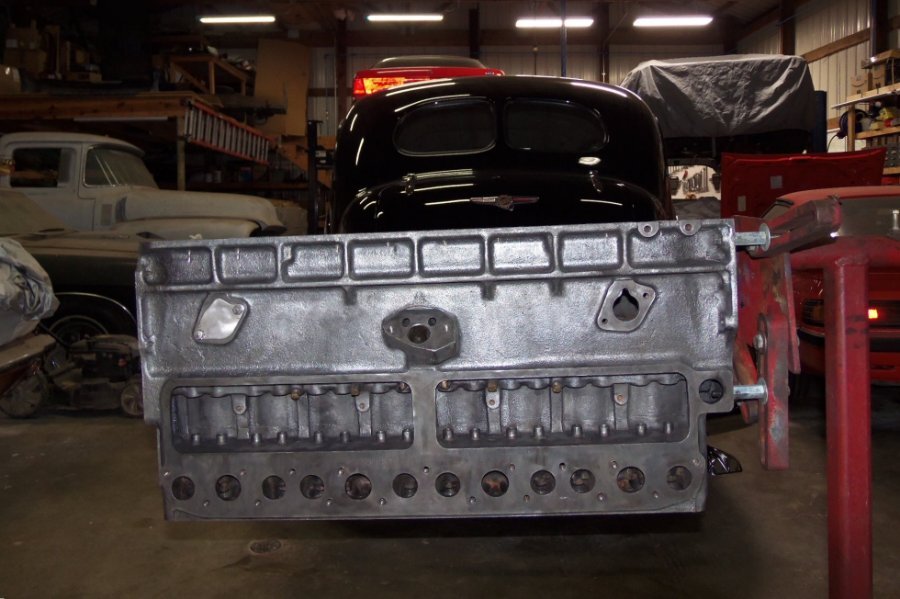
Before the first snow of the season fell, we got a day that was warm enough to use the air tools and power washer outside so I spent some time cleaning Chrysler straight 8 parts. I soaked the 324 cubic inch block with oven cleaner. After soaking for 20 or 30 minutes, I hit it with the power washer, gave it a blow dry, and then went after it with wire brush wheels on various air tools. I still need to chase all the threads, run the brushes through the oil passages and put the bore scope down the water distribution tube to see if it needs to be replaced. Looks like the distribution tubes are available: https://www.moparmall.com/MoPar-PN-1115296-1115302-Water-Dist-Tube-p/310-196.htm At this point, the block is clean enough to the machine shop to be magnafluxed, measured for pistons, bored, honed and have the cam bearings installed. The crankshaft will get machined, rods re-sized and the reciprocating assembly balanced at the same time. I still need to send out the harmonic balancer(s) to be rebuilt. Since it's neutral balance, I don't think my machinist will need the flywheel or damper for balancing but I'll ask him to be sure. I'll replace the core plugs once it's back from machining. Unlike other engines I've worked on, the convex core plugs go in flush with the block instead of recessed. The block will get another power washing with soap and water before it gets painted gloss silver Imron. I'll likely do one of the heads in gold paint like the current engine. I'm developing a strong dislike for non-detergent motor oils. I spent about 6 hours on a pair of oil pans and a couple of other parts. Scraped the majority of sludge out then gave them the oven cleaner, power washer and rotary wire brush treatment followed by a wipe down with phosphoric acid and more wiring brushing. Getting to the gunk under the baffles was the trickiest part. Of the 6 straight 8 oil pans I have here, these are the two worst so I won't even be using them though I'll likely paint them at the same time the rest of the parts get painted just to keep them from rusting. I may let the machine shop clean the next block. It's just too much work the way I do it. I also need to find a cheaper alternative to Evaporust so I can fill a container large enough to immerse big parts like the straight 8 cylinder heads and exhaust manifolds. Looks like people have used molasses, citric acid, apple cider vinegar, phosphoric acid and oxalic acid. Among those solutions, oxalic acid might give the best bang for the buck. Electrolysis also sounds like a good option. I need a container that will handle the width of an FE big block Ford block and the length and height of the Chrysler straight 8. Something that size would let me do a bunch of cylinder heads or manifolds at the same time.
 1 point
 -
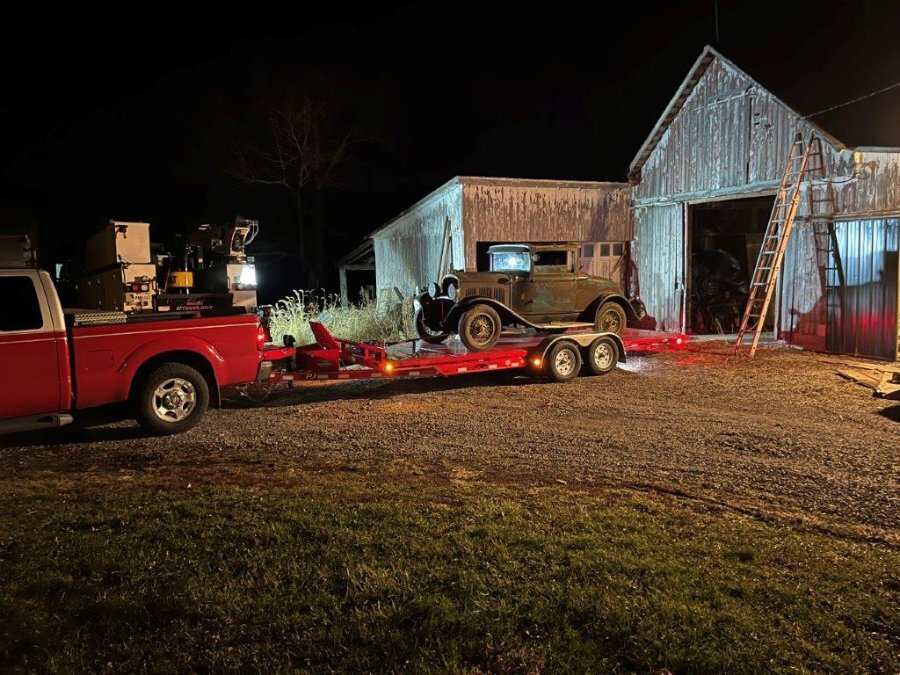
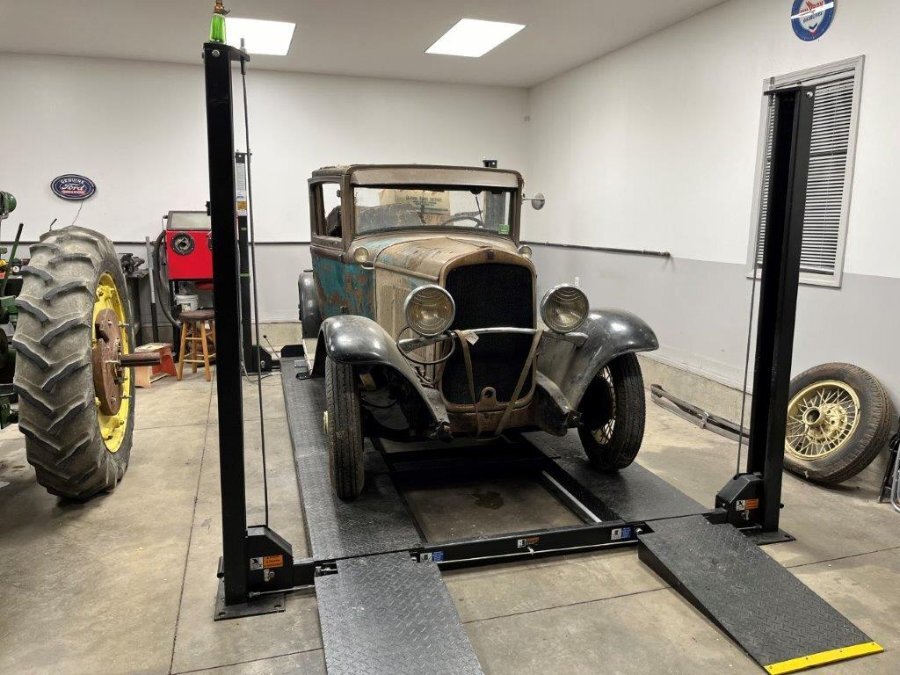
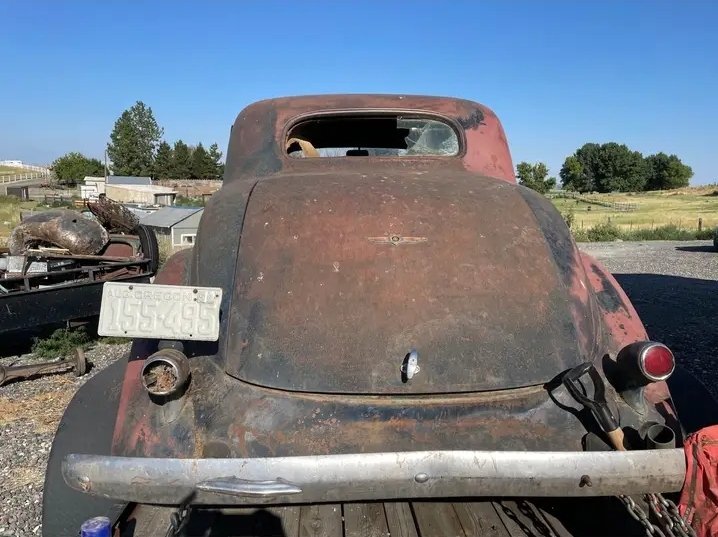
I thought I'd share my newest project. I was graciously gifted a 1929 Desoto Cupe de Lujo (rumble seat soft top deluxe coupe) from my friend with the simple goal of saving the car. He acquired the car 3-4 years ago from his uncle who drove the car in high school in late 60s and kept it ever since. I'm guessing the car was last driven in the early 70s. From what I can tell, it's 100% complete and was parked while driving. Over the years his uncle tried to preserve the car by putting oil down the cylinders and rolling the engine over and various other things. The engine is loose and it honestly looks like it would run if I clean the points and run it off a gas can. He did work on it some since it was parked in hopes of driving it again. He put new wheel cylinders, brake lines, and it appears he rebuilt the master cylinder. He collected some parts, like wheel bearings, a very nice (looks NOS) Desoto grill emblem, and a few other odds and ends. I picked it up last night after work, and didn't have much time to look it over very good. I did spend 15 minutes or so digging around through the boxes of parts and through the rumble seat area and found the original top (perfect for a pattern), the missing rear bow for the top (I was worried about that!), and even the original door panels that he saved when he replaced them in high school. He saved everything he ever took off the car down to each screw. The worst part of the car is going to be repairing the wood body frame as needed and making a new top for it. The cowl is weak and it flexes when you open the doors to the point the doors hit the opening at the rear. It takes a firm push to get the doors to close. Other than that, I think its going to be fairly straight forward. I'll just need to pick away at it as I get time. It was originally a teal-ish blue but someone painted it brown at some point. The brown is lacquer and is peeling off in sheets. Here are some pictures. My kids seemed to enjoy it. It's a pretty exciting event for them lol. I have other projects, but I have a big hang up currently with one, and the other one is in a running/driving state, so I haven't been eager to start it other than acquire some parts. With that said, I think this one will be what I tackle. Hopefully I can get after it in a reasonable amount of time as money and kids allow!


 1 point
 -
I suppose someone needs to say it ..... absolutely be as careful as you can removing it. Even though you are as careful as can be, they were somewhat fragile when new, now they are ~75 years old. The one in my truck looks very good and seems to be in working condition ..... sometime in the past it leaked and no longer works. I have a later aftermarket I was using and planning to use as a donor to repair my original .... it started leaking when I went to remove it. I'm just saying you need to be as careful as you can, if you get it out and clean it up and it still works ..... go buy a lottery ticket.1 point
-
Remove plug...carefully wedge the bulb out. Simple.1 point
-
Looks too me that the nut is removed but the bulb is corroded in place. Removing the core plug and soaking with a rust solvent the gently prying through that access is called for. A solvent that will dissolve rust would be great, maybe you could create a dam of some sort with plumber's putty to retain some evaporust around the bulb? Whatever you use, patience and time will be needed.1 point
-
The bulb is probably stuck to the gland nut and that could twist the tube and break it . .1 point
-
1 point
-
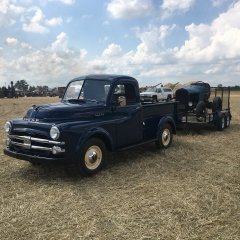
2-2-24: okay fellas the Meadowbrook is back in business. There were two problems: 1. The field wire had a break somewhere and was giving spotty continuity. 2. The voltage regulator was bad. I had put a NEW one on and that was bad, which threw me off and forced me to learn a few things. First thing I did was pull off the ground cable from the battery while the car was running. It died. That's a sign something is wrong with the charging system. I tested the generator by first taking the belt off and then running a jumper from the armature post on the gen to the negative battery post. The generator took off spinning, no issues there. Then I tested the VR for ground by running a jumper from the regulator base to the ground on the battery while the car was running. The ammeter did not show a charge so there was no grounding issues with the VR. Then I bypassed the VR by running a jumper from the field terminal to a ground bolt on the back of the generator. The ammeter showed full charge from the generator with the VR bypassed. So the new VR was the issue (and of course the old one initially). I ordered a new VR from eBay and got it today. I reinstalled everything (each connection with a bit of dielectric grease) and then polarized the generator and fired up the car. Immediately the ammeter went to charge as my battery was a tad low. Test drove for an hour. No issues. Thanks for the help, encouragement, and advice everyone. Much appreciated ?1 point
-
It is my understanding that the oil does not go to the filter until the bypass valve opens. Which is why it is called a bypass oil filter.1 point
-
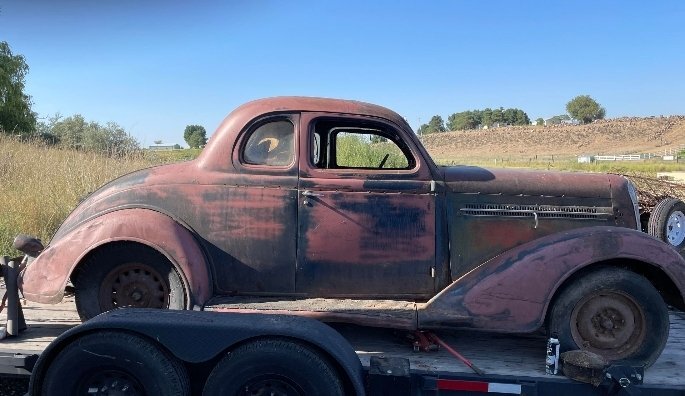
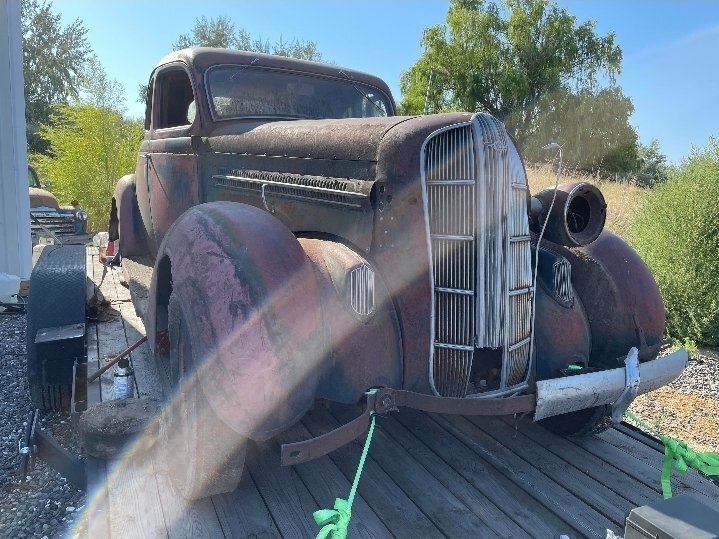
Hello everybody, I am Nicolas from France and I have bought à 36 dodge coupé in usa. I am waiting it and hope it will be here in the beginning of 2024. Happy to be on this forum and many questions for you ? Have a Nice Day1 point
-
I think your confusion comes from the misunderstanding that this type of oil filter is not a full flow oil filtration system. Oil is not continuously going through the filter. It only goes through the filter when the oil pressure is greater than the resistance of the spring in the oil bypass valve. The shop manual is great on how to do things, but sucks on explaining the theory behind how it works. Originally these cars did not have an oil filter. It was a dealer option. The oil change interval was 2500-3000 miles (city). In dirt or gravel environments (rural) it was more often, probably 1000-1500 miles. These cars had a crankcase ventilation system that took air in at the oil filler cap and vented it through the downdraft tube at the back of the engine. This was to keep water and water vapor out of the oil. However it did not address the dirt and particulate in the oil. Hence the oil changes at shorter than todays interval with the sealed crankcase. On a warm engine the bypass oil filter only worked when the oil pressure was at higher at higher engine RPMs and the bypass valve was open. At low Rpms your oil pressure goes down and the bypass valve would close and the oil did not travel through the filter. This ties into the crankcase vent system which did not work at low speeds as it needed higher speeds to create a vacuum by having air rush past the down draft tube to create said vacuum. At 30-45 psi it is not a problem to force oil through that small hole. I think at the bottom of the riser pipe are couple more holes as well. As long as the holes are between the top and bottom of the oil filter the oil is forced to go through the filter. Since it is not a full flow system it does not need a lot of holes to return oil to the crankcase. That's also why when the manual calls for 5 quarts of oil, it's more like 5 1/2 with the oil filter because the oil in the filter does not drain back into the crank with the engine off even if the filter sits higher than the crankcase. On todays cars the oil always flows through the oil filter. Since it is a sealed system, dirt and debris can't be sucked in the crankcase. The longer interval for changes is for burnt oil and engine wear particulate to be changed out with new oil and a filter. That's my story and I'm sticking to it. Hope this helps. Joe Lee1 point
-
Hello everybody, thanks for your posts.i have bought the car via marketplace and a french company based in Los Angeles has arrange everything for me. The car will leave the usa in the next weeks. I have a lot of work but I will take my time. Lot of rust but the car is complete except the right headlight . I have bought 4 tyres . I will need parts in the future so thanks for your help ??
 1 point