Search the Community
Showing results for tags 'p15'.
-
I ran across this video in a multi-part series that describes how this guy rebuilt his P15 engine. I found it pretty damn good, considering I know very little about doing that sort of thing. Some of you have probably seen it.
-
Greetings! Does anyone know the differences in the P15 Deluxe and P15 Special Deluxe trims?
-
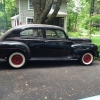
Look what I found by the side of the road yesterday! No "for sale"sign, but it is in front of a used car/parts yard (Tosy's Mustang Farm on Route 1A in Wrentham MA). Bad rockers and sills, but a recent inspection sticker and a serviceable interior that doesn't look like the site of a raccoon fight! I'd fix the rockers and sills and drive it as is! Feel free to add your own "Roadside Attractions" to this topic...
-
Reaching out for a little help if possible. Attached pics are of the bell housing on our 46 model flat six 218, inside the cab, drivers side, immediately next to/below the starter bolt up location. Pic#1: The rectangular shaped black piece with a hole at each corner is called the "Spring 6-58-5" ..it's the bracket that the Torque shaft attaches to on the engine side. I drew all this out in detail when I removed it - however in putting this all back together there are two things that have me uncertain...guess my details weren't detailed enough Pic#2-3: The Spring Bracket is flat, so when it's bolted down firm with the 2ea 5/16 bolts (as shown in pic#3 where they are just finger tightened down) against the bell housing, that 1/8" or so lip/edge on the bell housing is going to either bend the Spring Bracket or just curve it outward,..I guess ?? I didn't want to try it yet to just find out yet in my mind, I know it came off here and I feel sure there wasn't anything behind it, like a spacer, etc...course maybe there should have been ?? dont' know. Pic #4: This is the only drawing I've found, looking down from above on the torque shaft....this diagram is from the 46 P15 parts list manual. with associated parts breakdown as follows: Spring 6-58-5, Clutch Torque Shaft Clutch Housing Pivot Bracket, pp# 871993 1ea. Attaching Standard Parts are: 2ea 1" 5/16 bolts, 2ea 2" 5/16 bolts, and 4ea 5/16 washers. (So it doesn't say or show anything else as being required, like a spacer, etc...also in the diagram in pic#4 if the spring bracket is supposed to be bolted down, directly to the bell housing, and up against that 1/8" ridge/lip as I have it in pic#3, then they chose not to show that in the diagram as it just depicts the bracket being bolted up against a flat un-labeled surface.) Anyone out there able to take a look at their P15 and let me know how this one bracket should correctly bolt up...if this is correct,...or if I'm missing something here...it would be greatly appreciated. Of course I'm just taking a wild swag here, but I'm wondering if possible the reason it's called a "Spring" in the parts manual, is that when bolted in, across that lip/edge, it might give the bracket the ability to serve as a spring, sorta like a diving board effect,...?? but I'm just throwing that out there in effort of trying to make sense of this bolting up the way I have it as shown in pic #2. Also, the Spring bracket plate has a little hole in it separate from the 4ea mounting holes located at the corners. It's over on one end of the brkt. Seems like that would have to be where a spring connects. I know when I took this all apart, a previous individual had attached a spring around one of the torque shaft pins...I documented where it was attached, but it was obvious it wasn't correct.....I'm thinking the correct spring probably attached and anchored at this tiny hole..but obviously guessing...All that said - since the hole wasn't being used before (I don't even think it could be seen from years of grease, etc until I'd removed it and started cleaning it up),.I don't know at this point if the end of the brkt where the hole is located should be placed towards the front or the rear of the car..and exactly what it's for... I greatly appreciate any and all replys. Thanks again for all the help. Steve
-
Without buying a harness. What awg wiring do I use to redo everything. Headlights, horn, under dash, dom lights, parking lights, brake lights.
-
California, not Alabama! I was looking on eBay for the center grill piece for my '52 Suburban and found it for a very good price, AND the seller was located in a little town about 30 miles away, so I made arrangements to pick it up. The location originally was the home of an old lumber yard in the downtown, and when I walked into the yard, there sat a restored P15 Club Coupe. I wondered how extensive his inventory of Mopar parts might be- turns out very extensive with lots of NOS parts! The owner, Steve Rothholz has been buying and selling 30s-60s parts for a long time and has an eBay store: http://stores.ebay.com/forthebeachonly I spent some time with Steve and he told me that he is constantly buying parts and that it's a bit of an addiction. I think I resemble that remark! He is part owner in Globe Auto Wrecking, which has been in business since 1938. He currently has multiples of NOS parts (some in the original box) including brakes, engine stuff, body, interior and exterior trim, hubcaps, etc. He has over 900 cars in various local salvage yards, including Turner's Auto Wrecking in Fresno. He mentioned that he also has a number of Mopar engines available for sale including ones with Spitfire heads. He wants to move inventory so his prices are very reasonable. For example, the NOS P15 radio grilI (below) is $50 on his eBay store. Because he has so much inventory, only a fraction of it is listed on eBay. I suggested that he join the Forum and register, and maybe run a banner ad, so our members can benefit. He welcomes phone inquiries.Here is his contact info: Steve Rothholz 2135 McCall Ave Selma, CA (559) 352-1407 fourthebeachonly@hotmail.com
-
Looking for a P15 driver. 4 door sedan, maybe even a coupe. Must be driver, original or streetrod. Lmk what you've got.
-
I'm looking for these ivory knobs. Or maybe repros. Need some help. Thanks
-
So I picked up a what is said to be a Plymouth p15 from 1948. But I'm alittle confused cause the dash doesn't look like any that I've seen online. Im new to this and just wanted to see if its definalty a 1948 .
-
Wanted to share the path we went down in trying to save the original Pressboard type Inner Firewall Cover from our P15 project. Ours was looking pretty sad and had a few areas on the drivers side that were missing. What I found available as a direct fit replacement looked either cheap (stapled together) or one that looked pretty descent, (was at least a molded piece) but was close to $300. I've got $50 in the following repair to our firewall cover and thought I'd like to share this here on the forum. I also applied the same method to my other cardboard/pressboard kick panels and heater side panel ducts with consistent results. Loctite 2 part epoxy, 1/8th inch pressboard/chipboard material (I purchased a new 12" x 16" piece off ebay for $3 dollars - delivered), 4 cans of Plasti-Dip flat black, and 1 can of Plasti-Dip Glossifier with Fade Buster (depending on where you get it, Lowes versus a smaller hdw. store like Ace, ea. can costs around $6-7 dollars). I used masking tape on the areas that were frayed (like the edges of the openings of the cover), to make form walls to hold the Loctite 2 part epoxy in place while it cured. larger spots I took a very small amount of fiberglass matt, cut it up with scissors, and mixed it in with the epoxy for strength). I used the new 1/8 " chipboard to make new pieces to replace areas that were missing, and applied the same process we used in doing fiberglass repair. Which is as follows: there's much less strength in attaching two sections with a square 90 degree angle, you just don't get enough glued surface area contact to allow for strength, but overlap the two pieces and mate them together by shaping each piece with an overlapping taper (so one piece rests upon the other piece ) and you gain strength. The rule of thumb we used doing fiberglass repair was to make your tapered surface area where your going to glue things back together, equal to the new surface area you area attaching. Never had one fail that way. I've attached some pics we took along the way, that show the firewall cover from the day we removed, then mid stream epoxy and chipboard repairs, and then this past week when they got Plasti-Dipped. Pretty straight forward easy. Like with all this kind of stuff, being clean is critical. I used brake parts cleaner to clean areas before glueing, and also before applying the Plasti Dip. I like the brake parts cleaner as it leaves no residue and dries away quickly. (This was all a "what have we got to lose kinda thing", but our bonds seem strong and we had no sings of contamination when applying epoxy or the Plasti Dip). The information is not found on the cans, but if you go read their tech sheet found on the internet, the plasti dip shows a temp range of -30f to 200 f, good chemical resistance (however petroleums are shown as limited), which I didn't think should be a big problem inside the car, and a life of 7-10 years (outside in the weather) with the UF coating applied. I really liked the flat black of the Plasti Dip (before the uv top coat was added which also gives it the gloss) a little better than the gloss finish, and debated on whether the sun could get to the very bottom of the Cover enough to warrant using the UV top coat, but decided to go that route for a bit more assurance in regards to longevity. Course once the epoxy repairs set up, you've got a bit of easy sanding to do...and before applying the Plasti Dip I went over the entire panels with a red scotch brite pad and brake parts cleaner..to promote adhesion. Fun stuff..whether it's sanding a part and painting it, or something like this,...I really enjoy trying to make these old forgotten, neglected parts look like something again. Steve'o
-
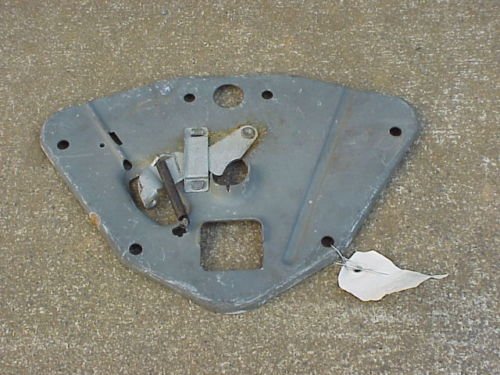
I've attached some pics of the lower half hood lock that I removed from our P15 a few years back. I removed the part, cleaned it up and painted it, bagged and tagged the misc. parts,....and put it all away to wait for the day it could be bolted back up in place. Attached the spring this evening and noticed that it rubs the lever arm at about dead center on the spring. (see attached pic #2 )..nothing looks bent and everything feels tight.......doesn't appear to me that it would prevent things from working, but did seem like it would have been real easy to eliminate this by building the forward attaching post about an 1/8 inch taller, ( heck maybe they wanted it to rub to keep it from rattling. ) Then started trying to determine if someone might have replaced with an incorrect spring. My oem parts book shows the following: pg:95, Group Code 15-11-16, pp# 906 066, Desc: Spring Hood Locking Bolt (5 coil) ??? well it's definitely got a lot more than 5 coils,...couldn't find any pics on the internet to help identify what a 906 066 spring should look like, however did find an ebay seller with a supposedly NOS lower latch plate and spring (see attached pic #1), which looks pretty much like the spring I have. Trying to confirm if I have the correct spring on this hood lock assy. Probably hard to tell if your spring is a match, or rubs, etc.. just by eyeballing, if it's all bolted up on the car. Thought I'd post anyway and maybe get lucky if someone has an assy and/or spring laying around they might be able to look at for me, or if you possible have calipers that will allow you to reach down and measure the diameter, that would help. I may also try messaging the ebay seller to see if he would measure the diameter of the spring he has to see if it's a match, however figure my chances of getting a response back, or accurate info.... are way better here on the forum.. All reply's welcome. We appreciate the help. Steve
-
Dis-assembled my starter for a cleanup and new coat of paint. Since I've only got two hands and felt the need to be super careful (as I'd never taken a starter apart before) I had the starter assembly sitting vertically on its Bendix end in a small box padded with bubble wrap to hold it still while I removed the end plate and then pulled the armature out of the housing...probably overdone but I like to be careful with stuff,...anyway being pleased with the dis-assembly at this point, I looked down and noticed 2ea washers laying on the table top which I had not seen until that moment. Each about the size of a quarter with one being metal and the other a poly insulator type material. A quick look at the starter diagram in my parts manual, and it showed the two washers, located on the armature shaft, on the commutator end of the armature. I have attached 2ea pictures from the manual showing the washers. The manual also shows the washers to be A): pp# 641 446 fiber washer at 2ea and B):pp#648 387 steel washer at 1ea...3ea total ?? (finally found the 2nd fiber washer located on the opposite end of the armature shaft). Two questions please for those in the know 1): I believe the steel washer needs to go next to the commutator and then the fiber washer would go on the end to insulate and keep bushing grease up inside the bushing and off the commutator and brushes. The manual also shows a note for the steel washer that reads "commutator end", so that would support the previous sentence as well, in my peanut head..?? 2): The exploded view diagram also shows a 3rd part listed as a pad, which would be located on the end of the armature shaft to pad the end of the shaft against the end plate. manual also shows the pad listed as "end felt". I would expect my felt pad dis-integrated a long time ago, anyway - what's the best thing to do here,....take a 1/16", 1/8", 1/4" thick piece of felt and cut out a small circular pad, grease it, and insert it into the bushing hole of the end plate, when I assemble ? I have some new moly wheel bearing grease I thought I would use for greasing the shaft/bushing ends, if that's not a good choice let me know, I would think any bearing grease would be ok, just not using too much !! but again if I was a pro at this I sure wouldn't be asking , would I ? And for those reading or wondering, nope I didn't paint the indivual ends of the starter housings and end plate where the main ground is delivered from the engine flywheel cover to and thru the starter when it is bolted up. Yeah - maybe there's hope for me yet.. All reply's and responses are welcome, I really appreciate learning from the forum which I do believe has some of the best knowledge anywhere - regarding these awesome old rides...I realize I can get pretty caught up in the details - but I'm hoping that attention to detail will not only further my education but also help make for a better overall car when done. thanks in advance for the help, again...!! Steve G.
-
Hi I live in U.K. And am rebuilding my p15 transmission I'm looking for 1st gear and also was told that there is a taller 2nd gear that fits which makes the ratio between 1st and 3rd much better any help is much appreciated cheers phil
-
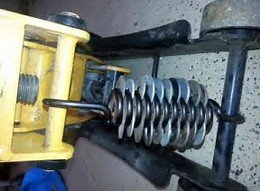
Was laying under our P15 today, looking at clearance between my new brake lines and the area where the clutch over center spring will connect to the frame and the torque shaft. Then (as Tim once put it, which this is super funny - a great flash of light went off in the distance !! ) as my mind began to search for " how am I gonna get this stiff spring assembly back in place without tearing me or the car (probably both) up " ??. Typically, depending on the size of the spring,...like with brakes, etc...if I can't pull it with just my hand strength, I use a screwdriver, or (I've got one of the old brake spring remove/install tools which looks like a crooked bar with a cupped end that grabs hold to a metal hole edge or stud), anyway - with this spring being about the size of a hood spring, I can't even make the thing budge with just hand force),...so I read through all the forum posts I could find on over center springs,....found a lot of info on adjustment of the spring, but unless I missed it - didn't really find anything concerning installation, except one fella who stated that he used some 3/8 steel cable and a turnbuckle, and four hours later he finally got it in place.... In searching outside the forum, I found the picture attached. Where the same question was being addressed in regards to the old Ford cars. Hoping folks might share the best way to install an over center spring on a 1946 P15. So far the method shown in the attached picture is the only thing I've stumbled across that seems do-able. I hated not to ask here, as more than once - I have been shown here on the forum, a very simple way to complete a task that I was trying to make more difficult than necessary. Thanks again for trying to educate an old "parts replacer" into something that more resembles a real, old car mechanic. Steve
- 5 replies
-
- 1
-
- clutch spring
- p15
-
(and 1 more)
Tagged with:
-
I pulled this bell crank off our P15 project a year or so back. Wire wheeled it, scuffed it up good with a scotchbrite, painted it, and put it aside with the other parts of the linkage. I noticed today that the linkage rod hole that connects one side of the bell crank to the steering column has some slop in it. It's a bit egg shaped from it's original 5/16 diameter to around 3/8, (so about 1/16th of slop) Any reason I shouldn't just weld in the sloppy hole and then re-drill it out ? I figure this bell crank is cast iron, and I've read about issues with welding on cast iron manifolds (course manifolds have to endure heat extremes that this part would never encounter), anyway - hoping to freshening this part up with the welder and drill press - if possible. Thanks again for the continued help with our project, and my restoration work education Steve
-
I sent this email with pics to Scarebird a few minutes ago, regarding mounting up the brake hoses to the calipers on my Scarebird brake kit. I would also appreciate any feedback from members who have installed the Scarebird front disc kit on your P15's. Thanks for the help. Steve To Scarebird Today at 12:08 PM Scarebird, Question please in regards to connecting hoses on front calipers. I've attached three pics in reference. Question is in regards to the proper clocking/routing of this brake hose. In attached pic#2 (4888.jpg) you can see the angle of the hose to caliper banjo connector. Question: Initially I loosely mounted this hose up with the hose angle pointed inward (away from routing over the top of the caliper). I did this because mocked up, with crush washers, it aligned up and fit square, nothing hit. But the hose route was tight and did not look like the route I saw in my paperwork. Then I had the brain fart to turn the steering a full left to right, which showed that the hoses would hit the shock absorbers. So I flipped it over and attached as in pic #1 (4887.jpg), pic#3 (4893.jpg) and noticed that the hose route now looked much more like the zerox copy pic I rcvd with my kit. To mount the hose as shown in pic#1 and #3, approx. 1/16th + inch had to be filed away from the lip/edge of the caliper to allow the base of the banjo conn fitting to clear the caliper housing evenly on all sides. (You could see it in the crush washers, as you got snugger with the bolt, the washers were cocking high on the side where the brake hose exits the connector, due to that angle of the connector. Also, with the banjo connector mounted in this position on the caliper, one of the flat edge's of the banjo connector is parallel with the molded cast iron anchor tab of the caliper, however it's not an interference fit at all - there's a small gap present that would allow the banjo connector to move some before the edge of the connector would come in contact with the cast iron tab block.. Am I anywhere close to having this right ? Should the Banjo bolt, when tightened down to adequately crush the crush washers be enough to hold this hose in place ? Trying to be pro-active on this end, although I'm quickly seeing where my years of replacing parts on vehicles can fall short, when it comes to experience and knowledge. Thanks again for your help, ( rounding third almost home with this, I should be good to go after this ). Steve
- 14 replies
-
- scarebird
- disc brake
-
(and 1 more)
Tagged with:
-
I'm working on a late P15 (early 1949) I've removed the transmission and clutch and can reach the lower half of the seal. the upper half will be hellish. It is held in place by three bolts and the topmost is high in the center of the bell housing and behind the flange of the crankshaft. I'm not sure how to ever get that one started. There Is no space for fingers and you are working blind. My best idea so for is to use a little rubber cement to attach the bolt to the seal and then coax it into its threads. Someone else must have solved this before. Also, the new seal is some kind of neoprene rubber rather than the asbestos rope. They are interchangeable aren't they?
-
Well the time is now, this 47 Plymouth business coupe SD has stalled for a year, but only for good reason. the original plan was a mild build with a 318 Magnum. But i was able to get my hands on an entire 08 Charger R/T, that's getting turned into a drag runner. Yup that means the 5.7 Hemi, trans, interior, steering column, gauges, seats, and entire electrical system is being installed in the the Plymouth. AND ONLY ABOUT A MONTH TO FINISH!!! Engine: 5.7 Hemi Trans: 5 speed Tiptronic Steering: 89 Chevy caviler Rear end: 01 ford explorer (DSK Brake typ) http://s1268.photobucket.com/user/vethd32/media/IMG_20170326_192443944_zps2oqtkxxj.jpg.html?filters[user]=144930205&filters[recent]=1&sort=1&o=1 http://s1268.photobucket.com/user/vethd32/media/IMG_20170325_112957080_zps742lbbze.jpg.html?filters[user]=144930205&filters[recent]=1&sort=1&o=3 http://s1268.photobucket.com/user/vethd32/media/IMG_20160709_241347219 1_zpsunomkp06.jpg.html?filters[user]=144930205&filters[recent]=1&sort=1&o=4 Ill try to keep this feed updated as best i can!
-
I had a productive Saturday. From this: To this: I've got a couple of rust spots to patch, but overall, it's not bad. The rust is limited to where it was bolted to the front fender on both sides. The drivers side is the worst of the two. It's solid metal at the bottom. Back in 1980, the body guy put a fiberglass patch over it. The side is solid. I put a magnet on the side to check that it's all metal. The passenger side is in better shape. Again, a small fiberglass patch was on it. Now for clean up, new wiring harness, front end rebuild, shocks, and checking out the engine.
-
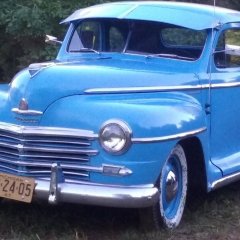
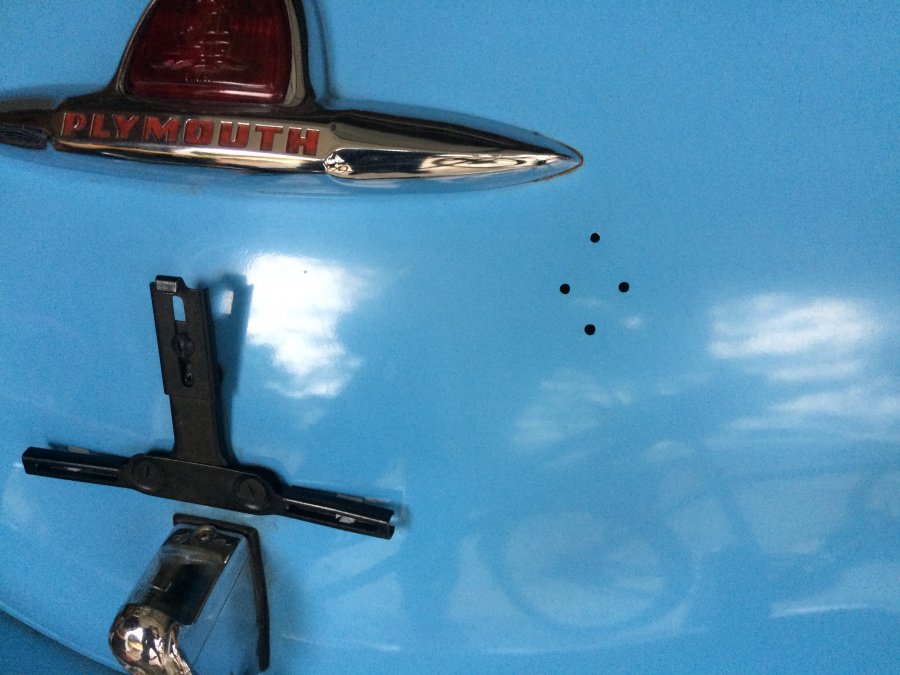
Hey, I've been lurking for a while and have learned a lot! I recently bought my Grandpa's 1947 Plymouth Special Deluxe (randomly found it by the side of the road for sale after my uncle sold it to a stranger) and I'm hoping someone can help me figure out what the holes in the trunk might be for. Neither my Grandpa nor Uncle are around anymore but my Grandpa used to say he thought AAA had badges that might fit there. Any ideas? Thanks!
-
THANKS EVERYONE WHO ASKED ABOUT THESE PARTS. I moved the entire lot today to one buyer. Jim Good morning, I sold my P15 last April and am now longer in the hobby. LOOKING TO UNLOAD TO ONE PARTY or VENDOR. I have a disassembled overdrive needing some work, a complete (sans steering wheel) steering set up with good sector gear that was pulled from a '48 Desoto, but I believe the parts book says fits P, D and Desoto. I have some manuals, including a Master Index parts reference for 46-54 for all Mopar (has great exploded illustrations), some misc. trim parts, ignition parts, coupe quarter glass, wing vents and glass, distributor housings (some mostly complete) Vacuum modules, etc., If you can come pick up these are yours. Otherwise, by end of June I will need to dispose of. Please keep this hardware in circulation or use. Located in Lake County, IL, northeast Illinois. Jim Leman 847-840-0784.
-
Problem: The car cannot be driven because the brakes lock on after a few presses of the pedal. I've put new rubbers in the drums and master cylinder. I believe the problem is related to the return valve in the master cylinder but after adjustment per the manual the pressure release port is still inoperative although after much adjustment the port opens but not at the time it should. Can anyone help me understand what's happening here and how to fix it? Thanks!
-
I took the flywheel that came off our 1946 P15 Plymouth Club Coupe project, over to a highly recommended differential clutch and gear machine shop that repairs the majority of older flywheels here in the Dallas Ft Worth Tx metroplex area. Super nice bunch of folks, incredible busy bunch - my gut impression was really good and my understanding is they've been there for over 25 years, anyway - Reason for getting with them is to have the flywheel re-surfaced and to replace the ring gear. Immediately upon looking at the flywheel - he asked how many miles were on the car. (the odometer reads 44,000 and some change),....he said I need to know if that's supposed to be a flat or a step flywheel, as he pointed to the round depression area (exactly where the clutch rides) on the flywheel surface. (I measured this lower surface area where the clutch rode in relation to the flat outer surface of the flywheel, with the slide rule end of a set of dial calipers, and I get a depth measurement of 24 thousands lower then the outer flat surface area of the flywheel. Their machine shop books did not go back as far as 46-48 so he wasn't able to look it up in his documents. But in looking at the lower circular area he stated that it would seem like an abnormal amount of wear for a car with 45K miles, so his guess was that this flywheel was a two step flywheel and not a flat flywheel that could possible have that much wear. Obviously I'm not much good here - except to show what details I have been able to put together, which are as follows: ###note### just an fyi - This car came from a car collection in Louisiana. So far in dis-assembling the car (and I've got it completely taken apart except for the frame and suspension), it has been a 100% original oem part car...course that still doesn't mean that this flywheel couldn't be a step child - but I would have to think the odds are in my favor, (initially, I had thought the rear motor mounts might be something odd but the more I've studied them I think they were just so badly deteriorated and squashed that they looked wrong at 1st eyeing them, the more I've studied them I believe they were also original). 1: 1946 Chrysler Corporation, Parts Division, Parts List Book, shows oem starter to be pp# 1113 119, (this is a match for the starter on the car) 2: " " " " " " " flywheel to be a PP# 1119 716, (the only numbers I can find on this flywheel . are a (2) and a (13) as shown in the casting, see the following 2 pics... . , 3: This car does have the standard 9 1/4 " clutch, however you can see in the pictures that the flywheel is drill and tapped for the 9 1/4 clutch basket, as well as what looks like the larger 11 " clutch basket. , . 4: The lower, round surface area of the flywheel - where the clutch rode in relation to the flat outer surface of the flywheel, when measured with the slide rule end of a dial caliper, shows a depth measurement of 24 thousands lower then the outer flat surface area of the flywheel. I'm trying to rule out the possibility that someone has done something (C R E A T I V E) here , regarding this flywheel - but obviously my knowledge isn't sufficient to know or see what might be going on. Any of you 1946 - 48 P15 guys out there who can shed some light on this,....your help is needed and greatly appreciated. QUESTION: Did the 46-48 Plymouth's have a two step flywheel ? Could they have a two step flywheel ? etc.. Thank you all so very much. If I never received any further help from this forum, I would still consider it in nothing but a positive light. The help sent my way to date has been second to none. I've certainly gotten more than my share of help and I will definitely try my best to hold up the standard set by the folks here on the forum, and try to help others in the future as my knowledge grows, again with and thanks to the help of YOU ALL. Steve Gentry