-
Posts
358 -
Joined
-
Last visited
-
Days Won
6
Everything posted by johnsartain
-
Paul, Now that would make really quick work out of derusting your truck! When I was researching using molasses, there was a tale of someone who put a vehicle in a pool of molasses and the pool leaked. The guy wasn't paying attention, leaving it in there over a long stretch of time, long after the molasses leaked out. He returned to a worthless pile of rust. I know from my own experience with it and the need to keep the parts submerged until ready to rinse off. Anything I had that breached the water(molasses) line, rusted like crazy. Given my experience, the might be some truth to the story.
-
Hey Don. What part does that heat shield fasten to, is it one of the lower manifold bolts?
-
Your's may be different than mine but the glass bowl on mine has a thumb knob under the glass, loosening it allows the bowl to drop enough to be removed. The upper part is made to my fuel pump. It is a sediment bowl and not a filter, the intent was to capture larger pieces of sediment from the tank to settle into it rather than entering the pump. This is the pump I used ... http://www.rockauto.com/en/moreinfo.php?pk=6285660&cc=956910&jsn=396
-
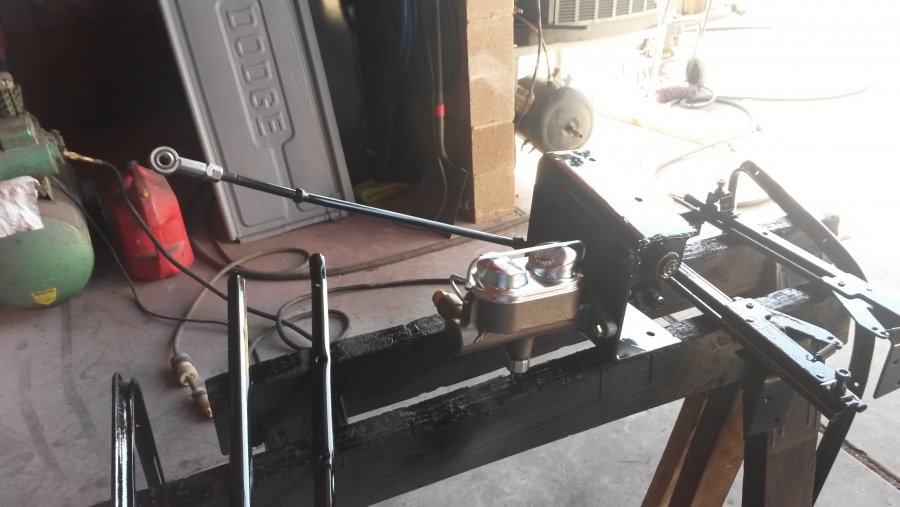
Here is a bracket and master cylinder I set up for my B2B. I used a master cylinder for a 80 model Jeep. It mounts to the crossrail right in front of the gas tank and immediately behind the pedals. The heim joint on the rod attaches to the normal place on the brake pedal.
-
-
Wow, Nice old truck! Most of the 6.5-16's and 7.0-16's sold today are load rated for trailers. It doesn't mean you can't use them but I wouldn't get my hopes up on a great ride. Coker and Lucas tires are both bias ply and radial. They are meant to look like the vintage tire of whatever era you're restoring. If you are doing a restoration, its a good way to go, but if its a driver, they are a bit expensive at around $190 apiece for the 15" Bias ply tire through Coker. The other thing to consider if that you may have a 2 piece riveted rim which is not a tubeless rim. It requires a boot(flap) and a tube which adds to the expense. I plan on possibly getting a set of vintage tires for my truck. I haven't made my mind up completely. A 205 70 16 General tire can be bought for $102 and will likely last longer. To me the stock rims with beauty rings and original style reproduction hub caps would look pretty cool. but they won't be the ones I drive on, they will be for car shows only.
-
If you are looking for one with a booster, fabricating a bracket to remote mount it will be a must do. There are a couple on the forum that have done this. Here is a ling to Wilwoods remote Tandem MC...http://www.wilwood.com/MasterCylinders/MasterCylinderList.aspx?group=Remote Tandem Master Cylinder
-
I saw an adaptation that used a master cylinder with relocatable reservoirs I thought was a real neat setup. They call it the Scarebird Conversion and it used a Wilwood master cylinder. There is also a link at ... the former using a Cherokee master cylider
-
Here is a link you may enjoy then http://dodgepilothouseclub.org/know/manual/manual.htm pages 413 - 421 have what you seek
-
I like the Motor truck manual. There are a lot of them out there on Craigslist and Ebay for 25$ or less. But this forum has really been the most informative.
-
Vintage Power Wagons has the part. It is Part # CC602069A for $15 on page 20 of their catalog. Their web site is https://www.vintagepowerwagons.com/, mostly Dodge powerwagon parts but there is some interchange. I got mine from them.
-
Thanks Reg, Some of the posts here had me wondering
-
I have the pedal start too. On the B2B is there a spring or a linkage that holds the starter lever to the pedal?
-
You may have been able to, and I'll keep that in mind should that need come. I tried doing it hydraulically but no luck.
-
Rock Auto list a Rear wheel cylinder for trucks that has a single wheel cylinder. If your's was like mine and was a split system then Roberts, Vintage Power Wagons, or Bernbaum has them but they are high. When I bought mine Bernbaum was cheapest. Sleeving them was out of the question because they were rusted tight and wouldn't come apart.
-
Keven, That would make me question how much of the "crap" is also in the main oil gallery which also feeds the crank journals. I could be time for a good flush of the oiling system. I can see where a sock that was allowed to get extra dirty could gather a lot of "crap" in the oil inlet if the oil flow was restricted. I wonder how difficult it may be to force oil or whatever through the system just to make sure everything is lubricating correctly. I just rebuilt mine, ran brushes through the gallery and oil passages, but you always wonder if you missed something. The only thing I could think of doing was to take a large syringe and for oil through the gallery. I did this after assembly to try to make sure oil got to all the journals. I was satisfied when I saw that the Assembly lube was forced out of the hole on the top of the connecting rod by oil. After spending 3 grand on building a engine it would be a shame for oiling to fail on startup. Any better ideas?
-
Just FYI, mine is marked with in on the side and out on the bottom. It is the type as pictured below...
-
JPP, I like those door cards, they look awesome, are they Cedar? Are they Tongue & grove closet liner, or did you flat glue and clamp them? How thick are they? I have to make me some maybe the back wall behind the seat as well. No to hijack a thread but I just had to say something.
-
One old engine I tore down for some of my parts had really thick sludge for oil. There is no telling how long it sat in the back of the truck I had bought. The only rust in the engine was the valve stems and the guides and 2 cylinders that were open to the elements. There was a bit in the cylinders but mostly caked on sludge and carbon. It was so nasty, I had a time tearing it down, it took 2 days and a 20 ton press to press the pistons out.
-
I thought I might include this tidbit on safety that someone gave me a long time ago. I never questioned as to how true it may be, I figured better safe than sorry. It went like this... Fuel sending units are a varying resistor which is typically a contact sliding from point to point across a resistor coil in side the tank. Even though sparks could occur they are of on consequence as the amount of fuel vapor in the tank is too rich to cause an explosion should a spark occur. The safety part comes in when testing the sending unit. Best practice is to completely remove the unit from the tank and the tank area and to wash the fuel from the sending unit and allow to dry completely before testing. The unit that Tanks inc sells for early Ford and Mopar is a 73-10 ohm unit which I believe the ohms is 73 when empty (lower float position) and 10 when full (upper float position). This page on Tanks inc. give their trouble shooting tips ( they probable apply to most other units as well)...http://www.tanksinc.com/index.cfm/page/ptype=results/category_id=159/home_id=-1/mode=cat/cat159.htm
-
1950 Dodge B2 Pickup (my new toy/project)
johnsartain replied to Marc 1952 B3B's topic in Mopar Flathead Truck Forum
It looks in great shape, looks like the first buy will be headlights and headlight buckets. -
Need measures 14-17-1 lever.
johnsartain replied to Fernando Mendes's topic in Mopar Flathead Truck Forum
I appreciate those pictures, i am fixing to have to make one myself. It will be a big help, good details. -
Aluminum B2B Fuel Tank Project
johnsartain replied to johnsartain's topic in Mopar Flathead Truck Forum
It was more of a " Let do this because we can" not a "Because its cheaper" with tanks inc pricing at about $250 + shipping, that's a price that is hard to beat. The only gain is it will never rust out. I may be dismayed when we fill it with water and go to find leaks. -
Aluminum B2B Fuel Tank Project
johnsartain replied to johnsartain's topic in Mopar Flathead Truck Forum
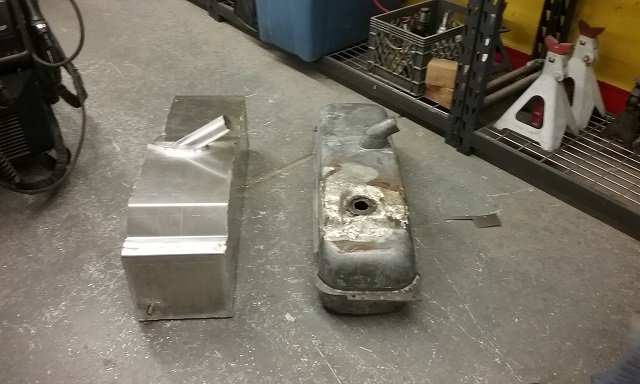
So finally after a work, here is a partially finished tank. I still have to put in a bung for the sending unit, drain plug, end brackets for mounting, and a couple of bars along the side to add more rigidity. A tig welder will be used to clean up the welds and repair any seams that fail pressure testing.


