Jeff Balazs
-
Posts
4,314 -
Joined
-
Last visited
-
Days Won
43
Content Type
Links Directory
Profiles
Articles
Forums
Downloads
Store
Gallery
Blogs
Events
Everything posted by Jeff Balazs
-
Often times people make up their minds ahead of time how something is going to go. Kind of sounds that way here. When you say you have cleaned up the grounds......are you just talking about cleaning the connectors? What about the wire itself? Some of the most difficult wiring issues I have ever had to trace down involved bad ground wires. Just sayin. Jeff
-
My Pertronix set up has been purr-fect. Make sure all your wiring is in good shape and you are using the matched coil. If in doubt replace any wiring in the ignition circuit with new. The module itself is isolated ..... only place it could ground is where the wires pass through the distributor body. My kit came with a boot type grommet for this application. As already mentioned this sort of electronic device does not do well with weak connections or low voltage. Jeff
-
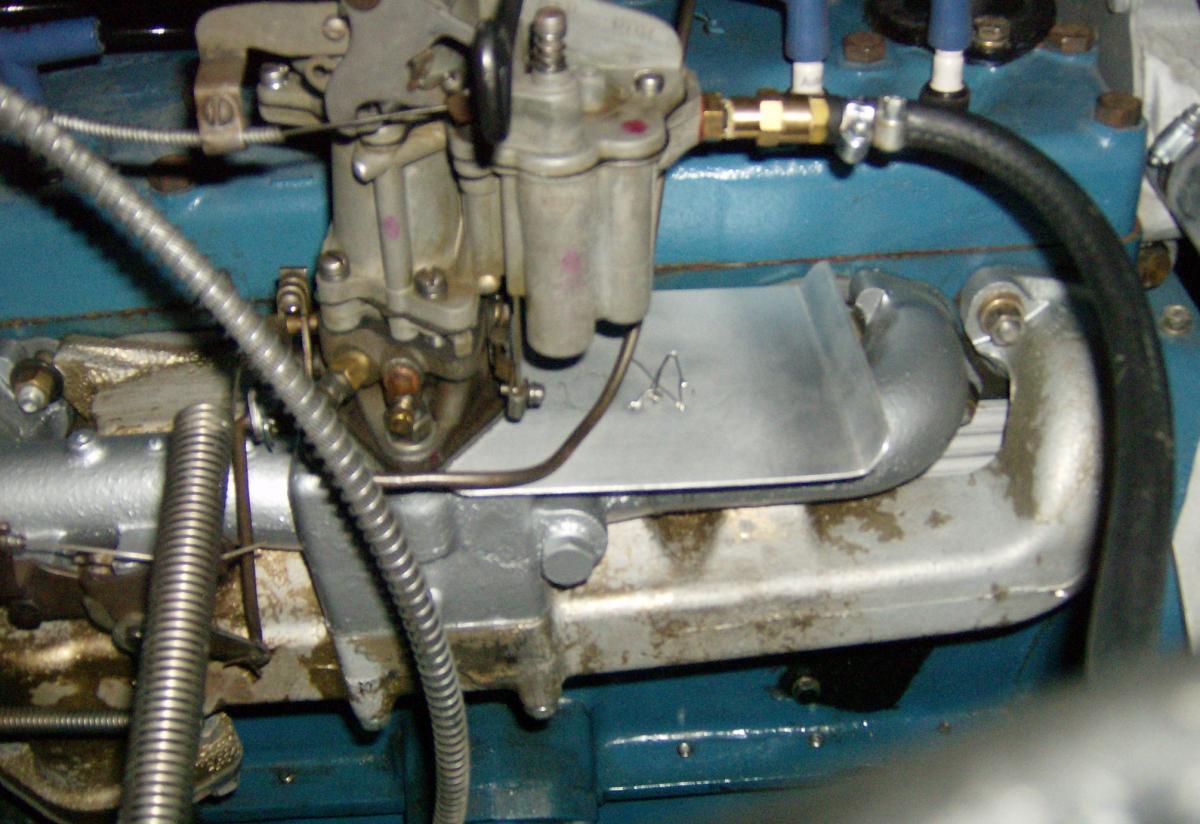
The second version of this shield I made has been on the truck for about a year now. I made it using two sheets of aluminum with 1/8" spacers in between. This shield is riveted together and is held in place above the manifold with baling wire. It can be removed in a moment using snips. It butts up to the carb base. As mentioned by others a good heavy (1/8") insulating gasket between the carb and the manifold is also part of this fix. Hope this helps. Jeff
-
Here is a photo of the 1st version of my home made heat shield. Once I had tested this for a while I made a little larger one and that is what I settled on. As you can see it is a very simple item. I made it from some sheet aluminum I had laying around. Hope this helps, Jeff
-
I did. I will try and find a photo of it. It is pretty simple and is just held in place on top of the manifold with a couple pieces of bailing wire. All anything like this has to do is help with deflecting heat away from the float chamber. I can say I have not had any issues with the dreaded hot start problem since fitting it. Jeff
-
Well I do know there can be quite a difference in creature comforts with any of these old trucks. Sometimes though a few subtle changes can make all the difference......and that is what my earlier comment was about. Often a slight change in the angles the cushions sit at or how they are stuffed can result in a lot more comfort. Bench seats do not have to be uncomfortable. I know they don't work for everybody......especially those that require lots of lumbar support but for a lot of folks they can be made to work just fine. And they keep the look of an old truck to my eye. Driving a Pilothouse truck on a daily basis has been an enjoyable experience for me. It has been a year now since I put mine back on the road. All in all there is little about it that I would change. Creature comfort considering it is over 60 years old is excellent. But it didn't get that way without a lot of thought being put into the refit. I made a lot of subtle improvements and changes. Most of them would only be noticeable to someone who really knows these trucks. I have ridden in a lot of vintage trucks built by all sorts of folks and I have to say I am really happy with my old Dodge. If you start off with a good design and refit it carefully it can be more than a match for a lot of later trucks. Jeff
-

Installed head, now barely goes forward and lots of white smoke
Jeff Balazs replied to pyrodork's topic in Technical Archives
Did you use Coppercoat on the head gasket? And retorque after warming it up? Jeff -
Ah-so Ed Interesting how it evolved. Wonder if there is a significant difference in leg room and the fore and aft measurements? A lot of times an adjustable mock up of the seating can suggest what mods may work best for you. Jeff
-
Fwiw......We all have different takes on this. I can't speak for these narrower cab trucks.......but the seat in my Pilothouse feels great to me. Hits me just right. I had it overstuffed and raised the front slightly to give it a slight tilt back.......and then added a horse blanket cover over the vinyl. Does the job fine and I think looks the part as well. Honestly I think all that is needed is a few little tweaks like what I have done. I can't imagine ever changing it more than I have. Oh yea.....I did add 3 point belts too. Jeff
-
You could try opening the throttle about 1/2 way and giving it a little choke. If it doesn't catch fairly quickly try opening the choke all the way while you still have the throttle open. Good luck. Jeff
-
I used a Pertronix module in my stock distributor along with one of their matched Flamethrower coils. It has been a fit and forget upgrade as far as my truck is concerned. There are other options but I wanted to stay with 6 volt and this one was just so simple. Jeff
-
I had my starter rebuilt by a local shop last fall. Made a world of difference to have this done right. First time around with another shop it was never this good. Having a 6 volt system doesn't have to mean slow starts. With a good battery and charging system and the right size (2/0) cables you shouldn't have any trouble turning it over. When you have it all correct it will start just a quickly as a modern vehicle. I drive mine daily and it always starts right up.......hot or cold. Jeff
-
If you have an old school radiator shop in your area I would call them and ask them if the repair and reline gas tanks. I had mine done locally for $200 and IMO it was some of the best money I spent on my truck. Just a suggestion... Jeff
-
My 1954 project.......not a quick build !!!
Jeff Balazs replied to thrashfit's topic in Mopar Flathead Truck Forum
The garage I keep my finished project in is pretty small. Have about 6" clearance to close the door. I would think that the breather is a mil spec item off a Power Wagon. Nothing wrong with that. It looks fairly purposeful compared to the stock item. Have fun with your build. Jeff -
Dolly Dodge Needs New Wiper Blades & Heater update
Jeff Balazs replied to DollyDodge's topic in Mopar Flathead Truck Forum
It sure looks like the arms you have might be too long. A shorter arm combined with a longer blade might just do the trick......and increase the wiped surface. Jeff -
Let's hope his fire prevention philosophy is different than yours.......
-
Kinda sounds?... ....well sorta ominous to me.
-
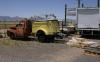
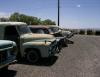
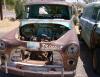
something for old truck lovers.....
Jeff Balazs replied to Jeff Balazs's topic in Mopar Flathead Truck Forum
Looks like it in this photo......didn't walk behind it as a rattler was buzzing away nearby. Their website is midfifty.com and I did ask them if they pick and ship. Jeff
-
something for old truck lovers.....
Jeff Balazs replied to Jeff Balazs's topic in Mopar Flathead Truck Forum
And a few more.....


-
something for old truck lovers.....
Jeff Balazs replied to Jeff Balazs's topic in Mopar Flathead Truck Forum
More photos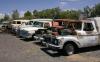

-
Drove past this mainly Ford boneyard the other day on the way from Bullhead City to Flagstaff. Had to stop and take a few photos even though it was blazing hot. Turned out there was something there for all of us. Place was called Mid Fifty. Obviously the slant was Ford but they are branching out. Jeff


-
Decided to post some pictures of my '48!
Jeff Balazs replied to 1949B-1-C's topic in Mopar Flathead Truck Forum
Very nice truck. Sounds like you are having fun with it. Mine has the side spare carrier too but it is mounted on the passenger side. Thanks for sharing with us. Jeff -
First road trip longer than a few miles
Jeff Balazs replied to Bobacuda's topic in Mopar Flathead Truck Forum
Good to hear this about this radiator. I have been looking at doing this on mine. You should have a thermostat in place. They were part of the original design and build for some very specific reasons. The main reason is to regulate the temperature of the block. Without it in place you actually run a pretty high risk of doing some long term damage as the block will not run with an even temperature from one end to the other. Not trying to incite a riot here just stating the obvious. If they were not necessary the manufacturer would have left them out of the design. 20/50 works well in hotter climates. You may even notice a difference when you put a thermostat in place.........as this is will have an effect on the way the oiling system performs. You have put a lot of work into your truck. Don't undo it by not paying attention to some very basic engineering principals. These engines run fine at 165 to 200 degrees of coolant temperature. Lower than that is not better. Hth, Jeff -
Wiper arms just sit there and don't go swoosh swoosh!!!
Jeff Balazs replied to doogan's topic in Mopar Flathead Truck Forum
I used Mobil synthetic grease to pack the gear case and on the arms inside the pivot blocks and the linkage points. This really did the trick for me. While not as efficient as modern wipers these are not bad either when treated like this. Hth. Jeff -
Paul; I figured you must be expanding your culinary skills. There is a series called "Project Smoke" you might enjoy if you are heading in that direction......... Have fun and try not to burn your fingers. Jeff