


bkahler
-
Posts
1,947 -
Joined
-
Last visited
-
Days Won
39
Content Type
Links Directory
Profiles
Articles
Forums
Downloads
Store
Gallery
Blogs
Events
Everything posted by bkahler
-
51 B3B build thread - after all these years
bkahler replied to bkahler's topic in Mopar Flathead Truck Forum
Normally yes but with dual carburetors there isn't room to mount a second filter on the rear carburetor so the filter needs to T off to the rear carburetor as well so both carburetors receive filtered gas. I've seen similar arrangements on dual carburetor setups although I don't recall seeing one rotated 90 degrees. Brad -
I'm going to follow this thread closely. I'm in the exact same situation as you on my 51 B3B only I don't have the original strips to work with, just the two that are fastened to the side walls. Reading through the archives I've read that Midwest Military supposedly is the only vendor that sells the correct profile bed strips. It sounds like the other vendors sell Chevy knockoffs which are different. I've been in contact with John at Midwest Military and he is going to sell me bed strips that don't have any holes in them which allows me to place the holes where needed. What I don't know is if he offers them in Stainless. I'm going to have to compare your location numbers with the my side rails to see if they match. Thanks! Brad
-
51 B3B build thread - after all these years
bkahler replied to bkahler's topic in Mopar Flathead Truck Forum
I've been working through the dual carburetor installation with the Offenhauser intake manifold ran into one issue I'd read about, another that I hadn't considered and made a decision on fuel filter orientation. I've decided to locate the filter at 90 degrees relative to the carburetor. I was going to have it pointing forward but didn't like the long overhang that it created. It seems a little more compact with it rotated 90 degrees. The issue that I had read about was the parking brake mechanism interfering with the rear carburetor choke linkage. It does in fact interfere! so I swapped the carburetor with the choke linkage to the front and moved the one without the linkage to the rear. I believe that should solve the problem. And finally I had always planned on using the original oil bath air cleaners on the carburetors and finally found last night that they are too large to both fit ? So now I've got to figure out what to use for air cleaners. Suggestions anyone? Brad

-
51 B3B build thread - after all these years
bkahler replied to bkahler's topic in Mopar Flathead Truck Forum
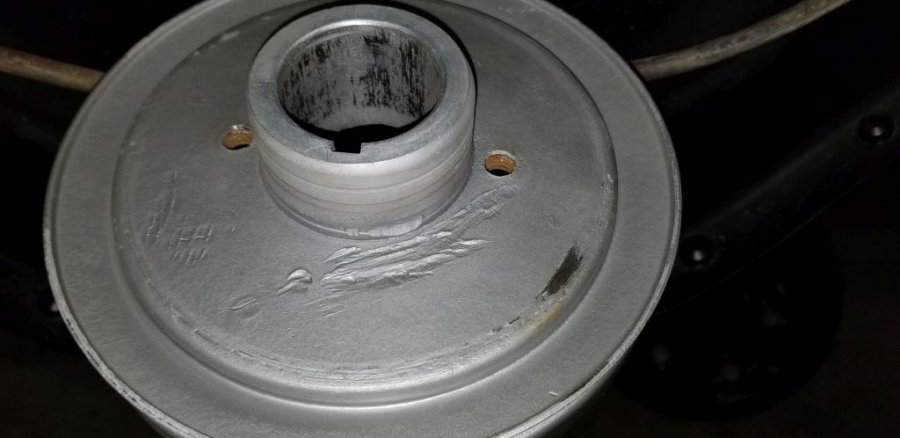
Here's a short video of the Pulley wobble check that I did last night. i couldn't get it to roll on the floor, it just wanted to fall over so I chucked it into my lathe instead. I've seen worse on other vehicles so I'm going to go ahead and use it unless someone can convince me otherwise ? Brad -
51 B3B build thread - after all these years
bkahler replied to bkahler's topic in Mopar Flathead Truck Forum
Hmm, I think I can do that ? I'm sure my cat will want to get involved once he see's it rolling across the floor....... Brad -
51 B3B build thread - after all these years
bkahler replied to bkahler's topic in Mopar Flathead Truck Forum
I was wondering how those marks could have been made on the back of the pulley. Makes sense. I'll have to figure out a way to check for out of round. Thanks! Brad -
51 B3B build thread - after all these years
bkahler replied to bkahler's topic in Mopar Flathead Truck Forum
Back when I set the engine on the frame I knew at the time that I needed to address the grooves in the crank pulley hub. However I didn't want to leave the front of the engine open so I installed the crank pulley to fill the hole in the interim. Plans are to install a speedi-sleeve to correct the problem. Today I pulled the pulley and noticed something I wasn't expecting. Just from hand turning the crank the paint rubbed off the pulley and the engine support frame. I think I now know the reason why the crank was so hard to turn without a cheater bar on it! Looking into the problem I removed the two bolts holding the support frame in place on the frame and found that it's adjustable and I had basically set the support frame to far forward. I believe just moving the bottom of the support frame towards the rear will resolve the rubbing issue. I suppose it's a good thing I'm dismantling things right now. I did a lot of work in haste 20 years ago and I think it's paying off to double check things now Brad


-
51 B3B build thread - after all these years
bkahler replied to bkahler's topic in Mopar Flathead Truck Forum
After nine days without internet service, four service calls, dozens of phone calls to various departments, it turns out AT&T's finest were bested by a mouse.....! Back to Dodge stuff A number of years ago I found one of the large service desk binders on ebay. It covers the B series pickups, power wagons and route vans. It has one section my other oem parts book doesn't have and that's a Standard Parts section. My smaller book has the Standard Parts listing but only has one page with a reference to a different document. The big book has a half dozen pages or more covering standard hardware and their associated parts numbers. Pretty cool. Brad

-
51 B3B build thread - after all these years
bkahler replied to bkahler's topic in Mopar Flathead Truck Forum
It turns out the shocks purchased at such a good price on ebay weren't quite the deal I was expecting. The first box I opened the shop was obviously used and worn out. I then opened the other boxes and while the shocks looked new they have issues. Mainly when you depress them only one of the shocks rebounds at a reasonable rate. All of them take some effort to depress but as you can see in the picture the bottom two take their sweet time about extending. I contacted the seller who while surprised at their condition provided me with a full refund. He told me he is selling parts from a closed auto parts store. There's no telling how long the shocks laid on their sides. These are gas shocks and I would expect them to be difficult to depress and extend rather quickly after doing so. I've placed the three new ones in a vertical position and am going to see if they recover any. It will be interesting to see if they do recover. At least the seller was great to deal with although I'm sure he wasn't happy. Brad
-
51 B3B build thread - after all these years
bkahler replied to bkahler's topic in Mopar Flathead Truck Forum
I have original copies of the factory parts book and service manuals. I find that the service manual is not all that helpful to the point I don't really think it's worth looking at it any more. I was looking at it this morning trying to find information on the transmission rear bearing retainer and couldn't find anything about it in the manual. Any suggestions on a good manual that would have better detailed information? Thanks, Brad -
Will do. Thanks
-
Are you still in the business of making these control cables? I'm not even sure I need any yet but it's nice to know there might be a source Brad
-
51 B3B build thread - after all these years
bkahler replied to bkahler's topic in Mopar Flathead Truck Forum
That was what I figured. I also noticed the Offenhauser intake is a little wider than the exhaust manifold so a spacer would help keep the spring from being forced diagonally towards the exhaust possibly putting in into a bind. I'll fabricate a spacer to take care of that issue. I miss having the opportunity to wander through junk yards looking for parts. I'm going to have to make real effort to locate some older yards around here. Back in Nebraska I had no issues finding places that had parts that I needed. Of course that was 20 years go so who knows if that's changed. Brad -
51 B3B build thread - after all these years
bkahler replied to bkahler's topic in Mopar Flathead Truck Forum
That's my plan, using a propane torch. (If I can find it!) My assumption is the spring relaxes, i.e gets weaker, which allows the weight to fall. Thanks, Brad -
51 B3B build thread - after all these years
bkahler replied to bkahler's topic in Mopar Flathead Truck Forum
I'll tinker some more with it in the next couple of days (if the garage isn't to cold!). So the spring gets weaker and allows the weight to move down as the engine heats up. See attached picture, item 3. No swap meets around here! I'll keep looking I've got some greenish colored pipe sealant used for gasoline and oil based type products. I'll give that a try. Thanks, Brad
-
51 B3B build thread - after all these years
bkahler replied to bkahler's topic in Mopar Flathead Truck Forum
Questions, questions and more questions 1) It appears I might have an issue with my heat riser spring. I'm not sure but it seems to operate backwards. Searching the forums it sounds like at one time Andy Bernbaum was selling some that were wound backwards. I bought my spring from Andy back in 1998. In order to be sure, what should the spring do when wind or unwind when heated? 2) It also seems that I have lost the spacer that goes on the shaft of the heat riser. Anyone know of a source for one? 3) Brake backing plate shims for shimming to create the correct clearances for the axles. Anyone know of a source for them? 4) I'm considering a dual horn setup. Anyone know of a source for a short version of the factory horn? 5) When installing the brake switch and the 1/4" plug in the back of the master cylinder, should I use any kind of sealant on those threads? Told you I had questions! Thanks, Brad -
I called Andy Bernbaum to verify and ordered. One 8' length is enough for both doors. Same for the window sweep, 8' takes care of both doors. Thanks for letting me hijack! Brad
-
Looking things over I believe you're right. The only other question is 8' for both windows or one?!
-
That may well be it. If I remember right there are two tracks for each door window, one that is flexible enough to curve and one that is straight. To me it looks like the straight track, but that's just my impression. Or, is the straight track called the "division" channel?
-
They may list it but I couldn't find it based on their descriptions. However, I have been known to miss things (frequently)!
-
Not intending to hijack this thread but can someone provide a source for the curved Run 23-42-16 in the diagram? I've searched Steele and Roberts with no luck. Thanks, Brad
-
Shock Absorber Replacements for Express Models
bkahler replied to JBNeal's topic in Mopar Flathead Truck Forum
Brian, thanks for taking all of the time and effort to compile this information. It was very timely to say the least. Much appreciated! Brad -
51 B3B build thread - after all these years
bkahler replied to bkahler's topic in Mopar Flathead Truck Forum
Back in 1997 when I was prepping the frame and various other components I came across a product called Copy Cad from Caswell Inc. It was advertised as a DIY product. I thought it sounded pretty cool and decided to try using it. In the attached picture are four J bolts that are used to fasten the rear leaf spring bumper mounts to the frame. I followed the instructions, sandblasted the parts, ect and they looked pretty good when I installed them. However, 20+ years later they don't look so good. I bolted them to the frame in 97 and the truck has always sat inside, never been wet. I would have to say the long term results are less than satisfactory. This time around I'm just going to sandblast and paint them black. Brad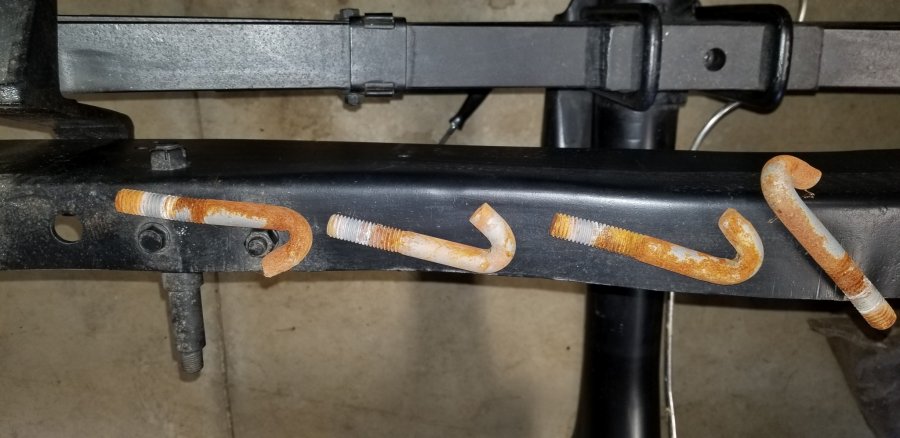
-
51 B3B build thread - after all these years
bkahler replied to bkahler's topic in Mopar Flathead Truck Forum
It's possible I have the hubs on the wrong sides as well but I know for certain that my backing plates are wrong because the brake lines to the rear wheel cylinders are angled to the rear and not the front. Considering that it's been 20 years since I assembled the brakes and suspension I've made the decision to just tear all of it apart, check things out and reassemble in the proper order. Better to do it all now while the access is nice and easy. At least I shouldn't have to deal with rusty bolts.....! Brad -
51 B3B build thread - after all these years
bkahler replied to bkahler's topic in Mopar Flathead Truck Forum
Oh yeah one other thing. I noticed last night that I apparently have the rear brake backing plates swapped. I have the drives side on the passenger side and vise versa. Another indication I was in a real hurry to get the truck on wheels so I could get it loaded on the trailer for the move south! Brad
