bkahler
-
Posts
1,945 -
Joined
-
Last visited
-
Days Won
39
Content Type
Links Directory
Profiles
Articles
Forums
Downloads
Store
Gallery
Blogs
Events
Everything posted by bkahler
-
51 B3B build thread - after all these years
bkahler replied to bkahler's topic in Mopar Flathead Truck Forum
When I first started planning on how to tackle my wiring I ran across Dave Erb's description where Alan Parkhurst documented his new wiring harness. If I remember the details correctly he bought a reproduction wiring harness and then took the time to meticulously document the harness with pictures and dimensions for each leg. His truck was either a B1 or B2 so it was slightly different than my B3. In 2008 I was transferred to Pasadena for a year and ended up with a lot of spare time on my hands. So I took his sketches and laid out all the differences between his truck and mine and proceeded to develop my own sketches adding in any changes that I wanted such as blinkers front and rear and the right side tail light. Once I had them done I built a wire wrapping stand and proceeded to start making my own harness. In the end the harnesses actually turned out pretty good.
.jpg.53753071232e1efb08840bbce0995eae.jpg)
-
51 B3B build thread - after all these years
bkahler replied to bkahler's topic in Mopar Flathead Truck Forum
10 years is just a drop in the bucket 😄 I probably went overboard because I used all lacquered wires throughout. From when I bought the first batch of wire in 2008 until just recently, the price has sky rocketed. But it sure looks nice! There wasn't much left of the original wiring and what was there was scary bad. -
51 B3B build thread - after all these years
bkahler replied to bkahler's topic in Mopar Flathead Truck Forum
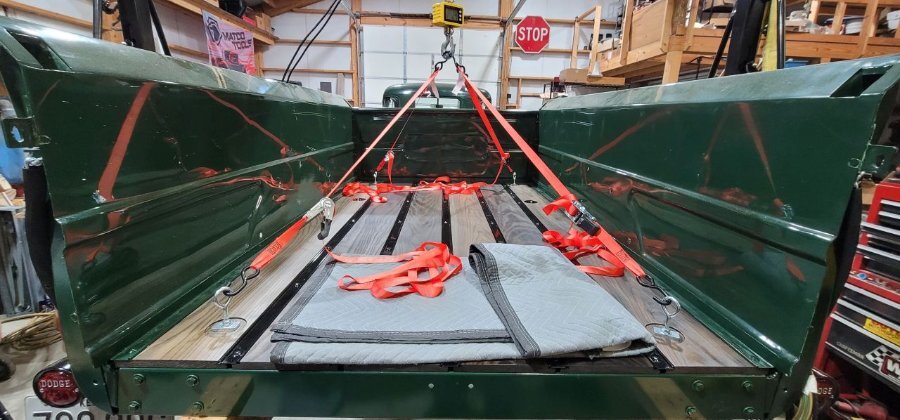
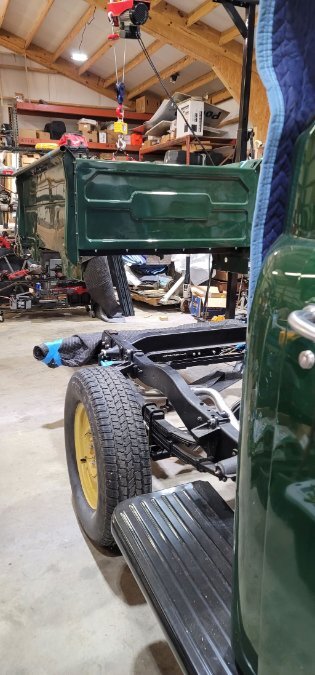
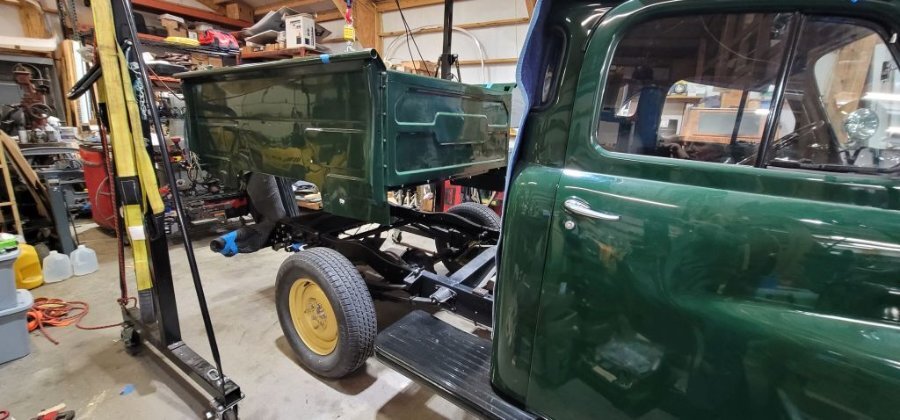
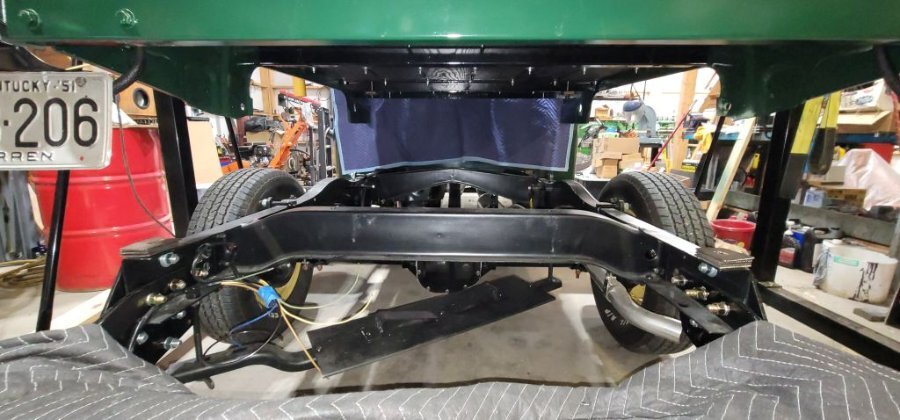
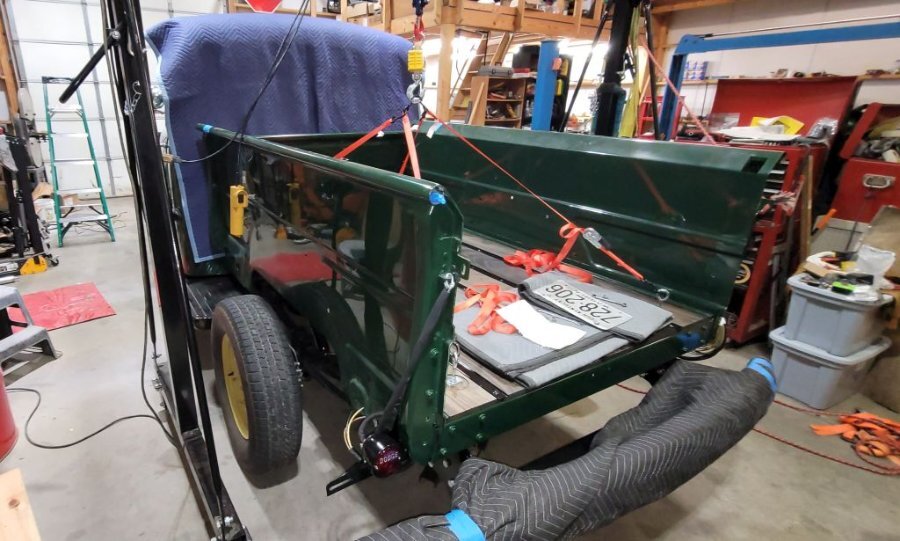
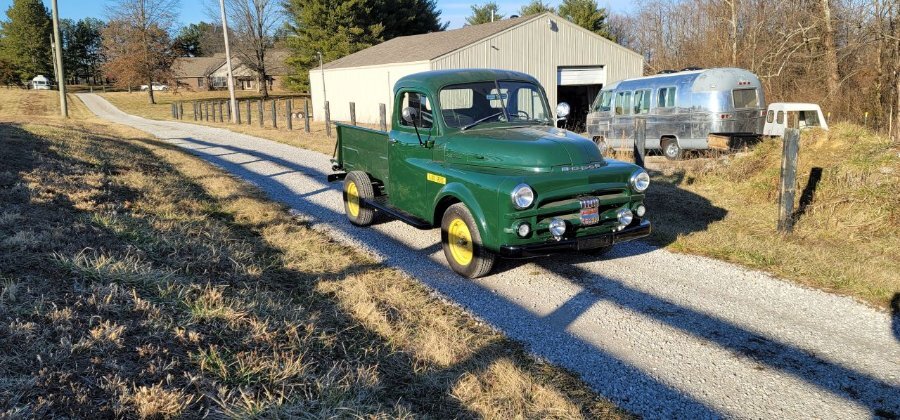
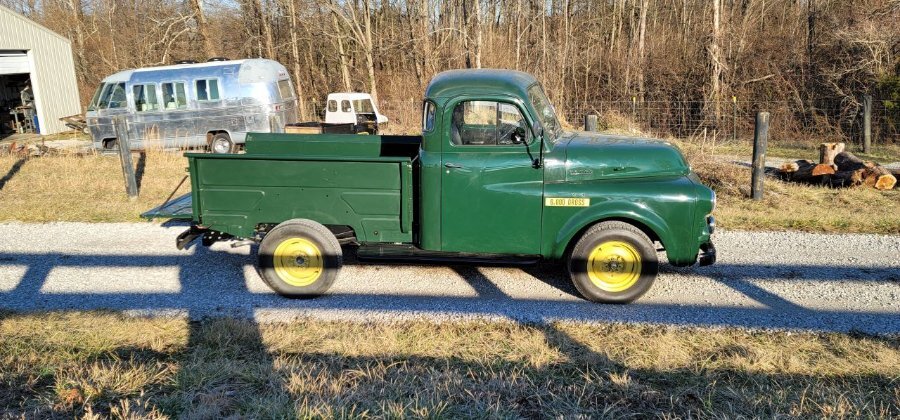
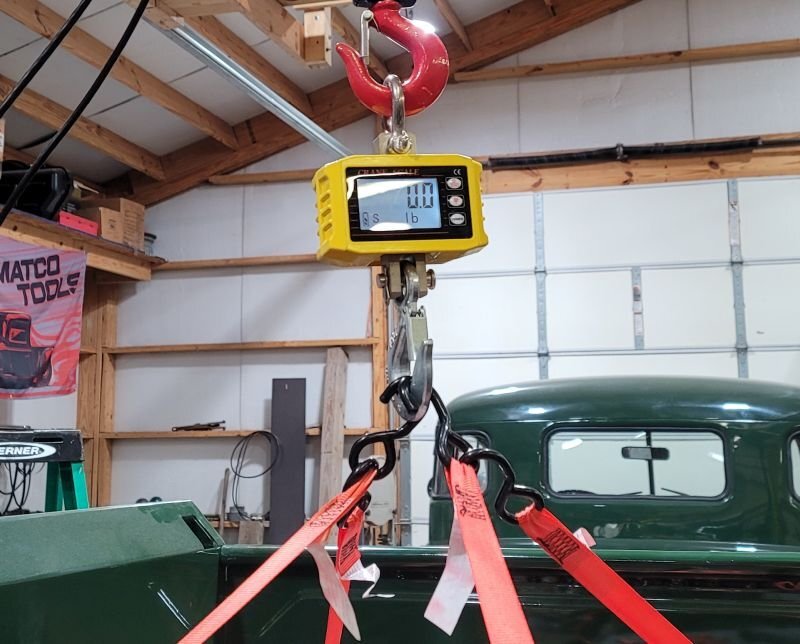
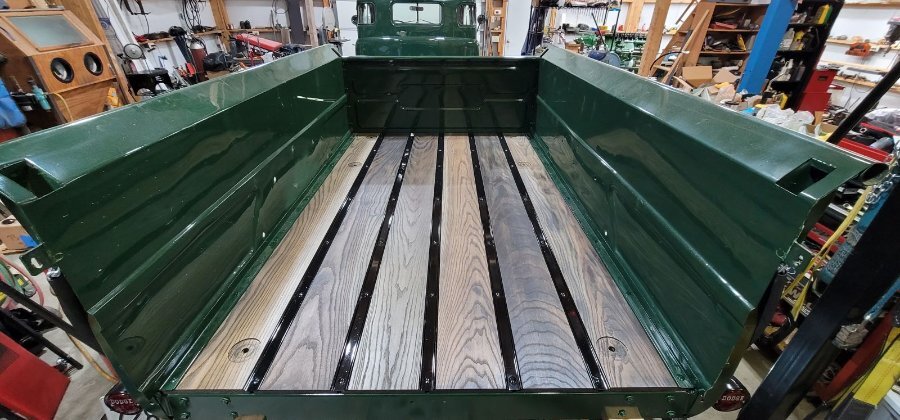
I'm happy to say the truck now has a bed I think all told, it took about 3 hours to get it picked up, and fitted onto the truck and another couple hours fiddling with the mounting hardware. Out of the six bed mounting bolts I had trouble with two of them. The front two on the passenger side had a problem with the repro channels being twisted so that the bottom holes on the channels were 1/2 the diameter of the bolt towards the rear on the bottom holes. It probably took me an hour to get those two bolts in and aligned properly. Once they were in I snugged the bolts down. I don't know what torque setting I should use so I need to look into that before the final tightening. Without the tailgate the bed weighed in at 257 lbs. Lighter than I was expecting, but after thinking about it, there's not a whole lot of heavy structural metal in the bed. The two heaviest pieces are the sides. The rest is just formed sheet metal pieces. We have wintry weather coming tonight so I took the truck out to get some decent pictures. It will be the last time it sees the sun until I get the rear fenders installed, wiring done in the rear, and the ABS interior panels installed. Getting the bed mounted on the truck let me breath a sigh of relief. It's only taken 29 years to get to this point 😮 Even better is I now have more room in my shop 😄


-
51 B3B build thread - after all these years
bkahler replied to bkahler's topic in Mopar Flathead Truck Forum
Hmm, in a way I think wood framing members would be easier to deal with the crappy repro parts. I really like the way the bed came out. Thanks for the guidance getting to this point -
51 B3B build thread - after all these years
bkahler replied to bkahler's topic in Mopar Flathead Truck Forum
I guess if you use enough swear words and the right kind of swear words you can accomplish anything It took me about three hours to remove, modify and re-install the three channels. After the channels were complete, installation of the planks took almost no time at all. Other than hanging the tailgate the bed box is done. I will probably leave the tailgate off until I lift the bed into place on the frame. That will make it a lot easier to align the six carriage bolts. Stay tuned for bed installation....
-
51 B3B build thread - after all these years
bkahler replied to bkahler's topic in Mopar Flathead Truck Forum
I thought about that for a bit but the originals are in pretty rough shape. They are bent, twisted, and rusty. That was why I bought the repros in the first place. It's just frustrating that the repros aren't what they should be. I probably could have saved some time if I had compared the originals to the repros when they first arrived so I could have corrected the problems before painting, etc. Oh well.... -
Yes, I would swap the transmission yoke and have the driveshaft made using the later style u-joints for ease of finding replacements.
-
51 B3B build thread - after all these years
bkahler replied to bkahler's topic in Mopar Flathead Truck Forum
I'm not sure where to start first with this continuing fiasco.... This morning I installed the two outer planks in the bed box, that task went smoothly ensuring that the large holes for the six 1/2" bolts were in the proper locations. I went and had lunch and then came back to set the next two planks into position along with the shovel strips. This is when things started to fall apart. As I was trying to fit the U-channel support it quickly became apparent 1/2" domed bolt holes weren't lining up. If you look at the picture below you can see the large hole doesn't line up with the hole in the channel. The hole in the channel is about 1/2 its diameter to far to the rear of the bed. I tried flipping the channel around to see if I had it installed backwards and that made it worse. So I started comparing the original channels to the repro channels. Guess what, they aren't they same, and even worse, the small holes are on the wrong side of the channel While I was bolting the black channel into place I was trying to figure out why the channel didn't tie the bed side panels together. If you look at the original channel you'll see the hole that would perform that task. Since the repro channels were made wrong there was no place to drill the hole because it's upside down. That's just plain poor quality control by whoever made the channels. I've been stewing over the problem for a couple of hours now and I think the best solution is for me to drill the six needed holes on the correct side of the repro channels. Sadly that adds a bunch more time and effort to get them to fit correctly but hey, I'm retired now so I've got all the time in the world.....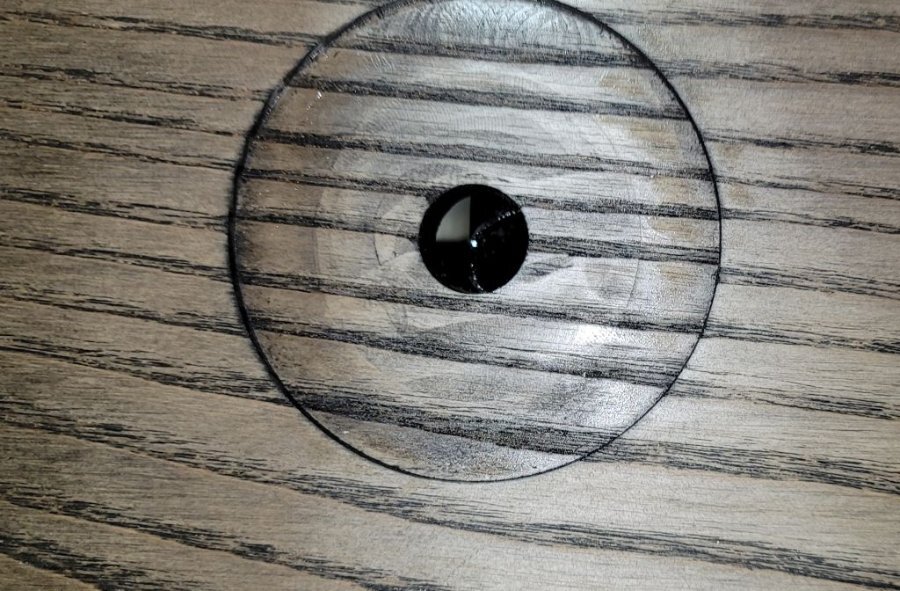

-
You shouldn't have to take the fenders off, all of the wiring is easily accessible with them in place. I did all of my wiring after the sheet metal was in place. I don't remember how many gallons it took for my gas gauge to start registering. I'm pretty sure it was more than 2 gallons.
-
Half hour tops, is all you should need 🤣
-
Unfortunately, not to many things last 20 years anymore
-
Put those tires on the front and big wide slicks on the back 😁
-
51 B3B build thread - after all these years
bkahler replied to bkahler's topic in Mopar Flathead Truck Forum
Yes, they bends are tighter than the original bends. The portion where the tail light mounts is fine, just the lengths of hole locations were off. The holes were off by about 3/8". -
51 B3B build thread - after all these years
bkahler replied to bkahler's topic in Mopar Flathead Truck Forum
Yep. -
51 B3B build thread - after all these years
bkahler replied to bkahler's topic in Mopar Flathead Truck Forum
I'm not so sure its from Chyna. I'm guessing someone with a CNC water-jet cutter and either a manual or CNC bender. I'm leaning toward manual bender because the bends are somewhat over bent. It was nicely made, just made wrong. -
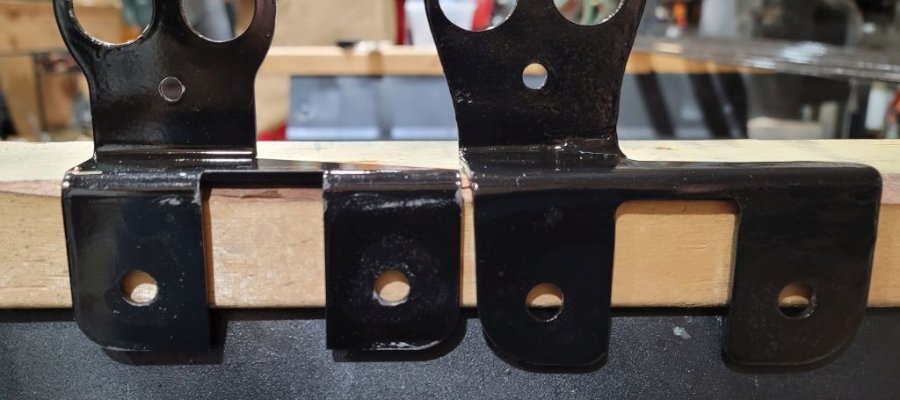
51 B3B build thread - after all these years
bkahler replied to bkahler's topic in Mopar Flathead Truck Forum
Sometimes the simple things bring happiness And sometimes the simple things bring sadness... The bracket on the left is a reproduction piece. The bracket on the right is an original bracket. The original bracket needed some straitening and repairs so in order to save time (and energy) I bought the repro bracket. After painting and installation I found that the tail light housing was up against the stake pocket and could not be bolted into place. At this point I went ahead and repaired the original bracket, which is shown in the top picture. Take note of the differences in dimensions. I really appreciate that there are vendors out there willing to fabricate reproduction parts, but it would sure be nice if they matched the originals in fit and function.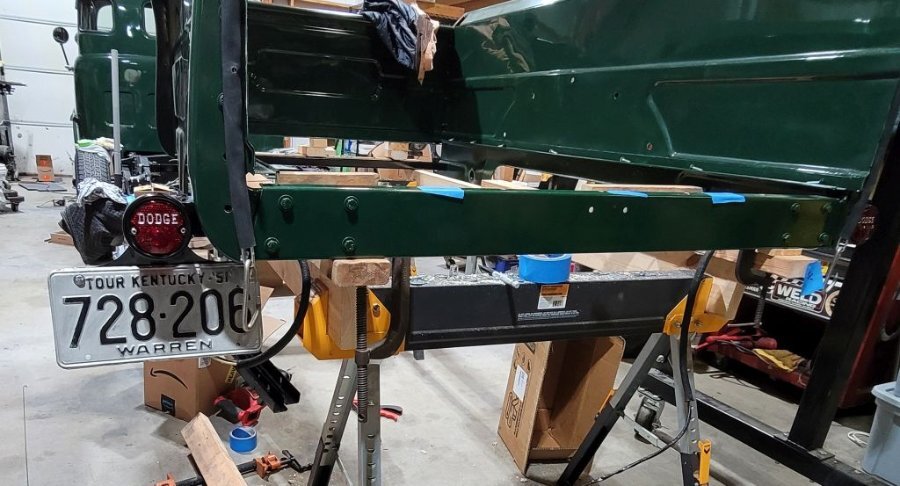
-
The tail lights I'm using came from Roberts, bought back in 1997, turned out to be poorly made at best. I ended up removing the bulb sockets and silver soldering in new replacement sockets. I also had to remake the lens gaskets out of 1/4" thick cork in order to get things to fit properly. The body, trim ring and glass were ok but for $100 I expected much better product.
-
I've been buying the fabric wire loom from Amazon. It's relatively expensive and if I was smart I should have just used plastic loom like you did or wrap in harness tape, which is what I did for the main wiring harnesses I made.
-
They look great. Are they original bars, or something you fabricated?
-
51 B3B build thread - after all these years
bkahler replied to bkahler's topic in Mopar Flathead Truck Forum
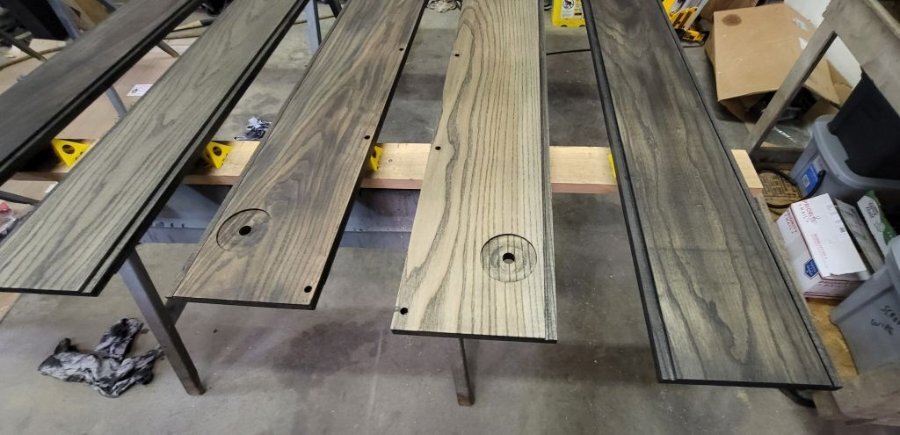
I'm happy to say the planks are finally done Five hours start to finish, two coats per side. Depending on the temperature, they will have to dry for around 48 hours. Starting tonight the temperature is supposed to start dropping so I probably won't do anything with the planks until this weekend. -
It makes for a good day when you accomplish a lot of tasks. I don't think my name and the word sexy have ever been used in the same sentence before 🤣 Thanks for the laugh This looks great to me.
-
You definitely do not want a leather seal, they are out dated technology. I'm not sure what seal you should get so hopefully someone will chime in with that info.
-
51 B3B build thread - after all these years
bkahler replied to bkahler's topic in Mopar Flathead Truck Forum
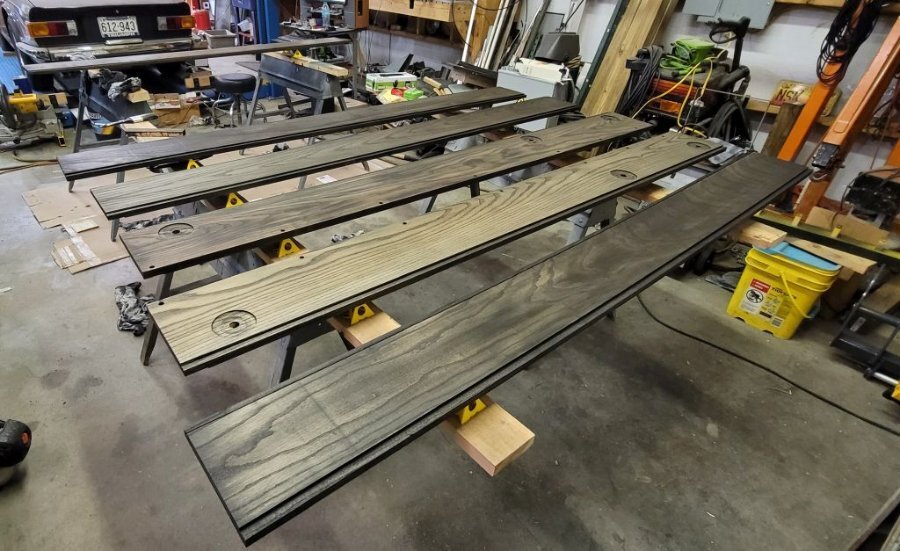
Got the kick panels installed and got the bed plank staining done. Overall the staining process went fairly well, but there was one board that just wouldn't darken up. The second board from the right has three applications of stain, the other boards only one. There's always one in every crowd..... Either late tomorrow afternoon or Tuesday morning I'll apply the Flood CWF Oil.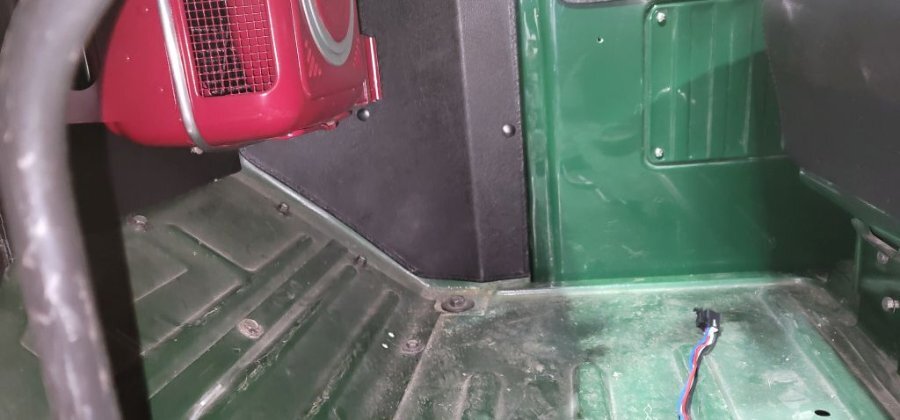
-
51 B3B build thread - after all these years
bkahler replied to bkahler's topic in Mopar Flathead Truck Forum
Installed the new ABS door panels and the arm rests today. It looks so much better than the brown cardboard. I might do the kick panels tomorrow in between staining boards.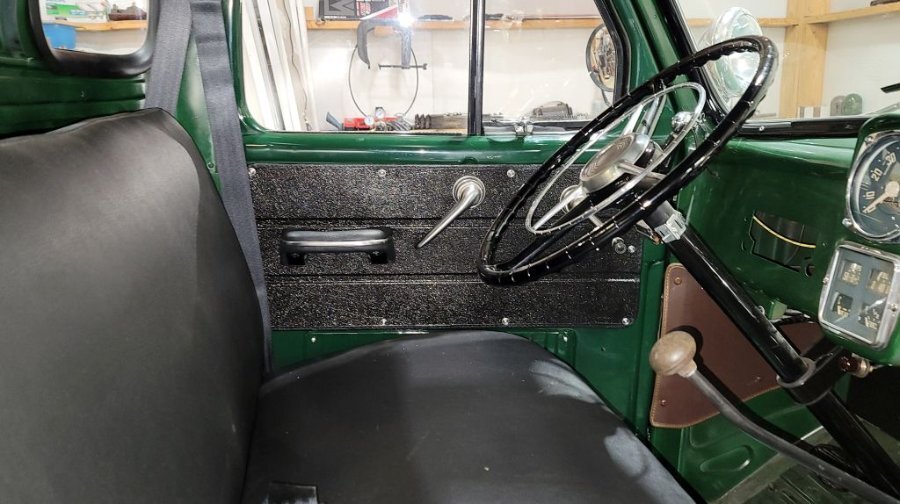
-
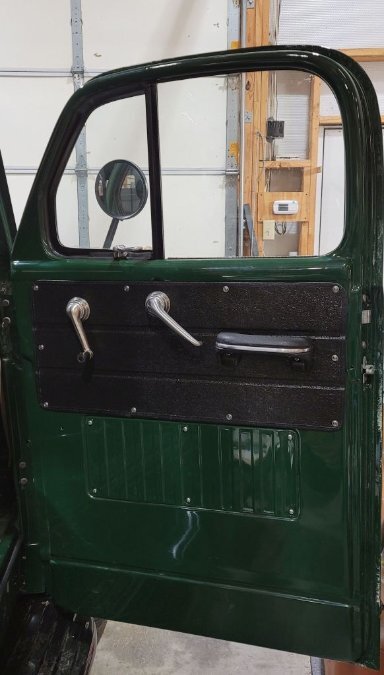
51 B3B build thread - after all these years
bkahler replied to bkahler's topic in Mopar Flathead Truck Forum
This his how my doors looked when I first got the truck, I'm pretty sure it wasn't factory original I don't know that I have ever seen pictures of the arm rests in 51 and later Dodge trucks. At least none that I can remember. I guess I need to pull out Bunn's books again and take a look. The Dodge truck arm rests in the link below resemble mine but the construction is definitely different. The Pontiac and Chevy links look identical to mine. Pontiac Armrest Chevy Armrest 1950-1956 Dodge Truck Armrest Edit: I searched for Plymouth arm rests but couldn't find anything that resembled mine .