


bkahler
-
Posts
1,947 -
Joined
-
Last visited
-
Days Won
39
Content Type
Links Directory
Profiles
Articles
Forums
Downloads
Store
Gallery
Blogs
Events
Everything posted by bkahler
-
First Foray - Just Purchased 1953 Dodge B3B
bkahler replied to Oliver's topic in Mopar Flathead Truck Forum
I believe that is the part number assigned by Dodge. My 51 B3B had the following tag in the bottom cushion. Like you I also found the mouse poop and shells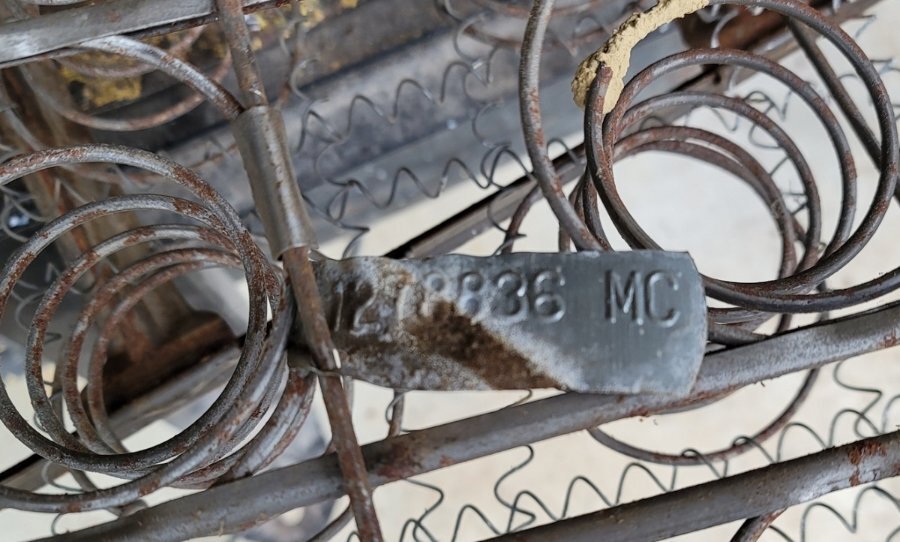
-
Be prepared to let some air out of the tires.
-
4th Annual Clements Tailgate BBQ....
bkahler replied to 48Dodger's topic in Mopar Flathead Truck Forum
The above link seems to be dead This particular truck caught my eye because it has what appear to be the same 6,000 GROSS tags as my truck has. Anyone know the history of this truck? -
Yeah, count me in for at least one pair for sure.
-
That might explain why one of the side walls of my bed is bowed out about 1" ?
-
I used a rust converter primer product called Corroseal that seemed to do a really nice job on a couple of place on my truck. No complaints from me on how it performed.
-
I can understand 1-ton trucks having such heavy duty springs. What I've never understood is why my 1/2-ton would have similar overload springs. I wonder how these springs affected the 6,000 GROSS tags that were on my truck
-
15th Annual Clements Tailgate BBQ, in Clements California
bkahler replied to 48Dodger's topic in Mopar Flathead Truck Forum
Sadly I'm going to have to cancel my plans for attending this year. As of today none of the sheet metal has been repainted due to weather and other associated issues trying to paint in cold weather. It's just been to cold and humid to paint. If the painter had a fully heated shop 24/7 it wouldn't be a problem but that's not the case so no painting until early next week. Paint isn't the only concern, the price of diesel is also a factor. At todays diesel prices I'd have to get a mortgage on my house to pay for the fuel. 5,000 miles at maybe 12 mpg avg....I'll let you do the math. With luck by this time next year I'll be retired, fuel prices will be down, the world will be sane and the truck will be done. Those conditions would make for a fun trip If the barbecue is on next year there is a much better chance that I'll make it. Y'all have fun- 99 replies
-
- 1
-

-
- bbq april 2nd 2022
- bbq april
- (and 5 more)
-
Diagnosis help needed - weird brake pedal issue
bkahler replied to bkahler's topic in Mopar Flathead Truck Forum
I've used various props for holding the pedal down over the years, unfortunately I don't have the seat in yet which makes using some sort of prop a little problematic. I've never done pressure bleeding before but I bought one just recently with the hopes of solving this problem. -
Diagnosis help needed - weird brake pedal issue
bkahler replied to bkahler's topic in Mopar Flathead Truck Forum
Yes, it's possible but I would rather not have to do that unless I know for certain I have to break into the hydraulics. The hoses are brand new so if one of them failed this early then that doesn't bode well for the rest of the truck. I'm going to start with doing another bleed, not sure if it will be pressure or pedal. Pressure bleeding I can do myself otherwise I'll have to track someone down to help pump the pedal. If bleeding doesn't solve the problem then I'll pull the wheels and make sure everything is free and lubed probably. -
51 B3B build thread - after all these years
bkahler replied to bkahler's topic in Mopar Flathead Truck Forum
Yeah, each day the scale is tilting more towards the rough cut side up than shiny side up -
Diagnosis help needed - weird brake pedal issue
bkahler replied to bkahler's topic in Mopar Flathead Truck Forum
I've believe the master cylinder has been ruled out due to the test results that I got. The pedal stayed firm once I clamped off the right front brake hose. -
Diagnosis help needed - weird brake pedal issue
bkahler replied to bkahler's topic in Mopar Flathead Truck Forum
Everything is new and I've not yet driven the truck. However I'll pull the wheels and check to ensure nothing is sticking. -
51 B3B build thread - after all these years
bkahler replied to bkahler's topic in Mopar Flathead Truck Forum
I'm currently leaning towards the rough side up but that means I'll be planing everything from one side to get it to the proper thickness. I'm not sure sure how well that will work. Decisions decisions..... -
Diagnosis help needed - weird brake pedal issue
bkahler replied to bkahler's topic in Mopar Flathead Truck Forum
Yeah, another bleeding is going to be the next thing that happens to try and resolve the problem. -
Diagnosis help needed - weird brake pedal issue
bkahler replied to bkahler's topic in Mopar Flathead Truck Forum
Thanks for the replies. Bleed nipples point straight up. I tend to agree that it has to be air in the caliper which baffles me because I bleed until no bubbles and I did both front calipers the same way. The drivers side seems to ok yet the passenger side doesn't. Just seems weird to me. I bought a pressure bleeder and once I get a rubber gasket made for the cap that goes on the MC I plan on trying it to see if that makes a difference. I know silicone is hard to get all of the bubbles out but I've done several other vehicles with silicone and didn't have an issue like this. As for hose clamps, there aren't any on the rubber hoses so that possibility shouldn't exist. Of course there is always the possibility that I THOUGHT I bled the right front caliper but didn't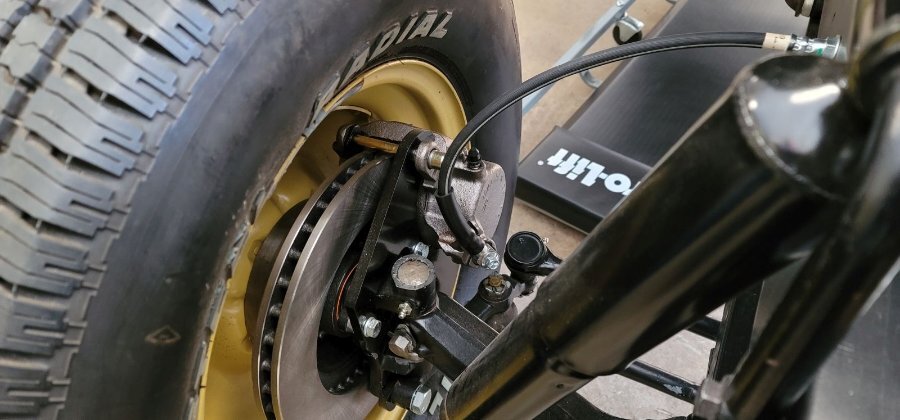
-
51 B3B build thread - after all these years
bkahler replied to bkahler's topic in Mopar Flathead Truck Forum
Brent, I thought you might find this interesting. I ran across this video on youtube today and noticed it had a 6000 GROSS label on both sides of the bed Apparently the truck is in England now but it supposedly came from the Oregon desert area.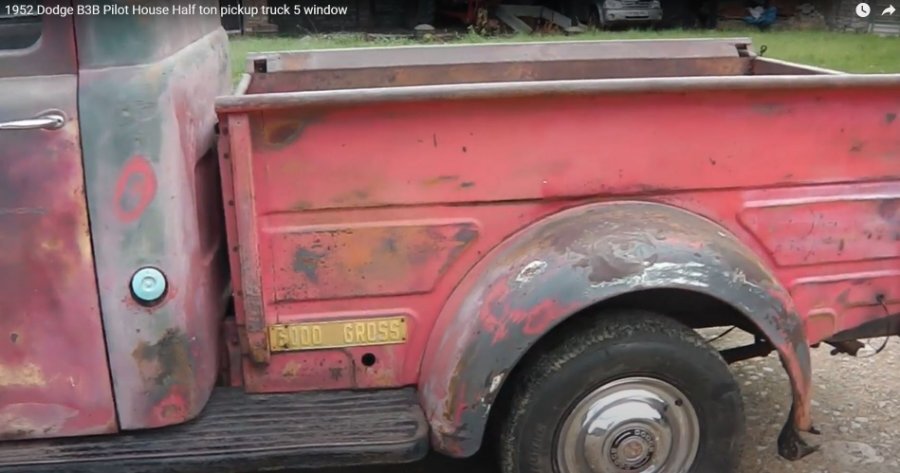
-
Diagnosis help needed - weird brake pedal issue
bkahler posted a topic in Mopar Flathead Truck Forum
Background: Rusty Hope front disc brake conversion. Rear wheel disc brakes with the Cherokee differential conversion. 97 Cherokee master cylinder. Silicone brake fluid. All new brake lines and rubber hoses. Problem: After truck has been sitting for a few minutes or more the brake pedal will go all the way to the floor but you can pump the pedal multiple times and it will build up pressure and it becomes reasonably firm. However, if you keep pressing on the pedal it very gradually goes to the floor. Once it does that you can pump the pedal back up and you can repeat the process again and again. Diagnostics so far: Verified all lines are tight. No sign of fluid anywhere and the MC reservoir is not losing any fluid. Initial research via google was the MC may not like the silicone fluid and it might be bleeding by the seals. However I don't think that's the case because of the results of the following test. One thing I found online was a suggestion to squeeze off the rubber brake lines and repeat the test each time to see if the problem can be pin pointed to an individual wheel. So I did this by putting a clamp on the rear hose to the differential and the results were still the same. So I then moved to the driver front wheel and again clamped the hose shut. No difference, pedal still went to the floor. Next I did the right front but the results were different. The pedal did NOT go to the floor and on the first pump there was reasonable pedal resistance. I pumped it a few times and the pedal stayed reasonably firm. I then waited about 15 minutes and tried the pedal again and it was still reasonably stiff on the first pump. So, I left things as they were for 24 hours and tried the pedal again and it was still reasonably firm. At this point I removed the clamp on the right front wheel and on the first pump the pedal immediately went to the floor and I had to pump it up to get a firm pedal. I then waited a few minutes and tried again, the pedal went to the floor. It would appear the problem has to do with the right front wheel caliper or hose or...? Nest step: At this point I'm not sure what to do next other than try replacing the caliper. Before I do that I thought I'd check with all Y'all to see if there were any other possible sources of the problem? What baffles me is what could be happening inside the caliper to cause these symptoms? Thanks! Brad -
HA! Kids now days....all they wanna do is have fun
-
David, thanks for the info. This would seem to indicate the metal bed pieces were assembled and then placed on the wood bed frame and everything bolted together and then lifted on to the truck. That's a good picture of the relationship between the shovel strips and the rear frame member. I think my truck had maybe two partial remnants of wood left when I got the truck. That's a really good picture with some good detail info. With the truck being a spring special we know that the sides of the bed were definitely NOT black. With the black paint on the metal cross members this tells me the wood bed with metal channel cross members was assembled and painted black as a sub assembly. I'm guessing next the metal bed was assembled as a separate sub assembly, painted whatever color it was to be painted and then the metal box assembly was set down onto the wood bed frame assembly. At this point they were bolted together and the whole package was lifted onto the truck chassis. From a factory production standpoint it makes sense, to me anyway I'm guessing the small 1" or so weld I had along the top of the angle strip was either done at the factory to hold it flat to the bed wall or a field fix by some previous owner. Based on the size and quality of the weld I'm betting it was welded at the factory. The weld wasn't really noticeable and it wasn't until I was drilling out the spot welds that I noticed it. It will be interesting to see if the other panel has a similar weld once I remove the angle strip from it. Yeah, basically you build two sub assemblies, the wood bed with metal channel crossmembers makes one sub assembly and the metal box makes the other sub assembly. Put them together and you're ready to place the assembled bed on the truck chassis. I think you are correct in that I should assemble the wood bed and cross members right on the truck chassis. I think building the metal box and lifting it onto the truck chassis would be easier, at least that's how I see it at this point. There are definitely a lot of different ways this job could be handled but I have to consider the logistics of what space and equipment I have available. My lack of readily available helpers limits me in some ways as well. Yes, the picture you posted showing the orientation of the grease zirk and the hole in the panel helps a lot.
-
My strips are the original style from Midwest Military. Interesting that you just happened to find bed strips by a dumpster. I've never been THAT lucky in my life ?
-
My strips are from Midwest Military. Sounds like making them 3/4" is the most logical thing to do. Were they originally unpainted? Getting 2 or 3 helpers to show up all at the same time is the reason I ended up buying a gantry crane! Besides, I'm getting old and hate lifting things
-
Wow. Kinda hard to believe the amount of wear on those links. I don't remember looking at that piece to close while rebuilding the carburetors. One more thing to add to the to do list.....
-
Looks to me like your shop supervisor was more interested in the comfort quality of the seat than the quality of the door construction
-
So they were recessed to some extent. I guess I'll play around with overall depth until I find a setting I like. I don't recall Bunn's book talking about bed floor color when the buyer had the bed painted the same color as the cab. In other words if the buyer ordered the bed painted the same color as the cab did he get a black floor or a green/red/whatever color floor? So you had some spot welds AND welds along the top edge? I've only removed the angle strip on one side so far and overall I found about a 2" long section where it was welded along the top edge, the rest of it was all spot welds. I plan on removing the strip on the other panel this week so it will be interesting to see if there is any welding along the top edge on that panel. I had read your thread previously which is where I found reference to your wood thickness being .820". My boards are about 1-1/16" thick at the moment with one side already surfaced (or at least an attempt at surfacing). I don't mind planing them down, I just wasn't sure if there was a problem leaving them thicker. My truck didn't have any wood in it when I bought it so other than pictures, I've never seen a bed up close to see all of the details. I would like to assemble the bed (minus wood) on saw horses as you did so I can get an idea of just what all I will be dealing with when it comes time to install the wood. My preference would be to totally assemble the bed and then lift it on to the truck chassis. I have gantry crane so the lifting and setting should be relatively easy to do.

